Safari Browser on iPhone now missing functions

I do a lot of (most) of my viewing / editing of threads and posts on my iPhone. Recently, I noticed that the top of the edit window “buttons” are greyed out - that is, they don’t work. These include the Bold, Italic, ellipsis (more), Link, Image, etc. They used to work fine and now it’s making things kind of a hassle. Also, I used to be able to copy and paste an image directly, now they must be uploaded with the “attach files” button which does work.

Has something changed with iOS that caused this, or were there software changes on DIYA’s side?

The buttons are still active when I use the Chrome browser on my phone.

This seems to have happened about 3-4 weeks ago. I tried restarting my phone etc. and this did not solve the problem.

B&C 18PZB100 ported enclosure design advice

I'm building a very high efficiency 3 way with some B&C 18PZB100 drivers. The woofer LP will be about 350 Hz in its own ported enclosure, so it will be critical to control all the lower midrange junk being radiating backwards into the cab. I'm used to building sealed enclosires. Based on my previous experiences with ported cabs, it will be tricky to make this planned design sound clean enough to satisfy hifi standards with the higher than usual LP with this big of a driver.

Basically, I wanted some advice on a vented alignment with optimized enclosure and port dimensions that will result in minimal resonances, play low enough despite the LF driver's low Qts and enclosure dampening strategy for best practical SQ. I also was hoping to bump up the Qts a little with the series resistance of the LP inductor, but not to the point of losing too much efficiency.

Any takers?

Attachments

  • Screenshot_20220702-164938_Word.jpg
    Screenshot_20220702-164938_Word.jpg
    216.9 KB · Views: 183

TEAC VRDS CMK4

So this is the second VRDS CMK4 (TEAC T1) I have to sort out over the last 10 years and it seems even worse than the first TEAC T1...I have all gears replaced but the best I can achieve is the tray closing once, the player playing but after opening again, the tray starts to automatically close again after about ~2-3 seconds, each time.
Apparently there is a marking on the big tray gear and on the chassis that shows the correct position, but it's underneath the CD tray. Can someone remind me how to remove the CD tray(or drawer) on these?
I checked the service manual of the T1 and VRDS-7 but both show exactly zero information on the gear positions.

I measured the microswitch with the tray ejected and I get a healthy 0.1 ohms. I also reflowed the joints on and around the connector itself.

My First NAS: Newbie Q&A on Hashing, Data & RAID Scrubbing and Check Summing for Backups

In pursuit of building-or rather having my local IT guy build me-my first NAS, I’ve sunk my newbie brain as deep as it can go into learning how best to use it after my builder does all the hardware and OS installs and then walks me through use of the GUI.

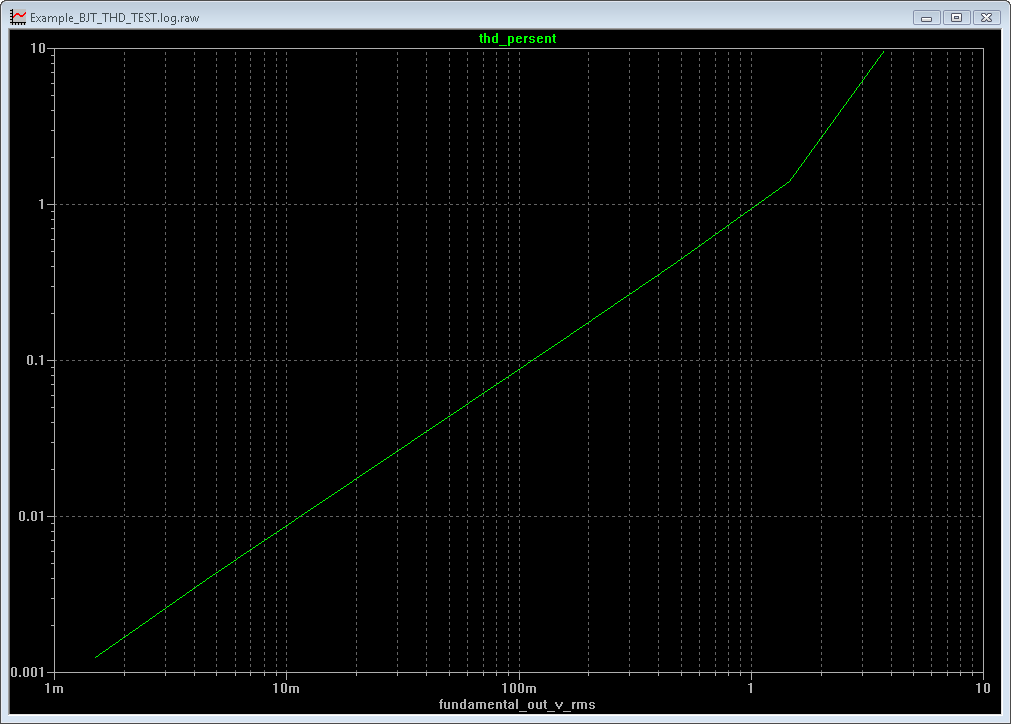
Of course, beyond basic storage capacity and drive storage redundancy to prevent user file losses, a NAS or any server and its file system (zfs or btrfs) are only as useful as they enable you to prevent data corruption. Save for the crazy maths (and terms like “pool” which seems to have multiple meanings in the data storage biz), these reports were helpful https://en.wikipedia.org/wiki/Hash_function https://en.wikipedia.org/wiki/Checksum for learning about hash functions and the tables of hash codes (“hashes”) they (apparently?) create for each document, photo, audio or video file.

But please to these questions:

Is a hash code automatically created for every user file (e.g., document, photo, audio, video) the first time it gets written to the NAS? Or do you have to use some kind of app or NAS utility and enable it to generate and assign a hash code to every one of your files?

And where are those codes stored? Inside of the file’s own container? Or are all user file hash codes stored someplace else? In a “hash table” and/or on a drive partition on the RAID drive array?

Are these hash codes used by the zfs and btrfs file system for routine data scrubbing?
https://blog.synology.com/how-data-scrubbing-protects-against-data-corruption
https://www.qnap.com/en/how-to/tuto...a-corruption-by-using-data-scrubbing-schedule
https://par.nsf.gov/servlets/purl/10100012

Then, as mentioned in the above links, following data scrubbing, are these hash codes also usually used for routine RAID scrubbing?

But for both data and RAID scrubbing, is data integrity ensured by comparing the hash code of each file with its initially (first ever created) hash code (stored wherever) to the hash code currently in the file. If the system’s comparing calculations show that the codes are different, then one or more of the file’s bits have flipped, so then it knows that the file is therefore corrupt?

If yes, then at that point will it flag me and ask if it wants the system to attempt to repair it?

If I say yes, then it will try to overwrite the corrupt file with the mirrored copy stored on a redundant (e.g., RAID 5) drive.

CAUTION: As RAID scrubbing puts mechanical stress and heat on HDDs, the rule of thumb seems to be to schedule it for once monthly-and only when drives are idle, so no user triggered read/write errors can occur. https://arstechnica.com/civis/threa...bad-for-disks-if-done-too-frequently.1413781/

Beyond scrubbing, what else can I and the zfs and/or btrfs do to both bit rot?

And to minimize the risk crashes:

Replace the RAIDed HDD array every 3 (consumer) to 5 (enterprise grade) years.

Do not install any software upgrade for the NAS until it’s been around long for the NAS brand and the user community forum to declare it to be bug free.

What else can I do to minimize the risk of crashes?

Finally, when backing up from my (main) NAS to an (ideally identical??) NAS, Kunzite says here “…and I'm check summing my backups...”
https://forum.qnap.com/viewtopic.php?t=168535

But as hash functions are never perfect, and while rare, data “collisions” are inevitable. https://en.wikipedia.org/wiki/Hash_collision So as those hash algorithms are used for data and RAID scrubbing, they are evidently also used for check summing to ensure that data transfers from the NAS to a backup device happen without file corruption.

Apparently, CRC-32 is among the least collusion proof hash algorithms. https://en.wikipedia.org/wiki/Hash_collision#CRC-32

Thus, for backups from main NAS to backup NAS, how much more is the SHA256 hash function (algorithm) worth using to prevent collisions and to verify data integrity of user files via check summing than MD5, because it uses twice the number of bits?

But if not much more advantageous for even potentially large audio files https://www.hdtracks.com/ , then would SHA256 be a lot more so than MD5 for check summing during for backups of DVD movie rips saved to uncompressed MKV and/or ISO files, because video bandwidths are so much bigger than audio?

And what would be a recommended checksum calculator app? https://www.lifewire.com/what-does-checksum-mean-2625825#toc-checksum-calculators

But if the app returns a check sum error between the file on my main NAS and the copy to be updated on my backup NAS, how then to repair the corrupt file?

Again, by using the file’s original hash code (stored some place) created the first time that it was ever stored in the NAS?

If yes, would that app then prompt me to choose to have the system repair the file?

Candy Dulfer & Dave Koz

Found this on YouTube today. I've always liked the tune, I've got it by the Isley Brothers in a vinyl jukebox.

This came up on a YouTube link.

Login to view embedded media

She's playing great and still looking good still, at 54.

Good duet with Dave


Can't believe I've had this on a CD now for over 20 years

Login to view embedded media
Dave Koz has recorded with the jazz guitarist Peter White.
He also had a radio show on Jazz FM, a Manchester radio channel about 20 years ago. I think it was syndicated, I don't think he was actually there.
  • Like
Reactions: system7

Dual 2" Driver - Is the Phenolic + Titanium a good combo?

Hello,

Regarding dual driver adapter and horn, do you guys have any experience coupling Phenolic and Titanium Driver at the same flange adapter? see attached image.

The most common application is to match two drivers from the same type (twin) as we can see in the link below where the author was investigating if the flange adapter in fact deliver +6dB for dual driver. Unfortunately this gain was not true because in his findings the flange changes the impedance coupling for the driver resulting to only +2dB. I'm not find many information about dual drivers on the web.

https://www.prosoundtraining.com/2010/05/26/manifold-drivers/

I do not want to go twin drivers running the same frequency range, but instead to have 1 Phenolic driver and 1 Titanium covering different frequency ranges but using only one horn to have single point source and avoid cancellations, the other benefit is to reduce space with a single compact box. Additionally, I'm thinking about using passive crossover between those two driver so they could share the same amplifier.

What do you guys think about pros and cons?

MID-HIGH : from 480Hz to ~2880Hz ==> Driver JBL D405 Phenolic
HIGH : from ~2880Hz to 20000Hz ==> Driver Snake SD375 Titanium

This box could deliver 110dB @2,83V/1m from 480Hz to 20000Hz

1/4 WL for 480Hz is 17,7cm so the horn don't need to big very long.

Regards

Attachments

EAR802 volume potentiometer question

Hi, I am restoring an EAR802 preamp that has been butchered to death by an "expert" modder. Different hard wired selector switch, "audiophile" leaky caps, lifted or cut circuit tracks, cheap "gold" cynch sockets, lots of hot melt glue, you get it...
I have tried to restore everything to original, the amp is basically working now.
My question: Every picture of the original amp shows a 4 deck volume pot. In my one there was a cheap 2 deck one.
PCB tracks of volume/balance control circuit were cut and lifted, so it was impossible to figure out the original circuit.
Can someone tell me:
Which sort of pot was used originally - 2 or 4 deck, which resistance, how was it connected?
I found a comment that originally both signal value and gain were controlled by the pot, this would be a reason for using 4 decks.
Can someone share a schematic of this preamp? - I found nothing complete on the net.
Thanks,
Volker

A ultra low noise Moving Coil Pre Preamplifier with 60x BF861 and Tentlabs embedded Regulator

With both my turntable setups, it is possible to create a beautiful analog piece of music. Until a few years ago, I used to play with a set of Sowter MC step up transformers with excellent results. Still, I kept thinking if it could be even “better”; the bass remained a bit soft (compared to digital) and I had the feeling there was room for improvement, especially in terms of spatial image and ultrafine dynamics.

My thinking was to develop an active MC PRE PRE to solve this “problem”. Only a PRE PRE because I already had the Phonodude, and there was need to change that beauty! As usual, I didn’t want anything standard out of the box, like an uncreative low noise opamp circuit or similar. I wanted something totally out of the box addressing the needs and difficulties of the concept of a MC PRE PRE and make it as close as I could to a Tube amplifier to match the Phonodude Tube RIAA amplifier. For the simple reason I am till today convinced that the inherent linearity of tubes is the main reason they sound so great.

Below is the basic Story what I did - Pictures and circuit are below.
You can read also my blog of course

My considerations were:
  • There should be no coupling capacitor at the input because of the extremely fine input signals and the noise contribution the impedance of the capacitor will induce at that spot.
  • Noise contribution had to be very low. Typical goal >70dB S/N ratio @ 0,5mV input signal.
  • No opamps or anything needing NFB….
  • A nice linear tube without negative feedback would be optimal, but they generate too much noise for these low signal levels.
  • A J-FET at the input, mmmmhhh, yes, that’s not really new, but it works very much like a tube. Unfortunately, most designs have the problem of keeping the power supply interfering signals (noise and hum) at bay (PSRR has to be extremely high and that doesn’t really work well with the standard J-FET circuits you will find on the WEB). Also, the Power Supply Line is always in the signal path and normally only decoupled with a Elco capacitor (which again is in the signal path…)

A circuit idea and design goals were defined and I was ready to start developing:
  1. To amplify the incoming signal, use a voltage controlled current source (VCCS), so that with a single resistor as load, you can do a linear I/V conversion directly to the common ground so Output Signal will be not seeing the PSU directly. (Just like in the DDDAC1794 I/V conversion…). The MC input is the voltage, controlling a current source (a J-FET), which will generate the output voltage by just running the current through a passive resistor. PSSR, DC-Bias and output voltage swing will be an issue, so we need more:
  2. Take another CONSTANT current source (CCS) that provides more current than the first one and let it drive the earlier mentioned stage. Some current will be “left over”. This differential “rest” current will flow to the output in a (Rload) load resistor. This means that the I/V stage works neatly in class A so there is DC-Bias at the output to allow for a voltage swing of the output signal around the DC-Point. A coupling capacitor is needed when your RIAA amplifier has none (Like the Phonodude). As a result, you kind of modulate the current through the resistor with the lower varying current. Result is amplified signal!
  3. The CCS must be as high impedance as possible, to have high PSRR. J-FETs do not do this, so it need to be a cascaded J-FET setup. This creates a CCS with very high output impedance in the Mohm range.
  4. Close off the design by feeding it with a very low-noise embedded Tent Shunt.

Compared to common step-up transformers the bandwidth of the DD MC PRE PRE is pretty good. It starts at DC and the -3dB point is above the 200kHz mark of my AP test setup. The 200kHz mark is -1,5dB and only 0,5dB at 100kHz. Note, the low frequency cut-off will depend on the OUTPUT coupling capacitor you will use. On my DDDAC Website I have a nice table for this: LINK TO DDDAC SITE

FFT measurement showing low distortion and low hum components (A-weighted). This is at a, compared to typical MC cartridges, high signal level of 10mV input (!). The d2 distortion is the only dominant one at roughly -60dB which equals 0,1% THD only. In practice the amplifier is distortion and hum “free”.

Final specifications:

Gain5 to 25 (will be factory set on demand)
Input Impedance1k Ohm *)
Output ImpedanceAprox. 200 – 500 Ohm
Bandwidth (within 0 – 1,5dB)0 – 200kHz
Distortion at 10mV signal inputd2: 0,1%
d3: 0,0025%
Output noise with inputs shorted (i.e. amplifier noise contribution)~20nV / SQRT(Hz)
Size58 x 73 mm
Power supply (DC)15V DC >100mA (per board)
Audio Grade recommended
*) Without Cartridge load which should be added depending on type cartridge

Conclusions

  • The measurements show that this is all VERY good for a discrete design. The DD PRE PRE has no need at all to hang around in the shadow from any other MC amplifier! On the contrary. It is difficult to get any better as the noise is almost at the level of the thermal noise of the cartridge’s coil DC resistance itself. Of course, you can’t get any better than thermal noise… Physical laws and all that.
  • Sound wise, the DD MC PRE PRE amplifier benefits greatly from the lack of any negative feedback. It is just very linear, sounds open and natural as any well-designed tube amplifier, only d2 and almost no d3. You can easily hear that well; it sounds beautifully natural and never sharp or muddled. Compared to the Sowter transformers (I can still select the one or the other in my setup) it is so much tighter in bass and delivers a great spatial sound with low level detail. I am more than happy with this development. Even if it is mine to say…
  • I’ve been playing music with this design for over a few years now to my complete satisfaction. The pre-pre sounds beautifully spacious, very finely detailed and with a tight bass. The self-noise is clearly below the vinyl noise itself.
  • I call “Mission Completed” to develop something “completely different” and fantastic sounding.
  • One last consideration; it is highly recommended to use a high-end coupling capacitor at the output to block the DC-Bias. It is worth it to get the maximum out of the amplifier. I use for example Mundorf Gold Silver Oil. But there are many other good brands of course. Your personal choice!
You can read also my blog

Attachments

  • DD MC PRE 05.JPG
    DD MC PRE 05.JPG
    487.2 KB · Views: 703
  • DD MC PRE 08.JPG
    DD MC PRE 08.JPG
    242.2 KB · Views: 482
  • DD MC PRE 09.JPG
    DD MC PRE 09.JPG
    291.4 KB · Views: 567
  • DD MC PRE 10.JPG
    DD MC PRE 10.JPG
    514.5 KB · Views: 618
  • DD MC PRE FFT 1kHz 0dB Test LP - Phonodude - Cleo - 12oclock Output - Aweighted 22-22kHz.png
    DD MC PRE FFT 1kHz 0dB Test LP - Phonodude - Cleo - 12oclock Output - Aweighted 22-22kHz.png
    31.8 KB · Views: 903
  • DD MC PRE PRE Circuit 12b_1.png
    DD MC PRE PRE Circuit 12b_1.png
    60.3 KB · Views: 919
  • DD MC PRE PRE Circuit 12b_2.png
    DD MC PRE PRE Circuit 12b_2.png
    108.9 KB · Views: 861
  • DD MC PRE THD vs Input Voltage 10mV.png
    DD MC PRE THD vs Input Voltage 10mV.png
    30.8 KB · Views: 693
  • MC Pre with BC861 - 1 FET Only - basic BIAS test V1RT20-noise only.GIF
    MC Pre with BC861 - 1 FET Only - basic BIAS test V1RT20-noise only.GIF
    10.8 KB · Views: 726

Who likes soundtracks?

Doesn't everyone like movie soundtracks…
I love it, when I hear the music from a movie that I like and all in a sudden I'm caught in the atmosphere of this movie.
I also have a penchant for dark, atmospheric music, which can be found in many soundtracks.

Some soundtracks I like a lot (yes I’m a fantasy and sci fi nerd):
Interstellar (Hans Zimmer)
Aliens (James Horner)
Dune (Toto; David Lynch-Version)
Nausicaä of the valley of wind (as an example for plenty Studio Ghibli Movie-Scores by Joe Hisaishi)
Avalon (Kenji Kawai)
Blade Runner (Vangelis)
Hidden Tiger, Crouching Dragon (Yo Yo Ma)
The last unicorn (America)
The Fountain (Clint Mansell)
Pans Labyrinth (Javier Navarrete)
Prometheus (Marc Streitenfeld)

Not to mention all the great composers: Ennio Morricone, John Williams, Danny Elfman, Jerry Goldsmith, Howard Shore, etc. etc.

This is just a fraction of my list of favourite soundtracks… what are yours?

Please Buy This So I Don't

I'm a big fan of my Yamaha DXR12s. Listening to them right now.

They remind me a lot of the Gedlee Summas that I used to own, but the Yamahas are much much cheaper.

The Summas use an absolute MONSTER of a midbass, which retails for $700 per pair: https://www.usspeaker.com/B&C-15TBX100-1.htm

Something I've noticed with these MONSTER woofers is that you have to add a lot of tech into the driver to widen the bandwidth. For instance, the 15TBX100 includes dual shorting rings to extend the bandwidth to 2khz. The woofer weighs a TON. It requires a beefy/expensive frame to accommodate that huge motor.

Basically, as you raise the power handling, you're forced to add expensive features in order to compensate for the higher inductance and the higher weight.

When I opened up my Yamaha DXR12s, I was surprised by how cheap the woofer is - but also by how good it sounds. It reminds me a lot of the Eminence Alpha drivers. They're cheap and they look it, but they also perform quite well if you don't feed them a ton of power.

I wouldn't use an Eminence Alpha 12 in a speaker for sound reinforcement, because it doesn't have much power handling. But for a home stereo situation, a mere ten watts will get you well past THX levels of output.

With that in mind, I implore you to go buy some Celestion TF 1220s so that I don't. They retail for $104 plus shipping, but Amazon has them for $66 with overnight delivery for free.

To me, they look like a good option for a moderately powered Summa-esque type of speaker. Comparable and maybe superior to the Eminence Alpha 12, which retails for $120:

https://www.parts-express.com/Eminence-Alpha-12A-12-Guitar-PA-Driver-290-405

The TF 1220 is hardly a "high tech wonder" but it's a solid affordable choice for a midbass

If you want to give them a listen first, head down to Guitar Center and listen to the QSC K12 speaker. It has the same woofer.
Here's a review:

https://www.soundonsound.com/reviews/qsc-k122

Attachments

  • Screenshot 2023-08-30 173325.png
    Screenshot 2023-08-30 173325.png
    315.3 KB · Views: 179

Upgraded PCB for ML23.5

The Mark Levinson 23 and 23.5 are great amps, but given their age of almost 40 years, it is no surprise that quite a number of them are starting to suffer from all kinds of minor problems up to fully blown output stages.

Since this amp was never designed for easy repair, it is quite a challenge to take boards apart without damaging the aged PCB.
That's why, after having repaired a number of them, I was thinking of producing a whole new PCB with modernised circuits, but still largely based on the Mark Levinson DNA.
All bipolars on the heatsinks are supposed to be reused with the new design, based on a high quality PCB with all basic control functions like regulated power supply and protection circuitry.
On top of this baseboard a socketed module is thought with the amplifier module minus OPS.

So far I have designed all modules in LTspice: regulated Jung-Didden power supplies, start up circuitry, output protection circuitry making boards OL-2 obsolete, etc. etc.

All modules are put in sub circuits, to get an easy model for the coplete amp in LTSpice.
However with all those subcircuits, LTSpice gets very slow, that's why I replaced a number of opamps with the generic opamp2, set with the correct parameters.
I have of course tested all individual modules separately to prevent that results deviate from the real opamps to be used.

What I haven't included in the model below are the regulated power supplies and the output protection circuitry, to keep simulation time at an acceptable level.

In the images below, you see a full 800Watt sim into a 2R load.
Distortion from the first stage as shown is 0.2 ppm with an overall distortion at the LS of 2.6 ppm.
Of course these figures are on the bright side, but definitely not more than a factor 10 off.

I'm just looking for some feedback to decide whether to go on with this project or not.
If you want to give the sim a try, the main .asc is below and unzip the file with subcircuits and libraries into the same directory.

Hans

Attachments

  • ML23.6-1.jpg
    ML23.6-1.jpg
    487.9 KB · Views: 558
  • ML23.6-2.jpg
    ML23.6-2.jpg
    312.2 KB · Views: 517
  • 23.6-Compl.asc
    23.6-Compl.asc
    2.5 KB · Views: 173
  • ML23_6.zip
    ML23_6.zip
    66.1 KB · Views: 160

DAC and Op Amp testing methods and suggestions before i blow things up :)

Hi,

Need some advise before i blow up my OP AMP. I want to test my right hand DAC and OP AMP, the left channel is working fine. My plan is to use a ttl probe to compare both Input pins (1) i'm expecting to see a pulse signal from both. I plan to ground the probe on any main board ground. Will that work or do i risk any damage? Any suggestion on a better way to check the DAC and any tips on how best to check the OP AMP with a multimeter ? I was planning on checking the +5v supply to the op amp on pin 2 and 5, and then a volt reading or ttl probe indications from pin 1 and 7 of the op amp output? (i have obtained replacement DAC) as it seems a common failure point on this board)
DAC Test.JPG

Upgrading caps and opamps on the minidsp 8x12 v2 DL?

I've been reading posts about replacing better quality components on a minidsp 4x10 and wondered if I could do the same with my minidsp 8x12 v2 DL.

  • Should I first replace all through-hole capacitors with better-quality caps of the same rating? (couplings - Nichicon Muse bipolar)
  • Could I replace the power supply capacitors with higher quality ones like the Panasonic Fc?
  • Could I replace the JRC2068 opamps with the OPA1642 without additional modifications?
This is the board - there are x6 JRC2068's on the top and x6 on the bottom by the RCA outputs
IMG_20230520_202853.jpg

IMG_20230520_202824.jpg

IMG_20230720_140113.jpg

I noticed there are x12 Nichicon KC 47uf 25v on the first row which I believe are the coupling caps, and there are another x12 100uf 25v on the second row, but I don't know what those are exactly.

IMG_20230720_140028.jpg

Lastly a shot of what I believe to be the power supply caps
IMG_20230720_140041.jpg

IMG_20230720_140057.jpg


This would be my first time modifying a DSP so any tips would be appreciated.

Using Xsim to Adjust Z-Offset

I'm working a 3-way floor standing speaker. I've built the enclosure and installed all 3 drivers. I'm at the point of measuring the frequency response to create the FRD files for crossover design using Xsim. However, I'm confused about what I've found for adjusting z-offset. I read several posts discussing this and have determined I need to create 7 FRD files. One each for the stand alone drivers, one for the Tweeter + Midrange, one for the Woofer + Midrange, one for the Tweeter + Woofer, and one for all 3 drivers in parallel.

Part of my confusion is from a post from Bill Waslo stating one needs to create 5 FRD files (Not 7). The two he is not using is the Tweeter + Woofer and the one having all 3 drivers in it. If seven files are really necessary, how do we use the two "extra" FRD files? Are we adjusting the tweeter and woofer FRD files more than once?

Another point of confusion centers on a statement suggesting you adjust the Midrange driver mod delay using the Tweeter + Midrange FRD file. Shouldn't we be adjusting the tweeter mod delay leaving the midrange untouched? I was under the impression that we're referencing both the tweeter and woofer to the midrange so no z-offset is necessary for the midrange. Is that correct?

Finally, one post mentions that the measurements should be made using 1/48 smoothing. I assume I'll find that option in my Omnimic software, but the post continues on to suggest that the driver tuning dialog box in Xsim defaults to 1/24th smoothing when importing all FRD's, regardless of the FRD's native resolution. This implies that to keep 1/48 smoothing all FRD files would need to be manually changed from 1/24 smoothing to "none". However, I do not find the option to change the smoothing in Xsim. Am I just missing it or did Xsim change this feature with a software update?

Topping PA5 (TPA325X) : Is a modification worth it? ?

Hi amigos,

Now that the Topping PA5 has been revealed to the public and its chip is known. I was wondering if we could start to study the amp and modify it, like the Sabaj A20A and other amp we went through)

The amplifier has been reviewed and measured here :

Topping PA5 Review (Amplifier) | Audio Science Review (ASR) Forum

Measurements of Topping PA5 PowerAMP - L7Audiolab


The chip is probably a TPA325X amp with some Wurth or CoilCraft inductors (flat wires) and with a PFFB circuit. The buffers caps seem to be Nichicon FW serie.
We still do not know about the Op amps but any input is welcome ) The PSU is a 38V brick @4A.

Given its measures which does not blush vs the Purifi, I wondered how we could do even better, if possible of course)


My First DIY Experience: An Aikido/Tetra Preamp

I thought perhaps that my first DIY experience, building a tube preamp with John Broskie's Aikido line and Tetra phono stage PCBs, might help other newbies.

I started my preamp project searching for an excellent and reasonably priced kit and found almost universal acclaim for John Broskie's circuits. However, since I was not confident in my ability - or the steadiness of my arthritic hands - to solder small parts on the PCBs I discovered that Roy Mottram of tubes4hifi could do the PCBs for me. That was a very lucky find for me, as Roy - who has his own well respected products - gave freely of his time and expertise answering my numerous questions on how to build the preamp. He also pointed me to other suppliers for appropriate parts (e.g., transformers, chassis, upgrade capacitors) to complete the project. I purchased a stepped attenuator from Roy, for volume control, and that has turned out to be an excellent choice: a very fair price and a great product.

Anyway, I finally got everything wired together and, with hesitation, turned it on - half expecting something dreadful to happen. IT WORKED! The Aikido line stage was so quiet I didn't think it was on. There were, however, two problems with the Tetra phono stage: A loud hum from one channel and excessive sibilance and other high frequency noise. I posted a question regarding the hum, "How do I fix this", and received several good responses. Trying one thing after another I was fiddling with the input RCAs on the chassis and the hum would come and go, so it seemed that a poor connection was causing a ground loop. So, I opened up the chassis hole a little, put extra isolation washers and re-soldered the connections. Hurray, the ground loop was gone. Thinking that the sibilance was due either to the tubes I was using or perhaps too much gain I asked "Freecrowder", a member of this Forum, whether he had come across the same problem. "Freecrowder" suggested that I verify if a jumper or optional resistor was included on my PCB. It connects the RIAA high frequency attenuation circuit. I didn't have the connection so tried a 100ohm resistor and the high frequencies settled down. Now the phono stage is QUIET.

I've never had a super quality preamp, so my comment about the sound reproduction this unit accomplishes hasn't a good reference point; but if there is a better tube preamp then it would surely be magical. This preamp reproduces the detail, texture and musicality available from the source with realism, dynamism and many more isms. I am VERY happy and I thank all the kind and patient people who answered my questions, provided advice and helped me build my perfect preamp.

For Sale Free Miro 1862 boards

All gone....

A blue box has arrived and because there are minim order quantities I have boards I'm not going to use:
1 x I2s over USB DAC boards (2 gone)
1 x PSU2 boards (2 gone)
1 x pair (2 pairs gone) of EUVL's dinky I/V boards
. I ordered 10 of these because they were cheap and what's the point of 1 spare?

I'll meet UK or EU post, all you have to do is to promise to make a small donation to a hospice charity near you.

20230901_111006.jpg

iWoofer - subwoofer's control system IOS/Android

Hi there, seemed I registered here yesterday but suddenly it was 14 years ago! And, OMG, about 20 years ago I built my first class D powered Sub.. For sure, nothing is more expensive than a time, guys. So, back to the topic, about 8 months ago I got an idea to build the smartphone-based system to control an audio DSP in convenient/intuitive manner. A full range DSP, I believe, is a too picky area with too high demands for hardware (HW) so it's quite difficult to make something popular there, I mean hard to find a right performance/cost balance.

Another thing is subwoofer, S/N -102db is ok? THD .01%? 2.5mS of total latency? I guess, in 99.9% case it is good enough, hence HW (PCBAssembly B.O.M.) cost for such kind of system will be around $3-4, and the PCB size 43x33mm. This tiny PCBA doesn't just add to your sub a wireless control by your iphone, but it replace full preamp functionality including adjustable Auto On/Off, input level indication (on the iPhone and on the HW side as well), up to 4 analog like knobs/switches (LPF frequency, HPF frequency, Phase, Boost all of these HW controllers are fully adjustable by smartphone). In fact your need an only power supply and amp board to build your own smartphone controllable subwoofer. Full HW source package (PCB/SCH files, CC254) is uploaded to the public domain and free to use for everyone and iWoofer free app you can find on the iTunes.

Why are we giving that for free? Ok, there is a story. Formerly we worked for some Chinese OEM's and built for them similar control systems but those company's going only straight way and adding the price of the product because of "it's our technology" and so on blah-blah-blah. In the modern world, every dime of a product price at the factory becomes a $ in the shop because of the full chain (OEM->brand->distributors->shop) is too long and greedy. So this chain inherently resists for anything new just by the chain structure, and it slowing down a motion from an idea to end user. I decided to move our commercial interest out from this chain and offer free HW design and free application as well.

Our goal is simple - make iWoofer platform popular, and offer some interesting feature in paid version of an application. For instance iWoofer Pro app let you use minimum phase FIR with 2.5mS (+2.5mS of IIR&ADC/DAC so the total is about 5mS) latency and 2.9Hz resolution (for the next version we have the plan to add a switch 2.9/1.45Hz however it will affect the latency as well). So our interest is the part of users who would like try our paid app ($4.99). I'm happy to feel that I don't need hiding anything, and no any secrets in my idea. Obviously, our commercial target is an OEM factory's, which usually has no idea what an end user want, and why, that's actually most important. This is the reason of my post here, brothers, no one know better than you about what/why is better for advanced users, I appreciate and respect any of your opinions, positive or negative. I hope you'll guys will let me know what do you think about the idea in general and its implementation practically. That's very first post about iWoofer system in public. Thank you if read up to the end, or half 😉

PS: Our temporary website iWoofer is an open source hardware design, please download the iWoofer_HW package for details. - iwoofer

Schematic and PCBA pics are attached.

PS2: The Android version app is under construction and there is some issue expected about internal mic, using for room correction feature. Because a lot of manufacturers, lots of models. But at least free iWoofer app will be published soon.

Attachments

  • IMG_20170313_205427.jpg
    IMG_20170313_205427.jpg
    868.8 KB · Views: 1,502
  • 2017-04-20_13-16-23.png
    2017-04-20_13-16-23.png
    320.9 KB · Views: 1,379
  • iWoofer_sch.png
    iWoofer_sch.png
    149.2 KB · Views: 1,361

Sealed vs Vented measurements, equal slope?

I'm trying to decide whether to go with a sealed or a vented box. I have a sealed box for two 12" subs so what I did was to put 1 sub, and cover the other hole with a board. Then I measured the frequency response of the box. Then I made a hole for the port, used a piece of PVC pipe, and repeated the measurement, but The results were strange.

I expected the plot to have different curves, but they seemed to have the same slope. The ported box had the same response at around 45Hz, and 3dB higher at 20Hz, but that's it. It didn't look anything like 12dB/oct vs 24dB/oct. In WinISD with the same size box, same driver, but different configurations, the plots were quite different as expected.

I think this may be due to the fact that I used a way too small port. I just used a 40mm pvc pipe (because I have hole saws for 40mm but not for 110 😆). Yes, chuffing was unbearable, as expected. I was thinking of repeating the measurement with a 110mm port. But I'm not sure about the physics of this: does port diameter have any effect other than air speed? Does a too small port get "saturated" somehow and stop performing? I thought ports only provide a "load" so they can be any size as long as they meet the required length to provide the needed load. My 2x6.5" Yamaha NS-50F, for example, have only a 40mm port.

It could be also that the sealed measurement is wrong because the box may be leaking a little?

Constant current source as anode load-sonic benefits

What are the sonic benefits of using a CCS as an anode load?
I know that a CCS presents a "better" anode load for a tube and that the tube in question becomes more linear,
which should also mean less distortion.
Also the voltage swing should be greater as I understand it.
So, I guess my question is this: -Has anyone built an amp and compared the sonic qualities of a resistor as an anode load
and a CCS as a load?

Project Delta

I’m a self-taught engineer and a newcomer to DIY audio. I recently built my first amplifier. Instead of using the blameless or BC-1 as a reference, my goal was to create something simple that wasn’t based on an existing design. No long tail pairs, no current sources, just enough silicon for playing music. To make it a bit interesting, I adhered to one self imposed constraint; avoid coupling capacitors or inductors in the signal path. The result is a push-pull class A amplifier that I call Project Delta.

Output power? About 15 watts into 8 ohms.
Distortion? I estimate 1% at peak power, primarily second order.
Frequency response? Yes.

I didn’t try to do it perfectly, just to do it myself. By that measure, I succeeded in all I set out to do. As luck would have it, it also sounds good to me.

I have little to no ability, know-how, or desire to take meaningful measurements. If that’s what you’re here for, accept my deepest apologies. Attached is a simplified circuit diagram and pictures of my monoblocks if it may satisfy your curiosity.

Attachments

  • PJD schematic.png
    PJD schematic.png
    17.2 KB · Views: 172
  • PJD build.jpg
    PJD build.jpg
    495 KB · Views: 169
  • 20230831_200950.jpg
    20230831_200950.jpg
    217.1 KB · Views: 163

audio research classic 30 transistor HELP code needed

hi guys, i have a audio research classic 30 maybe by chance anyone can help me figure what code for this transistor part of my amplifier.

Q2 orange red orange - based on the diagram

Q2 orange red yellow - based on actual

anyone can help what transistor is this or code of this transistor?

Attachments

  • 371750710_992378288693036_2346040572541159565_n.jpg
    371750710_992378288693036_2346040572541159565_n.jpg
    20.6 KB · Views: 93
  • 371503323_117778768082734_702370419384788088_n.jpg
    371503323_117778768082734_702370419384788088_n.jpg
    145.8 KB · Views: 102
  • 371783902_276988618457777_2388656016778899577_n.jpg
    371783902_276988618457777_2388656016778899577_n.jpg
    572.3 KB · Views: 103
  • 371910779_211965154930449_2990660182356870914_n.jpg
    371910779_211965154930449_2990660182356870914_n.jpg
    397.4 KB · Views: 111
  • audio-research_classic-30.pdf_1.png
    audio-research_classic-30.pdf_1.png
    12.4 KB · Views: 108
  • audio-research_classic-30.pdf_2.png
    audio-research_classic-30.pdf_2.png
    14.1 KB · Views: 115

Transformer Wiring Help

Hello, I'm working on a Hohner Symphonic 310 Organ, which I want to restore to it's original specifications, as it was heavily modified by a very sloppy person before.

The power supply had been modified for it to barely work, I suspect one of the original selenium rectifiers blew so they had to replace it with a silicon one, but in the process they bypassed the voltage selector and directly used the 120v mains for a section of the power supply.

Here's the state that I received the amplifier/power supply, as you can see, it's horrible.

IMG_20230302_171616403.jpg


now, I've managed to obtain the original schematic from Hohner, and my next step is to restore the power supply, using new components to replace the smelly rectifiers and the old capacitors.
but now I can't figure out how to wire the transformer for the rectifiers.

1693524938045.png

In the schematic, the 110v and 240v secondaries are shown as independent secondaries, but my transformer has the 110v and 240v secondaries connected in series.

Is there any way to wire my transformer to provide the needed 240v and 350v to two separate full wave rectifiers as shown in the schematic?
I'm not 100% sure but I think the transformer was modified, should I just try to get it rewound or is there way to make it work?
here's a picture of the power supply and amplifier unit after a needed clean, on the bottom left is the transformer in question.

IMG_20230310_012621604.jpg


Thanks for the help.

Related notes, advise if you want.

Most importantly, this is a passion project and I'm very much a beginner. I'm aware of the dangers of high voltage and I'm okay with damaging or breaking things in the process, maybe I'm in over my head but I like the challenge.

I'm planning to replace the rectifiers with 1N400X diodes, using dropping resistors to lower voltages where they should be. I'm looking into a solution similar to these, to be able to screw them in place of the old ones so it looks nice.

I think I'll use a 10nf safety capacitor for the "death capacitor" in the primary. Today I was able to find one in a local shop but it's rated for 3kv, is that okay or should I try finding one rated for 400v, or should I just get rid of it and do as this recommends.

I'm in the process of acquiring replacements for the capacitors, I'm just getting new aluminum electrolytics, and probably this for one of the more difficult ones to find. I wonder if I should empty the cans and put the new caps in for a better look, I think if I don't it's going to look too messy for my liking.

About the regulator valves: I'm not sure if they work, as they were also bypassed in the circuit, (which in combination with all the jank made the organ behave in a funny way when anything else was using enough power in the house... like turn on an appliance and the pitch goes down and the oscillators go out of whack and make funny gargling noises.) Is it worth to try to find replacements for the regulator valves, or should I replace them with something else?

I've already posted here asking for help about the reverb unit which is also missing completely, and I'm looking into the options for finding a replacement.
I have attached the full schematic in this post, as it seems to be the only copy of it online, or at least I couldn't find it so I had to ask Hohner.

I'll probably keep posting as things come up in the journey of fixing this thing.

Attachments

ICEPower 50ASX2 plays then goes into Protection

Hey all, got another fun project. I bought a B&K AV30.2 Amp "Brick" and was surprised to see an ICEPower 50ASX2 module in it...cool, as I have not yet heard one of these ASX units.

Anyway, the ICEPower 50ASX2 module is run in SE mode - 2 channel. It plays for a few seconds then cuts out. I have separated the preamp/buffer and ran a signal straight to the amp to determine if the fault lie with the preamp section or amp - it is with the amp.

I checked pin 1/2/3 - Enable/overcurrent/thermal pinouts. When amp is properly playing, they all show 4.89v (good). When it stops playing, the Enable pinout internally goes dead (.2v), while the other two pins are still at 5v (good).

Now according to manual, the Thermal and Overcurrent pins are output only - while the enable is both input and output - meaning an external source can pull down the 5V to 0V to shut down the amp on enable pin, AND/OR the amp can be shut down internally (sending the pin from 5v to 0v) by Thermal or Undervoltage issues. Now since the Thermal pinout shows fine at 5v (why the redundancy here?), it leaves the Undervoltage as being the culprit for the amp is going into protection...I checked and it is jumpered on 115v...

I have seen a few of these B&K AV30.2 amps that have the ICEPower 50ASX2 modules doing the same thing - play and then go silent...don't know if they modified the 50ASX2 or just an issue with the ICEpower unit itself...

Anyway, anyone have any ideas?

Electrocompaniet Ampliwire 250 output Relay problems.

Hello, I have a Electrocompaniet Ampliwire 250 that is having relay issue with one of the output channel. I know the relay is bad but the issue is how to get it off the PCB without destroying the board. It looks like some sort of glue or epoxy was used to adhere the relay to the pcb.

Has anyone here removed those relays without damage to the pcb?

Hum and noises from ungrounding amp

Hello to everyone here .. i was on vacation this time , and i decided to make something simple .. i found an old speaker monitor in my storage and thought of making it into a guitar amp .. i made a simple amp with tda2030 and a higain preamp .. everything works perfectly and i designed it too front panel on the 3d printer, but the problem is the following. the whole box is plastic and besides that if I feed it with a transformer that doesn't have a ground, a hum noise is heard,, does this solve the problem somehow or do I have to put a transformer with ground,, to be more clear, I mean the transformer I have put it, it does not have a ground plug in the wall AC, it only has the 2 terminals., thank you

Attachments

  • IMG_5802.jpeg
    IMG_5802.jpeg
    529 KB · Views: 93
  • IMG_5800.jpeg
    IMG_5800.jpeg
    606.5 KB · Views: 99

B&W 801 Series 80 protection circuit and spare parts

Hello,

I just bought those speakers in title.

Few questions:

I have read from inernet that its good to bypass that protection circuit.
What is the point with this story?

I need some spare parts for those speakers. Just a little things.
Controlling buttons to that protection circuit. Those what are on upper part of front baffle. Buttons have lightbulb logo and lightbulb logo overwrited with slash. And third button also with dunno what kind of logo. What does those buttons do? I also need 4pcs of B&W logos.
Where i can get those?

I don`t know that is this area right for this kind o question, but i hope i get some answers.

THANKS !


Here is example picture of B&W 801 Series 80:

Attachments

  • 801_pairopen.jpg
    801_pairopen.jpg
    102.8 KB · Views: 2,960

For Sale Troels Gravesen nomex mkii crossover

For sale troels Gravesen nomex mkii crossover.
Sadly not assembled and I have not enough time to do so.
I will provide the parts (the level 2 version, Jantzen standard caps on woofer and mid, Jantzen superior on tweeter, cored coil on woofer (1.4mm no discs), air core coils on mid(1.4mm) and tweeter section and superes 10w resistors and of course the schematic.


Price is 250 euros including shipping for EU
I accept PayPal

Subwoofer High xMax Distortion?

I'm planning a pair of subwoofer 'stands' with 10" or 12" drivers to go under my stand mounts that have 8" woofers. Range will be 20hz - 80hz.

In terms of SPL the super high Xmax drivers such as Dayton Ultimax UM10-22 seem impressive with 19mm xmax.

My question is, do these type of drivers also provide low distortion or is it SPL at all costs?

There is also the Dayton RSS266 variants with a bit less Xmax 12mm and a similar price.

Or I could step back again in SPL with a pair or 3 standard 8" woofers having about 6mm xmax, not subs.

I guess I'm asking if higher xmax sacrifices linearity at more 'normal' operating levels.

Home Improvement Contractors

My goal this year was to repair water/mold damage caused by inept window installer contractors. They left gaps in the flashing that let water go behind the siding and inside the wall. They also demolished my original drip rails and this of course allowed water to seep behind the exterior flashing and inside the wall.

There's a lot of steps to this job so I was ready to hire multiple contractors and/or coordinate some of it myself. My first attempts to hire licensed contractors yielded people that didn't actually want to repair anything; just slap some siding over it and charge me thousand$. They were pushy and arrogant and I was very dissatisfied with their open ended ($$$$$$$$$$$$$$$$$$$) proposals that required large (tens of thousands of dollars) retainers. OK I can do better.

I made a plan and lined up some unskilled labor ( my buddies and some guys I hired at the Home Depot loading dock; there's guys there every day looking for work and they'll bust their heinies for a few hundred dollars). Stripped two layers of siding and all the sheathing. The sheathing was still wet and there was extensive mold damage. Treated everything with fungicide, did a few small repairs while the walls were open, installed R13 insulation (there was NO insulation), installed new sheathing (the good stuff CDX "Sheathing rated" plywood), flashing, housewrap, flash tape, NEW drip rails, NO LEAKS finally.

Now I'm interviewing siding contractors. Everything is 100% kosher and ALL I need is siding. Well, they want to use THEIR sheathing (can't explain why) and THEIR housewrap (Tyvek isn't good enough?) . They want to rip ALL the flashing off (now that it finally doesn't leak) and basically just cram it right back up my ***.

You can't win at this game. Bottom line is that I don't trust their craftsmanship after being burned before. Maybe I'm going to end up hiring more guys at Home Depot. Yelp has nothing but glowing reviews, even for contractors I know for a fact are shady. They don't want to fix anything; they just want to make money.
  • Like
Reactions: rayma

Z(x) as a proxy for Le(x) as a proxy for IMD and AMD

I've been using a free air impedance sweep with the driver cone held out (+ve direction) and held in (-ve direction) as a proxy to measure a driver's Le(x): inductance variation as a function of cone/voice coil movement.

A primer is here:

"Le(x) is a driver test result that shows how inductance changes based on the position of the voice coil in the magnetic gap. Generally, better performing drivers with complex motors do not have substantial changes in inductance throughout their operating excursion, while inexpensive low end drivers with simple motors have much higher inductance with coil inwards and lower inductance with the coil outwards. Le(x) related distortion is a major product of intermodulation distortion and amplitude modulation distortion. This is a form of distortion that is based purely on excursion, and is more of an issue with louder output and higher signal complexity.

There are two ways of displaying Le(x) results. One way is a curve with Le on the Y axis and MM excursion on the X axis, with 0mm in the center showing the at-rest inductance. This is how the Klippel testing system displays the results. The other way is an impedance vs frequency plot with impedance on the Y axis and frequency on the X axis. These are created with the driver cone clamped or held in place, and several plots are needed at various excursion positions. This form is much easier to do with cheaper testing software, and it is what we are showing below.

Each of these Le(x) plots is comprised of 3 impedance curves. One is at rest, one is at the full inward Xmax position and the other is at the full outward Xmax position. Of course, the mm of cone offset depends on the driver's available Xmax. In executing this test, to avoid inaccurate results, the operator has to be very careful of not exceeding the inward or outward excursion.

In these 3 curves, the one with the driver at rest is not clamped or held, and therefore has the full free-air resonance peak shown. The 2 curves with the driver held in position typically mangle the resonance however. As such, the curves are only accurate above roughly 300 or 400 Hz and grayed out below that. For drivers 7" and under, the typical change in Le impedance curves happen above 300 Hz anyway, so this is normally not a limitation.

Note that the vertical scale of these plots is relatively compressed, so minor curve offsets are relatively major in audibility at high output levels. Also keep in mind the expected bandwidth of the driver in question. Smaller drivers are expected to operate higher in frequency and top end Le(x) performance becomes more important in these cases. Along with harmonic distortion sweeps and response curve usability, Le(x) plots can also help you decide on an optimum crossover frequency.

Ideal performance in these test results would be all three curves falling on top of each other at least an octave past the driver's usable frequency range. (or up to 8-10kHz in the case of a wide/full range driver) Poor results would be three greatly offset curves way down into the lower midrange."

Reference:
http://www.zaphaudio.com/Le(x)/

Klippel has also written about it:

1693429715487.png

Reference: pending…


So here are my test results for various drivers.

10”
Peerless 10" woofer- model 830668 (8 ohm driver)

830668.png

Green- cone at rest (as evident by peak at Fs)
Pink- cone held in
Blue- cone held out


Bowers and Wilkins 10" woofer from 801 D4 loudspeaker (8 ohm driver)

801D4.png


Bottom curve (pink)- rest position
Blue curve - cone held inwards
Orange curve- cone held outwards

12”
Peerless / Tymphany 12" woofer, model 835017 (4ohm driver)

835017.png


Green- cone neutral
Pink - cone held in
Blue- cone held out

8”
Purifi 8" midwoofer, model PTT8.0X08-NAB (8 ohm driver)

PTT8X.png

Green - cone neutral
Purple -cone held in...
Green - cone held out


Commentary:

I use the same impedance scale 0-150 ohms, and 5Hz to 20KHz for all.
It is quick and easy to do with today's available tools eg. Woofer Tester 3 or DATS or impedance jig for ARTA/REW.
As time allows, I will editing the original post with other drivers.

As usual these tests are from the drivers on my shelf, no Amazon affiliations or kickbacks from manufacturers allowed and advertisement free.
This is for learning/shared understanding only. If you want to send me a driver for testing- please don’t. One of the great things about this test is that you can do it yourself- with relative ease (no need to build an enclosure) and it takes minutes to do (unlike harmonic distortion testing which takes hours)

Comments on the usefulness, relative importance of IMD and AMD, and limitations of this testing method are welcome.
Suggestions for other drivers welcome.
Also, feel free to add your drivers.

Arcam Delta 290 Keeps Blowing Output Mosfets

Recently got an Arcam Delta 290 - believe it to be a later model with IRFP240 mosfets mounted vertically on a heatsink and built in phono preamp. Originally it had no power and a blown fuse. Checked the output mosfets found Q1 to be shorted, removed Q1 and Q2, replaced the fuse and the amp powered on ok.

I've ordered 10x new IRFP240 from Farnell and replaced both Q1 and Q2 the amp then came on ok for a few seconds light went green and then a few seconds later I smelled something burning and the light went orange. Checked and Q1 and Q2 are both shorted dead again and also R1 and R1A. Went through the whole circuit checked all resistors and diodes and replaced a few resistors that were damaged. None of the transistors or diodes were showing shorted so I replaced Q1 and Q2 again - this time the amp came on again for a few seconds and then immediately blew the fuse just before the light should turn from orange to green. Again Q1 and Q2 are dead.

I do not really know where to go from here - I do not really want to keep replacing Q1 and Q2 if it isn't going to fix the problem but I can see no faults or shorted components that would explain why these keep burning.

Maybe someone here knows more about this model and can point me in the right direction or maybe Farnell are selling garbage IRFP240 chips? Am I correct in my assumption that all the output mosfets run off the same Power supply so that if there was a PSU issue surely it should be burning all of the output mosfets?

Pentacone Pentowther info wanted.....

I managed to pickup a wonderful pair of Pentacone Pentowther speakers with Lowther PM6a drivers that needed a recone. After a week away with Lowther they came back sounding fantastic.
Now a year on and the drivers have finally settled from a crazy run in period I'm looking for information on these rare UK speakers.
After a search I found that Pentacone was briefly on this very site over 10 years ago.
Does anyone have any information on these speakers?
Thanks.
DSC_0001.JPG
16934894151418522512020293020062.jpg

Mesmerize (i.e. B1 with shunt regulator and relay inout selection)

Almost finished preamp in search of a good home. I started a Mesmerize a while back and did not finish it. I now have too many irons in the fire and need to refocus on just a few projects. This is Salas' Mesmerize board nearly fully populated. It has not been powered up and tested yet but should be OK. The board and buffer JFET quad alone are worth over $50. Let me know if you have any questions or want make me an offer if you are interested.

Mesmerize Link: https://diyaudiostore.com/products/mezmerize-b1-buffer?_pos=1&_sid=4da3f0447&_ss=r

Pic.jpg

Bob Ludwig closes down his mastering lab. That's the End of an Era!!!

A very nice two-part interview with Bob, by Tom Fine.

Highly recommended.

I first started working with Bob in 1991 in NYC, when he fastidiously remastered the LP version of Arturo Delmoni's "Songs My Mother Taught Me," which blows the North Star LP into the weeds. Bob later, in Maine, remastered the digital version, which similarly blew the MFSL "Songs My Mother" CD into the weeds.

Bob's SMMTM digital remastering is now available again, this time from IMPEX/Elusive Disc, as a gold CD.

For my last "The Fifth Element" Stereophile column, Bob graciously consented to be interviewed by me. If you don't recall it, it is very much worth revisiting.

With all my best wishes to Bob and Gail.

john

For Sale AD1862N-D

I have for sale a pair of AD1862N-D DAC Chips. They were pulled from Denon CD Player. 100% authentic and in working condition. This is a special selection of AD1862 which were manufactured fro Denon.
Asking 100$ for the pair plus the shipping. Shipping to USA and Canada .

Attachments

  • IMG_1742[1].JPG
    IMG_1742[1].JPG
    527.9 KB · Views: 63

Superphon Revelation MK II PreAmp

Recently the Superphon Revelation MK II preamp has come my way. Was designed and built by Stan Warren, at one time the other half of PS Audio. Cant' find out much about it though. Performance wise a very good preamp, phono section exceptional.

However the Volume and Balance pots are quite pedestrian and should be upgraded. I have in the parts bin a TKD 25Kohm volume pot. Anybody know if this would be of correct value? Any other help greatly appreciated.

Attachments

  • superphon_1.jpg
    superphon_1.jpg
    11.8 KB · Views: 2,934

74AHC02 and 74AHC08 DAC with 97 dB(A) dynamic range

Hi all,

For those who like to build DAC circuits rather than to apply DAC chips:

While I was working on my valve DAC I got curious about how well a conceptually similar circuit built with CMOS logic gates and active filters could work. Using 74AHC02 and 74AHC08 CMOS logic gates as the DAC (a four-tap return-to-zero FIRDAC) with a very straightforward crystal oscillator and an LT3042 voltage reference, I measured a noise floor of about -97 dB(A) with respect to the maximum signal level. The schematics are attached, the FPGA code is the same as the FPGA code for my valve DAC that can be found on the Linear Audio website.

The FPGA code contains a sigma-delta modulator that has three modes: seventh-order chaotic and two fifth-order modes with embedded pulse width modulator. In the valve DAC the PWM8 mode clearly has the smallest in-band noise, but with the 74AHC02/74AHC08 circuit it hardly makes any difference. The in-band noise floors are nearly the same for all modes:

PWM4: -97.83 dB(A)
chaos: -97.06 dB(A)
PWM4 (repeated measurement): -97.44 dB(A)
PWM8: -98.32 dB(A)

The out of band noise is different, as expected:

chaos: about 1.3 mV RMS
PWM4: about 2 mV RMS
PWM8: about 6.7 mV RMS

The out-of-band values are estimated by looking at the quasi peak-peak noise with an oscilloscope and assuming that the RMS value is about a sixth of the quasi peak-peak value.

The maximum signal level is about 1.96 V RMS. All values are differential voltages, the single-ended voltages are half the differential voltages.

Best regards,
Marcel van de Gevel

Edit, 30 May 2023:
Hans Polak has done measurements and experiments and among many other things, found that the noise floor is substantially lower than I measured, see https://www.diyaudio.com/community/...ith-97-db-a-dynamic-range.313520/post-7363723

Attachments

Denon AVP-A1HD sound problem

Hello everybody!

I am a newbie and eager to learn, please don't laugh me 😀 for my stupid question.

I have a old denon avp-a1hd preamplifier, recently the sound will be dropped after playing 15 to 20 minutes. I replaced the original small fan with a bigger one, that makes the playing time longer, about 1 to 2 hours depending on room temperature. The problem is only happened when the input source is via digital such as coaxial cable, playing via USB etc. For example, if I connect my cd player via coaxial cable, the problem happens, however if I connect via xlr cable, it works fine.

It has too many pcbs inside the amplifier, I am hesitated to unmounting those board without any clue.
My question is what is the most likely reason for the failure?
Could anyone please help me to work a way to fix the problem? Thank you very much!

Felix

Diy tube preamp with extern dc Power supply, what is it?

Hello, I recently bought an old diy preamp, i though it was a curcio Daniel design but i am not so sure anymore. My preamp has a riaa and different control for left / right phono, it uses 8 ecc83 and 2 ecc 82. The dc Power supply had a El 34 tube plus another i dont know what it is, small tube like ecc83. The preamp was build in Norway in the 80s or 90s. I have very litle info on it but I post some pictures, perhaps someone knows what design this is. It plays very nice, the Power supply is quite heavy. Any input on design and build quality is very much apreciated, I dont have any info on it.

Attachments

  • IMG_20230828_182002.jpg
    IMG_20230828_182002.jpg
    353.6 KB · Views: 135
  • IMG_20230828_204404.jpg
    IMG_20230828_204404.jpg
    368.8 KB · Views: 142
  • IMG_20230828_204411.jpg
    IMG_20230828_204411.jpg
    344.8 KB · Views: 132
  • IMG_20230828_205808.jpg
    IMG_20230828_205808.jpg
    259.7 KB · Views: 118
  • IMG_20230828_211515.jpg
    IMG_20230828_211515.jpg
    212.2 KB · Views: 126
  • IMG_20230828_205426.jpg
    IMG_20230828_205426.jpg
    222.7 KB · Views: 128
  • IMG_20230828_204758.jpg
    IMG_20230828_204758.jpg
    197.3 KB · Views: 130
  • Screenshot_20230825-122013.jpg
    Screenshot_20230825-122013.jpg
    183.1 KB · Views: 158

X1 and Xono series power supply questions.

Friend has an X1 pre with the cosmetically matching power supply.
He has acquired an Xono phono stage with the smaller black power supply.

Both of these power supplies have two outputs.

First question.
Can both the X1 and Xono be fed from just one of these supplies at the same time ?

Second question.
If this is possible, then is their any risk of sonic degradation in doing so ?

Third question.
There are minor internal differences in these two power supplies.
Is one 'better' than the other ?
Fairly sure I saw something many sleeps ago that some seemed to think the smaller black supply was a little better.
I would like to see if these thoughts are valid or voodoo 🙂

Many thanks 🙂

Krell KSA-300 repair

People, good afternoon! Sorry for the OffTop. Help please. My KSA 300 is under repair. Tell me the number of the chip as in the photo, which analog can be found so that it is like from the factory. And the number of the flat oval transistor on the right (where many).please. If you can, please show the original photos from your amplifiers. Sorry for my English. All the best/Users/maksim/Desktop/16fc5bd3-113c-4b47-8234-2c14c5ea3df8.JPG
/Users/maksim/Desktop/IMG_8459.jpg
/Users/maksim/Desktop/IMG_8458.PNG

2-way vs 3-way

Are 2-way speakers better than 3-way speakers?

2-way speakers have the advantage of having fewer transitions, but they have the problem of not being able to play deep notes (30 hz<).

already 3-way speakers can play deep notes (30 hz <) more easily, in addition to containing a speaker designed for medium frequencies.

my question is, which one has a better soundstage.

Are 1W/1M sensivity plots compareable?

Hello,

i am struggling to understand the compareability of sensivity measurements.

Example:

A driver which is called a 2 Ohm driver has a Re = 1.3 Ohm, a minimum impedance of 2.1 Ohm
A driver which is called a 8 Ohm driver has a Re = 4.5 Ohm, a minimum impdedance of 4.5 Ohm


One question is:

the Impedance value ( 2/8 Ohm ) is a mean value as i understand it. But how is it calculated ?

Is a 8 Ohm driver with Re = 4.5 Ohm still a 8 Ohm driver or more like a 7 Ohm driver ?

I am struggling how much voltage i should set to get a 1W/1M sensivity measurement, as for a 8 Ohm driver i should apply 2,83V to equal 1 W. But 8 Ohm drivers are different the Re range goes from 4.2 Ohm to 6.2 Ohm.

Does that make a difference which voltage i have to set ? Or is it correct to apply 1khz and set 2,83V as long as the driver is labeled 8 Ohm ?

Thank you !

ICEpower and JST connector notes

Just collecting some information on JST connectors and Icepower amps. Please help by correcting any mistakes. Good info and links are available on Wikipedia and Matt's Tech Pages.

Definitions:
Header
is the part on the ICEpower PCB.
Housing is the white plastic part that holds the contacts (wires), and plugs into the header.
Contact is the small metal piece that crimps on the wire.

High current or voltage use VH (speaker, AC power) or NV (DC power) connectors.
The connector contacts are identical and interchangeable in the VH and NV housings. VH housing has 4.96mm spacing and NV housing 5mm spacing. The VH housing does not fit the NV header. The NV housing does not fit the VH header.
Contact SVH-41T-P1.1 for 16-20 AWG wire
Contact SVH-21T-P1.1 for 18-22 AWG wire

Sample jumper wire JUMPER SVH-41T-P1.1 X2 12" Digi-Key Part Number 455-3107-ND Manufacturer Product Number ASVHSVH16K305
Black 16 AWG Jumper Lead Socket to Socket Tin 12.0" (304.8mm) will work with VH and NV housings. Note that the only available color is black.

Signal or low voltage/current use EH or PH connectors. The connector contacts are virtually the same and interchangeable in the EH and PH housings. As with the VH/NV above, the EH housing will not fit the PH header.
Contact SEH-001T-P0.6 for 22-30 AWG wire
Contact SPH-002T-P0.5S for 24-30 AWG wire

Sample jumper wire JUMPER SEH-001T-P0.6 X2 12" Digi-Key Part Number 455-3104-ND Manufacturer Product Number ASEHSEH22K305
Black 22 AWG Jumper Lead Socket to Socket Tin 12.0" (304.8mm) will work with both EH and PH housings.

JST connector planning:
If the connector is being used for PCB to PCB connection, you probably want contacts and housings on both ends. For example, 200ASC to 200AC. I generally prefer mass produced, machine made wires. Crimping tools are expensive, and there is a learning curve to using them. The difficulty is finding premade with contacts and housings at both ends with decent wire.

The official ICEpower wiring harnesses only have connectors and housings at one end. The same is true for Ghent Audio harnesses.

If connecting a 500ASP (which has VH header for DC bus 50V, +-12V) with a 200AC (which has EH header for +-12V and NV for 47V; and yes, the 200AC is designed to "hang" from the 250ASP or 500ASP, even though they provide absolute maximum 50V to the 200AC) you will need to crimp or solder contacts for the VH to EH wires. The housings and contacts are inexpensive, but plan ahead so you order them at the same time.

The premade crimped wire may have the wrong AWG, wire is low quality or the colors are limited. When soldering wire to the contacts, use enough heat and flux to be sure of a solid solder connection.

Removing wire and contact from the housing:
PH/EH: use a stiff, solid 20 gauge wire as a tool. First, push the connection wire all the way into the housing. Insert the wire tool into the housing on the wire end into the groove until the white tab is pushed up. Then pull on the wire and remove it a few mm, then pull out the wire and tool.

VH: push the connection wire in all the way. Press down on the contact lock tab with a flat screwdriver. Pull out the connection wire.

NV: push the connection wire in all the way. Then insert a 1.2mm flat screwdriver (as found in a cheap precision set) in the hole above the contact hole. Gently pry the screwdriver up, which will push the lock tab on the contact down. Then pull out the wire.

LTSPICE THD Analyzer

I created an LTSPICE add-on to automate THD measurements and plot result in the form of THD vs. Amplitude and THD vs. Frequency graphs.
I was inspired by "jfet_amp_disto_plot" by Helmut Sennewald, "Audio Distortion Analyser" by Tony Casey and "Fundamental Null Distortion Residual" by jcx from http://www.diyaudio.com/forums/software-tools/101810-spice-simulation-37.html#post133313

How it works:
It outputs sinusoidal signal with amplitude or frequency stepping sweep into device under test (DUT). Output signal from DUT is feed into analyzer input. After waiting some time for signal to become steady state, analyzer restores fundamental and subtracts it from input signal. This subtraction allows to increase resolution or reduce measurement time for the same resolution. You can monitor residual components at “Notch output”.
Residual signal is then fed into synchronous filters and detector. Each harmonic is filtered and measured separately. Maximum of 10 harmonics are analyzed. Amount of harmonics could be easily increased by adding corresponding filters and possessing.

THD_Vout.png

THD_Freq.png

How to use LTSPICE Audio THD Analyzer:

Place THD_Analyzer.asy symbol and Analyser_Controls.txt files in the same directory, where you are saving schematic (DUT schematic),
that you would like to analyze.

Put SPICE directives “.inc Analyzer_Controls.txt” and “.tran 0 {AnalysisTime} {SettlingTime} {MaxTimestep}” in DUT schematic .

Edit “Analyzer_Controls.txt“ to enable (uncomment) appropriate sweep (amplitude or frequency ) and save this file.

Setup “.param Ag=xxx” as amplitude for frequency sweep or “.param Fg=xxx” as frequency for amplitude sweep.

Run the simulation.

After simulation is complete, go to View menu and open SPICE Error Log or use Ctrl+L command.

Click with right mouse button on opened Log file.

Execute “Plot .step’ed .meas data” command. Right mouse button click on opened plot and use Add Trace or Ctrl+A and select the data that you want to plot.

You may want to double click on axis to change axis limits or switch to logarithmic scale.

Notch output shows residual components, after fundamental removal.

Please note that fundamental may not be removed completely. This is not necessarily affecting resolution of measurements as soon as additional synchronous filtering is used to measure amplitude of harmonics.

Increasing SettlingTime and StrobeLength, or (and) decreasing MaxTimestep would likely improve fundamental rejection.

Generator output is DC coupled and has 0 Ohm output impedance. Use external AC coupling and appropriate series resistor if required, to ensure proper operation of simulated circuit.

THD_Analyzer.zip contains all necessary files and example. Unzip all files in the same directory, open “Example_BJT_THD_TEST.asc” and run simulation.
You can monitor analysis progress in the left lower corner of LTSPICE window. After simulation and analysis is complete (including completion of .MEASURE), follow the instructions to display
results.

Demo'ing Hill Type I Plasma Tweeters at Axpona 2023

I worked for Alan Hill from '77 to '90 and was given a pair of Plasmatronics Hill Type I speakers as a wedding present in 1980. I have resurrected my Hill type I plasma tweeters and added new 6" mids and a 12" subwoofer to them. All of the plasma support electronics had to be redesigned by me (original tubes and power supplies are extinct). I would like to show them at AXPONA 2023 as an homage to Alan and his amazing creation. It was suggested to me that I start a Go Fund Me campaign to offset the cost of show rental space (and Helium!). I am wondering if enough people would be interested to hear these wonderful tweeters.

Fireplace mantle built in centre speaker build - Crossover help

So I've been wanting to make a wall mounted centre speaker for a while now and come up with what seemed like a good selection of speakers via playing with VirtuixCAD2 and SpeakerBoxLite.com.

Taking performance, size and price into consideration, I came up with an MTM design that has the following:

2 x Peerless SDS-P830656 5.25" 8 ohm woofers.
1 x Peerless XT25BG60-04 1" 4 ohm tweeter.

I came up with an enclosure volume of 12.8 litres and then modelled this enclosure design on TinkerCad:

Mantle Centre Speaker TinkerCad.png


I built the unit and took measurements with a boom arm and Umik-1 following the guide at AudioScienceReview here and came up with some reasonable looking graphs which follow the manufacturers anechoic graphs close enough to look legit to my untrained eye.

Mantle Centre Speaker.jpg


Now comes the tricky part. I seem to have a ~3khz dip in the tweeter response and I'm trying to design the crossover on VirtuixCAD2 and would like some help.
I measured each of the 3 drivers with the Dayton Audio DATS v3 to get accurate t/s specs and then input that data into the software. I think I've got it fairly flat (as best I can) but I'm not sure if the phase response is going to cause issues or if the resistance is too low (going down to about 3.1 ohms).
I'd love some feedback to assist with the crossover design as I want this speaker to sound great!

Mantle Centre Speaker VirtuixCAD2.png


For some context it's going to be powered by a Denon AVR-X3300W in a 5.1.2 speaker layout and will be mounted to the wall just above the fireplace alcove.

Silver Flute 8" + 1" waveguide tower?

I have a pair of SF W20RC38-04 drivers (4 ohm version) that I'd like to make some 2-way floorstanders with. Was thinking of matching with waveguided D2604/833000 or XT25TG30. I've never designed my own crossover before so was looking for an existing one but came up empty. Anyone know of any existing designs using these 4 ohm 8" SF's? I did come across the Decware DM945, is the crossover published anywhere?

Thanks in advance.

1000W 8R CLASS D IRS2092+IRFB4227 BTL

In my opinion, class D amplifier is the largest. And is the only advantage.
Is efficiency. High voltage output makes him meaningful. Low voltage. Its performance is no better than that of class AB amplifier. Please refer to for the specific principle
https://www.diyaudio.com/community/...ss-d-is-class-ab-class-a.388305/#post-7074713

And how high the voltage output is. Will make class D exceed the meaning of class ab.
I think the output voltage sine wave + - 140V voltage is OK. And it is easy to implement.
We can use + -70v or + -75v voltage for power supply.
Use L30D architecture. That is, irs2092s + irfb4227 structure.
https://www.diyaudio.com/community/threads/l30d-irs2092-irfb-4227-iraudamp9-mydiy.280531/
Then use BTL.
It is easy to realize the output + - 140V PP sine wave. That is 280vpp voltage output.
And the distortion is controlled at 0.07%. This will be beyond any class single-chip amplifier design.
And it's very Tu
If anyone is interested, I will design L30D BTL 1000W 8R amplifier.
It may be the amplifier with the lowest distortion of 1000W 8R in the world at present.
Most of those small integrated circuits have more than 10% distortion, 50W 8R, 100W 4R.
For example, tpa3255 ma12070

If we are only satisfied with 50W 8R. 100W 4R (a single chip ClassD usually only indicates 4R power) then any class AB amplifier can easily achieve 50W 8R and 100W 4R
The distortion is less than 0.002%, such as mx50se.
That low-power class D amplifier is meaningless. It needs to convert the audio signal into PWM.
Then convert PWM into audio signal. In order to save 5 watts of electricity at 50W 8R power.
At 10 watts. Class D does not even save power than mx50se. Because I measured it.
Class d always maintains the maximum PWM output voltage.
ok We will only discuss class D now. So is anyone interested

Check this tube amp circuit for me please

This is an amp I recently built. It sounds good but the NFB circuit resistor values are just guess work because calculating the right values is beyond my ability at this point. Can the two cathode resistors in the preamp be the same value as they are or should the lower resistor be smaller? Also, I wanted a bit more gain to drive the 6V6 so I added that bypass capacitor to the top resistor. Is that a correct way of increasing the gain? Also, what if the lower resistor is eliminated and the top resistor made 1.5K with the bypass capacitor in place. Would that just short the NFB to ground?

Attachments

does Tamura XE 45 8(kOhm) output transformer fit for a 300B Push Pull?

dear all

I am the owner of an old DIY valve power amplifier bought a long time ago, so i decided to investigate on it

First of all I saw it fits a couple of tamura XE 45 8 out transformers
I read tamura sheets seems that the out trafos are not suggested for a 300B PP
What's your opinion?

First Stage 6SN7WGTA (PHILIPS) Driver 6SN7GTB (SILVANIA) power tubes 300b super 4300a golden dragon, rectifier CV 378
power inductor Tamura A 4004 power trafo Tango 10422

your impression is highly appreciated
Projects by fanatics, for fanatics
Get answers and advice for everyone wanting to learn the art of audio.
Join the Community
507,840
Members
7,890,293
Messages

Filter

Forum Statistics

Threads
406,351
Messages
7,890,293
Members
507,840
Latest member
temp91899