
How rude is this?
Jaguar XJ13 - Wikipedia
Probably can't say I own it but we have been less than 1m apart....... 🙂
Jaguar XJ13 - Wikipedia
Probably can't say I own it but we have been less than 1m apart....... 🙂
Well then this isn't going to help my cause.
You could really upset people by using the vfet as your car stereo...
Ducati, with Guzzi sidecar, containing 3pcs of 12V/140Ah, feeding pair of Tannoy small Reds, one front, second back

worth a try - replace 4N35, check resistors connected to it
if that isn't helping, remove mosfet and check it with simple matching jig
all in hope that VFet is ok, and fact that you can vary output node voltage is implying that, same as that biasing parts are OK
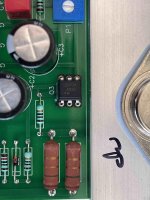
just to amuse us, post proper macro pic of Dodo channel pcb
Hi, I've replaced the optocoupler and socketed it. No change in measurements or performance. Next to change the MOSFET but they're hard to get so will take a few days.
pics
pics
Attachments
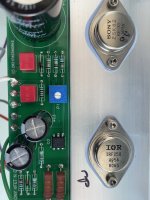
mosfet - test it first
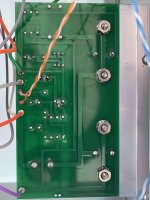
or place any of IRFP N channel you have around, just slab it somewhere on heatsink with any insulation pad and connect with wires to pads
IRFP150, IRFP 240 will do the job
edit: you can revisit some of these solder joints (trimpot)
especially gray wire from beneath looking fishy, even if from upper side it looks fine; certainly is just ugly but still functional ..... but avoiding ugly in soldering is good practice - leading to higher level of reliability
Last edited:
I got off Topic with Internal Combustion Engine Banter
VFet N-Channel Update:
I believe I have found my audio nirvana.
Decades of messing around, countless dollars spent,
and a closet full of audio gear, here I am.
The lucky recipient of a "simple" ~10 WPC class A toaster.
My Goodness, this thing is special.
John Lee Hooker with Carlos Santana playing as I type this makes me smile.
Last edited:


try direct to a dac ....pc volume
The only other preamp I have is Schiit Saga S, which is passive/buffer which I might try, but I think the amp needs a little gain help.
I wonder what the wrench was used for (on top on Luxman).
Right before I hooked up the interconnects, I noticed one of the RCA jacks was loose. Don't want to cause any unnecessary noise out of my Yamaha NS1000, those drivers are hard to replace.
The only other preamp I have is Schiit Saga S, which is passive/buffer which I might try, but I think the amp needs a little gain help.
I think you can run the Saga as a normal preamp, with gain.
- Home
- Amplifiers
- Pass Labs
- DIY Sony VFET pt 2 (N-Channel Build)