a model railway shuttle controller.
led flashed but relay didnt click.
missed soldering one of relay coil pins.
led flashed but relay didnt click.
missed soldering one of relay coil pins.
An utterly crud battery charger of the sort branded with many names, Ohlsen for one, a solid European sounding name for a Chinese built smart charger. The thing has but one switch, a mode button. It will fail and require attention with solvents or replacement with something equally poorly made. So it was that I spent 40 minutes of my life replacing a failed switch with a just as poorly built switch. 40 minutes never to be returned to me. Buy cheap buy twice is a poor throwaway, it should be buy cheap, get extremely frustrated at your tight fisted stupidity and doubt your own sanity.
FINALLY got around to replacing the faulty Varactor in a Pioneer TX-710L tuner (I think it's officially a 710-2). The replacement part avialable was electrically equivalent but in SMD so I used an adapter board.
Doesn't look too out of place IMO.
It needs an alignment but, seems to work okay and no silliness so far... I'll test it for quite a bit longer before I call it a day, however, having been fooled before by this stubborn thing


Doesn't look too out of place IMO.
It needs an alignment but, seems to work okay and no silliness so far... I'll test it for quite a bit longer before I call it a day, however, having been fooled before by this stubborn thing
Easy one this morning, technically not a repair. I recently got 2 42" flatscreens off online classifieds for free to try to fix.
The 1st one, a Samsung LCD looks like it is a goner, both image and menu are polarized, not worth buying parts IMHO.
The 2nd one, an ancient Daytek plasma of a weight I did not know flatscreens could achieve, didn't power up, as described in the listing. A minute amount of Googling revealed that Dayteks have TWO power buttons, one being like a main breaker that has to be closed. 😎
repaired my pcbcad software.
i created a quad package and after i routed pcb i noticed pin was on left hand side when it should be on lower side.
so added option for pin 1 to start on any side.
i created a quad package and after i routed pcb i noticed pin was on left hand side when it should be on lower side.
so added option for pin 1 to start on any side.
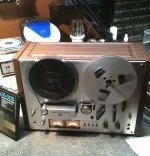
Just finished up an overhaul of my Akai GX-4000D tape deck.
She plays just fine, runs like a champ, good solid built machine.
Can't tell any difference with my ears OR my o'scope between source or tape.
This was likely the most popular model that Akai ever made.
She plays just fine, runs like a champ, good solid built machine.
Can't tell any difference with my ears OR my o'scope between source or tape.
This was likely the most popular model that Akai ever made.
Attachments
FINALLY got around to replacing the faulty Varactor in a Pioneer TX-710L tuner (I think it's officially a 710-2). The replacement part avialable was electrically equivalent but in SMD so I used an adapter board.
Doesn't look too out of place IMO.
It needs an alignment but, seems to work okay and no silliness so far... I'll test it for quite a bit longer before I call it a day, however, having been fooled before by this stubborn thingView attachment 869884View attachment 869885View attachment 869886
That is a great repair, I'm curious to know how did you diagnose that the Varactor was the problem? The obvious seems that it didn't change between stations, but would like to know the symptoms it experienced.
My son’s Sennheiser HD407 headphones (for about the third time).
They’re only something like £30 new but why throw them out when the cable rips off the driver as you snag it on something? Plus it’s a few minutes fun and satisfaction for me.
When getting in to resolder wires, I found the ear foam disintegrated - he will never know that he now has the best audiophile quality green Scotchbrite scouring pad inside those plush ear covers!
It would intermittently make an awful noise and the frequency would jump around.That is a great repair, I'm curious to know how did you diagnose that the Varactor was the problem? The obvious seems that it didn't change between stations, but would like to know the symptoms it experienced.
Then it would behave itself for a while again.
Ultimately, it was a process of elimination and there was almost nothing else left, safe to say I had less hair at the end than when I started... Thread here:
Pioneer TX-710L / TX-710-2 FM tuning problems
Pioneer TX-710L / TX-710-2 FM tuning problems
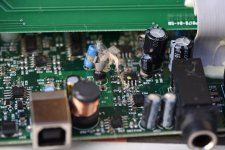
My Focusrite 2i2 1st gen.
It stopped working after I accidentally shorted the phantom power when working on the phantom powered electret circuit I have been playing with. It was still recognized by the computer but there was no output or input.
voltages seemed a bit low (should be 5V and 3.3V) but was around 4.6V and 3V. Thought it may be a power supply problem. found that the analogue circuitry and the cmos switches were working fine but inputing a 1Khz sine wave from another sound card and tracing the signal with the scope. signal got to the ADC and stopped.
I emailed focusrite (they have lifetime support) to ask about possible issues with the power-supply, and told them what I had done (shorted phantom power) and the troubleshooting I'd. They said "sounds like the codec, do you think you would be able to replace it if we send you one?" Note that this is a sound card that I bought about 7 years ago! I have to say I am completely blown away by this level of customer service.
I tentatively said yes, having never desoldered any soic SMD chips before, and they shipped me a new cirrus logic chip.
I ended up buying a hot air station for $139.00 figuring I'd use it in the future as I will be doing some smd stuff. I first tried desoldering on an old motherboard, with the soldering iron, and managed to damage the board in the process, which is what made me decide to get the hot air station.
I desoldered the chip last weekend, 1st pic (did manage to lift one pad, but it was a no connect thankfully)
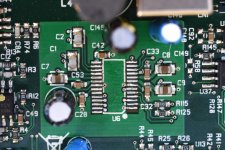
Today I cleaned up the pads with some flux and my normal 3mm sodering iron tip 2nd pic.
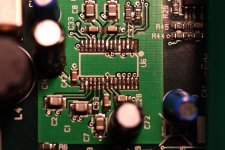
Then I carefully put a tiny amount of solder paste on the pads, placed the chip and heated with the hot air gun.
Well it went ok except for the solder bridges 3rd pic.
So trying to blow hot air on those heated up the nearby electrolitic which went bang 4th pic. It also lifted another no connect pad which was under one of the pins with the solder bridge.
In the end I got rid of the solder bridges with some desoldering braid, but I had a problem in that I didn't know what value the cap was. So I looked up the datasheet and the example circuit had a 47uF. I had a 47uF 50v (way higher voltage than needed) nichicon muse cap so I replaced it with that.
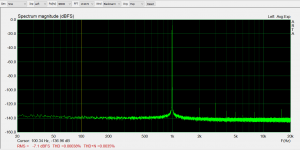
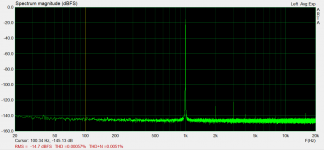
Plugged it in and it works again! 🙂 It may even have a lower noise floor and distortion than it did before the repair. Not 100% sure on that, but I don't remember getting under 140db on the noise floor before.
So all in all I'm pretty pleased as this was my first SMD repair.
edit: added loopback test. First one is with ARTA calibrated and -7db out, and input level adjusted to give as close to -7db as I could get. -7db seems about the sweet spot for lowest distortion.
last image is with the input level dropped approx 8db which gives a bit better noise floor.
Tony.
It stopped working after I accidentally shorted the phantom power when working on the phantom powered electret circuit I have been playing with. It was still recognized by the computer but there was no output or input.
voltages seemed a bit low (should be 5V and 3.3V) but was around 4.6V and 3V. Thought it may be a power supply problem. found that the analogue circuitry and the cmos switches were working fine but inputing a 1Khz sine wave from another sound card and tracing the signal with the scope. signal got to the ADC and stopped.
I emailed focusrite (they have lifetime support) to ask about possible issues with the power-supply, and told them what I had done (shorted phantom power) and the troubleshooting I'd. They said "sounds like the codec, do you think you would be able to replace it if we send you one?" Note that this is a sound card that I bought about 7 years ago! I have to say I am completely blown away by this level of customer service.
I tentatively said yes, having never desoldered any soic SMD chips before, and they shipped me a new cirrus logic chip.
I ended up buying a hot air station for $139.00 figuring I'd use it in the future as I will be doing some smd stuff. I first tried desoldering on an old motherboard, with the soldering iron, and managed to damage the board in the process, which is what made me decide to get the hot air station.
I desoldered the chip last weekend, 1st pic (did manage to lift one pad, but it was a no connect thankfully)
Today I cleaned up the pads with some flux and my normal 3mm sodering iron tip 2nd pic.
Then I carefully put a tiny amount of solder paste on the pads, placed the chip and heated with the hot air gun.
Well it went ok except for the solder bridges 3rd pic.
So trying to blow hot air on those heated up the nearby electrolitic which went bang 4th pic. It also lifted another no connect pad which was under one of the pins with the solder bridge.
In the end I got rid of the solder bridges with some desoldering braid, but I had a problem in that I didn't know what value the cap was. So I looked up the datasheet and the example circuit had a 47uF. I had a 47uF 50v (way higher voltage than needed) nichicon muse cap so I replaced it with that.
Plugged it in and it works again! 🙂 It may even have a lower noise floor and distortion than it did before the repair. Not 100% sure on that, but I don't remember getting under 140db on the noise floor before.
So all in all I'm pretty pleased as this was my first SMD repair.
edit: added loopback test. First one is with ARTA calibrated and -7db out, and input level adjusted to give as close to -7db as I could get. -7db seems about the sweet spot for lowest distortion.
last image is with the input level dropped approx 8db which gives a bit better noise floor.
Tony.
Attachments

Last edited:
Well done sir! That's quite a task for your first SMD repair.  And very nice of Focusrite to sent you the chip.
Good results with noise at or better than before the repair.
And very nice of Focusrite to sent you the chip.Good results with noise at or better than before the repair.
Well done! Spectrum is fine too.So all in all I'm pretty pleased as this was my first SMD repair.

Started repairing my steering wheel today.
The result is far from perfect, but much better then worn out leather with holes in it.
The result is far from perfect, but much better then worn out leather with holes in it.
Attachments

Last edited:
Thanks Pano and VovK Z 🙂 Yngvejos, nice job! It looks more professional than my seat repairs I have done in the past!! 🙂
Tony.
Tony.
Finish the stitching and it's a nice wheel... E90?
Thanks. It belongs to my E87 118d. M-Sport. I recently sold my E91 325i, so now the E87 finally get some love. 😉
Wintermute: thanks. 🙂
A replaced the spigot on the kitchen sink. What should have been an easy and pleasant 30 minute jib turned into over 3 hours of cursing and swearing, with almost every tool I own strewn about the kitchen floor.
The old spigot flange under the sink had corroded and refused to unscrew. The screw heads stripped out, so I took to tying to the collar/flange spin by driving it around with a hammer and large screw driver. It didn't budge a millimeter. Hot air gun, WD-40, penetrating oil, channel lock pliers, nothing would move it. After a trip to the hardware store to buy a vise-grip plier (I thought I owned 3, but no) I managed to break off the screws. At the that point there was nothing left to do but try to drill the collar apart. No way to get a grinder in there, it's too tight a space. The drill worked and I was able to bang the stupid thing out.
All the threads of the new spigot are all liberally coated with silicone grease in the hopes that corrosion will not lock this one in.
I'm sure you've all had simple jobs like this that turn into a nightmare. 🙁
Almost every repair job around this 80 year old house was a nightmare along with uncontrolled cursing.
- Home
- Member Areas
- The Lounge
- What did you last repair?