Hi wiseoldtech,
Up here in Canada, those Adcom amplifiers don't seem to have that problem. I have only ever seen one with the fan kit installed and I was authorized warranty for that brand.
Location, location, location.
-Chris
Yes hi Chris.
That's because the fan kit was optional.
The one's I've serviced all had hot spots on the board and thus cracked solder too.
While I'm on here now - after re-installing that damn Win10 again, it's gonna be a long haul.
I've had to literally re-install the OS on my new hard drive, and slowly re-install all my programs - that will take days/weeks surely.
I gave up on that "clone" program.
And the damn server won't take my product key for some reason now, (error code 0x8007232) so I gotta look at that "activate windows" thingy in the lower right corner now.
This crap is exhausting!
PLUS.... the MB (Asus P5LD2) isn't seeing one of my Pata CD drives for some reason.
I've got C, D hard drives, a Sata CD/DVD drive, but I want to copy disks later on.
I've been pulling my hair out!
W10 should activate automatically (for just an HDD swap anyway) as the key is held by MS on their servers and recognised automatically during clean install. If it doesn't (for example you've swapped more stuff making the PC unrecognisable from a hardware perspective), then you'll have to try phone activation and/or plead your case to MS. HDD and RAM swaps should certainly be no issue though.
Just enter 'I do not have a key' during the clean install.
Just enter 'I do not have a key' during the clean install.
In Linux there is no OS activation requirement; you only have to download an installation image, boot that image, and let the installer do its work for you. If you want more software you can add that later on once you have your OS configured to connect to an authorised mirror. Packages, software, are downloaded using a secure connection. On a Debian system, users do not need to search for third party sites to download their software from; Debian has its own official mirrors. Package managers do the dirty work of keeping track of what needs to be installed and what is no longer required. Users only need to issue commands either through a graphical front end or through a terminal.
I have been using Debian since 2007; no more headaches about having to scan for viruses, and having to wait for updates to complete.
The downside of using Linux is software is often not matured, in other words, it is often under-debugged. There is also the issue of device drivers not being available for Linux.
My last repair/refurb was this; my customer required the same configuration as the Shadows used in 1964 so I did as requested and added independently switched and adjustable regeneration controls for all four heads. The original had the slide switch for double speed, now any configuration is available including the original configuration.
Attachments

Thank you, Wiseoldtech. I had rebuilt the relay circuit a few years back, but the relay contacts weren't great even back then. The relay is energized when the preamp is on, as you know, so after ~35 years, these have been operating for many, many hours.
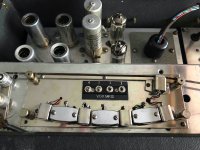
The Adcom 555 II I am working currently had several overheated areas on the board at the VAS and pre-driver transistors, which were also failing. They were bad enough to cause the traces to lift from the circuit board. This unit had been in an enclosed wall cabinet with no ventilation for years when I bought it. I'm using good-sized heat sinks for the transistors on the board I just populated. The other 555 II amps I've worked on have had some indications of excessive heat, but nothing like this.
The Adcom 555 II I am working currently had several overheated areas on the board at the VAS and pre-driver transistors, which were also failing. They were bad enough to cause the traces to lift from the circuit board. This unit had been in an enclosed wall cabinet with no ventilation for years when I bought it. I'm using good-sized heat sinks for the transistors on the board I just populated. The other 555 II amps I've worked on have had some indications of excessive heat, but nothing like this.
On the Holman preamps - the pull-in voltage on the relay becomes weak due to the circuitry involved.
Bad caps, etc., contribute to the issue.
I've done those relay overhauls on them, and gave the relay a bit more "kick" to close.
The Adcom 555's, unless they have the cooling fan option, tend to overheat the driver board.
I had to custom build a small quiet fan system inside, after adding heatsinks to the drivers and doing a restoration on the amp.
I wouldn't consider bending a pcb (making the bga contacts work again) in a 46" samsung tv a repair, but it made a free TV from the neighbours next door which were quoted a 400 euro repair and had dumped it... Call it a dirty fix
Rebuilt and improved a Marantz 2285B. It took about 16 hours of work, but now the unit exceeded the expectations of the owner that requested this work. Personally, I am very happy with it's performance.
The owner of this 2285B has another one. He is requesting that I do the same thing, but to go further with the improvements. Sadly, this is possible to do and I fear we have reached the point of diminishing returns. Another person brought in a Marantz 2265B and requested the same service. Because it is very close to the 2285B in design, I can do this.
-Chris
... Levinson No. 27 amp... got left channel working beautifully, but right channel was dead.
Got the Levinson finished up on New Year's Day, and have been using it almost continuously throughout each day since. Sounds fantastic; this was very satisfying, being complex to work on. The effect of different preamps is more pronounced with this amp than my other amps. I've found it sounds best with my preamps with more gain and a little more midrange, like the Audible Illusions tube pre in the photo.
Attachments

Hi Chris,
I also believe that the going into the "law of diminishing returns" on some things is a bit over the top.
Marantz, others, have built their equipment to a certain price point, and yes, in some cases, certain improvements can benefit the additional time expended on these.
However, I've seen an increasing amount of people, mostly people who've curiously scanned the internet sources/blogs, and now insist on making their equipment "soar to new heights" because some blasted guru somewhere said to do it, for that "ultimate satisfaction".
It's gotten annoying, and at times those customers act like they know more than me, becoming insistant that I follow some internet guru's advice.
Most of the time, I don't know the guru's qualifications, or background, let alone their education.
These customers could be taking some 14 year old "whiz kid" advice for all I know.
But listen, after being in the business for 45+ years, and being openminded and flexible, I am not one to bow to such pressure.
I know what I know, ........period.
Hi wiseoldtech,
There are some solid benefits from improving equipment to a point. On one hand, you are erasing years worth of decline, then you can make certain circuit changes and component optimizations that really improve the sound quality both audibly and measurably. I have my mix of methods that do improve equipment for real. It is also true that some equipment simply can't be improved very much. They will always deliver sub-par performance no matter what you do. This is likely due to a combination of poor circuit design and haphazard circuit board layout.
From my own viewpoint, there is enhanced pleasure listening to equipment that sounds better. Most of my own equipment has been improved through the same methods I use on working on someone else's equipment. I tend to go further on my stuff - because I can and it doesn't have as great a cost to me. It is also a hobby to do this. But everything I do is based on solid engineering.
-Chris
What did you last repair??
Closet light.
I built it. I broke it. Nobody else is gonna fix it.
This really belongs in the "Terrible electr(on)ic jokes" threads. When we re-did the kitchen, laundry, bathroom, we had a vertical pipes, ducts, and wires clump which didn't want to fit in any of the walls. And we found this lovely 15-inch louver door at ReStore. So we got a broom closet. Very tiny. And dark.
Today I put something in the closet and the light flickered. I beat the door frame and it flickered. I got the stool to play with wires above the housing, it flickered. I tugged, and the light quit.
OK, bad splice. No way to reach the splice box (yes, a code violation). Gotta drop the housing. There's laws about lights in closets, from days when incandescents started fires in over-packed closets. So I had this massive housing mounted to the door header. Which it wasn't made to mount to. And that was some years back. How did I do that? Overhead work through a door narrower than my shoulders. And for another good reason I am very grumpy.
Well, I found where I had "cleverly" put screws through the housing where Halo never intended. And put together enough extension to reach them. After taking all the guts out of the housing. And dropping the screws among the closet clutter.
Found the loose black wire and an empty hole. Hate the Halo junction boxes. Get the housing back roughly in place. A little crooked, oh well. Over the years I had replaced the incandescent with a cool LED fixture, so I left most of the can-guts out. Works now. Not proud.
PRR........
Have you ever heard about Mr Beams stuff?
I've got a narrow coat closet in the living room by the front door.
At times, particularly at night, I always had issues finding stuff without some light.
Sure, I could go and get the trusty Mag Light flashlight from the kitchen pantry, but eventually got one of these neat LED things....
As soon as I get near the louvered door or open it, this light comes on, stays on for 30 seconds (or 60 seconds if set that way) after all movement stops near it.
It's great!
So are the other Mr Beams products. (check their web site)
No wiring!
Bright!
Batteries last a long time! (mine are over three years old)
Attachments

I bought something similar from China. Works the same way and uses LEDs.
Wonderful stuff available these days. You couldn't make it for anywhere near what they sell it for.
In our closet, we asked the electrician to put in a light during an early walk through. It's pretty handy. I'm reasonably sure it is done to code. But you're never 100% certain unless you inspect the work, or do it yourself. He did a pretty neat job (saw it while I was running my own wires - with permission).
-Chris
One of my normally cool-running LED lamps failed, with brown discolouration at the lamp base indicating considerable heat before failure....a cool LED fixture...
It may have been an anomaly, but I think it's just as well to assume that an LED fixture might in fact get hot if things go wrong, and plan fire safety accordingly.
In the past, I've had the same thing happen with previous-generation "coily" compact fluorescent bulbs. Evidently the switching electronics in the lamp base can get pretty hot before failing completely.
-Gnobuddy
Yes, I've seen the same thing. I can tell you from unscrewing a failed lamp that they get very hot.
-Chris
-Chris
PRR's story reminded me of another recent repair. A friend had six identical LED light fixtures in his garage, the kind that replicates the size and appearance of old-fashioned four-foot-long fluorescent "tube" lighting. One of the six fixtures died, and that particular design was no longer available; buying a replacement would mean one fixture would no longer match the appearance of the other five in the garage.
So he brought the dead LED lighting fixture to me, and we investigated it together. The light comes from a long flexible plastic strip festooned with white LEDs. There is a small internal switching power supply that powers them, and this SMPS was now dead.
I figured there was zero chance of repairing or replacing the original tiny SMPS, but if I could figure out the power requirements of the LED strip, I could design a conventional 60 Hz power supply for it.
Without an identical working fixture to compare with (my friend lives 45 minutes drive away), we investigated the LED strip. It turned out there were four parallel strings of 24 white LEDs each. In series with this group was a second group of LEDS, this time three parallel strings of 19 LEDs.
The original power supply had three output wires, running to the two ends and the junction of the 24 and 19-LED strips respectively.
By careful probing with a bench power supply and series resistor, I found one LED lit up brightly with about 7 mA through it, and dropped about 2.75 volts across itself.
Now we could deduce that the original power supply would have produced two outputs, about 66 V DC current-limited to 30 mA, and about 52 V DC, current limited to about 23 mA.
Looking at the layout, I thought I could simplify the power supply considerably by simply providing about 120 volts DC, end to end across the entire (24+19) LED strip, current limited to about 30 mA for the four-in-parallel LED section.
The catch would be that the three-in-parallel 19-LED section would then run brighter than the rest of the LEDS. To avoid this, I decided to simply parallel a resistor across the three-in-parallel, 19 LED section, so that roughly 7.5 mA went through the resistor. With the resistor in place, every LED in the entire fixture would be running at the same current, about 7.5 mA. This meant they would all light up with the same brightness.
The space available for the power supply is tiny (less than an inch wide and an inch high, but up to several inches long.) With current draw so low, and the power supply permanently enclosed in a grounded metal enclosure, I proposed we forego an isolating transformer. My friend has considerable experience with AC power (and several electrical certifications), and he was okay with this, so I proceeded.
I then used LTSpice to design a simple half-wave rectifier, running directly from 120V AC (via a fuse). A series resistor keeps inrush current low, an 1N4007 diode and a pi-filter with big value resistors and a couple of 100 uF electrolytic caps rectifies and smooths ripple before feeding the LEDs with a more-or-less constant current source of about 30 mA DC.
After a few days wait to get the parts, I built a quick prototype on a small piece of protoboard, and it worked well. So I built a second one, on perfboard, this time squeezed down into a space slim enough to fit inside the light fixture. I bench-tested it, then packed it all up and my buddy took it home. All he has to do is mount it in the housing, and connect up the external pull-chain on/off switch.
This was quite a satisfying repair. My 60 Hz power supply is certainly less efficient than the original SMPS would have been - but power consumption from the wall outlet is just a few watts, we kept a perfectly usable light fixture out of the landfill, and my friend got to keep his matched set of six shop light fixtures. 🙂
-Gnobuddy
I've had those CFL bulbs, and the plastic bases discolor, turn brownish from the heat.
I never liked them.
I'm much happier with the LED versions - Philips seem to be the ones to get - they last and last.
The cheap brands don't last - Feit Electric, etc.
I never liked them.
I'm much happier with the LED versions - Philips seem to be the ones to get - they last and last.
The cheap brands don't last - Feit Electric, etc.
Okay! So at least three of us have seen CFL and LED bulbs get quite hot before failure. Definitely plan for the possibility, then, and make sure nothing combustible is nearby.
-Gnobuddy
-Gnobuddy
I
The cheap brands don't last - Feit Electric, etc.
Interesting that the authorities in the states haven't investigated the bulb manufacturers for fraud. They are labeled "for life" and fail after about 18 months. The only ones we haven't had an issue with are Cree and Phillips, but all else seem poorly designed.
- Home
- Member Areas
- The Lounge
- What did you last repair?