NO.Thank you,
I have to make it work after all the time and energy spent on it.
Is it advisable to put corner brackets in speaker box to make it sturdy?
Something like this
https://www.lowes.com/pd/Hillman-3-in-Steel-Zinc-Plated-Corner-Brace/4461065
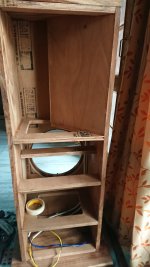
Glad to read that you're not fastening the solid wood front baffle to the sides, and are leaving it 'float' at the edges. People tend to discount how much wood can move with humidity changes - something the early cabinet makers knew.Left Speaker - All pieces cut except back panel and three 2.5 inch braces. Back panel will also be screw mounted using gasket.
- Maybe glueup tomorrow.
- Using double baffle, one is recessed 3/4 plywood. Front one is 1 inch thick hard wood and is as per design, will be attaching centre of front baffle to recessed baffle permanently using glue and dowels, away from centre using bolts to allow for wood movement of 1 inch thick panel. 1 inch thick panel will not be attached to side panels as front baffle will expand/contract and rip the side panels. That's is what I understood about wood movement.
- Few days gap, then driver cutouts, wiring.
- Will be using rubber paint to seal cabinet.
- Back panel and the onto right Speaker Front, back, most pieces are already cut.
Thank you
But why no bracket, though I have used like 13 5/16 dowels in total(all sides combined) to attach box to base, but I wanted to use one steel bracket at center of front baffle only that will firmly hold the box to base.
But why no bracket, though I have used like 13 5/16 dowels in total(all sides combined) to attach box to base, but I wanted to use one steel bracket at center of front baffle only that will firmly hold the box to base.
One bracket at centre of baffle to base should be okay. I misunderstood, and thought you were putting a metal bracket at each corner.
Hi Everyone,
The SB acoustics speaker drivers already have some spongy stuff on its back side from the manufacturer, is that a gasket or I need to add additional gasket tape?
The SB acoustics speaker drivers already have some spongy stuff on its back side from the manufacturer, is that a gasket or I need to add additional gasket tape?
That is a gasket. Depending on how flat your (recessed) baffle is, it mostly is enough.

Hello Everyone.
I read somewhere on this forum that 3/4 roundover is of no use on baffle.
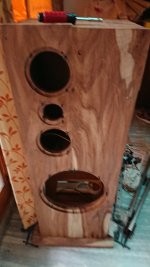
Is it mandatory to do 1 inch roundover on sides and top of baffle?
If yes why, what's the logic behind this.
Thank you
Update
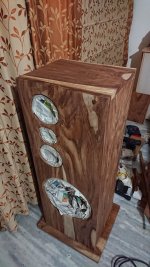
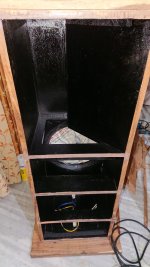
Rubber paint done, used reinforcement cloth with rubber paint to seal gap between front(1 inch floating) and recessed(3/4) inch baffle where drivers are to be mounted and the top cover of the MTM section.
Sanding started, then finish with tung oil and maybe beeswax or shellac on top.
After that mounting of driver, crossover and testing(1-2 weeks).
I'll be using ceramic wool for sound absorption. Will start test without wool and add gradually.
Gasket on back side to mount back panel with screws. I want back panel to be floating so I can make modification to interior easily.
The is only left speaker, right speaker building in parallel
I read somewhere on this forum that 3/4 roundover is of no use on baffle.
Is it mandatory to do 1 inch roundover on sides and top of baffle?
If yes why, what's the logic behind this.
Thank you
Update
Rubber paint done, used reinforcement cloth with rubber paint to seal gap between front(1 inch floating) and recessed(3/4) inch baffle where drivers are to be mounted and the top cover of the MTM section.
Sanding started, then finish with tung oil and maybe beeswax or shellac on top.
After that mounting of driver, crossover and testing(1-2 weeks).
I'll be using ceramic wool for sound absorption. Will start test without wool and add gradually.
Gasket on back side to mount back panel with screws. I want back panel to be floating so I can make modification to interior easily.
The is only left speaker, right speaker building in parallel
Attachments
Last edited:
Any bevel or roundover is better than a sharp edge. If 3/4 inch roundover is what you can do with your situation, then do it. Of course a huge 2 inch radius would be better, but we do what we can.I read somewhere on this forum that 3/4 roundover is of no use on baffle.
Is it mandatory to do 1 inch roundover on sides and top of baffle?
Thankyou
What happens with bigger radius?
Where can I find a 2 inch radius router bit?
I didn't know about the radius thingy, bought 3/4 in radius bit, which is costly. Have to sell this one before buying 1 inch bit.
What happens with bigger radius?
Where can I find a 2 inch radius router bit?
I didn't know about the radius thingy, bought 3/4 in radius bit, which is costly. Have to sell this one before buying 1 inch bit.
Last edited:
I think you'll be fine with the 3/4". I hope your router has a speed control so you can slow it down. Full speed with a large diameter bit is dangerous.
I'd believe the only way you could get a 2" bit would be with a shaper, not a router
I'd believe the only way you could get a 2" bit would be with a shaper, not a router
I believe this is true. The largest roundover router bit I am aware of is 1.5" radius. I have one, and it is a beast. I must be used in a 2.5+ HP router, mounted in a router table, and a speed of 10,000 rpm max.I'd believe the only way you could get a 2" bit would be with a shaper, not a router
https://www.diyaudio.com/community/threads/new-active-satori-textreme.366347/post-6512046
https://www.diyaudio.com/community/threads/purifi-waveguide-project.394174/post-7333484
Running this very large bit is my least favorite activities in woodworking / speaker building. But it is the only practical way to generate a large radius roundover...
As the edge radius gets larger, the high frequency diffraction ripple gets smaller.What happens with bigger radius?
Thats alof of metal spinning at high speed. I'd hate to see that size of bit come apart if it suddenly hits a hard piece of material. You almost need body armor to protect yourself from that sort of failure.
1 1/4" roundover bit with a large router was a bit hairy used freehand with a large piece of baltic birch attached the bottom of the router. Yeah, it would scare a lot of people that aren't used to using a router. Multiple passes are a must with a large bit like that.
It's probably too late now, but a chamfer provides arguably better diffraction control and is potentially easier to implement than super-sized router bits, eg:

Doesn't look as attractive compared to a large round over, but gets the job done. Certainly much easier to implement. I just don't like the sharp angled look.
- Home
- Loudspeakers
- Multi-Way
- SB 12.3 Speaker build (Very very very slow build) :D