If nothing works out, I'll do the same. Use dowels for stability and fill the gaps between edges.I made my own router table with the router bolted underneath a board and the bit sticking out through a hole. I used a bit of aluminium as guide. I also had a circular saw that fit under that. I made an entire 4.35 m boat and all the furniture for the house with that one back in a little island where I didnt have easy access to good workshop tools. I did all the fine work with a stanley hand plane. I had a power planer but the hand tool did a neater job
What wood are you using, is that mango? I hate joining edges of solid wood panels. Even if you get the initial edge perfect, the wood itself will twist it out of shape. Maybe you can cheat? I have a pair of solid birch boxes that I totally forgot to acount for edge when planning cuts and now cant bear to use the finished boxes due to glueing it edge to edge insteat or 45 degree beveled edges. The 20mm wide edges look really bad. I will be running a shallow bit along the seam and back fill it with marbled epoxy to disguise the seam line
I am not a pro woodworker, just diy person who wants to try one wood project coz of how beautiful wood grais are.
Its Sheesham wood(Indian rosewood), that is what I asked for, I always have some doubts though if its real Sheesham 😀, but the grains are nice.
You don't really need to be a pro woodworker to justify having a decent router table. Many, if not most, DIYers here have one and use it on a regular basis. It's one of the very basic tools you need to build just about anything using real wood. Unless, of course, you have good hand tools and the skill to use them effectively instead.
I would make a straight edge and buy a suitable circular saw blade (in lieu of not having a table saw).
my last speakers I was able to joint together very successfully buying some skirting molding (dead straight from factory) and making a straight edge by screwing that to some thin ply then cutting off the excess running the circular saw along the molding.
By clamping your work piece to the bottom, I got a very straight edge / square edge. you need to ensure your circular saw blade is 90 degrees. I used 2 quick / set squares and both side of the blade to get it near perfect 90

Agree on that, but there are many variables.You don't really need to be a pro woodworker to justify having a decent router table. Many, if not most, DIYers here have one and use it on a regular basis. It's one of the very basic tools you need to build just about anything using real wood. Unless, of course, you have good hand tools and the skill to use them effectively instead.
Space is one. I don't have a workshop, all the stuff is placed into corners where there is shade. I have a drill press that sits outside in a corner, all small tools are inside. So I can't have tools that take up space. I thought the Router/Circular saw sled would be able to accomplish jointing and other tasks, but I couldn't make it work. Its perfect for milling the flat side though. I'll dispose off the sled and then build a proper router table.
I think you'll get good use out of a small router table. If you don't want to bother building one yourself here is a small Bosch model for only $219 US. Just add your router and you're ready to go.
https://www.amazon.com/dp/B000H14DLY/ref=syn_sd_onsite_desktop_0?ie=UTF8&psc=1&pd_rd_plhdr=t
https://www.amazon.com/dp/B000H14DLY/ref=syn_sd_onsite_desktop_0?ie=UTF8&psc=1&pd_rd_plhdr=t
Last edited:
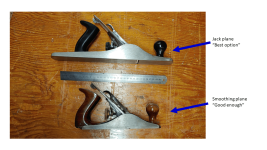
This would be the first thing I would try. A small level of waviness at the glue-line can be corrected with a hand plane. it is not fast, but it works. Professionals no longer do it this way, because time is money, but a decent hand plane is not expensive, and it is fairly fool proof. The right tool for this is called a "Jack Plane" and has a length of 15 to 18 inches. A shorter 12" plane "Smoothing Plane" can be used. Don't try it with a small block plane.when using wood, I find that I can apply fine control with a simple stanley handplane.
Clamp the pieces together, and with a pencil, mark the spots with good contact. These are the high spots to be shaved down. Then separate them and shave a bit off of the high spots. Repeat the process over and over until a tight fit is made.
It is very important that the plane blade is very sharp.
I never liked using a router for this kind of work. If I did not have a table saw, I would use a hand held circular saw with an straight edge (preferably an aluminum straight edge), and then finish the jointed edge with a hand plane.
j.
Just curious, what imparticular do you not like about using a router table? Seems that for many of us it is actually the preferred tool for creating a smooth straight edge for panel joinery.
Of all the power tools I use regularly, I dislike the router the most. It is very hard to control the dust. It is louder than any other power tool. Kickback is far more likely with a router than with any other tool... I have never had a serious injury while wood working, but every "near miss" I have had involved a router.
I try to minimize my use of routers to ONLY those tasks which require a router bit... Cutting the recessed circle holes for drivers, cutting circular holes in bulkheads, and applying a round-over edge. And I try to do those outside, so I don't fill my shop with fine dust.
I try to minimize my use of routers to ONLY those tasks which require a router bit... Cutting the recessed circle holes for drivers, cutting circular holes in bulkheads, and applying a round-over edge. And I try to do those outside, so I don't fill my shop with fine dust.
Silky flat faces and crisp edges the hands on way. All this done with hand tools, including splitting lumber to thinner planks using a hand saw


Thankyou.
About using hand plane, don't you need experience to use it correctly. I tried to plane with electric plane and created high and low spots.
First I am going to try this and then I'll try hand plane.
About using hand plane, don't you need experience to use it correctly. I tried to plane with electric plane and created high and low spots.
First I am going to try this and then I'll try hand plane.
You can probably find a good used plane. They are simple devices, and they never really wear out. Some of mine are at least 80 years old.
My Dad was a joiner/carpenter. He passed away when I was 12 and left behind chests full of hand tools, mostly Stanley. We moved to Australia soon after and makes me sad to think what would have happened to them. I had used a few for craft as a kid and knew all of his tools
Over the years have managed to build a collection of good hand tools. I use an Ezelap and sharpen to shave hair. I do use a lot of wood files to start off and finish off with a hand plane and sanding board. I like using Feast Watson sanding sealer between sanding and do a final wet sanding with metho and get a silky smooth surface without the plastiky feel of PU or epoxy finishes. I usually wax this using kiwi boot polish in either black, tan or brown and sometimes mix them up. The feel of the surface after buffing is something!
I have been suggesting the use of a router table, not a free-hand router, as the next best thing to a jointer for creating a smooth, very straight edge for attaching boards to one another.Of all the power tools I use regularly, I dislike the router the most. It is very hard to control the dust. It is louder than any other power tool. Kickback is far more likely with a router than with any other tool... I have never had a serious injury while wood working, but every "near miss" I have had involved a router.
I try to minimize my use of routers to ONLY those tasks which require a router bit... Cutting the recessed circle holes for drivers, cutting circular holes in bulkheads, and applying a round-over edge. And I try to do those outside, so I don't fill my shop with fine dust.
With a good router table using a fence with a vacuum attachment you can control most of the dust. Maybe not as well as with a hand plane, but not too bad either.
And with a good quality, sharp router bit and proper fence set up you can get essentially a perfect edge for board to board glue ups. I think even better than you can get with a hand plane where there is still a possiblity of carving a dip somewhere along the line. Particuarly on a long boards. Also I have trouble keeping a hand plane pefectly perpendicular to the board. That's not a problem, however, with a router table.
Last edited:
My take on router is, its a very useful tool and makes life easier but it needs to be handled with caution just like any other power tool which is why I use jig to hold it in place and sides covered in case bit breaks.
I like natural finishes(no plastics for me). Will be using pure tung oil and over it amber shellac finish.My Dad was a joiner/carpenter. He passed away when I was 12 and left behind chests full of hand tools, mostly Stanley. We moved to Australia soon after and makes me sad to think what would have happened to them. I had used a few for craft as a kid and knew all of his tools
Over the years have managed to build a collection of good hand tools. I use an Ezelap and sharpen to shave hair. I do use a lot of wood files to start off and finish off with a hand plane and sanding board. I like using Feast Watson sanding sealer between sanding and do a final wet sanding with metho and get a silky smooth surface without the plastiky feel of PU or epoxy finishes. I usually wax this using kiwi boot polish in either black, tan or brown and sometimes mix them up. The feel of the surface after buffing is something!
I have some router work coming up, so today went to look for a serious router table. Everything looked toyish! So I have decided to get my local metal shop to make on for me using a 50x200mm aluminium angle extrusion. They will have to use a 1 m length and cut slots to mount my laminate trimmer from underneath as well as the mounting holes. Simple and stable. I now just have to design the holes and slots in FreeCAD once it's reinstalled
I'm not sure what brands or models of router tables you have look at, but the ones I've seen do not appear to be toyish at all. In fact, they are quite serious looking. Have you looked at the ones from Kreg?
On routers, I recently upgraded my old craftsman to a makita. It’s a huge improvement. Also upgraded my flush cut and round over bits. I’m not saying you need to spend tons of money on new tools to get a nice finish. The investment really helped me.
Man, router quality can make or break you. I have owned my share of routers over the years. Funny thing was that some of the most popular ones were my least favorite. One that I wish that I still had was made by Bosch. Model was maybe a 1315 with variable speed. I have two Milwaukee's now, and no they are not my favorite either. Go figure.
I am enjoying reading this thread, especially when hand tools are mentioned. They can bring something to wood working that few power tools ever could.
I am enjoying reading this thread, especially when hand tools are mentioned. They can bring something to wood working that few power tools ever could.
The thing to always keep in mind about routers is that they are heavy, fast and the COG is high up. I went to laminate trimmers as I find the lighter weight is easier to stabilise. At one stage I worked for Creative Furniture in Sydney and manned the router and sanding tables. I actually left work in protest as they wanted me to cut my dreads. I can understand the safety concerns, so I looked into other jobs
When I say that the commercially made tables feel toyish is from the built-in features rather than the heft of the machine. Think very carefully about bad results. Imagine your sheet material being cut at 45 degree bevel, so everything can come together neatly. This means that every cut needs to have the "the same 45 degrees". But there is movement due to instability, and the manufacturers do not provide an indent at 45 degrees for the table saws either. Which means that every time you have to rely on a jig to get the angle. But the Jig needs to be held right, and a slight waver can make if off by a tiny degree. Not cool!
The other thing is that the router table blade can destroy ply edges with chipping. There is pressure built up at the cutting point with the material being forced between the fence and blade. I don't like the slasher way of doing things. For me, it's abrasive tools like sanding boards and tables. You can fully control how much material you are abrading off. A circular saw, router and angle grinder are my least preferred tools due to this
I'll give an example of what's possible with working with mostly hand tools and one drill, angle grinder, belt sander and DIY table saw. The main tools used in this project were hand planers, hand saws, sanding boards and a 9" Dexter Russel utility
https://www.facebook.com/media/set/?set=a.731462436942426&type=3
- Home
- Loudspeakers
- Multi-Way
- SB 12.3 Speaker build (Very very very slow build) :D