Warning: This is going to be a very slow build, I will not be held responsible if... 😀
Hello everyone.
Starting this thread, if someone else wants to make them. I wanted big driver in a sealed cabinet and this best suited my need. Also i wanted to build using wood.
This started two years back.
1. Lumber - Purchased in 2019 mid-late and has been drying for more than a year now.
2. Drivers - Purchased in 2019
3. Crossover - Except 7mH and 4mH all are DIY. Remaining components ordered. Will be assembling crossover soon.
Since i don't have a planer or jointer, I have built a router sled/saw jig to cut and joint lumber. Its made of 4040 profile with Linear guide on which i can mount router or circular saw.
Now i need some router bits which will take some time.
Last edited:
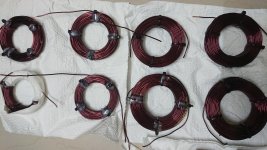
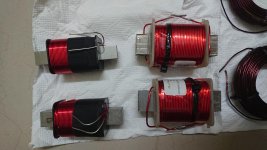
Inductors
Inductors for crossover.
At first it didn't go right so i gave up winding them by myself. Since i had already invested in enamelled copper wire roll, i gave it another try and I was able to get decent results. These were wound with hands. It would be even better if one has rotating axis or something. Checked the Inductors at 100Hz setting and values are close.
Attachments
Last edited:
Thank you for the link.
I'll be using drivers as per design. Only change i am thinking about is centered MTM which designer approves on his website.
I'll be using drivers as per design. Only change i am thinking about is centered MTM which designer approves on his website.
There is no such thing as a slow build. I bought drivers in 2007 and completed the build in 2018 😀
Your build takes as long as it needs to. Life and motivation get in the way. All the best!
Your build takes as long as it needs to. Life and motivation get in the way. All the best!

On one side slow build gives something to keep oneself busy but only problem is that some components deteriorate over time.
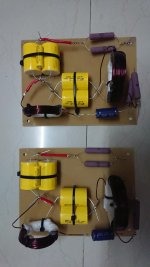
About the crossover
Tweeter crossover is ready. I thought caps bought from mouser would be smaller 😀 but I was wrong. They are big and high voltage(lower voltage wasn't available for all values required).
I have used one sided copper clad board just to support the weight of components as it will be hanging in air(Four steel threaded rods at four corners). Keeping resistors in air so they don't slow-roast the board.
Router bits ordered.
I can only start woodwork once I go back home and I am not sure when will that happen(maybe a few months).
Attachments
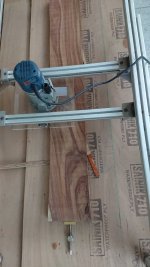
Flattened many panels, now I am stuck with Jointing panels. There is no wood Jointer available nearby.
Router sled with bit is not giving me a perfect seam to joint panels togethe, nor does circular saw.
Now I have lot of time to work on this project, thinking how to solve this problem.
Router sled with bit is not giving me a perfect seam to joint panels togethe, nor does circular saw.
Now I have lot of time to work on this project, thinking how to solve this problem.
Don't understand why router sled is unable to create a perfect edge for jointing panels together. It should be doable with a decent sled.
Maybe the vibrations in the frame as the router spins.
I can clearly see light through gap or even slide printing paper without any force applied. Looks bad.
I can clearly see light through gap or even slide printing paper without any force applied. Looks bad.
Yeah, looking at your picture again I can see where there could be a problem. What is it in that mechanism that actually guides the router?
Can you mount the router under a table and slide the wood forward along the exposed bit. Keep the router fixed and moved the wood along a guide
Its linear guide upside down, 1500mm rail mounted on a 4040 profile, acrylic sheet for router base.Yeah, looking at your picture again I can see where there could be a problem. What is it in that mechanism that actually guides the router?
Thank you Randy.Can you mount the router under a table and slide the wood forward along the exposed bit. Keep the router fixed and moved the wood along a guide
I don't have a router table.
I also tried electric hand planer, it did improve the seam but there is still gap. At some points the seam was almost invisible but rest there was gap.
I suspect that there is just too much play in that type of mechanism to do a good job of edge routing.
And I agree with Randy. If you want to do serious woodworking you need to have a decent router table. You don't have spend a lot of money on a fancy one. You can build a simple one yourself. That's what I did and it works fine.
Also look at this video to see how to set up an offset between the in-feed fence and out-feed fence to do edge routing with the table.
https://www.wwgoa.com/video/use-router-table-as-jointer-031871/
Last edited:
I made my own router table with the router bolted underneath a board and the bit sticking out through a hole. I used a bit of aluminium as guide. I also had a circular saw that fit under that. I made an entire 4.35 m boat and all the furniture for the house with that one back in a little island where I didnt have easy access to good workshop tools. I did all the fine work with a stanley hand plane. I had a power planer but the hand tool did a neater job
What wood are you using, is that mango? I hate joining edges of solid wood panels. Even if you get the initial edge perfect, the wood itself will twist it out of shape. Maybe you can cheat? I have a pair of solid birch boxes that I totally forgot to acount for edge when planning cuts and now cant bear to use the finished boxes due to glueing it edge to edge insteat or 45 degree beveled edges. The 20mm wide edges look really bad. I will be running a shallow bit along the seam and back fill it with marbled epoxy to disguise the seam line
What wood are you using, is that mango? I hate joining edges of solid wood panels. Even if you get the initial edge perfect, the wood itself will twist it out of shape. Maybe you can cheat? I have a pair of solid birch boxes that I totally forgot to acount for edge when planning cuts and now cant bear to use the finished boxes due to glueing it edge to edge insteat or 45 degree beveled edges. The 20mm wide edges look really bad. I will be running a shallow bit along the seam and back fill it with marbled epoxy to disguise the seam line
Thank you
I'll check it out.
I was thinking of using inverted planer as jointer for edges only but it again requies building a structure of some sort. BTW I am somewhere below a novice level 😀. I love DIY wood, metal, electronics and lot many things.
I'll check it out.
I was thinking of using inverted planer as jointer for edges only but it again requies building a structure of some sort. BTW I am somewhere below a novice level 😀. I love DIY wood, metal, electronics and lot many things.
- Home
- Loudspeakers
- Multi-Way
- SB 12.3 Speaker build (Very very very slow build) :D