You can indeed cut perfect 45 degree angles with a router table. That is certainly one of its strong features. You simply need to use a 45 degree Chamfer bit. Results will be a perfect fit . And even better yet use a Lock Chamfer bit and get not only a perfect fit, but also a miter joint with exceptional strength. You cannot do that very easily with hand tools, if at all.
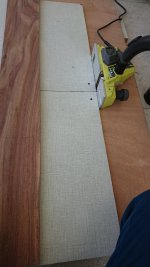
And you can cut perfect plywood edges with virtually no chipping whatsoever with a router table by simply using the appropiate bit. A good quality spiral upcut bit is generally the best choice for getting a smooth edge with no chipping on plywood.
Finally, you should never do a cut on a router table running the wood piece between the router bit and the fence. It will almost certainly rip the piece out of your hands and project it forward from the router table with great velocity. And potentially pull your hand into the spinning bit at the same time.
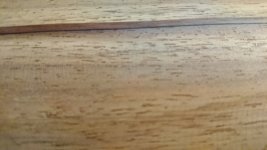
Good result, 75% length, there is almost no gap(can't put or slode a paper in between) at all except bottom 25%, maybe due to short length of the outfeed side of planer.
Will start glueup to make panels. Since I have only two bar clamps, will take few days.
Will start glueup to make panels. Since I have only two bar clamps, will take few days.
Attachments

Thank you.
Now 24hrs to dry.
One mistake I did, usually we finish all sides and then joint.I left some pieces unfinised/not same thickness. I will need to plane/level them with surfacing bit to make all sides 90deg and then make the final cuts on sides.
Now 24hrs to dry.
One mistake I did, usually we finish all sides and then joint.I left some pieces unfinised/not same thickness. I will need to plane/level them with surfacing bit to make all sides 90deg and then make the final cuts on sides.
Attachments

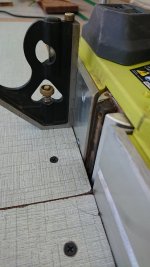
The lock miter bit mentioned by @classicalfan makes a very good right-angle joint. It is excellent for plywood/mdf or other sheet material which have a consistent uniform thickness. The joint must be cut with a precise bit depth and fence position, and this is determined based on the material thickness... If one sheet of material is 18.3 mm thick, and another is 18.7 mm, the setup will be different.
To anyone interested in this router bit, I highly recommend the setup tool which aids in exact positioning of the bit depth and router fence position.

To anyone interested in this router bit, I highly recommend the setup tool which aids in exact positioning of the bit depth and router fence position.

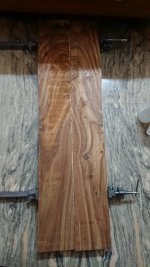
That is some very beautiful wood. I hope that it works well for you. Some of the hardwoods can be challenging. Come to think of it, I have a short hallway in my house that is solid (not veneer) 3/4" rosewood. Fortunately, it was prefinished when I got it. Leftover from a large flooring project.
Like this one, earlier I was thinking of dove tail using dark piece of wood at top, but dove taile is too complex for me at present. Will check out setup of this bit.The lock miter bit mentioned by @classicalfan makes a very good right-angle joint. It is excellent for plywood/mdf or other sheet material which have a consistent uniform thickness. The joint must be cut with a precise bit depth and fence position, and this is determined based on the material thickness... If one sheet of material is 18.3 mm thick, and another is 18.7 mm, the setup will be different.
To anyone interested in this router bit, I highly recommend the setup tool which aids in exact positioning of the bit depth and router fence position.
View attachment 1162359
It is already proving challenging, I milled all wood in January during timeoff from work, but failed at jointing. So had to put a pause for some time and stored the milled pieces inside, between then and now some milled pieces have developed minor bow, I kept some margins for 2nd milling, but now temp on higher side so rushing to step where I can cover it with oil and shellac so that movement is reduced.That is some very beautiful wood. I hope that it works well for you. Some of the hardwoods can be challenging. Come to think of it, I have a short hallway in my house that is solid (not veneer) 3/4" rosewood. Fortunately, it was prefinished when I got it. Leftover from a large flooring project.
I feel your pain. Just recently, Iwas working with cherry wood that was originally 1 1/4" thick. Ummm, after flattening, not so much. Still pretty though.

REAL WOOD. I love it. Maybe not as tamed as manufactured wood products, but you will make it work.
Thank you,
I have to make it work after all the time and energy spent on it.
Is it advisable to put corner brackets in speaker box to make it sturdy?
Something like this
https://www.lowes.com/pd/Hillman-3-in-Steel-Zinc-Plated-Corner-Brace/4461065
I have to make it work after all the time and energy spent on it.
Is it advisable to put corner brackets in speaker box to make it sturdy?
Something like this
https://www.lowes.com/pd/Hillman-3-in-Steel-Zinc-Plated-Corner-Brace/4461065
Last edited:
I always do. Bracing that provides strength in a corner serves all associated sides. Other internal bracing is used with a round over on its edges. At least that is my thinking. What adhesives do you have access to?
What are you using for joinery? It looks like just plain butt joints from the picture, but it's hard to tell exactly what else is there.Thank you,
I have to make it work after all the time and energy spent on it.
Is it advisable to put corner brackets in speaker box to make it sturdy?
Something like this
https://www.lowes.com/pd/Hillman-3-in-Steel-Zinc-Plated-Corner-Brace/4461065
Some well placed dowels can add a great deal of strength as well as possibly straightening out the wood at the same time. And you won't need the metal corner brackets at all.
Dowels are made for alignment, they add no strength. Pardon my saying so. It is that I have enough background in just this sort of thing (cabinet making). Biscuits as well are newer development and no they don't really add strength either. The joinery is key for making a strong joint, but in this case if only a butt joint is being used, then you better have blocks or maybe pocket holes for screws. I am not a big fan of those either, but they can have their place in building.
Fortunately there are other ways to strengthen an enclosure. One popular way is to run a rabbit joint all the way on the back of the enclosure and then insert the back panel giving an incredible increase in strength. You could do kind of same thing with the front baffle bay routing a rabbit around its edge that just fits inside of the front of the enclosure. I did this with the last set of speakers that I built and plan to use this idea more in the future.
No matter what your plan, you need to figure out how to get more clamps. No one ever has enough.
I have used titebond original for joining.I always do. Bracing that provides strength in a corner serves all associated sides. Other internal bracing is used with a round over on its edges. At least that is my thinking. What adhesives do you have access to?
I tried miter but couldn't perfect it so changing it to butt joint.What are you using for joinery? It looks like just plain butt joints from the picture, but it's hard to tell exactly what else is there.
Some well placed dowels can add a great deal of strength as well as possibly straightening out the wood at the same time. And you won't need the metal corner brackets at all.
Panels are joined using dowels 5/16 inch and panel to base as well. Since it is heavy enclosure I'll put some sort of corner brackets to make it stable, so that when its lifted or tilted it doesn't become leaning tower of pisa 😀
Thank you
Dowels, in fact, add a great deal of strength to a joint. Used correctly they can produce a joint even stronger than one made with Dominos. Here is the proof:Dowels are made for alignment, they add no strength. Pardon my saying so. It is that I have enough background in just this sort of thing (cabinet making). Biscuits as well are newer development and no they don't really add strength either. The joinery is key for making a strong joint, but in this case if only a butt joint is being used, then you better have blocks or maybe pocket holes for screws. I am not a big fan of those either, but they can have their place in building.
Fortunately there are other ways to strengthen an enclosure. One popular way is to run a rabbit joint all the way on the back of the enclosure and then insert the back panel giving an incredible increase in strength. You could do kind of same thing with the front baffle bay routing a rabbit around its edge that just fits inside of the front of the enclosure. I did this with the last set of speakers that I built and plan to use this idea more in the future.
No matter what your plan, you need to figure out how to get more clamps. No one ever has enough.
https://www.dowelmax.com/wood-joint-strength-tests/
Also, if you want "to run a rabbit" they get tired after awhile and stop running. However, if you want "to run a rabbet" it can make for a very good woodworking joint.
Last edited:
You really don't need corner brackets in a speaker enclosure. Once the front and back panels are attached they will provide all the strength needed to keep the enclosure from racking.I have used titebond original for joining.
I tried miter but couldn't perfect it so changing it to butt joint.
Panels are joined using dowels 5/16 inch and panel to base as well. Since it is heavy enclosure I'll put some sort of corner brackets to make it stable, so that when its lifted or tilted it doesn't become leaning tower of pisa 😀
Thank you
When I was in high school, I worked at a local hardware store. We sold some furniture that was cheaply made, and I discovered something quite unexpected. A lowboy TV stand that I was assembling looked like it was going to fall over. It would have except the kit included a flat rectangular sheet of what was little more than cardboard. You get the stand square and then drive tacks around the perimeter of the stand, and guess what, it was reasonably solid! Cool lesson, although I would use higher quality product to begin with, but the idea holds water. So, running a rabbet (thank you for the correction) run on the inside perimeter of the cabinet, will provide a great deal of gluing surface. Tote-Bond is just great for this application, and the panel setting inside of the rabbet joint will ease the clamping process provided it is a good fit. Dry fit many times, of course.
Concerning the dowels and biscuits, or footballs, or whatever the term may be, is one up for discussion. Unfortunately, I cannot remember the year or month of the Fine Woodworking magazine article that I was reading way back then, that was their take on all of it. Having said that, dominos used in mortise and tenon joints seems to be the cats meow, let alone an actual mortise and tenon joint. It might seem reasonable to take this logic towards dowelling technics in general. Your point sir is taken. I would like to add that I appreciate the nature in which your observation was made. Too many times, people can come on strong when it isn't needed. Discussion is the key. Thanks.
Concerning the dowels and biscuits, or footballs, or whatever the term may be, is one up for discussion. Unfortunately, I cannot remember the year or month of the Fine Woodworking magazine article that I was reading way back then, that was their take on all of it. Having said that, dominos used in mortise and tenon joints seems to be the cats meow, let alone an actual mortise and tenon joint. It might seem reasonable to take this logic towards dowelling technics in general. Your point sir is taken. I would like to add that I appreciate the nature in which your observation was made. Too many times, people can come on strong when it isn't needed. Discussion is the key. Thanks.
- Home
- Loudspeakers
- Multi-Way
- SB 12.3 Speaker build (Very very very slow build) :D