The new update will be with the stand mounted Manzi... simple stuff... trying to keep the design as low cost as possible... Baffle tweaks... minor crossover tweaks. Retaining the $100 material cost for each speaker.
Evolutionary... not revolutionary.... Kinda like the Boeing 737... or more fittingly, the VW Bug.... Getting another 3+ db of efficiency being the main improvement.
OK, you've got my attention. Curious to see it.
You planning on the Texas show this year?
I have a few mounting measurements that might help others.
I will just deal with the 12" 830669 for now.
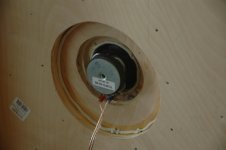
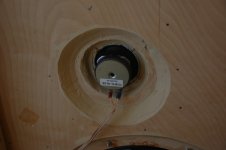
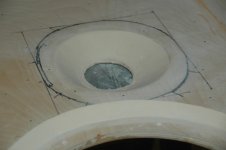
I cut the relief rings to a diameter of 12-9/16". This requires a little guessing due to the speaker shape. I ended up with about 1/8" extra (1/16" on each side) as you might be able to see in the pics. So, a tight fit would be 12-7/16".
I cut the relief rings to two different depths - deep at .238" and shallow at .176" Pics below show these.
Deep:


Shallow:


I will just deal with the 12" 830669 for now.
I cut the relief rings to a diameter of 12-9/16". This requires a little guessing due to the speaker shape. I ended up with about 1/8" extra (1/16" on each side) as you might be able to see in the pics. So, a tight fit would be 12-7/16".
I cut the relief rings to two different depths - deep at .238" and shallow at .176" Pics below show these.
Deep:
Shallow:
Ok, I have the prototypes all assembled, but I am getting no sound! I know that the amp and source are working as I tested on some other speakers.
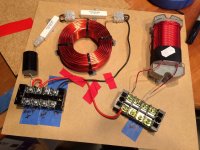
Here is one of my crossovers. The tweeter + pretty much is in a circle pattern.
Tweeter wiring:
The positive from the amp goes to the far left where is it bridged to all 4 of the far left terminals on the left block.
The 6.2uF capacitor is attached directly to the terminal and then on to the 4.7 ohm resistor and on to the parallel of the 8 ohm resistor and 2mh inductor and to the terminal to be connected to the tweeter + speaker terminal.
The negative, together with the woofer negative comes off the third terminal on the left block which is connected to the amp negative.
Woofer wiring:
Positive from amp comes off the second terminal from the left on the rleft block which is bridged to the first. Then to the right block and on to the 20 mh inductor and back to the right block to be attached to the woofer + terminal.
Help!
Attachments
I will just deal with the 12" 830669 for now.
Driver qts is low for OB.
Jerry: Looks OK at first glance. I don't see the negative lines, but you say they come back to position 3, right?
That's taken care of in the crossover. Works well.Driver qts is low for OB.
Jerry: Looks OK at first glance. I don't see the negative lines, but you say they come back to position 3, right?
Hi pano,
Yes, both negatives to the drivers are connected on the top of 3 on the left block and the amp negative is connected on the bottom of 3.
I thought that maybe the barrier strips were not what it thought, but upon inspection of extras, they are regular barrier strips.
I guess I'll go back to "go" and test each piece separately. Not easy to do as I am hopping around on one foot after foot surgery.
Ouch, hop carefully!
Yes, I'd say make up some jumper wires and test point by point. I thought looking at the photo that the problem would be obvious - but it's not to me. Probably someone will see the missing piece of the puzzle.
Yes, I'd say make up some jumper wires and test point by point. I thought looking at the photo that the problem would be obvious - but it's not to me.
Probably someone will see the missing piece of the puzzle.Ok, I am officially an idiot - as if it ever were in doubt. In my haste to final test, I hooked up the amp wrong. Getting good sound on the little test 15 watt Lepai. I'll move them over to an old Arcam AVR 100 (90 x2) next and then on to what should be their final home - an Audio Refinement (designed by YBA) 5 x 125.
Plenty of bass - even on the crappy little amp.
Plenty of bass - even on the crappy little amp.
Jerrym.....
If I only had a dollar for similar situations... too many to display here!
Good to know you got it sorted out....
Thanks for the effort and confidence to do the build..
If I only had a dollar for similar situations... too many to display here!
Good to know you got it sorted out....
Thanks for the effort and confidence to do the build..
Clarification question re: post 1601/1602
Thank you for the excellent summary of designs in posts #1601 and #1602.
What is the wing depth for the Peerless resp. GRS version with the TC9?
The crossover shown in 1601 is the one for the Peerless. What are the crossover values for the GRS? (or are they identical, i.e., just replace the Peerless with the GRS in the crossover diagram?)
Thank you!
(Happy owner of the original Manzanita and considering trying out the GRS/TC9 version [not the Ultra; won't fit...])
You can use the same low pass for the 12" GRS. I believe John made a trap for it, to clean it up a little, but I have not used that version. You may want to play with the value of the series attenuation resistor. That one needs tuning for you room, anyway.
A little follow up... I am sure Pano was referring to the GRS 15.... a typo showing GRS 12..... The basic crossover set up is very similar.... one reason I went to the GRS 15.... it would work well for any one who had or was considering the original Peerless 12". The crossover, like most crossovers can be tweaked... but, by and large, the original is close enough.
Ok, here is my update on my 12" build.
The speakers are sounding far better than they deserve to considering the cost and the ease of the build. A ridiculously good value.
I have never heard speakers change so much over the first 10-15 hours of play. I could hear them loosening up almost by the minute. At first, the bass was flabby, but has tightened up dramatically and now is that smooth bass we are after with open baffle designs.
The only weakness is that they they just cannot grind out something like Bachman Turner Overdrive. That is OK, since that type of music makes up less than 5% of what I listen to. Even that may be fixed if I get the energy to add a couple of sealed subs forced to go low with DSP. I don't want to DSP the Manzitas to keep the processing from getting anywhere near the mid-range.
I went from 4.7 ohms to 5.7 and then 6.7ohms for R2 to try to flesh out vocals a bit and each improved things. I then tried 7.7 and it was a hot mess. Mids were discontinuous.
As much as I read the thread, I missed the fact that the woofer trap is appropriate for the 830669. I think that the 2K spike may be what I was chasing when I added to the R2 values. Tomorrow, I will order the parts for the trap and start over adjusting the crossovers when they arrive.
I think that I misinterpreted the instructions for the wings. My baffles are a single piece of 15" MDF with the wings added to the back of the baffle for a total measurement of 4.75" from the front of the baffle to back of the wings. If this is wrong, I can nip off a little of the wing depth. I have a euro-style sliding saw and can mount the whole speaker on the slider.
These are the first speakers that I have built and I have to say that I LOVE the ability to tune the crossover to the room and my taste. I can't imagine going back to a speaker I cannot adjust.
Thanks again for developing and documenting the project.
Thanks for the encouraging write up! Glad that you are enjoying these fun - and as you say, very tuneable - speakers. Tweaking the crossover to your room and placement is important.
You should be OK on the wings. 4.75" deep is right about where you should be. The original Manazitas that John and I built had a tapered wing on one side, straight on the other. They were changed to straight on both sides for ease of build.
You should be OK on the wings. 4.75" deep is right about where you should be. The original Manazitas that John and I built had a tapered wing on one side, straight on the other. They were changed to straight on both sides for ease of build.
This is an example of clearing out the midrange - literally.
TLDR: Cleared out the space behind the Vifa tweeter and greatly improved the imaging and clarity of the Ultras. Changing the feet helped, too.
John mentioned he's working on some new updates to the Manzi design and it got me thinking about taking on a new project. Yet I'd never quite finished the Ultras properly so it was time to get to work on getting them done.
The front baffles of the Ultra's are made up of two boards and my clunky woodworking had left a couple of 90 degree ridges behind the tweeter and another behind the woofer. Years back I put some duct tape over the ridges near the rear of the tweeters and it helped.
This time I filled in the 90 degree angles with plastic wood. This improved the soundstage and texture in the midrange and removed a slight bass distortion that I'd not really noticed until it wasn't there anymore. Really nice improvements that pushed me to do more.
There was still a 90 degree ridge near the rear of the tweeter. It was close enough to the tweeter to act like a small chamber and it was causing unwanted reflections and likely some congestion. So the ridge was chiseled out and the remaining surface was smoothed with more plastic wood. The small chamber behind the tweeter is completely gone now and there's nothing impeding the back flow of air from the tweeter.
The results are similar to the earlier changes only more so. More spaciousness. Bigger soundstage. Much clearer midrange presentation overall. It literally opened up the mids.
The Ultras now sound good with some laid back tube gear that had always sounded too mellow with them. It's a nice change.
The house has suspended wood floors so the Ultras were never spiked but they did have felt feet. Changed that to some rubber caster cups and was rewarded with even more open sound. It eliminated a bit of bass bloat and that's helped clean up the midrange even more. Will continue to play with other footers as this is all for the better.
The combo of opening up the rear of the Vifa and changing the footers has really done nice job on the sound. John said the Ultras really let you hear the type and quality of the amp in the system yet my Ultras used to sound decent with a cold, sterile sounding amp. After these changes you can clearly hear the poor amp in the chain.
Will likely put off taking on another project for a bit and enjoy the improvements for a while. 😀
Attachments
Barry, Thanks for your insight(s) and the pictures! It is fun to tweak away... all the little changes can add up to considerable performance improvement.
- Home
- Loudspeakers
- Multi-Way
- Fast, fun, Inexpensive OB project