You guys advertise a Rear Panel IEC Socket Option for the Pesante 2U.
Where is it located on the rear panel? Can I get a picture? That would help a lot for making the decision.
Thanks.
Where is it located on the rear panel? Can I get a picture? That would help a lot for making the decision.
Thanks.
You guys advertise a Rear Panel IEC Socket Option for the Pesante 2U.
Where is it located on the rear panel? Can I get a picture? That would help a lot for making the decision.
Thanks.
The Pesante chassis entry on the store includes a link to a page that I think will answer your questions or at least get you close.
Thanks Astromo. We need to get the information from the chassis category pages into the product pages themselves. On the todo list..
You guys advertise a Rear Panel IEC Socket Option for the Pesante 2U.
Where is it located on the rear panel? Can I get a picture? That would help a lot for making the decision.
Thanks.
Hi Gasgeek,
You can also visit this link:
http://www.modu.it/pesante_posteriore.jpg
The rear panel can be mounted both ways so the cut-out can be placed on
the right part of the panel as well.
Questions about 3U Slimline chassis
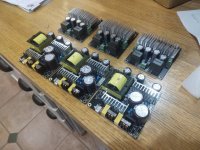
I am creating a build list for a rack-mountable 3 channel amp with 3 class D amp+ps modules that I purchased from 3EAudio (pictured below). I am thinking of doing this with a 3U slimline chassis (350mm deep) since I don't need any cooling fins but will add the vented aluminum top option.
I plan on keeping this case around for a long time even if I end up swapping out the guts occasionally. So I'd like to make it look as classy as possible. I have a number of questions that I am hoping to get advice from the many savvy builders here.
* For the IEC power input I am thinking of using a Shaffner EMI Suppressing Filter:
- Schaffner EMI Filter (20 amp)
- Schaffner EMI Filter Datasheet
* For the 3.5mm trigger port, this Amphenol piece looks pretty high quality:
- 3.5mm trigger port
* Additionally, I imagine I would like a switch on the back panel to disable the trigger if need be. This E-switch DPDT unit looks to be pretty good:
Trigger on/off switch
E-Switch Spec Sheet
* For the speaker binding posts, I purchased these carbon fiber-finish posts on sale from Parts Express (carbon fiber finish is silly but they look pretty high quality):
- 5-way Binding Posts
* For the XLRs and RCAs, I purchased Neutrik connectors from Parts Express:
- Neutrik XLRs
- Neutrik RCAs
For now I don't want to do anything fancy with the front face, just a power switch on the front and 6 LEDs (3 blue power, 3 red fault). I am debating whether I want to print a logo or have a logo machined into the front... But I may wait on that part.
* For the front panel power switch. I'm looking at one of these two options but leaning towards te NKK Locking switch:
- NKK Locking switch
- E-Switch Rocker
Specific Questions:
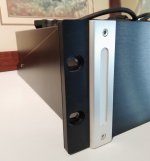
I don't think I saw an option for DIYAudio/Hifi2000 to provide a 10mm front face long enough to be rack mounted? I am hoping that I could repurpose the Emotiva side rails from my old Emotiva UPA 200 power amp (pictured below). They are 3U high and I should be able to line up the fronts to match that of the 3U slimline 10mm fronts.
Has anyone drawn up CAD DXFs for a back panel for 3 XLR + RCA inputs (using Neutrik D cup), 6 binding posts, 12 volt trigger input, trigger enable/disable toggle, and IEC power? I can draw up in QCAD if no one has anything. Am I missing any inputs/outputs, switches that folks can think of?
Has anyone created a 12-volt trigger board that could flip a high-powered relay? I already bought an external trigger Ada Fruit Relay on Amazon which I could pilfer the guts of it (and the guts have gotten really good reviews). Or are there common 12-volt trigger relays that are typically used like this Rasberry Pi Relay?
I am creating a build list for a rack-mountable 3 channel amp with 3 class D amp+ps modules that I purchased from 3EAudio (pictured below). I am thinking of doing this with a 3U slimline chassis (350mm deep) since I don't need any cooling fins but will add the vented aluminum top option.
I plan on keeping this case around for a long time even if I end up swapping out the guts occasionally. So I'd like to make it look as classy as possible. I have a number of questions that I am hoping to get advice from the many savvy builders here.
* For the IEC power input I am thinking of using a Shaffner EMI Suppressing Filter:
- Schaffner EMI Filter (20 amp)
- Schaffner EMI Filter Datasheet
* For the 3.5mm trigger port, this Amphenol piece looks pretty high quality:
- 3.5mm trigger port
* Additionally, I imagine I would like a switch on the back panel to disable the trigger if need be. This E-switch DPDT unit looks to be pretty good:
Trigger on/off switch
E-Switch Spec Sheet
* For the speaker binding posts, I purchased these carbon fiber-finish posts on sale from Parts Express (carbon fiber finish is silly but they look pretty high quality):
- 5-way Binding Posts
* For the XLRs and RCAs, I purchased Neutrik connectors from Parts Express:
- Neutrik XLRs
- Neutrik RCAs
For now I don't want to do anything fancy with the front face, just a power switch on the front and 6 LEDs (3 blue power, 3 red fault). I am debating whether I want to print a logo or have a logo machined into the front... But I may wait on that part.
* For the front panel power switch. I'm looking at one of these two options but leaning towards te NKK Locking switch:
- NKK Locking switch
- E-Switch Rocker
Specific Questions:
I don't think I saw an option for DIYAudio/Hifi2000 to provide a 10mm front face long enough to be rack mounted? I am hoping that I could repurpose the Emotiva side rails from my old Emotiva UPA 200 power amp (pictured below). They are 3U high and I should be able to line up the fronts to match that of the 3U slimline 10mm fronts.
Has anyone drawn up CAD DXFs for a back panel for 3 XLR + RCA inputs (using Neutrik D cup), 6 binding posts, 12 volt trigger input, trigger enable/disable toggle, and IEC power? I can draw up in QCAD if no one has anything. Am I missing any inputs/outputs, switches that folks can think of?
Has anyone created a 12-volt trigger board that could flip a high-powered relay? I already bought an external trigger Ada Fruit Relay on Amazon which I could pilfer the guts of it (and the guts have gotten really good reviews). Or are there common 12-volt trigger relays that are typically used like this Rasberry Pi Relay?
Attachments
Good luck with your research and feedback from other builders.
Correct. The 4mm panels are made for Rackmount and have the rack mounting holes pre-cut. The 10mm is made to fit within a 19" shelf but doesn't have the flange/ears for mounting.
I don't think I saw an option for DIYAudio/Hifi2000 to provide a 10mm front face long enough to be rack mounted?
Correct. The 4mm panels are made for Rackmount and have the rack mounting holes pre-cut. The 10mm is made to fit within a 19" shelf but doesn't have the flange/ears for mounting.
Which software (easy to use and, hopefully, free) can I use to generate a file for a customized front panel? I don't need anything fancy, just a few holes and a few words...
I would greatly appreciate any suggestions!
I would greatly appreciate any suggestions!
I think you can use "Front Panel Designer" from Front Panel Express. I believe it can export to DXF/SVG formats.
And a related question - If you order heatsinks separately from the chassis, do they come drilled for the related Dissipante mounting brackets?
Which software (easy to use and, hopefully, free) can I use to generate a file for a customized front panel? I don't need anything fancy, just a few holes and a few words...
I would greatly appreciate any suggestions!
Yes, Front Panel Express / Schaeffer AG have "Front Panel Designer" which exports to DXF:
- Front Panel Express: Front Panel Design Software and CAD Conversion Service: Front Panel Designer
- Schaeffer AG: Front Panel Designer
Can you order a chassis with a heatsink only on one side?
And air on the other side? Yes. The chassis/heatsink mounting rails would be visible too. It would be a custom order. Sticking a heatsink on a chassis that doesn't have heatsinks or vice versa would be a total custom job.
And a related question - If you order heatsinks separately from the chassis, do they come drilled for the related Dissipante mounting brackets?
Yes. All heatsinks come with the chassis rail mounting holes.
What about a heatsink on one side and a quasi-heatsink on the other side? Would a 3U quasi-heatsink mount in the space of a full heatsink?
Pretty sure the answer is no. Even a steel version of a particular line isn't compatible with an aluminum version of the same line.
You might be able to do something like what we did with the very first ACA which was like a C shape that wraps around the heatsink, but those kinds of jobs usually have a minimum quantity or would be totally custom. Please email contact@diyaudiostore.com and we can work out what's possible.
You might be able to do something like what we did with the very first ACA which was like a C shape that wraps around the heatsink, but those kinds of jobs usually have a minimum quantity or would be totally custom. Please email contact@diyaudiostore.com and we can work out what's possible.
Hello,
I'm hoping to use a Pesante 4U for a project I'm planning. This is more PC than audio related, and the project will need a moderate amount of active cooling.
Is it possible to have custom work done on Pesante side and rear panels? What I need is some mounting holes for 120mm or 140mm computer case fans, which entail a large center hole and 4 screw holes. I'd need probably 1-2 fans per side and 2-3 in the rear panel. The work doesn't have to be pretty - I'll be putting dust filters over the side holes and the back panel will never be seen. I don't care if it's carefully CNC'd or just done with a hole saw and twist drill - I trust that you guys would do a better job of that than I would.
Last edited:
How stable are the chassis's without say the back panel on them?
The side rails and the number of attachment points make for a pretty stiff structure.
What have you got in mind?
If you've got mains AC inside, then it wouldn't be a terrific plan to operate with an open panel.
Missing one panel, as long as it’s not one of the side rails, will still be strong and solid.
As mentioned before, these chassis use the sides as the spines that everything bolts into.
As mentioned before, these chassis use the sides as the spines that everything bolts into.
The heatsinks are connected to the front panel by the heatsink rails so the covers (top, bottom, rear) are helpful but essentially optional. The perforated base bolts to the heatsink rails and would add further rigidity.
- Home
- The diyAudio Store
- Chassis Discussion