Please see my edit above - you were absolutely correct, working on fixing this bug now. Thanks for the report.
EDIT: Bug has now been squashed
EDIT: Bug has now been squashed
Last edited:
Back Panel Kit Binding Posts
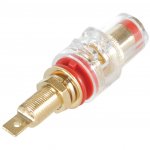
Hi -- I have a Deluxe chassis with the binding posts from the back panel kit. I'm having trouble figuring out how to attach the binding posts correctly, and I'm pulling my hair out looking for images of the Dayton BPFI-G's installed.
I'm attaching the posts with the hardware in the order it shipped with the posts, but I cannot tell whether the keyed plastic ring belongs on the outside or inside of the chassis. It seemed logical the keyed plastic would be on the outside (fits great that way) and that the second plastic ring would be on the inside to isolate the binding post from the chassis, but I cannot get a tight fit when I screw down the washers against the inner plastic ring. It tightens great with both plastic rings on the outside, but then the post isn't isolated. That can't be right.
Am I doing this right? Just wanted to confirm before I keep trying to find a way to get it tight with the plastic rings aligned this way.
Thanks!
Thanks -- I have a different style locking washer on mine, but that's how I have it oriented (with the two plastic rings isolating the post from the chassis). I'll give it another go tonight.
Sometimes the keyed washer fits into the clear plastic cove of the outer post, other times it's the non-keyed that fits better. There seems to be production variances. Regardless, the shoulder washers will keep the metal of the post through the chassis centered and therefore isolated. A couple turns of trimmed electrical tape on the shaft is also useful if you are worried, but those posts normally work perfectly.
I was planning on getting a 3U chasis for my M2 build. Is there a UMS hole layout for heat sink in a PDF?
The .pdf is on this page -- Universal Mounting Specification – diyAudio Store
The heatsinks of the 3U 300 will be on the ragged edge of too small for the M2, you may need to add a small fan.
The heatsinks of the 3U 300 will be on the ragged edge of too small for the M2, you may need to add a small fan.
I like the narrower minidissapante chassis. Planning to use a 400mm long heatsink. Also moves the edcor further from the power transformer. I populated all the boards and they fit in the narrower space. Just haven’t bought the chassis yet.
So the UMS spacing fits on a 3U heat sink? I thought it had been modified.
So the UMS spacing fits on a 3U heat sink? I thought it had been modified.
The transistors will only need to be on one side of the PCB, there's plenty of room. 🙂
The 400mm sinks are actually (2) 200mm sinks. The UMS will fit nicely, just make sure you drill the holes in the proper places on each sink.
The 400mm sinks are actually (2) 200mm sinks. The UMS will fit nicely, just make sure you drill the holes in the proper places on each sink.
Sometimes the keyed washer fits into the clear plastic cove of the outer post, other times it's the non-keyed that fits better. There seems to be production variances. Regardless, the shoulder washers will keep the metal of the post through the chassis centered and therefore isolated. A couple turns of trimmed electrical tape on the shaft is also useful if you are worried, but those posts normally work perfectly.
It appears the backplate for the steel disspante may be too thin for these binding posts. Once I filed the keyed plastic rings down just a bit and got them flush with the chassis, they tightened up okay.
It appears the backplate for the steel disspante may be too thin for these binding posts. Once I filed the keyed plastic rings down just a bit and got them flush with the chassis, they tightened up okay.
Interesting observation. The Aluminum Deluxe 4U has a 1.5mm alu back panel and the the Steel Deluxe 4U has a 1mm thick steel back panel. It might well be that the Dayton posts you got (from an earlier run of back panel kits) have a notch that is > 1mm thickness, and this is the cause of the problem. If that's the entirety of the issue, then it's great to hear that filing them back to being 1mm thick solves the issue.
The last run of back panel kits (now sold out) didn't use the keyed washers.
I think that .5 mm makes the difference. The binding posts are working great with the keyed washer filed down flush with the back panel. Only took a couple minutes to get them squared away.
I recently purchased a Deluxe 4U Aluminum chassis with the handle option. After drilling the holes through I find that the counter-bore for the screws is smaller than the head of the 8 screws that were provided for installation. Needless to say, the handles can be installed with the screws provided. Is that a problem with the holes or were the wrong screws sent by mistake?
Is there any special way that we are supposed to attach the anti-vibration feet to the chassis? Didn't see any instruction on it. There are also no holes in the chassis for them so I guess we just drill holes through the bottom where we want them.
Chassis Customisation Limited to Multiple Orders?
I'm struggling to make sense of advice provided about requesting simple custom mods to a Deluxe Chassis.
My journey started here:I didn't get much by way of response, so I spotted Jason's advice here:and so sent a message to contact@diyaudiostore.com
I modified my query and limited to a smaller scope of drilling holes, viz.:
Then I got a response advising:
The diyAudio Store - DIY amplifier kits, chassis, and parts and Hi-Fi 2000 contenitori per l'elettronica, case modding HTPC, Galaxy, rack, DIYaudio, computer cases, front panel express, knobs,milled Handles, milled fronts, hi-end,
that advertises a full customisation service in terms of milling and drilling panels and doesn't appear to limit that customisation to multiple orders. If I've missed a key qualification, I apologise in advance, but I understood services such as:
CNC work on 10mm aluminum panels – diyAudio Store
to cover one off orders.
So, a week ago I expressed my concerns including raising the possibility of some simple misunderstanding and included the attached mark-up of a 5U Deluxe front panel to provide some graphical explanation.
Since then no response.
I'd like to order a chassis but don't want to make a financial outlay until I've got an assurance that what I'm requesting will be processed in a straight forward manner. The delay in response is telling me that the store's contact email is stretched or overloaded.
I'd appreciate some communication via whatever avenue to clear this up. Given that the query is not that complex (to my simple understanding anyway), I'm struggling to understand the reason for the extended delay in the absence of a follow up response after I've asked for further information.
Thanks in advance.
I'm struggling to make sense of advice provided about requesting simple custom mods to a Deluxe Chassis.
My journey started here:I didn't get much by way of response, so I spotted Jason's advice here:and so sent a message to contact@diyaudiostore.com
I modified my query and limited to a smaller scope of drilling holes, viz.:
I want to minimise the scope of customisation to make it easier for all concerned.
I would like to think that requesting holes be drilled through the standard pilot holes will not require CAD drawings and that a sketch mark up and written specification of requeirements will suffice.
Then I got a response advising:
I found this response rather confusing given the advice on both:I have referred your question to HiFi2000 and they have replied that HiFi2000 does not offer this service for single panels.
The diyAudio Store - DIY amplifier kits, chassis, and parts and Hi-Fi 2000 contenitori per l'elettronica, case modding HTPC, Galaxy, rack, DIYaudio, computer cases, front panel express, knobs,milled Handles, milled fronts, hi-end,
that advertises a full customisation service in terms of milling and drilling panels and doesn't appear to limit that customisation to multiple orders. If I've missed a key qualification, I apologise in advance, but I understood services such as:
CNC work on 10mm aluminum panels – diyAudio Store
to cover one off orders.
So, a week ago I expressed my concerns including raising the possibility of some simple misunderstanding and included the attached mark-up of a 5U Deluxe front panel to provide some graphical explanation.
Since then no response.
I'd like to order a chassis but don't want to make a financial outlay until I've got an assurance that what I'm requesting will be processed in a straight forward manner. The delay in response is telling me that the store's contact email is stretched or overloaded.
I'd appreciate some communication via whatever avenue to clear this up. Given that the query is not that complex (to my simple understanding anyway), I'm struggling to understand the reason for the extended delay in the absence of a follow up response after I've asked for further information.
Thanks in advance.
Attachments
I recently purchased a Deluxe 4U Aluminum chassis with the handle option. After drilling the holes through I find that the counter-bore for the screws is smaller than the head of the 8 screws that were provided for installation. Needless to say, the handles can be installed with the screws provided. Is that a problem with the holes or were the wrong screws sent by mistake?
Same problem here with the supplied handle screws. I just bought M4 socket head cap screws at the local hardware. Problem solved.
Is there any special way that we are supposed to attach the anti-vibration feet to the chassis? Didn't see any instruction on it. There are also no holes in the chassis for them so I guess we just drill holes through the bottom where we want them.
I used the same holes for mounting the bottom plate. Actually, I drilled out the holes on the heat-sink bracket to clear 8-32 screws and attached clip-on nuts. Then used 8-32 x 1 1/4" screws to attached both the feet and the bottom cover.
I recently purchased a Deluxe 4U Aluminum chassis with the handle option. After drilling the holes through I find that the counter-bore for the screws is smaller than the head of the 8 screws that were provided for installation. Needless to say, the handles can be installed with the screws provided. Is that a problem with the holes or were the wrong screws sent by mistake?
Good question. Getting an answer for you on this.
Is there any special way that we are supposed to attach the anti-vibration feet to the chassis? Didn't see any instruction on it. There are also no holes in the chassis for them so I guess we just drill holes through the bottom where we want them.
The feet are installed by drilling your own holes. This has been discussed many times over the years, but the logic behind it (other than "it's always been this way") was that some customers of theirs expressed a preference to use 3 feet to ensure there was no wobble. This then leads to the question of should the panels have 4 holes, or 3, or 5, or none. I am sure a secondary issue is that the same panels are used for top and bottom, and so drilling holes in them would require stocking tens more unique items, increasing storage requirements and thus cost which would increase the price of the final product.
As for the elephant in the room which is detailed assembly instructions, videos, etc - that's another story and one that I am confident will be addressed in 2019. The included "exploded" assembly diagram that's included with all the chassis is nice, but I know from experience that a lot of people would prefer something more "step by step" style, so that's something I will definitely champion next year.
I'm struggling to make sense of advice provided about requesting simple custom mods to a Deluxe Chassis.
The questions you've asked about custom work are quite detailed and best handled by emailing the helpdesk rather than posting in this thread. The email helpdesk is much better suited to passing complicated questions around between customers, Hifi2000 and ourselves.
This forum area / threads are not well serviced (I've tried implementing some processed for our helpdesk staff member to ensure "no thread is left behind" but they haven't worked), however it's very easy for questions to be missed.
So my advice for anyone asking for custom work is to email the helpdesk, and you can be sure that your case/questions will be taken care of, and not forgotten or lost in a thread.
To that end, Astromo - I'll take over your ticket myself on the helpdesk and ensure that we achieve some finality.
So, a week ago I expressed my concerns including raising the possibility of some simple misunderstanding and included the attached mark-up of a 5U Deluxe front panel to provide some graphical explanation.
Since then no response.
I have found your ticket in our helpdesk and yes I can see it's been sitting there for a week. My apologies. There's two things going on here..
Firstly, I can see that the difficulty of your custom requests has pushed this into the "too hard basket" and that's why it's been sitting around. I don't mean that in any negative way towards you or that the situation is at all acceptable, I am just being frank about the current limitations of the helpdesk to handle requests that aren't straight forward. I will take over your ticket personally and see it through to completion.
The second concerns your comment that the helpdesk is stretched and overloaded. This is true. I have statistics on how quickly the helpdesk responds to and resolves queries, and right now the average response time is 25 hours, first response time is 19 hours, average resolution is 3 days 6 hours, and average number of responses to achieve resolution is 1.71. Not great, but we're doing fine for "standard" queries.
The growth of the store and especially the number of orders during the BFCM / Christmas period has pushed our trusty solo helpdesk assistant, Elena, who has been manning the diyAudio and Store helpdesk for over a decade to her limits. Hifi2000 is also working around the clock to deal with their Christmas rush and influx of orders. Everyone's pushed to their limits at the moment. Additionally Elena is on leave for the next 2 weeks and as of yesterday I'm personally dealing with every ticket.
The reality is that things that are outside spec / the norm take longer to resolve. When it comes to Hifi2000 we work closely with them and act as their communication layer, and for the 99% of regular orders this works well. I can say for sure that custom work is at present the weakest link in this chain, and it's definitely best dealt with in private, over email, in a helpdesk ticket where all the information can be in one spot and there is a clear history of everything that has been discussed.
In terms of how to order custom Hifi2000 work, at present we're kind of hamstrung by the limitations of our Shopify implementation, but I'll be working towards a better ordering process for custom work in 2019. Custom work is a small fraction of our current order types, but I'd love for every DIYer to be able to easily order custom work in the future, as easily as ordering a regular product. That will take some time. In the meantime, shoot us an email, and we'll take care of it.
I'll make another point, again referencing the above helpdesk statistics - our helpdesk takes care of tickets in a very efficient fashion. We're not doing a great job of watching forum threads here. The threads here are primarily for discussing anything technical that the helpdesk can't handle (our helpdesk is non technical, our expertise is the logistics of your order). So, we do advertise that all technical questions should go in these threads so that the community can help answer them, and all non technical order related questions should go to our email helpdesk where they can be dealt with efficiently. I'm not sure if that's how we'll keep doing things, but I think I should probably implement a blanket rule that anything related to ordering should just go immediately to the helpdesk.
Thanks for your comments and questions and for raising these issues, which are entirely fair. I look forward to improving things in the future, and I hope the above helps explain what's happened in this case.
- Home
- The diyAudio Store
- Chassis Discussion