Audio enthousiast from Belgium

Hi Everyone,

I'm Tom from Flanders, Belgium and started an audio Hobby about a year ago. Started with the idea of building a simple full range speaker. I have a background in electronics but absolutely no woodworking skills. Working on an MTM at the moment and a bluetooth speaker box and still trying to find out how to properly use my palm router. Love Rock and classical music and dream about building a 5.1 home cinema experience.

My audio setup at the moment:
ARCAM AVR amplifier
ARCAM CD player
WIIM mini
SU-1 DAC
SB ACoustics phono player
FOSI audio preamp
B&w 607 front speakers
Pro-ject desktop speakers
a bunch of dayton audio components waiting to become speakers
  • Like
Reactions: Ken Newton

First Crossover Build - Confirm Wiring

Hi all. I'm in the process of building my first crossover and before I go and start laying out and drilling, I was hoping that someone could confirm if I've wired this properly per the schematic (done by Solen). I know the arrangement of the parts is way wrong but I just want to confirm that my tie points are correct.

Since I'll be fine tuning values and upgrading caps, I'll likely use terminal strips like Troels Graveson to facilitate easy swapping. Like I said, this is my first build, so would be so grateful for a confirmation. Thanks

Attachments

  • crossover.jpg
    crossover.jpg
    715.6 KB · Views: 61
  • Solen Crossover.jpeg
    Solen Crossover.jpeg
    41.8 KB · Views: 58

Grounding parts on non-conductive Tubelab SSE chassis

Hi there - I'm sourcing the material for the top plate of the chassis for my Tubelab SSE build. On the wiring diagram page, it says to make sure that "all metal objects (transformers, supplemental cap, choke, volume control, etc) should have a good paint free contact with the chassis". If I use something like anodised aluminum, does this mean I have to scrape away the anodised layer so that the parts make solid contact? Or is the anodised aluminum still conductive enough to ground the parts?

Measurements on output transformers for the Williamson amp

I recently did some measurements on three contemporary output transformers aimed for use in the Williamson amp.

The measurements provide a look at the primary winding inductance, as well as impedance and output frequency response over a 2Hz to 95kHz range (the limit of my USB soundcard) using REW software.

The output transformers were the venerable Partridge WWFB, plus two Australian made OPTs that came out in early 1948 to meet the Williamson diy demand (Ferguson OP25 and Red Line AF8).
https://www.dalmura.com.au/static/Partridge%20datasheets.pdf
https://www.dalmura.com.au/static/FergusonFeb1948.pdf
https://www.dalmura.com.au/static/Pages%20from%20Australasian-Radio-World-1948-06.pdf

The measurements are not for the OPT in a Williamson amp, but just of the OPT itself, but do provide an insight in to how a particular OPT could be compared to other OPT's, and to support how such an OPT could be integrated in to a Williamson amp and the required low and high frequency response tailoring that may be needed for unconditional stability.

Aspects that I thought were quite interesting were the noticeable response differences when choosing a speaker impedance setting, and the variation of measured inductance due to a variety of influences.

The write-up is linked below, and may change over time if I come across other contemporary OPT's or add to the measurements made or correct mistakes/misunderstandings. I must admit that the 'modern' soundcard/REW combination is a joy to use on a diy bench, and can but wait and hope for a new generation of soundcards that bring sub-1Hz to circa 190kHz bandwidth capability, as that would provide a nice addition to an OPT's performance assessment.
https://www.dalmura.com.au/static/Williamson%20output%20transformer%20measurements.pdf

Annoying Background Music in Movies

I seem to remember that background music in movies used to be either pleasant or sometimes suspenseful to match the scene, but never annoying. Now, however, it seems that movies are being made with lots of irritating types of background music.

On top of that they will sometimes suddenly increase the volume to very high levels and then back down again. So, if you decrease the volume to prevent being irritated from the very loud music, then you have to turn it back up again to hear the dialog. As a result, I constantly have to adjust and readjust the sound volume throughout the movie.

It this just me, or do others have the same issue.

High frequency output noise - Marantz M-CR603

Hello,

I have a problem with a really high frequency noise at the output of my Marantz M-CR603, a ~300kHz noise of ~1Vpp : (I precise the amp with loaded with an 8Ohm dummy load)

(see out_noise_1.jpg, and out_noise_2.jpg is the same noise but with a different temporal scale - we can see a slower other oscillations superposed on the other)

The amp features an SMPS power supply, and the amplification is digital, here the amplification scheme :

(see amplifier scheme.png)

Now I have the feeling the noise is not normal. It is quite high in amplitude and I fear for my speaker, from what I have read on internet about high frequency noise and tweeter blowing. So I was looking for a culprit in the circuit. I first checked the power supply. There are two supply here, a +12V and a +32V. The +12V is not noisy at all. However, the +32V is really noisy (1Mhz noise). Here a picture of the rail with my scope AC coupled :

( see +32_noise.jpg)

I thought it may have been one of the SMPS capacitor (I already found some bad on it, that I've changed), so I've changed all of them with new one, but with no improvements.
The supply comes from the SMPS board to the main board through CN61 (see filtering_1.png).

->Now on the schematics, I can see some small filtering cap at the entry on the board (see filtering_1.png), and some other at the digital amp chip (see filtering_2.png). The electrolytics are good (there are one per channel of 3300) and the little ones are film caps, nicely soldered.
So I guess all caps are good doing their job

-> Now, I see inductance in serie with the outputs, but both right and left channels of both A and B speaker output are noisy so I don't suspect a problem in a particular component bur rather in the supply.

-> So I am lost ! If supply is supposed to be good (but is it with a 1MHz noise ..?) and the signals paths are good, where is the problem coming from ? (but is there really a problem with the 1V, 300kHz noise at the speaker output ?)

Any ideas would be welcome !
Thanks

Attachments

  • +32_noise.jpg
    +32_noise.jpg
    164.1 KB · Views: 36
  • out_noise_1.jpg
    out_noise_1.jpg
    165.2 KB · Views: 32
  • out_noise_2.jpg
    out_noise_2.jpg
    141.7 KB · Views: 31
  • amplifier scheme.PNG
    amplifier scheme.PNG
    255.1 KB · Views: 29
  • filtering_1.PNG
    filtering_1.PNG
    15.1 KB · Views: 27
  • filtering_2.PNG
    filtering_2.PNG
    100.9 KB · Views: 33

Dayton DATS V3 question

If I wanted to measure the primary impedance of an output transformer from a tube amp can I load the secondary with the specified load resistor and use the DATS V3 on the primary to give me the impedance or is there a better way?

I've got a transformer that has a 4, 8 and 16 ohm tap. Anyways the 4 ohm tap is supposed to be the center of the winding and I should get equal voltages from the 4 ohm tap and ground and the 4 ohm tap and the 16 ohm tap. The 16 ohm tap has a slightly higher output voltage than the 4 ohm tap.

60Hz sinewave on primary winding.

4 ohm tap to ground 118mVrms
16 ohm tap to 4 ohm tap 127mVrms

Need to measure the primary impedance with a 4 ohm load and then a 16 ohm load so that I can determine if the 16 ohm tap is greater than 16 ohms or if the 4 ohm tap is less than 4 ohms or if it's a combination of both.

2 Monoblock Class Ds Not Working, I'm Lost

Hello! I'm new to the forum and I'm hoping someone may be able to help me. I have been trying car audio amp repair but I'm lost at the moment.
I have 2 Monoblocks with different issues.

1. Concrete Audio 2k
Protect mode at 13v+ although rated up to 16v
At 12v, gain all the way down, no input, and with a speaker connected (I have tried a few different speakers and all do the same), starts normally then makes a loud pop every 3-4 seconds and flashes protect light
Does not happen with nothing connected (12v), audible click, power light and fans running, no protect

2. Soundstream XXX-6500D
Turns on with power LED and no protect, fans run, but no output to speaker terminals
Tried multiple speakers, tested with multimeter (any settings to try? I may not have tried correct setting), multiple RCAs, but only tested with 12v. This specific one has ratings at 13.5v, 14.4, and 16v but my other XXX-6500D has at 12v-16v.
Would 12v vs 13.5v cause this?

As of right now I would prefer to get the Soundstream working sooner than the Concrete Audio amp as I would like to install the Soundstream in my setup

I have a variable power supply that can go up to 30v and 3amps, a component tester, multimeter, and an oscilloscope but I am a bit confused on where to probe, what settings I should have, and where I should ground the probe or if I shouldn't use the ground lead.

Any help is appreciated and if there is anything someone would like me to send pictures of I can do so.

Hello everybody

Good to be on the forum, thank you very much. I am from south Africa and a keen hifi enthusiast. I have fiddled with and built several items. It all started in the 80's with the Linsey Hood amp. Still have some parts for it! It chewed up a pair of Leak Sandwich 300 speakers when I got too enthuastic with it. That kicked off some speaker building projects, mainly SEAS based.

Improvement of PACTF resistor

PACTF,Polymer cured Amorphous Carbon Thick Film resistor.

Compared with the first generation "gold" carbon resistor, the principle remains unchanged, but the process becomes more pocket-sized.

Try to mix nano silicon dioxide into the resistive substance according to the original formula, and the resistance value is obviously increased. Connect this resistor to 220 volts, and the heating power is about 1 watt. After more than ten seconds, the resistance obviously heats up, and the resistance value has an obvious trend of upward change(+5%).

In addition, the resistance value of this kind of resistor will gradually and slowly decrease to a stable value within several weeks at room temperature, which may be related to stress and so on.

However, the mechanical strength of the resistor paste is enhanced by adding silicon dioxide, and a higher proportion of silicon dioxide filler is used in the shell to reduce the effect of stress on the resistor film, so the resistance value decreases very little. After just maded 48.9 kΩ, the resistance value is stable at 48.4 kΩ after 45 days. Has preliminary practical value.

Mark the resistor with a water-based pen, and coat it with insulating paint after drying, which will make it look beautiful and the mark will not be erased easily.

It is welded in the circuit of the electron tube radio and works normally. Although it is a amateur miniaturized version, the size is still much larger than that of the industry finished product.

Attachments

  • IMG_20250405_203032.jpg
    IMG_20250405_203032.jpg
    189.6 KB · Views: 50
  • IMG_20250406_015830.jpg
    IMG_20250406_015830.jpg
    372.2 KB · Views: 45
  • IMG_20250406_030115.jpg
    IMG_20250406_030115.jpg
    291.3 KB · Views: 44
  • IMG_20250406_145305.jpg
    IMG_20250406_145305.jpg
    311.2 KB · Views: 44
  • IMG_20250406_171004.jpg
    IMG_20250406_171004.jpg
    322.6 KB · Views: 41
  • IMG_20250406_175250.jpg
    IMG_20250406_175250.jpg
    391 KB · Views: 51
  • IMG_20250406_220322.jpg
    IMG_20250406_220322.jpg
    514.6 KB · Views: 54
  • IMG_20250306_153448.jpg
    IMG_20250306_153448.jpg
    355.3 KB · Views: 50
  • IMG_20250405_210944.jpg
    IMG_20250405_210944.jpg
    210 KB · Views: 41

Transmission Electronics, Pre IMF Transmission Line or not?

ANY info would be great:
What i have sourced: They were designed by John Wright and built in electrical shop (Transmission Electronics) at 495/9 Oxford Road Reading Berks. The company was then called Transmission Electronics Ltd, and the products were badged IMF (Note this model in photos does not carry the IMF badge) Eventually the joint venture folded as the shop owner decided it wasn’t his “thing” anymore, and the IMF side went off I think around mid 1973 to High Wycombe and founded IMF Electronics Ltd. The company fully became IMF.

I
$$$$$$$$$$.jpg
$$$$$$$$$$$.jpg
$$$$$$$$$.jpg
$$$$.jpg
$$$.jpg
$$$$$.jpg
$$$$$$.jpg
$$$$$$$$.jpg
$$.jpg
$$$$$$$.jpg
can't find much info on this model.
What i do know is their made by Transmission Electronics Ltd. which later became IMF Electronics.
1×Woofer Kef B139, (1973 sticker)
1×Passive Kef
1×KEF Tweeter
1×Celestion Mid
They are very well made.
Sound fantastic.

The Othorn tapped horn

Here is a tapped horn design intended for pro sound reinforcement type applications, or any just plain old, really loud music apps that I started working on last July and finally finished the design back at the beginning of March. I worked on this in tandem with the Gjallerhorn. I decided to have the Gjallerhorn built first as it was a larger, more complicated, more expensive and risky design. Since it turned out so well I am feeling rather confident about this one. 😎 My goals with this design were true 30hz extension with solid useable output to the 25hz range. This is quite a bit lower than the majority of pro bass bins will really reach to despite their ratings. The increasing popularity of down tuned 5 and 6 string bass guitars, bass drops and the prevalance of DnB and Dubstep genres have started to ask for more power than ever from subs in the 25-35hz range. Along with this extension I wanted it to still be able to get quite loud and to retain decent sensitivity. I also decided to use an enclosure form of no larger than 36x36x24" which is large but not out of the ordinary for pro bass bins and comparable in total volume with many double 18" vented subs. A larger 45x45 type of cabinet like the Gjallerhorn or Labsub would've given better efficiency and higher output but these types of cabs are larger and heavier than I want to lug around very often. A pair of these should do most bars or small venues with no problem and 4 should do a good job in a mid sized venue. 2 will fit in the cargo hold of most medium sized suv's.

I already own a pair of B&C 21sw152-4 drivers and Danley has already used them in a couple of tapped horns so it was a no brainer to design around them.

Fast forwarding through about 9 months of design work and revisions here is what the final design will be. I will contract he same cabinet shop that built the Gjallerhorn cabs to do these as well. Unfortunately with everything else going on I don't have the time to build cabs this complicated myself anymore🙁. Besides I could never deliver the build quality that the professionals can.

BTW Thanks to Soho54 for being my sanity checker on this cab design.

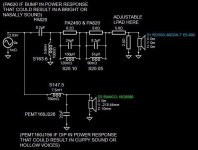
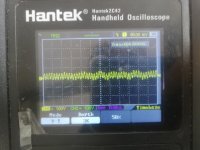
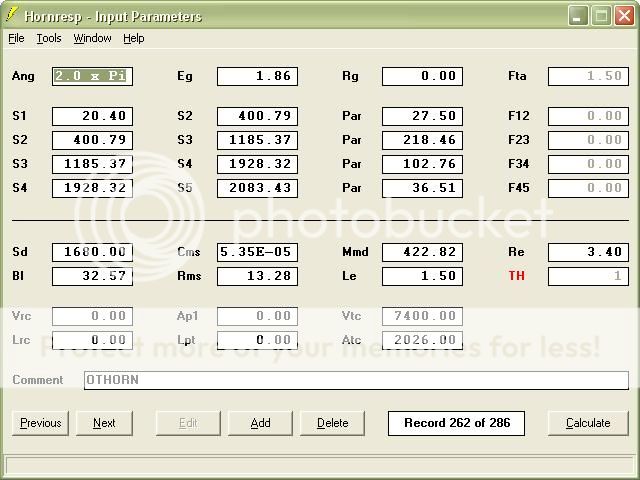
Here is the HornResponse and Akabak input data for simulating the cab. This one was also designed in Akabak working backwards from the cabinet size and best fold that would fit in the cab and achieve the right low corner instead of the other way around. I have found this works much easier for me than coming up with a pretty simulation and trying to fold and cram it into a workable cabinet while maintaining the parameters. Once again I use Akabak since there were so many folds, different expansion rates and corners involved. Amazingly the much simpler HR simulation that approximates the final Akabak one is very close. The differences are there but quite small. Not worth worrying about for most people unless you are a stickler like me who is worried about accuracy to the nth degree. Anyway here are the inputs.


NOTE: If you wish to model 18" drivers in this cabinet you should change the value of VTC to 4000 and the ATC value to 1465

HR
OTHORNHRinput.jpg


Akabak script
|COMMENT: OTHORN B&C 21SW152-4 30hz TH 36"x36"x24" revised 030411 completion(Driver restricts horn by approximately 517cm2 at S32)


|========================================================================================================


|REQUIRED AKABAK SETTINGS:


|File > Preferences > Physical system constants:


|Sound velocity c = 344m/s

|Medium density rho = 1.205kg/m3


|Sum > Acoustic power:


|Frequency range = 10Hz to 20kHz

|Points = 533

|Input voltage = 1.86V rms

|Integration = 2Pi-sr

|Integration steps = 1 degree ... 1 degree

|Integration method = Cross


|========================================================================================================


Def_Const |

{

|Length, area and volume values converted to metres, square metres and cubic metres:


S1 = 20.397216e-4; |Horn segment 1 throat area (sq cm)
S2 = 400.79072e-4; |Horn segment 1 mouth area and horn segment 2 throat area (sq cm)
S3 = 480.93721e-4; |Horn segment 2 mouth area and horn segment 3 throat area (sq cm)
S4 = 490.40735e-4; |Horn segment 3 mouth area and horn segment 4 throat area (sq cm)
S5 = 499.87748e-4; |Horn segment 4 mouth area and horn segment 5 throat area (sq cm)
S6 = 503.41786e-4; |Horn segment 5 mouth area and horn segment 6 throat area (sq cm)
S7 = 752.67183e-4; |Horn segment 6 mouth area and horn segment 7 throat area (sq cm)
S8 = 525.374e-4; |Horn segment 7 mouth area and horn segment 8 throat area (sq cm)
S9 = 672.07369e-4; |Horn segment 8 mouth area and horn segment 9 throat area (sq cm)
S10 = 1003.4701e-4; |Horn segment 9 mouth area and horn segment 10 throat area (sq cm)
S11 = 706.47214e-4; |Horn segment 10 mouth area and horn segment 11 throat area (sq cm)
S12 = 710.68271e-4; |Horn segment 11 mouth area and horn segment 12 throat area (sq cm)
S13 = 1011.4833e-4; |Horn segment 12 mouth area and horn segment 13 throat area (sq cm)
S14 = 744.03216e-4; |Horn segment 13 mouth area and horn segment 14 throat area (sq cm)
S15 = 827.70445e-4; |Horn segment 14 mouth area and horn segment 15 throat area (sq cm)
S16 = 1148.9606e-4; |Horn segment 15 mouth area and horn segment 16 throat area (sq cm)
S17 = 850.19967e-4; |Horn segment 16 mouth area and horn segment 17 throat area (sq cm)
S18 = 852.58905e-4; |Horn segment 17 mouth area and horn segment 18 throat area (sq cm)
S19 = 1222.0554e-4; |Horn segment 18 mouth area and horn segment 19 throat area (sq cm)
S20 = 876.8326e-4; |Horn segment 19 mouth area and horn segment 20 throat area (sq cm)
S21 = 434.06586e-4; |Horn segment 20 mouth area and horn segment 21a throat area (sq cm)
S22 = 572.31875e-4; |Horn segment 21a mouth area and horn segment 22a throat area (sq cm)|
S23 = 1185.3696e-4; |Horn segment 22a mouth area and horn segment 23 throat area (sq cm)
S24 = 1724.8322e-4; |Horn segment 23 mouth area and horn segment 24 throat area (sq cm)
S25 = 1255.2883e-4; |Horn segment 24 mouth area and horn segment 25 throat area (sq cm)
S26 = 619.44195e-4; |Horn segment 25 mouth area and horn segment 26a throat area (sq cm)|
S27 = 680.54455e-4; |Horn segment 26a mouth area and horn segment 27a throat area (sq cm)|
S28 = 1400.7642e-4; |Horn segment 27a mouth area and horn segment 28 throat area (sq cm)
S29 = 2279.1994e-4; |Horn segment 28 mouth area and horn segment 29 throat area (sq cm)
S30 = 1799.9231e-4; |Horn segment 29 mouth area and horn segment 30 throat area (sq cm)
S31 = 1805.1536e-4; |Horn segment 30 mouth area and horn segment 31 throat area (sq cm)
S32 = 1411.3236e-4; |Horn segment 31 mouth area and horn segment 32 throat area (sq cm)/(1411.3236cm restricted by driver (estimated),1928.3236cm ignoring driver in path)
S33 = 2043.1017e-4; |Horn segment 32 mouth area and horn segment 33 throat area (sq cm)
S34 = 2057.0009e-4; |Horn segment 33 mouth area and horn segment 34 throat area (sq cm)
S35 = 2260.638e-4; |Horn segment 34 mouth area (sq cm)

L12 = 27.504644e-2; |Horn segment 1 axial length (cm)
L23 = 27.258518e-2; |Horn segment 2 axial length (cm)
L34 = 3.070098e-2; |Horn segment 3 axial length (cm)
L45 = 3.355594e-2; |Horn segment 4 axial length (cm)
L56 = 1.203198e-2; |Horn segment 5 axial length (cm)
L67 = 3.625088e-2; |Horn segment 6 axial length (cm)
L78 = 3.781298e-2; |Horn segment 7 axial length (cm)
L89 = 41.853612e-2; |Horn segment 8 axial length (cm)
L910 = 4.81838e-2; |Horn segment 9 axial length (cm)
L1011 = 5.029708e-2; |Horn segment 10 axial length (cm)
L1112 = 1.20142e-2; |Horn segment 11 axial length (cm)
L1213 = 4.740656e-2; |Horn segment 12 axial length (cm)
L1314 = 4.877562e-2; |Horn segment 13 axial length (cm)
L1415 = 37.930582e-2; |Horn segment 14 axial length (cm)
L1516 = 5.453888e-2; |Horn segment 15 axial length (cm)
L1617 = 5.582412e-2; |Horn segment 16 axial length (cm)
L1718 = 1.20269e-2; |Horn segment 17 axial length (cm)
L1819 = 5.869432e-2; |Horn segment 18 axial length (cm)
L1920 = 6.282436e-2; |Horn segment 19 axial length (cm)
L2021 = 1.371346e-2; |Horn segment 20 axial length (cm)
L2122 = 46.972982e-2; |Horn segment 21a axial length (cm)
L2223 = 2.97434e-2; |Horn segment 22 axial length (cm)
L2324 = 7.91972e-2; |Horn segment 23 axial length (cm)
L2425 = 8.488172e-2; |Horn segment 24 axial length (cm)
L2526 = 2.246376e-2; |Horn segment 25 axial length (cm)
L2627 = 30.794452e-2; |Horn segment 26a axial length (cm)
L2728 = 2.872232e-2; |Horn segment 27 axial length (cm)
L2829 = 11.00836e-2; |Horn segment 28 axial length (cm)
L2930 = 10.296144e-2; |Horn segment 29 axial length (cm)
L3031 = 1.199134e-2; |Horn segment 30 axial length (cm)
L3132 = 27.93238e-2; |Horn segment 31 axial length (cm)
L3233 = 26.647902e-2; |Horn segment 32 axial length (cm)
L3334 = 3.189478e-2; |Horn segment 33 axial length (cm)
L3435 = 6.672834e-2; |Horn segment 34 axial length (cm)

Vtc = 7400e-6; |Throat chamber volume (cc)(Estimated)

Atc = 2026.00e-4; |Throat chamber cross-sectional area (sq cm) (Estimated)


|Parameter Conversions:


Sd = 1680.00e-4; |Diaphragm area (sq cm)


Ltc = Vtc / Atc;

}

|========================================================================================================


|Network node numbers for this tapped horn system:


| 0-Voltage-1

| |

| -Chamber-5-Driver---

| | |

|8-Segment-9-Segment-10-Segment-11-Segment-12-Segment-13-Segment-14-Segment-15-Segment-16-Segment-17-Segment-18-Segment-19-Segment-20-Segment-21-Segment-22-Segment-23-Segment-24-Segment-25-Segment-26-Segment-27-Segment-28-Segment-29-Segment-30-Segment-31-Segment-32-Segment-33-Segment-34-Segment-35-Segment-36-Segment-37-Segment-38-Segment-39-Segment-40-Segment-41-Segment-42-Radiator


|========================================================================================================


Def_Driver 'Driver'


Sd=1680.00cm2

Bl=32.57Tm

Cms=5.35E-05m/N

Rms=13.28Ns/m

fs=32.0001Hz |Mmd = 422.82g not recognised by AkAbak, fs calculated and used instead

Le=1.50mH

Re=3.40ohm

ExpoLe=1


System 'System'


Driver Def='Driver''Driver'

Node=1=0=5=39


Duct 'Throat chamber'

Node=5=9

SD={Atc}

Len={Ltc}

Visc=0


Waveguide 'Segment 1'

Node=8=9

STh={S1}

SMo={S2}

Len={L12}


Waveguide 'Segment 2'

Node=9=10

STh={S2}

SMo={S3}

Len={L23}


Waveguide 'Segment 3'

Node=10=11

STh={S3}

SMo={S4}

Len={L34}


Waveguide 'Segment 4'

Node=11=12

STh={S4}

SMo={S5}

Len={L45}


Waveguide 'Segment 5'

Node=12=13

STh={S5}

SMo={S6}

Len={L56}


Waveguide 'Segment 6'

Node=13=14

STh={S6}

SMo={S7}

Len={L67}


Waveguide 'Segment 7'

Node=15=14

STh={S8}

SMo={S7}

Len={L78}


Waveguide 'Segment 8'

Node=15=16

STh={S8}

SMo={S9}

Len={L89}


Waveguide 'Segment 9'

Node=16=17

STh={S9}

SMo={S10}

Len={L910}


Waveguide 'Segment 10'

Node=18=17

STh={S11}

SMo={S10}

Len={L1011}


Waveguide 'Segment 11'

Node=18=19

STh={S11}

SMo={S12}

Len={L1112}


Waveguide 'Segment 12'

Node=19=20

STh={S12}

SMo={S13}

Len={L1213}


Waveguide 'Segment 13'

Node=21=20

STh={S14}

SMo={S13}

Len={L1314}


Waveguide 'Segment 14'

Node=21=22

STh={S14}

SMo={S15}

Len={L1415}


Waveguide 'Segment 15'

Node=22=23

STh={S15}

SMo={S16}

Len={L1516}


Waveguide 'Segment 16'

Node=24=23

STh={S17}

SMo={S16}

Len={L1617}


Waveguide 'Segment 17'

Node=24=25

STh={S17}

SMo={S18}

Len={L1718}


Waveguide 'Segment 18'

Node=25=26

STh={S18}

SMo={S19}

Len={L1819}


Waveguide 'Segment 19'

Node=27=26

STh={S20}

SMo={S19}

Len={L1920}


Waveguide 'Segment 20'

Node=28=27

STh={S21}

SMo={S20}

Len={L2021}


Waveguide 'Segment 21'

Node=28=29

STh={S21}

SMo={S22}

Len={L2122}


Waveguide 'Segment 21b'

Node=28=29

STh={S21}

SMo={S22}

Len={L2122}


Waveguide 'Segment 22'

Node=29=30

STh={S22}

SMo={S23}

Len={L2223}


Waveguide 'Segment 23'

Node=30=31

STh={S23}

SMo={S24}

Len={L2324}


Waveguide 'Segment 24'

Node=32=31

STh={S25}

SMo={S24}

Len={L2425}


Waveguide 'Segment 25'

Node=33=32

STh={S26}

SMo={S25}

Len={L2526}


Waveguide 'Segment 26'

Node=33=34

STh={S26}

SMo={S27}

Len={L2627}


Waveguide 'Segment 26b'

Node=33=34

STh={S26}

SMo={S27}

Len={L2627}


Waveguide 'Segment 27'

Node=34=35

STh={S27}

SMo={S28}

Len={L2728}


Waveguide 'Segment 28'

Node=36=35

STh={S28}

SMo={S29}

Len={L2829}


Waveguide 'Segment 29'

Node=36=37

STh={S30}

SMo={S29}

Len={L2930}


Waveguide 'Segment 30'

Node=37=38

STh={S30}

SMo={S31}

Len={L3031}


Waveguide 'Segment 31'

Node=39=38

STh={S32}

SMo={S31}

Len={L3132}


Waveguide 'Segment 32'

Node=39=40

STh={S32}

SMo={S33}

Len={L3233}


Waveguide 'Segment 33'

Node=40=41

STh={S33}

SMo={S34}

Len={L3334}


Waveguide 'Segment 34'

Node=41=42

STh={S34}

SMo={S35}

Len={L3435}

Radiator 'Horn mouth'

Node=42

SD={S35}

Reverse-feeding stepdown transformer as stepup

I'm seeking some advice as to what rating a stepdown XFMR (VA, voltage) would require to be a candidate for stepping 12VAC up to 25-26VAC/CT (i.e. 50VAC series) when reverse-fed (i.e. primary/sec swapped). This is to create a bipolar supply (317/337 regulation) of ± 27-30V, with 60mA draw on each rail, to power a graphic EQ with discrete op amps. I'd like to apply Elvee's D-Noizator mod as well.

I have tried this with a 6VA 48V (24-CT-24) split bobbin XFMR (Triad Magnetics FS48-125-C2), and the results were abysmal. Flipping the XFMR and feeding the series secondary as a primary yielded 2 X 23.3VAC, or 32V rectified, (no load). These rails collapse to <14V with even a 1K load across them. Obviously this XFMR is woefully underrated for what I'm trying to do. The 12VAC supply was a 10A rated supply; the 12VAC supply did not sag, nor did it have any DC on it.

I now understand that XFMRs are not inherently bidirectional, and have extra windings to account for regulation. So it seems one must up the VA rating to antitipate lossy operation when reverse-feeding, and plan for the loss of voltage due to regulation compensation, the question is by how much? Are split bobbins notoriously bad for this? I've read toroids might offer better performance in this regard (?)

A copmpany engineer suggested a 7VA toroid would hold up to my demands, but I'm not so sure.

This is for a guitar effects pedal with discrete op amps that run at 25-30V. Connecting to mains isn't an option for me (and effects pedals typically have wall adapters anyway), and the emissions testing required for a SMPS is also prohibitive at this stage (I may make these units for commercial sale at some point). The plan is to utilise wall wart 12VAC adapters. There are other effects pedals that flip prim/sec sides to step up voltages in this manner (e.g. for tube plate voltages), which is where I hatched the idea.

I'm going to have to buy a bunch of different XFMRs to try out, but any advice on ballpark XFMR ratings (and what I need to consider generally) would help me greatly in saving on getting redundant parts.

TL;DR: Seeking advice on mimum XFMR specs for reverse feeding as a stepup (12VAC into secondary, now acting as primary) to obtain bipolar supply of ± 27-30V, 60mA draw per rail.

Thank you very much.

Hum from monoblocks when RCA cable is connected

Hello Masters, i need advise hopefully to resolve hum issue.
The monoblocks are Cary 805B - they're SET DHT with 6sl7 > 300B > 211.
When they turned on and connected to speakers and disconnected from a PRE - virtually zero hum comes from speakers (klipsch La Scala with 104 db sensitivity).
When RCA cables are connected from the PRE - 50hz hum appears. Not too bad - but it's there.
Hum level lower when only one monoblock is connected to the PRE. When both are connected the hum is louder.
Basic digital voltmeter (not sure if it's True RMS) shows 0.3-0.4 mv AC at speaker outputs.

Nothing connected to the PREamp.
Power cables of the PRE and the monoblocks go to the same AC strip (no filtering).
All equipment in the room is unplugged from AC.
AC receptacles + cables are USA style - so only one way is possible.

Different sets of power cables were tested.
2 sets of RCA cables were tested (all 3m/10ft length).
2 preamps were tested.

With 2 other stereo power amps i don't have this issue - both are tube push-pull, but one chassis stereo, not separate monoblocks...

What do you think?
Is there a hope?
Or having DHT with separate chassis i'm doomed for hum?

Thanks in advance !!!!

About to start building a pair of ACA kits

I have good soldering skills, have built 10 or so tuner, preamp, amp kits in my life, both SS and tube.
But never had an identical pair of kits waiting to be built. So my question:

Should I build both kits simultaneously, or finish one before I start the second?
I am leaning towards doing both at the same time but I can see one big risk to that; if I later find I did something wrong, I likely will have done it wrong twice, and will need to fix it twice!

What say you?
  • Like
Reactions: STOXX

My Transistors, original or copy?

This thread intended to be an information resource for all. Please post measured data and photos for complimentary pairs in one post. The data will be condensed so we have a single post for each type to make things easy to look up. It will be a sticky.

I would like to thank MikeB for encouraging the creation of this resource, and all the members who have collected and posted information previously. Also the members who post new data. We will condense new information into a pre-existing post for the type number. All O.T. posts will be removed to keep this thread clean and useful.

My hope is that this thread will assist members in their semiconductor purchases. Another thread on this can be found here.

-Chris

ZEN Amplifier Mini with IRF610 as Headphone Amplifier for 32 Ohm

The ZEN Amplifier concept is simple. But it works great.
Here is such an amplifier but with less current and uses IRF610 as MOSFET.
It makes a simple and sweet headphone amp.

Building shouldn't be difficult.
The heatsinking it takes is not so much.
There is some THD, but it is mainly 2nd harmonic.
So, it would be good listening.

The amp is designed for 32 Ohms headphones.
For other impedances it may need tweaking to make it alright.

ZEN Mini Headphone Amp_19.jpg
  • Like
Reactions: mawi and decramer

Did you know that Mouser sells Visaton?

Here is something I didn't expect: Mouser electronics https://www.mouser.com/ sells Visaton drivers and even entire speakers!
1747875475921.png

They sell individual drivers too.
1747875576007.png


I looked up the price for one randomly-selected driver - TIW250XS8, a very nice 8" woofer.
Parts express: $296.98
Mouser: $238.74

I'm just so surprised. Does anyone know how Mouser's price for a whole speaker compare to retail stores?
  • Like
Reactions: rsavas

FREE Mackie SDR 24/96 hard disc recorder

Virtually new Mackie hard disc recorder, 24 tracks simultaneous recording, mounted in Gator hard case. A number of DB25 cables for input and output are also included.

Because if bulk and lack of original box, only available for free pickup in Washington DC area (Bethesda MD).

PM if you need photos but really, since it is free, do really need the photos?

EAR834P Project

I have started a new Phono Stage project. After watching Stephe's series and reading a lot of the discussions I decided to get one of the built up Chinese clones and then upgrade the critical components. I settled on the two chassis version with a volume control. I think that I have a plan!

In addition to Stephe's series I got a lot of ideas from the discussion here: https://www.lencoheaven.net/forum/index.php?topic=26658.0

I got a unit without tubes for $158 from AliExpress. Shipping via DHL was like 75 bucks. I was amazed that they got it to Pennsylvania from Hong Kong in four days!

PXL_20231016_191709935.jpg


It looks very nicely put together inside and out. These things are not available on Amazon and I don't think that they are really intended for the American market, but rather aimed at audiophiles in Hong Kong.

I auditioned it briefly as it came and it's not bad. There is plenty of gain and no noise or hum to speak of. The tonal balance seems pretty even and extended. The soundstage was not very wide or deep at all. Focus was okay on that miniature stage.

The first upgrade on my list is to add the choke to the power supply and I got that done this afternoon.
PXL_20231020_200302867.jpg
PXL_20231020_201657474.jpg
PXL_20231020_210221990.jpg


The replacement coupling caps should be here tomorrow. I ended up getting two Mundorfs and one Clarity Cap. Mundorf makes a 0.15 mf but I couldn't find them.

I have decided to go closer to Stephe's plan and not remove the subsonic filter between V2 and V3 as Thorsten's mods do. I am using Robert's RIAA values, however. I have ordered the precision mica caps and resistors to replace the RIAA filters. The parts here are just okay.
PXL_20231019_074251865.jpg


I have decided to also bypass the electrolytics on the signal board and ordered the film caps needed. While I'm at it I'm going to put caps across the tube heaters. These will go on the bottom of the board.

The power supply is marked 115v and the voltages are just a bit high with my 123ish wall voltage. Not out of spec but higher than ideal: B+ is around 297 and my heaters are at like 6.7 volts. The treatise that I linked above describes how to change the diodes to adjust B+ and which resistors to change for the 6.3 circuit, but I think that I'm just going to build a bucking transformer. It seems like a 6.3v heater circuit transformer would be just right.

I'll let you all know how it goes and how it sounds as I go.

Pete
  • Like
Reactions: chrisng

Hardwire RCA cable for turntable

I am replacing the RCA hardwire cable for a turntable restoration. The cable is connected to the turntable via the pictured harness. The middle black wire is ground wire that connects to the receiver/pre-amp, the outer wires are right and left signal and ground. The second image is the Mogami 2549 cable I am using. So I do this correctly, do I trim the shield on both ends of the Mogami and connect one wire for signal, the other for ground, for both R/L connections on the RCA connector and the turntable harness? I will connect a 5th wire for the component ground (middle black wire on harness)

appreciate the help


tempImageHlTahh.gifScreenshot 2025-05-21 at 2.50.57 PM.png

New member, long-time DIY'er

Hoo-boy... goes back now 4 decades of the hobby on and off... But, I came by it honestly. My dad wrote for Stereo Review for many years and I helped out with testing gear back then, which morphed into reviving old Dynaco gear, which morphed into obsessively reading and building things in The Audio Amateur, which even led to writing a few things for Speaker Builder, which led to amps, DACs, speakers, etc. Now, getting back into things with a DSP DAC project.

Luxman LV105 need help

Hello I am new to the site and am hoping someone with knowledge of the Luxman Lv105 can chime in with some information .. I purchased this unit as a fixer upper ,I have a LV103 and love it . Had a chance and a Lv105 not the U version , for very cheap because it's been messed with by a real hack. Anyway my first problem is getting a usable schematic for this amp ,I downloaded one but the numbers on my board are not the same as the schematic making it impossible to get your bearings . first thing I need to identify is a resistor on the protection board , it's been removed for some reason so I have nothing to go by .. on the board it's printed R-7376 . More questions to come but thought I would start simple . cheers and thanks in advance for any help .. Roger

Morning from new member in Yorkshire, UK

Just stumbled across a thread on the Jim Rogers DW2 Bass Speaker which was fascinating to read. Following retirement I have resurrected my 1980's system which has been in storage for the last 40 years or so, as I just haven't had a suitable room to listen in. Have now moved, all is up and running and to my utter astonishment it sounds to my ears, simply stunning - god only knows how it all still works! You guessed it, the system includes a DW2 and I even have the original typed instructions which I will post on the relevant thread. Would love to get rid of the open wire bindings for banana plugs, so maybe something I will attempt with a mate of mine who is good with this tyoe of thing! Cheers for now Andy
System as follows
Late 70's Rega Planar 2 with Ortofon Concorde
Quad 306 plus matching preamp & FM tuner on dedicared Quad stand
Goodmans LS3/5A on modern Attacam stands with dedicated baseplates + aforementioned Jim Rogers DW2
Denon DCD-1520 CD player

Happy to post photos if anyone is interested!
  • Like
Reactions: Galu

PMC TB2+ analysis, measurements and foam replacement - Part II

The PMC TB2+ cabinet
The TB2 cabinet measures 20x30x40 cm (BxDxH) on the outside. Inside it looks like this.

PMC TB2i cabinet drawing 17052025.jpg


The line that is folded into this cabinet is a straight line with the following dimensions:
  • Line lenght 1,145 mtr.
  • Line cross section 8x16 = 128 cm²
  • Woofer position 17,3cm from the start of the line
  • Port cross section 7x15,5cm = 108,5 cm²
The effective volume of the cabinet is about 15 liters.
A line lenght of 1,145 mtr gives a quarter wavelength resonance frequency of about ~75Hz.

The drawing shows a schematic picture of the line, and shows the damping material distribution.

PMC TB2 line dimensions and damping.jpg


The red damping layer is a white eggcrate foam 50mm thick. The green small damping piece directly behind the woofer is also an eggcrate white foam, 25mm thick. The port is closed with a foam plug, a piece of reticulated black foam about 3cm thick. The white foam is in perfect condition, the foam in the port opening deteriorates over the years and reduces to dust.

Below some photos. Left the view through the tweeter mounting hole. The top of the first divider is clearly visible. Damping material lines the whole lenght of the line, including the top and bottom of the cabinet. Right is the view from the woofer, with in the center the small piece of 25mm thick eggcrate damping material that basically covers the backside of the woofer.

IMG20250509191824.jpg
IMG20250511183404.jpg


The view through the removed speaker connector panel. It shows the bottom of the second divider.

IMG20250511183549.jpg


The crossover
The crossover is mounted on the backside of the connector panel.
The component side. The PCB is doublesided.

IMG20250509191050.jpg
IMG20250510195704.jpg


The crossover is a simple 12dB/oct lowpass, combined with a 12dB/oct highpass filter. Drivers are connected out of phase.

PMC TB2+ crossover 21052025.jpg


The 20uF capacitor is an Alcap, 100V, 10% type. The 3,0uF is a Bennic XPP, 5%, 250V type.

Speaker and driver impedance with crossover
This shows the speaker and driver impedance response for both speakers. Red= speaker response, white=tweeter, green= woofer.

PMC TB2+ Speaker A Red=speaker White=Tweeter Green=Woofer impedance.png

Speaker A

PMC TB2+ Speaker B Red=speaker White=Tweeter Green=Woofer impedance.png

Speaker B

From the impedance response the line tuning frequency is about 50Hz. The crossover frequency is around 2,5Khz.

Woofer TS parameters
The woofers are Vifa M17WG-09-08 models. These are old drivers so before I measured the TS parameters I run them through a burn in routine for about 40hrs near maximum excursion (~4mm peak) and frequencies between 20-35Hz. I measured the parameters three times but the differences were small. The method used was "added mass" (15 gramm).

IMG20250516190010.jpg


PMC woofer B TS param 1V + impedance20052025.png
PMC woofer B TS param 1V 20052025.png


PMC woofer A TS param 1V + impedance20052025.png
PMC woofer A TS param 1V 20052025.png


To check on these measurement I looked for data sheets and other measurements. I found more that I expected:
  • A review from Klang & Ton 2/2005
  • A Tymphany Vifa datasheet
  • Peerless M17WG09-08 data from the loudspeakerdatabase.com
Data sourceFsQmsQesQtsCmsRmsVasMms
K&T 2/200548,682,360,670,520,891,6925,6911.97
Tymphany-Vifa datasheet442,770,560,46----3411
Peerless specs56,33,840.90,730,6821,0819,611.7
Clio driver A59,333,120,960,740,59971,4317,1312
Clio driver B57,863,260,920,720,61631,3717,612,28

My own measurements are very close to the Peerless specs. The K&T and the Tymphany-Vifa specs are very similar. I don't know what conclusions, if any, can be drawn from these results. For now I will trust my own measurements.

Attachments

  • IMG20250509191104.jpg
    IMG20250509191104.jpg
    364.2 KB · Views: 97
  • IMG20250510195704.jpg
    IMG20250510195704.jpg
    221.5 KB · Views: 29
  • Tymphany Vifa M17WG-09-08.pdf
    Tymphany Vifa M17WG-09-08.pdf
    107.8 KB · Views: 22

ECC83 valve running with +100 volts on the grid

Hi Folks, I've just fixed a VOX AC30 S1 guitar amp which had, in the past, blown the heater fuse and had It's ECC83 (V1) replaced. I put this down to maybe a heater/cathode short.
This time V1 has gone again and when tested it shows the grid voltage having know effect of anode current - A new ECC83 has fixed the problem.

However, the AC30 S1 schematic shows V1(b) grid being driven directly from the anode of V1 (a) which is 99.5v. its cathode is 100v which is correctly biased. When I look at the datasheet for the ECC83 it shows max positive grid voltage is zero volts. Is it therefore safe to run the ECC83 with such a high positive voltage on it's grid and am I looking at another valve failure in the future?
Your advice would be appreciated.
Regards Geoff.

Attachments

PCB Adapters for upgrade crystals

Hi! Want to share an idea about upgrading crystals to good oscillators. Here is a probe of such one, while studiyng KiCad. First one is for upgrade 2pin crystals in HC-49/US case (11.35mm x 5.00mm, 5mm spacing between legs). Capacitor C4 is optional and needed in cases where logic level is higher than 3.3V, in other cases we solder a jumper instead. Regulator voltage 1.8/3.3V need to be choosen depending to logic level, according to datasheet of IC. XO pin need to cut and I propose to use it hole as gnd for adapter and it's out need to be connected to XI pin/hole. I would be glad to receive useful advice regarding board design in KiCad.

Attachments

  • Osc1.jpg
    Osc1.jpg
    23.4 KB · Views: 62
  • Osc2.jpg
    Osc2.jpg
    22.2 KB · Views: 59
  • Osc3.jpg
    Osc3.jpg
    21 KB · Views: 64

Unstable Bias on Accuphase P-266: Need Help Diagnosing

For a while, I’ve been stuck on repairing a channel of my Accuphase P-266. Initially, I tracked the fault to a shorted dual transistor (Q3: uPA75V) in the complementary differential input stage. I replaced both dual transistors with matched KSC1845 and KSA992 transistors. Additionally, I discovered that the R23 68-ohm fusible resistor was open, so I replaced it with a regular metal film resistor.

When I turned the amplifier on, nothing seemed out of the ordinary. However, when I began measuring the bias on T.P.1, I noticed the reading was very unstable. According to the schematic, the correct reading for T.P.1 in class AB mode is 88mV, but the value fluctuated wildly. It would jump well above 100mV and sometimes drop all the way down to 14mV.

I tested all the semiconductors in diode mode with my multimeter and didn’t find any anomalies. I’ve also replaced all the electrolytic capacitors. At this point, I’m stumped and unsure of what could be causing the issue.

Here are a few possibilities I’m considering:
  1. Could the trimmpotentiometers be faulty? I’ve cleaned them with IPA and lubricated them with contact cleaner, but could they still be causing the instability?
  2. Could the new complementary differential input transistors I installed be contributing to the problem?
  3. Is it possible that a diode or a transistor, while testing well, is failing under load?

I’ve attached a photo of the repaired board for reference. I would appreciate any insights or advice!

Attachments

  • IMG_0585.jpg
    IMG_0585.jpg
    418.7 KB · Views: 130
  • IMG_0586 1.jpg
    IMG_0586 1.jpg
    387.3 KB · Views: 124
  • accuphase_p-266_sch.pdf
    accuphase_p-266_sch.pdf
    169.2 KB · Views: 109

Accuphase P-266 VU meter issue.

Hi guys, quick question which may have a long answer.
I spotted a cheap P-266 power amp for sale. This is one of the old school Accuphase models which can switch between class AB and A.
An issue the seller has mentioned with a photo attached- both VU meters on power up, rest at -30. But they are not stuck, they 'work'.
Is this possibly indicative of a problem with the amp? Or that the meters simply need recalibration?

Attachments

  • 20190224_094952.jpg
    20190224_094952.jpg
    118.5 KB · Views: 147

ESP P101 mosfet amp - how quiet?

I see that on Rod's ESP site, he measures his MOSFET amp as having noise of <2mV RMS (unweighted -54dBV). A voltage seems to be a sensible way of measuring noise, but I'm not informed enough to know how this value compares to the SNR quoted on most commercial amp specifications (e.g. 116dB), so i'm struggling to put it into context. I realise this will be an incredibly basic question for many of you, but for thicko here is it comparable or convertible in some way? Or is it good/bad/indifferent?

For those of you who have built your own version of these, I'd also be interested to hear if you felt it was quiet or noisy compared to other amps, and if you made any mistakes or improvements etc related to noise/hiss/hum and so on of the completed amplifier. Obviously there'll be other sources of noise too (interconnects, upstream equipment etc) but this question is particularly about the amp (and PSU) built to Rod's official guides.

I'm interested in this particular amp because I already have the official PCBs and most components, bought some years ago but then never built. I'm trying to decide if I'd want to build and use it for my next application: an active configuration involving potentially sensitive drivers rather close to the listening position. In this case it seems very likely that noise of lower levels than normal might become quite audible, and I really dislike hearing it.

Thanks,
Kev

Another corner array project

In the next few months I expect to start the build of a corner vertical array pair of speakers.

This will be used in a fairly small lounge living room with multiple sources, digital and analogue.

  • Vinyl
  • CD
  • Streaming, media etc
  • TV
  • Computer files
My hopes and expectations are.

  • To put them right in the corners, out the way. I took the pic attached when moving the furniture around just to show where they would go, right in the corners outside where the current speakers are standing at the time of the picture. I should explain that the current speakers are not normally diverging and the polystyrene sheet next to the TV is just old packaging! – the sound bar etc would go. The room is very asymmetric, the left “corner” of the listening area being created by a pillar that holds the structure for upstairs. I don’t know what happens with the structural beam running across, in terms of reflections.
  • To significantly exceed the sound quality available from commercially available loudspeakers.
  • To reduce to a minimum the listening position sensitivity one normally finds with two speaker stereo speakers, which I understand these should help with.
  • To hear some of the magic attributed to vertical arrays of full range speakers.
  • Ultimately to make it fairly simple to operate and control, remotes for source and volume would be nice.
  • I imagine my project would be a decide, design and build and use project, not numerous constant experiments, and so would not follow the depths and details of projects like the two towers, admirable though I am sure they are.
I need to decide what to build, I have taken some ideas from kind, patient and encouraging friends and read about the Roger Russel IDS 25, and I have looked carefully at Murphys Corner array. I have read lots of the threads on the forum and it’s fair to say one can easily become confused!

Consequently I thought to start a thread that others might follow later if they wished.

Some current outstanding questions for starters are;

  • Amplification, I have an existing old Musical Fidelity A100 that might be pressed into service?
  • EQ, I have no experience other than that gathered from operating my Hypex plate amps that drive the bass and provide room EQ of my 3-way system I built a few years ago to the Troels Gravesen Fusion design for another room. So I have the UMIK1 and measured and adjusted to achieve a reasonable in room plot with those.
  • I have read about different wiring, shading etc and am rapidly moving out of areas I understand!
  • Currently I would intend to build a wooden cabinet (maybe black MDF) version of Murphys Corner array or some of the others, with around 50 (25 per side) Vifa TC 9’s, and move on gradually from there.
  • If I build a cabinet with 25 units at 83.7mm each that totals 2092.5mm and the room is 2425 high. What happens to the remaining 332.5 mm, a little bit for the base etc, but then the arrays are not fully floor to ceiling, does this matter?
  • I understand its sensible to buy some spares, so maybe 55 units, I wonder if I can get a reasonable price somewhere on that number?
  • I have read of volume per unit at 1.5 to 2.7 litres, some sealed some not………..To fit the corners neatly the small end would be easier, a triangle section or similar with knocked off corners.
  • If the cabinets are suitably designed they could bolt into rawl bolts on the walls to keep them as rigidly mounted as the walls?
  • A black grille finish, as seen on threads appeals to make them as inconspicuous as possible.
  • A foam/felt strip either side of the driver lines might keep the grille/cover at a reasonable clearance and deal with some edge effects satisfactorily?
I am comfortable with the woodwork and simple electronics.

I have read a good part of the many threads and contributions and would greatly appreciate input of guidance, knowledge, experience and expertise from those of you who have the kindness and patience!

I would then document decisions and results as they come along.

Many thanks in advance

M

20240222_184055.jpg

Accuphase C-280, E-303X, P-266, P-300L, P-500 and others diagrams, repair etc

I was looking for a schematic or service manual of P-300L (problem solved).

Data of the mains transformer alone would be nice also,
because it is burnt.

This is not for the first time a defective transformer is
encountered on Accuphase amps or japanese gear in
general.

The german importer will not provide schematics any
more "because of sole property of Accuphase". This
has been different in the past though.

Thank you for response.

Edit: I can help with diagrams for C240 , C280 , E202 , E204 ,
E303 , E305 , P11 , P266 , P500 as paper copies, maybe
PDF later.

Edit for search engine: C-240 , C-280 , E-202 , E-204 ,
E-303 , E-305 , P-11 , P-266 , P-500

Edit: P-266L schematics in post 25,
C-280 in post 36 , high resolution in post 104
P-500 in 37,
E-303X in 38.
P-300 L see post 67 .. 69.

Edit: Accuphase P-11 power amp schematic in post 42

C-240 preamp schematic
is in post 43.
C - 280V schematic in post 80

M-60 mono power amp service manual
see post 44.

E-303 power amp schematic here https://www.diyaudio.com/forums/solid-state/360711-accuphase-303-dc-offset-issue.html#post6362484

Somebody offered Service manual for E-550 Integrated Amp in post 45, see also post 55.

Many Accuphase and other schematics listed here : Schematics – Audio-Circuit [.dk]

More Accuphase manuals, even for service : Accuphase manuals | Hifi Manuals Free: Service Manuals, Owners Manuals, Schematics online for free download .. is this https://www.vintageshifi.com/ now defunct ?

Accuphase P-600 schematic photo is here :
https://www.diyaudio.com/community/threads/accuphase-p600.410952/#post-7644118

A-45 and others see post 92 and 92

Better scan for E-303X schematic is here :

The making of: The Two Towers (a 25 driver Full Range line array)

After riding along on a few different line array threads I figured this project deserved it's own thread.
I wanted to get new speakers for my living room for a while but could not quite find something I liked.
The speakers I have right now are just too big to use in a proper setup. In a domestic setting with a girlfriend and a 7 year old son there's just not much room to place anything. After surfing the net in search for an answer I stumbled over several line array's.
Now that was something I thought had potential! Way lower floor space needed than my current speakers with 15" woofers.

So the idea was born to build line array's using 25 full range drivers in each array, long enough to somewhat be floor to ceiling.

Next problem, what should it look like? And what materials to use? I remember seeing a DIY thread with a translam construction. That idea was very appealing to me. You can make it any shape you want on the outside and the inner walls can be used to benefit the design.

I started up my favorite 3D program and started sketching. Pretty soon I had some ideas about the outer and inner shape. Here's a much later version to give an idea:
stacked.jpg


I wanted a round outer shape, round corners to help reduce diffraction. On the inside I choose a wavy shape to hopefully aid in scattering/diffusing the back wave and making the walls uneven in thickness. That last feature should help reduce resonances of the enclosure.

Also obvious are the braces, making it a potentially very stiff enclosure.

The total array design on the left and the final outcome of this project on the right:
Finaldesign.jpg
LineArray.jpg

(not too far off I presume)

Here's a list of (hopefully) useful shortcuts to different milestones and/or projects done with the arrays:

A memorable moment, first sound!
It took a long time to get there, was it really worth it?

13th December 2014, First sound: A memorable moment!

Measurements begin...
My journey to better sound

14th January 2015, Start of first measurements: Measuring my way to better sound quality

Break trough in processing...
stepping outside of the boundaries of DRC-FIR

16th July 2015, Break trough in processing: Getting time coherency to work
(creating a time coherent correction in my listening room)

Proof of time coherency, at last 🙂

12th January 2016, Proof of time coherency at last! Tested with APL_TDA software

TDA_3D.jpg


Adding Ambience!
Taking control over the room

With installing a virtual Haas Kicker I'm trying to restore some of the energy I "robbed" from the room with my damping panels. I had some clues it might be interesting from my Car Audio days and always wanted to try a proper version in my home. By far one of the most fun tests I have done!
It starts somewhere here... with a later revisit of the theme here! The second part is concentrating on adding reverb to the ambient channels. I can highly recommend playing with this Haas Kicker idea, be it virtual or trough diffusive panels.


Review time!
Printed as is, I hope more will follow

21st January 2016, First official review: Jan Fekkes reviews the Towers

Shuffling the phase, how does that work?
Another interesting, hopefully successful experiment

A thread was started on Fixing the Stereo Phantom Center which inspired me to do some tests with it. Early on it made me do some mid-side EQ, following a paper in that thread. Later on it led to experimenting with a phase only shuffler to brighten up the phantom center. What I think is happening can be read here...

Condensed version of this thread?
For those looking for a more condensed version of this thread, I started a post (a couple actually) on the JRiver forums that's more compact, but it also lacks the detail I put into this thread.
Here's the link: Why I love JRiver, a tale of taming my Line Arrays

Another review, this time by DIYAudio member: Boden
Read it here...
Eelco dropped by for a chat about REW, JRiver and FIR filters and a short listening session. We talked about all things audio and discussed the DSP methods I use in this Monster thread.

Reviews keep on coming in, this time by xrk971
Find his kind words here
We managed to take advantage of a business trip to get both xrk971 and BYRTT together at my home.

It's raining reviews! Another one from BYRTT
You can find it here...
BYRTT was part of the get together. He's the only one to have heard both my lines and the insane effort from B&O, the Beolab 90.
I was very curious about a comparison.

Update! Driver change to Scan Speak 10F
End result here...
In time I'll write more about it after proper DSP has been applied.
I am curious though, will this be the first 25 driver Scan Speak 10F equiped array?
==================================================================================
Line Array Theory, a great read for anyone considering arrays
Infinite line source: analysis by werewolf

An old AES paper on Line Arrays, from speaker dave (David Smith), written at the time he worked at McIntosh:
Constant Beam Width Transducers line arrays

And as long as I'm adding line array papers: This original work of Jim Griffin is worth the read too!
http://www.audioroundtable.com/misc/nflawp.pdf

ISO 226:2003 Equal Loudness Contour:
Interactive link with dB numbers
==================================================================================
Amplifier tests!
The story starts here!
A big special thanks to member koldby and BYRTT. We had a small get together to do some subjective listening.
5 different amplifiers were tested with the arrays.
Vandermill-amp.jpg


==================================================================================

A Picture with the new DIY Scan Speak 30W/4558T00 subs added:

811714d1580045572-towers-25-driver-range-line-array-subinroom-jpg


The actual subwoofer build is scattered all over the thread, but here are some links:
Still making sawdust
Getting it together...
Did I screw it up?
Waiting for paint

744875d1553338967-towers-25-driver-range-line-array-submlv-jpg


Getting ready to paint...
Paint is on!
More info here: www.vandermill-audio.nl outside link (enough to make your own!)

And the new Fetzilla ambient amplifier that followed shortly after that:
817807d1581943721-towers-25-driver-range-line-array-theme-jpg

TEAC Multibit vs DSD 1 bit

Hi, I got a new cd player. The TEAC VRDS 701.

I try switch between PCM: Multibit ( no filter ) and DSD 1bit ( with 2 filter options Fir1: 185KHz / Fir2: 90KHz ).
I now play DSD with Fir2.

Sound nice, more open, wider stage then multibit. Or am I just imagine it?

You have some thoughts / experience on Multibit vs DSD.

Frank

Attachments

  • IMG_8260(1).jpg
    IMG_8260(1).jpg
    629 KB · Views: 69

SX-Amp and NX-Amp

Updated January 15 2016

I've put the complete write-ups for the nx-Amplifier and sx-Amplifier up on my website hifisonix.com

If you want to make 'em, including where to buy PCB's, everything is there - look under the respective amplifier posts.

Over 400 PCB sets (V1 and V2) of these amplifiers have been sold with most being built. The BOM’s have been updated to reflect newer parts since a lot changed wrt availability over the last 10 years.


nx-Amplifier

100W RMS into 8 Ohms CFA class AB Amplifier featuring DC-570 kHz bandwidth, <1us rise times, ~200 V/us slew rate. Uses +-45 to +-50V Power Supply. PSU +Protection board with Mosfet SSR provides overcurrent, DC offset and on/off muting.

The new V2.0 nx-Amplifier PCB incorporates all of the errata changes and suggestions made by builders over the last few years: https://hifisonix.com/projects/nx-amp-audio-amplifier/

Download the nx-Amp V2.09 build document here: https://hifisonix.com/wp-content/uploads/2020/02/The-Ovation-nx-Amplifier-V2.10.pdf

You can also buy a set of very high quality double sided through hole plated, silk screened gold flashed V2.0 boards from Jim's Audio here: http://www.ebay.co.uk/itm/100Wx2-Ov...version-2-0-/321584519451?hash=item4adfee591b


sx-Amplifier

15W RMS into 8 Ohms current feedback class A amplifier, 28 Watts peak class A into 8 Ohms. DC-530 kHz (-3 dB) bandwidth, 140 V/us slew rate and rise times <1 us. Uses +-20V to +- 22V DC power supply . Here is the sx-Amp homepage: https://hifisonix.com/projects/sx-amplifier-audio-power-amplifier/ (updated March 2016, and BOM updated 18th September 2016))

Here is the build document https://hifisonix.com/wp-content/uploads/2014/03/The-sx-Amplifier-V2.10.pdf

You can buy a set of very high quality double sided, through hole plated gold flashed sx-Amplifier PCB's from Jim's Audio here: http://www.ebay.co.uk/itm/15Wx2-cla...ack-PCB-set-/321898146597?hash=item4af29feb25

Here is gcl's beautiful sx-Amp build. Classic no nonsense 1950's/1960's styling https://www.diyaudio.com/community/threads/sx-amp-and-nx-amp.236522/post-7198470


Notes About Components

The BC547 and BC557 have been discontinued by a number of suppliers and this has lead to problems in both the sx-Amp and the nx-Amp for some builders.

In place of the BC547(C) NPN devices you can use the BC550(C) - data sheet here https://www.onsemi.com/download/data-sheet/pdf/bc550-d.pdf

For the originally specified BC557(c) PNP devices you can use the BC560(c) - data sheet here https://www.onsemi.com/download/data-sheet/pdf/bc560c-d.pdf

You can use either the C suffix with an hFE range of ~400 to 800 or the B suffix with an hFE range of ~200 to 450. I suggest if you can use the C suffix, then that should be the first option. However, note that you should use the same hFE suffix for both the NPN and the PNP small signal transistors.

______________________________________________________________________________________

Here is the nx-Amplifier December 2021 BOM updated to cater for obsoleted parts:-

Attachments

  • Like
Reactions: clpk

For Sale Beyer (Beyerdynamic) SUTs MC step-up transformers - low Z

These Beyer (Beyerdynamic) units are really rare and hard to come by. You generally see them in 150, 200 or 600 ohms input impedance versions, but these are for 5 to 20 ohms MC cartridges.

Good for cartridges that wants to "see" a load impedance of 50, 100 or 200 ohms, for most of the higher quality MC cartridges.

These transformers are know to be very high quality, and to have extended frequency response, and good shielding against noise and hum pickup.

This pair have different labels but are exactly the same electronically and measures the same in my tests. This is a matched stereo pair with the same model number.

Transformers checked and working great!

I am from Brazil and have a great record of selling online on DIYAudio.com, GroupDIY.com, GearSpace, Ebay, Reverb, etc.

$240.00 shipped anywhere.

Rotel RA1592 flashing power button

Been having a really bad experience with rotel products, expensive, gorgeous, high quality pieces of junk, just about every piece (new units ) fail... current issue, ra1592, adjusted a few settings in the menu, then powered off, on restart blue ring around power button just steady flashing and clicking, lightly used mint unit out of warranty, which means support or repair is all but impossible... if anyone knows the flashing code or how to hard reset a unit not using menu option, that would great, or a qualified repair center near Nashville.... I could use your help....

New Member

Hi everyone,

A long time ago, when I was young and free, I used to build power amps and speakers for fun. Then I had children.
But now I'm dusting off my devices from long ago and looking to put together some active speakers for the living room, using some 2SJ162/2SK1058 MOSFETs, some Vifa drivers and some MiniDSPs for filtering.

I live in Christchurch New Zealand, and started out as an electrical engineer, but that knowledge is now long forgotten as I too a career in software development instead. But I'm keen to get back into it!
  • Like
Reactions: dantwomey

Musician getting back into electronics

I'm a composer and music teacher based in Adelaide, South Australia. Having been an electronics hubbyist when I was younger, I am now coming back to electronics out of a desire to build my own gear, and possibly build gear for others to enjoy too (e.g. guitar pedals and the like) - I also like the smell of molten solder. I've read this forum a good while as a passive oberver, and have enjoyed the supportive community that is DIYaudio.

Cheers! - Nick
  • Like
Reactions: Deenoo and gabdx

Hello from an analog audio repair hobbyist in Ohio, USA

Greetings! I've monitored this site for several years, but this is my first posting. This community interests me because I enjoy DIY and learn best through active exchanges.

I enjoy the challenge of repairing and restoring analog, solid-state, discrete-component audio electronics. I look for (semi) obscure or boutique items, such as Spectron, Spectral, Bedini, Marsh, Acoustic Electronics, Threshold, H-CAT, Audio Refinement, and AVI.

Specifically, most of my repair queue is composed of items from the 1970s to 1990s; I don't have an interest in buying or working on tubes, vinyl, digital, or SMD.

I don't get Ford-Chevy political over audio technologies, makes, or models. I enjoy listening to music, but the challenge of repairing it is more fun for me. So, I play some Pink Floyd through my massive Rowe AMI SGF Discotheque speakers while struggling to troubleshoot a new problem.

I rank myself as an educated beginner. I understand basic analog troubleshooting, have a decent lab setup, and can read schematics (but often struggle to understand how some circuits function). I could use a few days with a seasoned bench technician to get over my learned hump.

As I get older, I hate to see electronics go to the landfill, so that is strong motivation to bring them back to life.

I look forward to the learning and hope I will be able to contribute meaningfully in some way.

Jpre: analog preamp with ESP32 smart home integration and USB C switching power supply

Hey guys! I'm Jos, an embedded hardware engineer from The Netherlands. I am into vintage audio gear by hobby, but also really like a modern smart home. Right now I can turn on my audio setup with a smart power outlet, but I don't have many means to change the volume or input. It just feels wrong to get a modern surround processor connected to classic systems.

Here is the solution I came up with:
1678740211017.png


In summary:
  • Full analog audio path with opamp amplification and a relay based attenuator.
  • ESP32 DEVKITC module for relay control and wireless MQTT integration with Home Assistant server.
  • Every channel wired up to ESP32 ADCs to switch output based on what input is playing.
  • 12V Trigger output for semi modern power amps.
  • Two rotary encoders and a round smart watch IPS screen as the user interface.
  • Neopixel output for good measure.
  • USB C power input with switching converter and linear regulation.
This is the power supply plan:
1678740267076.png


The idea is to use a TI TPS65130 symmetrical switching converter to change the 5V USB input to a +/-12V output which is cleaned up by a TPS7A49/TPS7A30 low noise LDOs for super clean +/-10V for the opamps. We can then steal the 12V for the trigger output. The remaining 3.3V we can take from the ESP32 module.

The end result is this circuit board:
1678740472898.png


A mockup for a 3D printable enclosure is also getting closer:
1678740903793.png
1678740932669.png


Finally, I have a lot of code to learn. ESP-IDF with the LVGL graphic library got me this for now:
1678740579040.png


I am gonna pull the trigger and order the PCB next weekend or so. I have attached the schematic. Does anyone have any feedback or ideas for now?

Attachments

Design Phase - 35Hz Tapped Horn w/ Compression Chamber (Hog Scoop + Inverted Driver)

Design Phase - 35Hz Tapped Horn w/ Compression Chamber (Hog Scoop + Inverted Driver)

This project has been inspired by all the love for Hog Scoops... And the fair share of hate they get as well.

This will bee my first attempt at an 18" horn subwoofer.
Proposed plan is based on the well known "Hog Scoop",
a tried and tested free design hosted over on the freespeakerplans.com forum.

https://www.freespeakerplans.com/?view=article&id=31:hog-scoop

Drawn up nearly 20 years ago, this well proven classic has stood the test of time and is a very
clever piece of speaker box design, still to this day.
Credit for this creation must go to Stipe Ercegovic, more commonly known a Staiper, a well respected member on the Speakerplans Scoop subforum for a long time,
but he disappearred from there several years ago and doesn't seem to frequent these places anymore.

The Hog Scoop, technically an F1 hybrid of sorts, the offspring of two genetically similar species,
living a life somewhere between a tapped horn and a traditional back loaded "scoop".
A rear loaded horn with the bonus of the driver shooting into the horn path, or a tapped horn enclosure
equipped with a compression chamber.... Call it what you will, this quarter wave resonator is well capable of
hitting the low bass notes and producing high SPL when equipped with the right hardware.

So, I would like to run inverted drivers in a slightly tweaked version of this enclosure, something similar to the image attached to the end of this post.
These are the M4.18 subwoofers, made by MM-Acoustics in Europe, a Macedonian outfit headed by Marjan Milosevic, a regular poster and long time member over on SP.

My god, they look absolutely amazing, so business like.
This is the look I am going for.... They are absolutely badass indeed.

Anyway..... enough airy introductions, and down to business then !!

Hog Scoop Hornresp input parameters

First things first, I decided it would bee prudent to simulate a hog scoop with a driver in it's normal orientation first..... Cone side out.
This was to bee my baseline sim, a benchmark to work from before l went tweaking the original design.

And staight away I ran into problems.

For a start, the speakerplans.com forum isn't very active these days..... And a huge amount of information from back when it was is just lost.

Many externally hosted images are not there any more, there are many dead links, hosted plans, you name it, gone !!!
It didn't make my research easy but I did what I could with what I had.

That said, there were many helpful and informative threads to bee found amongst all the bickericking and the politics in the Scoop subforum.

So, lets discuss what was available to find on the net first.... Multiple posts regarding the Hog Scoop hornresp input parameters were scattered around the web....
And just not consistent.
I was hoping to pull some numbers out of a post or a sketch somewhere but straight off the bat, numbers and posts were conflicting.

Unfortunately, I found more than one set of digits, which only infuriated and confused me even more.

Here are the most posted (and reposted) HR Hog Scoop numbers, I beleive they orignally came from Staiper, and these ones were the most common to bee found online,
copy and pasted in at least 4 different places, so I am inclined to stick with the guy who originally penned the Hog Scoop design. He did create it after all.

Stipe Hog Scoop

S1 = 750
Con = 112.8
S2 = 1062
Con = 42
S3 = 1770
Con = 51
S4 = 2544
Con = 47
S5 = 5700
Vrc = 0
Lrc = 0
Fr = 0
Tal = 0
Vtc = 49456
Atc = 86

Re-posted by bitzo,
https://forum.speakerplans.com/forum_posts.asp?TID=16974&PID=214119&title=database-simulation#214119

toastyghost,
https://forum.speakerplans.com/forum_posts.asp?TID=16974&PID=727583&title=database-simulation#727583

Bee,
https://forum.speakerplans.com/forum_posts.asp?TID=72607&PID=828911&title=hog-scoop-drivers#828911

and salzburgsound system

The next set of input data numbers to bee found were these ones you see below.....
--------S1 = 750
Par = 0.10
S2 = 750
Par = 200.90
S3 = 1700
Par = 61.00
S4 = 4740
Par = 12.10
S5 = 5700
Vrc = 0
Ap1 = 0
Lrc = 0
Lpt = 0
Vtc = 37060
Atc = 1453.10

Posted by Heathrow B Line
https://forum.speakerplans.com/foru...=901195&title=scoop-hr-reference-guide#901195

epa

Freddi

And one more, with newer and revised numbers, taken from a post by user "epa" from 2014.

S1 = 750
Par = 0.10
S2 = 750
Par = 187.90
S3 = 1700
Par = 52.00
S4 = 4740
Par = 12.10
S5 = 5700
Vrc = 0
Lrc = 0
Ap1 = 0
Lpt = 0
Vtc = 41091
Atc = 2210.00

Posted by epa

Other than these three sets of input parameters, I did find a few posts by Staiper himself, modeling the Hog Scoop as an exponential horn,
in quite a numerically sparce fashion I must add.... It would seem this stripped down form of modelling came from Rog Mogale himself.
i will link after the following
---------->
Staiper Exponential Hog

S1 = 750
S2 = 5700
L = 260 EXP
Vtc = 36000 (with driver)
Atc = 1000

https://forum.speakerplans.com/forum_posts.asp?TID=8887&PID=218876&title=hog-scoop#218876

Staiper Exponential Again....

S1 = 750
S2 = 5700
L = 257 EXP
Vtc = 37000
Atc = 9000

https://forum.speakerplans.com/forum_posts.asp?TID=8329&PID=77534&title=tapped-horn-design#77534

And finally....... An attempt at simming a Hog Scoop by the man, Rog Mogale himself.

S1 = 750
S2 = 5700
L = 240 EXP
Vtc = 35000
Atc = 890

https://forum.speakerplans.com/forum_posts.asp?TID=8329&PID=77097&title=tapped-horn-design#77097

And here is a good thread full of interesting tit bits where Rog discusses his exponential scoop modelling methods with others.
https://forum.speakerplans.com/forum_posts.asp?TID=8329&PID=77097&title=tapped-horn-design#77097

A must read for anyone into this line of work.

Annd..... Time to take stock.

All my research and reading paid off, but unfortunately I still feel I do not have any concrete numbers for a Hog Scoop simulation binge.

So, I took some time out and drew up a scaled plan of the Hog, just enough to play with.
it gave me a much more definite idea of the direction I asm going in, speaker boxes ofthen quite literally build themselves as the project goes on.
Solutions are often just so obvious when you have the material object taking shape before your eyes.

And measurements can bee taken from the plan and scaled up to something that resembles real world numbers.
(Drawing attached)
And just to bee sure, I am going to get my hands on one side panel first, (18mm sheet board 986 x 950mm) and draw it out @ a life size scale on the floor.

Drivers for this design

I currently have 2 B&C 18TBX100 (4 ohm) belonging to a friend to use for the first 2 boxes and am debating which drivers to buy for the rest.

Quite likely B&C as well, I like the power handling (1500w) and price of the 18SW1OO.
When given the option, I usually buy 4 ohm versions of any driver when I can.
They can often bee had for the same price as their 8ohm equivalents but sometimes not. Sometimes they are just more hassle to obtain but I do make an effort to
use 4 ohm drivers when ever I can.
I am also open to other brands, I do know I need a certain type of driver to do well in these boxes and if one particular driver turns out to bee
especially suited to the task it will surely bee strongly considered.

So far, everything is going well.... The only other uncertainty I have right now is the design of the rear chamber.
I am not sure exactly how it will end up but I am confident the design (and build) process will answer it's own questions if and when they arise.
More on that in detail later.

Okay, I think I have written enough for now.... Any advice and criticism is warmly welcomed.
Please feel free to join me on my journey of discovery and don't bee shy to interject or comment if need bee.

M4.18 MM-Acoustics.jpg


K - Scoop.jpg
  • Like
Reactions: Rik_bS

JL coupon

Its been awhile since I ordered a PCB from JLPCB, so I guess they do a coupon. Weirdly, I have a small board I want built so the timing is good. I thought I'd seen a thread here about the tariffs had made JL not viable anymore due to shipping/customs. Anyone with a recent order shipped to US? Problems? No political please, just did it work and what was extra cost.

  • Locked
For Sale (Quick) Mark Audio’s MOAP 11 Drivers Pictures and prices dropped

(Update) all sold. I have nothing left in terms of drivers . Thanks everyone. I don’t know how to change the tile so am reposting this add.
🌟The Buyer pays for shipping unless otherwise on the Audio products being sold.


Pending/(update) 4-13-2025. So Am willing to trade for a pair of Fostex FE206En drivers and maybe some cash. A. Mark Audio’s MOAP 11 Full Range Drivers brand new on the box never used.
$347.90. my price on these drivers. That’s 50% off with the tax I paid which is $647.90 for both drivers . No low ball offers please. Buyer pays for shipping. E mail for offers and speaker pictures of the fostex FE206En drivers.

Sold/B. Mark Audio’s Puliva Seven HD in copper color. Asking $50.00 A pair. Buyer pays Shipping.

Sold/ C. Mark Audios CHN-50P Paper drivers. Brand new never used in the box. Am asking $20.00. Buyer pays for Shipping.

Fostex Full Range Drivers.

Sold /A. Fostex FE126NV drivers Brand new in box.
Asking $95.00 a pair. Buy for pays Shipping.

Sold/B. Fostex FE126E Drivers Brand new in box. Asking $85.00 a A pair. Buyer pays for shipping.

Dayton Audio.

Sold/ A. RS125 5” inch drivers. Am asking $45.00 a pair. Buyer Pays for shipping.

Completes speaker boxes for sale.

sold /1. Frugal Horn XL for Sale am asking $100.00 for the pair. Offers are welcome if wanting to e mail me? No low ball offers please.

If you have any questions please ask? My E- Mail is;

Jmboo1922@gmail.com.

I no longer have the following Items which have been all sold.

1. Fostex FF165K Enable drivers.

2. Vifa /Peerless Ring tweeters.

3. Paper tweeters (buy out at Parts Express).

Attachments

  • IMG_6045.jpeg
    IMG_6045.jpeg
    782.5 KB · Views: 72
  • IMG_6044.jpeg
    IMG_6044.jpeg
    683.6 KB · Views: 63
  • IMG_6039.jpeg
    IMG_6039.jpeg
    744.5 KB · Views: 61

Experiments with the current drive

As a continuation of work by Esa Merilainen and Pascal Brunet, as well as my previous work, an approach with a deeper feedback circuitry has been tested. The deeper feedback indeed lowers harmonic distortions by 20dB and more, including the most stubborn 3rd harmonic, in a somewhat unexpected (by me) way.

Introduction​

In the previous experiments, a degree of improvement was reported by applying series resistors 6/12/24 Ohms, which corresponds to the feedback depth of only 6…20dB. The results were promising but it was not clear what you would get with deeper feedback.

Method​

Measuring a driver impedance​

A few drivers from different vendors have been measured using Feeltech FY3200S-20M generator and Rigol DHO802 oscilloscope.

4.png


The driver impedance lump was modelled as Zeq = (L+RDC)||C||Rres:

sig150-4.png


Contrary to the statements of previous researchers, it was found that the p grade of Lp is neither 0.5 nor 0.55 but varies from driver to driver, from 0.6 to 1.0.

Feedback loop structure​

To start with, Dayton Audio SIG150-4 was used. An equivalent of 0.1*Zeq[SIG150] was used as a feedback discriminator, to get a voltage amplifier (LM3886, simplicity’s sake) with a gain in the range between 20 and 30dB. Of course, the feedback network cannot be universal. For SIG150-4:
1-P9200001.jpg


1726795018800.png

sig150-4-fb.png


A reasonable amount of RF care was taken. The amplifier is stable. Measurements were taken by an 12dBA AudioTechnika 4040(Or 2020?) cardiod condenser microphone calibrated by ECM8000 calibrated by AZ8930, at 0.5m from the cone, while being adjusted to 1m loudness (60..85 dB SPL), in a moderately damped living room (RT60 ~= 250ms for f>200Hz). In the signal processing, frequency resolution was traded off to benefit precision and dynamic range (i.e. the curves have been denoised). Dotted lines correspond to the resulting noise floor for the given harmonic and excitation levels. The curves are positioned on the originating frequency, i.e. they correspond to the frequency that produces the harmonic, rather than where it appears, and are properly normalized for the cone frequency response (FR).

Results​

Voltage Drive​

sig150-vd-2nd.png

sig150-vd-3rd.png


Current Drive​

sig150-cd-2nd.png


sig150-cd-3rd.png


Discussion​

For LM3886, the depth of feedback is higher due to GBP=200kHz (46 dB on 1kHz). Most decent DIY Class A/B amplifiers have GBP over 1MHz. The depth of feedback can be improved by using second-degree astatizm and/or nested feedback. It is not entirely clear how to implement the current drive with non-self-oscillating Class D amplifiers efficiently.

Note that an open-air inductor serves as an antenna and gets lots of interference, even after turning most of the switching PSUs in the vicinity off. In a real product, the inductor must be shielded.

If seen as necessary, the f<2Fs distortions can be dealt with by motion feedback. However, here the focus of the efforts is on the midrange drivers. Here, you do not need to worry about Fs lump.

90 dB @ 1m is as loud as SIG150 (sensitivity 91.1 dB @ 2.83V / 1m) can get without producing obnoxious distortions, both voltage and current drive. Sig150 is not capable of producing clean sound for f < 2*Fs, and multiple saturated resonances appear all the way through the passband, which is fairly typical for non-professional drivers.

The current sensing network is too sensitive to power and temperature variations. Thicker wire shall be used for the inductor and all resistors must be high-power rated. Satisfying the destruction limit is not sufficient distortion-wise.

It is not clear how far you can get with the current drive because you are limited by the cone distortions.

Conclusion​

More experiments with different drivers, both Fe and Nd, both chirp and music to follow. The effect on Barkhausen noise (non-repeatable-in-details discretization of non-linear de/re-magnetization distortions) is most interesting for magnets that are never fully saturated because of the back current of the magnetizer and some domains are easier to flip than others.

The drivers are implicitly optimized for voltage drive. The current-drive-optimized drivers may turn out to be quite different. It’s a terra incognita, for you to discover.

Waiting for the missing components to be shipped and delivered…

Copyright © Michael Zrull, 2024/09/19. All rights reserved. Released under GPL 3.0. I won't patent it nor restrict DIY by any means.

PCBs and built boards for PCM56 or AD1865

I want to build one or two fairly simple multi-bit DACs with cheap and available legacy chips, which right now looks like PCM56 or AD1865. All the TDA1541 and PCM63 type stuff has got rare and expensive now.

So point me towards some PCBs or built boards that can be used with PCM56 or AS1865. There seem to be quite a few on AliExpress and I'd welcome advice on which are good ones to buy. Input could be SPDIF or a I2S board.

I can build with tubes so could add a tube output stage and I can build power supplies. But useless with SMDs, that's not possible so a built board would be best.

Hopefully this thread could inspire others to build available, cheap and simple DIY multi-bit DACs.

Multiple Small Subs - Geddes Approach

After reading about the AudioKinesis "Swarm" sub system and the Geddes paper on loudspeakers, I am fairly convinced that 3-4 randomly placed small subs are well worth trying in both 2-channel and HT rooms. Geddes specifically recommends multiple and different (not matching) subs to force more randomness (and I assume averaging) of room modes. The Swarms are matched drivers/cabinets.

My question is which small commercial subs would be appropriate for this theory? There are hundreds of small 8, 10, and 12 inch subs that are sealed, ported, etc. Has anyone tried this approach and can anyone recommend a combination of subs? I would like to use the smallest possible subs given the need for 3 or 4 or them in my room.

8 NOS 3C24/VT204 with Eimac cap/pins

I have a box of 8 NOS 3C24 tubes, along with 7 sets if EIMAC HR-2 heat dissipating top caps (misplaced 1 set) for sale. Left DIY quite some time ago and now going through and slowly selling off my pile of parts.

They are US Army/Navy made by N.A. Philips Co. US made. Boxes have date codes as well.

$500 CAD for the lot.

20250225_215019.jpg

Attachments

  • 20250225_214836.jpg
    20250225_214836.jpg
    263.9 KB · Views: 62
  • 20250225_214848.jpg
    20250225_214848.jpg
    157.6 KB · Views: 59
  • 20250225_214855.jpg
    20250225_214855.jpg
    295.3 KB · Views: 61
  • 20250225_214904.jpg
    20250225_214904.jpg
    188.2 KB · Views: 60
  • 20250225_214912.jpg
    20250225_214912.jpg
    271 KB · Views: 59
  • 20250225_214944.jpg
    20250225_214944.jpg
    319.7 KB · Views: 62
  • 20250225_215009.jpg
    20250225_215009.jpg
    491.3 KB · Views: 61
Projects by fanatics, for fanatics
Get answers and advice for everyone wanting to learn the art of audio.
Join the Community
508,400
Members
7,917,019
Messages

Filter

Forum Statistics

Threads
407,661
Messages
7,917,019
Members
508,400
Latest member
wirewirepantsonfire