
Yup. It looks just like that. Took a minute to get it pulled in the door. Box doesn't appear to have any damage whatsoever to it.As promised, the packing is progressing nicely but is a lot of work. You can see how carefully the pieces are packed in foam and strapping and then a nice box and then strapped on the outside.
View attachment 1198338
View attachment 1198339
View attachment 1198340
Folks should be receiving tracking numbers soon.
I guess first order of business is to fish out the bass section parts and decide where to glue and clamp it.
Russellc
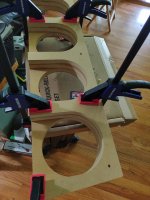
After attaching each layer, before the next could be put on, I had to drill out the hole (into the dowel) so the next dowel wouldn't stick up too high. No biggie, once dried, drill, pound in dowel, put next layer, repeat.
Bubba
Bubba
Well, I guess it's the same "glue mess" but easier to clean up. I just glued the first, clamped for 30 minutes per directions. Then added next layer, clamp for 30 minutes, so on. Left clamped over night. Wiping excess glue after the squeeze.
Russellc
Russellc
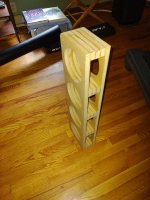
I have both bass units assembled. Have been sanding edges of all the parts, then filler, sand smooth.
I figure to attach the front panel next, I think that will be logical order, it will determine that faceplate is properly aligned, then base can be attached, clamped so it is perfectly perpendicular, not "tilted" in either direction.
More sealer and sanding, then prime and paint.
Russellc
I figure to attach the front panel next, I think that will be logical order, it will determine that faceplate is properly aligned, then base can be attached, clamped so it is perfectly perpendicular, not "tilted" in either direction.
More sealer and sanding, then prime and paint.
Russellc
Trying to avoid the "home made" look. Also figuring what to go under base to floor. One member had nice extended arms sticking out with spikes on end of arms.
Russellc
Russellc
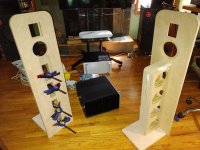
Ready to put wings on. Guide holes for screws on same side all 4 pieces, so wrong side for 2. No big deal, I just drilled a tiny hole all the way through. There is a slight bowing to the wings, so that if top and bottom are flat to the edge of face plate. The bow takes it a little beyond the edge. Careful placing of the long square piece will hold it even once wing is screwed to it
Bubba
Bubba
I ran into same thing with pilot holes on the wings. I drilled through and flipped over for countersink. Use a drill guide to ensure perpendicular holes or a drill press.
Are you going to leave screws exposed, or fill and sand?
The long square pieces that the wings screw to will require careful placement. Once I get it positioned at the top, I will put a screw through, then pivot the piece down a screw it as well, at least temporarily. Hopefully this effort will result in the wings edge fitting flush to edge of face plate, all the way down. This assumes the long square piece is straight and if not, I will have to find a method to attach it so it is.
Bubba
I leave screws exposed. You need them that way to remove wings periodically if servicing the cabinet to remove a driver etc. I used a block of wood same thickness as wing to set gauge width of where ledger strip goes and then glue and clamp so it holds wing flush.
- Home
- Group Buys
- XSD Speaker Flatpack GB