Greenerd #3 arbor press. Out of the hunters point naval shipyard circa 1940, pinion shaft finally gave up. I started looking at domestic ratcheting three ton arbor presses and they are a bit pricier than I expected. I had the thought to Google Greenerd and shockingly they still existed and had all the parts on the shelf, looking for new cast iron vintage style 3/8 - 24 wingbolts I found a reproduction of a fastener used for the tops of army Willie's jeeps that works perfectly.


Meter maintenance..
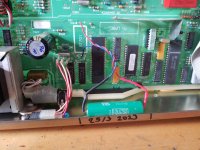
Have two hp3478a that needed new ram batteries before they went below 2 volt and calibration went to smithereens.
Thought I knew battery size .. but originals were shorter, so as true diy I glued them in,, who cares they will hold charge 20 more years, and I will be to shaky to hold a soldering iron.
Attachments
I came back after a year with what was a fully working nodejs ecommerce website.
It came up with lots of errors.
I eventually tracked it down to the pool setting.
I had it set to 1000 pools.
This means I can have 1000 connection strings.
However I was always using the same one so it got confused and threw out errors.
So set pool to 1 and it now works slow but ok.
It came up with lots of errors.
I eventually tracked it down to the pool setting.
I had it set to 1000 pools.
This means I can have 1000 connection strings.
However I was always using the same one so it got confused and threw out errors.
So set pool to 1 and it now works slow but ok.
When it's time to give up!
I replaced NiMH cells in a hair trimmer.
The original charger was a trickle charger and causes the cells to deteriorate.
I suspect Remington had upgraded the product from Nicd & not upgraded the charger.
As the 2 cells are embedded in the device so cannot be removed for charging I decided to build a 2.4V smart charger using a Maxim 713 ic.
Several attempts later, I still couldn't make it work.
Then I found a ready made wallwart on Aliexpress that automatically detects 2-10 cells in series and has the delta V charge termination for NiMH.
Works perfectly.
Last week I was making me a yummy peanut-butter & banana sammich on whole wheat toast. As I was getting some milk from the fridge, I heard a <snap!> from the countertop behind me. I turned to notice that the toaster had gone dead, half-toasted bread ejected.
This week I finally had a few minutes to look at it. Judging only by the noise it made, I wasn't too hopeful; it sounded like something had shorted out in the electronics (yes, it's a toaster with a microprocessor - good lord). However, I skipped over an important clue - there was not a trace of any burnt-parts smell from the thing.
So after a half-hour of disassembly, I finally figured out that the trouble was actually just a break in the AC cord right where it went into the molded plug. (Sheesh.) Cut it back about 1/4", replaced the plug, all is well.
It's always a little embarrassing, after all these decades working as a repair technician, to have a brain fart and disregard basic troubleshooting techniques the way I did here. Oh well - at least it got a good cleaning inside & out - looks like new!
"yes, it's a toaster with a microprocessor - good lord"
I wonder when that nonsense started?
I have a 4 slice "Frigidare Professional" toaster about 4-5 years old. Bought it for the wife after the previous 3 which were purchased in rapid succession failed to please her with their toasting inability (she takes her toast seriously...really. e.g. It MUST be evenly toasted across the entire slice from crust to crust).
Anyway one side would stop after ~ 20 seconds and lift the slices (the default setting of #4 runs 3m20s) so I opened it up expecting to see the innards of a toaster and saw a computer inside as well.
I got lucky, I just re-seated all the connectors and all was well again and that was over a year ago. I will say it was a lot easier taking it apart than reassembling, the fit of the parts was very good and everything had to be aligned just so or it would not go back together, a bit excessive for a toaster if you ask me.
Three of my Rigol digital scope's buttons were refusing to easily respond for some time now. I dismantled it down to bits, then bathed the elastic keypads in warm water and mild detergent to refresh looks. Dried them with hot air. Then cleaned the buttons contacts and control PCB's mating grid-pads with IPA. Original offenders behaved themselves since. But not before long another couple of buttons became difficult.
So today I retaliated. I dismantled the scope fully again but this time I wasn't as gentle to the buttons. I simply dragged their black conductive points back and forth and to the sides on printer tray paper. Pressing just enough to leave grey marks on it. Result is all buttons became as responsive as new! If not better. 🙂


So today I retaliated. I dismantled the scope fully again but this time I wasn't as gentle to the buttons. I simply dragged their black conductive points back and forth and to the sides on printer tray paper. Pressing just enough to leave grey marks on it. Result is all buttons became as responsive as new! If not better. 🙂
This looks similar to membranes and contacts in synth keyboards. I would be weary of removing the carbon on the membranes as you did. Instead, use a pencil eraser on the PCB-side contacts and then IPA there.
The carbon-side can be redone if necessary with special conductive ink, otherwise it usually can be left as-is.
The carbon-side can be redone if necessary with special conductive ink, otherwise it usually can be left as-is.
Done the IPA thing in the first attempt but it proved halfway restoring sensitivity and not preventing next occasions in this case. The carbon contacts roughening drag on paper approach worked impressively on the other hand. If it will also prove long lived, then its a total winner. Else I will next time try some metal particles loaded paint or something similar.
https://www.google.com/url?sa=t&rct...AuQDec&t=133&usg=AOvVaw3VbfVxyI48jiXnEfisTFVzyes, it's a toaster with a microprocessor - good lord
Conductive rubber keypads have often been a bit of a problem. Sometimes the rubber 'sweats' plasticiser with the contacts having a wet and slimy look and feel. I would have thought the membrane would be available as a spares item tbh, it surely has part number somewhere in some manual 
As last resort there are some repair compounds available (I have never tried these so can't say how good or other wise they might be). Pricey to at around £32 GBP

As last resort there are some repair compounds available (I have never tried these so can't say how good or other wise they might be). Pricey to at around £32 GBP
Attachments
It was about 2005 the first time I saw an electronically controlled turd of a toaster...
Even though it was a Toaster OVEN, if you tried to make more toast after you make the first batch of toast (why have a device that makes 6 pieces of toast at a time if you don't plan on using it twice in a row - people have families?) the latching switch which was to immitate the control of the a real toaster didn't latch again until a cool down period... It also make crap toast regarding the consistancy of the toasting pattern. And as hard as I could, I couldn't find a photo of the model of it. It seems history would like for forget it LOL
This is a similar thing but more fleshed out...

But I find this general design (not specifically this model - I've never used one) to be crap because I find a mechanical design (the cheap 20$ special from Proctor-Silex in the 1980s) to work better anyway - You can make toast twice simply by setting it to burn the toast 😛

Even though it was a Toaster OVEN, if you tried to make more toast after you make the first batch of toast (why have a device that makes 6 pieces of toast at a time if you don't plan on using it twice in a row - people have families?) the latching switch which was to immitate the control of the a real toaster didn't latch again until a cool down period... It also make crap toast regarding the consistancy of the toasting pattern. And as hard as I could, I couldn't find a photo of the model of it. It seems history would like for forget it LOL
This is a similar thing but more fleshed out...
But I find this general design (not specifically this model - I've never used one) to be crap because I find a mechanical design (the cheap 20$ special from Proctor-Silex in the 1980s) to work better anyway - You can make toast twice simply by setting it to burn the toast 😛
Yes, that's it, the rub on paper took the slimy patina away. Easy to perform and cost free, fast. Deserves a chance I would think, especially in onsite maintenance situations. Silver loaded professional coating solution like the one you linked should work even in more advanced contact wear situations and be more future proof. Costly unless doing many such repairs a year, mainly because of its 18 months shelf life spec. It's also quite involving to carefully coat sometimes hundreds of tiny contact dots.Conductive rubber keypads have often been a bit of a problem. Sometimes the rubber 'sweats' plasticiser with the contacts having a wet and slimy look and feel. I would have thought the membrane would be available as a spares item tbh, it surely has part number somewhere in some manual
As last resort there are some repair compounds available (I have never tried these so can't say how good or other wise they might be). Pricey to at around £32 GBP
I've used an eraser to clean up the contacts... Works. Works for memory cards, pci/isa cards etc too.Yes, that's it, the rub on paper took the slimy patina away. Easy to perform and cost free, fast. Deserves a chance I would think, especially in onsite maintenance situations. Silver loaded professional coating solution like the one you linked should work even in more advanced contact wear situations and be more future proof. Costly unless doing many such repairs a year, mainly because of its 18 months shelf life spec. It's also quite involving to carefully coat sometimes hundreds of tiny contact dots.
- Home
- Member Areas
- The Lounge
- What did you last repair?