I would seriously doubt that any improvements could be made to that chassis, running on only 3 volts.Anyone for improvements on the driver stage / transformer coupling / power output? ;')
My "vintage" BK precision 1801 frequency counter, now decades old, STILL doesn't need anything repaired on it.
It's "dead on" accurate when comparing it to modern equipment.
OK, so I have one of these (piccy off the web but mine is identical). I drilled a small hole in the bottom of the case to access the crystal trimmer cap so it could be calibrated while at operating temperature and any stray C accounted for as it would be when in normal use. For a frequency reference back in the day I adjusted it to the locked colour sub carrier in a TV which in the UK was 4.4336187Mhz (you never forgot those numbers)
Silly me... There was nothing wrong with that little SMPS that powers the nixie clock... There was a bad cap in the HV section that was getting hot. It just started to draw more current over time until it hit the OC limiter in the SMPS.
With the bad cap, it drew ~500mA, with the new cap it's down to 250mA, and the flicker is gone.
Here's to another few years since I didn't buy a fancy cap for it - I used another crap cap because free is free 😛

With the bad cap, it drew ~500mA, with the new cap it's down to 250mA, and the flicker is gone.
Here's to another few years since I didn't buy a fancy cap for it - I used another crap cap because free is free 😛
What Did I repair today? Absolutely nothing, but I did go round one with our 17 year old riding lawnmower. During the last mow of the season last year a loud bang occurred and one of the three blades goes flying across the yard with the shaft and one bearing still attached. I parked it and finished the job with a push mower. Today was autopsy time.
This mower was found on the property when we bought it over 10 years ago. I have changed most of the major parts over the years, but this was a recurrence of an old failure mechanism. The cheap bearings at the blade end of the spindle get sloppy or seize and the 22 HP V-twin will just keep things spinning until something breaks. In this failure event two blade tips touch at speed and lots of stuff breaks.
All the damaged components have been identified and new (cheap) stuff is on its way from Amazon. So is a new muffler since there isn't much left of the old one.
Round two happens tomorrow when I figure out how to get one of the spindle assemblies off the mowing deck when the pulley and the nut holding the pulley is frozen to the spindle shaft. The usual weapons, force, hammer, chemicals, fire, and all at the same time didn't work, so tomorrow I may just try to cut the whole assembly in half with a reciprocating saw.
Not sure I repaired anything today, but did have a couple of challenges. Woke up to a cold house in the middle of a cold snap with a sick child on a weekend when emergency call surcharge applies. Changed very clogged furnace filter, new batteries in thermostat, turned on gas fireplace. Furnace came back to life after a while, most probably the new filter did it, but not sure as was not immediate.
Then fought getting a DisplayPort connection to a PC to work. HDMI worked, why not DP? A fair amount of Googling found the likely culprit: the monitor was set to DP 1.1 and needed to be set to DP 1.2. After trying for a long while and reading the manual, it appears I have an older monitor that has no DP 1.2 option, even though newer ones with the same model number do. HDMI it is.
Then fought getting a DisplayPort connection to a PC to work. HDMI worked, why not DP? A fair amount of Googling found the likely culprit: the monitor was set to DP 1.1 and needed to be set to DP 1.2. After trying for a long while and reading the manual, it appears I have an older monitor that has no DP 1.2 option, even though newer ones with the same model number do. HDMI it is.
I had a similar engine in a rider; its governor no longer governed. So I bypassed it; throttle cable direct to the carburetor. Sounded more like a racetrack when I mowed, than a lawnmower. Still couldnt kill it, but I think the exhaust valve finally burned on one cylinder. I wasn't the operator when that happened, so who knows how it was being run. Probably WFO...left it for the new owner of the place on his OK, along with an antique B&S AC generator. Big 'ol 9HP Briggs motor, with a retrofitted motorcycle exhaust.the 22 HP V-twin will just keep things spinning until something breaks.
I stopped putting off repairing my Logitech K-740 keyboard that I bought in 2014 for about $69.
a few of the keys needed a heavy stroke to work.
I really like it though, it's got a 3 level dimmable illuminated-in white keyboard, light tactile touch keys, and is only 1/2 inch thick.
So.. on the bench it went.
After removing about 20 tiny screws, I fired up the air compressor and blew out whatever I could from the membrane, impossible to fully dis-assemble it.
It works nice again.
Checking around, sadly it's long discontinued, with some for sale used going for $399!
Lordy!
I use TVS Gold keyboards...fully mechanical, very rugged.
New is about $30, flea market is 50 to 60 cents..wash and a few keys need contact cleaner spray to go back to work...
New is about $30, flea market is 50 to 60 cents..wash and a few keys need contact cleaner spray to go back to work...
If it was a B&S Intek V-twin the most likely failure mode that kills a cylinder is the exhaust valve guide migrating in the cylinder head until it prevents the exhaust valve from fully opening. At some point the migration will continue taking up all the slack in the valvetrain which results in a bent pushrod. The engine usually continues to run at this point with reduced output and a rough idle. Eventually the pushrod comes loose and winds up in the crankcase. Now the exhaust valve no longer opens at all so the engine must release the cylinder pressure back out the intake valve causing a severe backfire during an attempt to start it.Still couldnt kill it, but I think the exhaust valve finally burned on one cylinder. I wasn't the operator when that happened, so who knows how it was being run.
A migrating valve guide can be knocked back into place, but once it has wandered it will do so again within a few hours of run time unless you "stake it." IE, mangle it's outer surface so it can't move. The head must be removed from the engine to do this as you need access through the exhaust port. Excess engine heat is the usual cause as the aluminum head expands faster than the bronze valve guide. B&S claims that this is not a design flaw, but customer abuse. Their story is that poor storage conditions allow mice to crawl into the engine shrouding blocking the airflow ports. A teardown of the external shrouding on my mower did reveal some mice "skeletons in the closet" along with a lot of dried mud, straw and grass. Afterall, the mower was found abandoned in an overgrown field. I cleaned up everything and got a pair of used heads cheap on Ebay and have had no engine issues since, except a dead starter. There is still at least one pushrod somewhere inside the crankcase.
Hi,
got my HP6140C high precision current source working.
Still needs precise adjustment, but at least it´s up and running again.
jauu
Calvin
got my HP6140C high precision current source working.
Still needs precise adjustment, but at least it´s up and running again.
jauu
Calvin
Amazing how these things run regardless - I was certain the bits comprising that governor were just floating around in the crankcase as well. The shaft the arm attached to just turned as if nothing was attached to it, on the inside of the case. I wasnt about to pull that engine, the pulley and open it up to find out.There is still at least one pushrod somewhere inside the crankcase.
The one with that clear binding around the periphery? I'll have to put it on my scan-list when I go "shopping"; maybe I can get a piece of that $399. Keyboards and headphones...Hmmmm. Overpriced a bit?Logitech K-740 keyboard
I repaired the stairs carpet by replacing it with the scraps from the original job 30+ years ago. This carpet runs to 3 floors with the stairs in-between and were going to replace it until we found out the cost. It was very high quality wool carpet that still looks good everywhere else but the main stairs where the edges wore away. I'd never done carpet before. There was just enough scrap to do 7 steps. They didn't do the bullnose properly in the first job but I just emulated they way they did it.


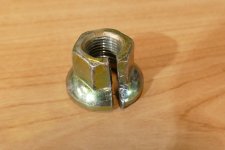
Round two turned out to be far easier than I anticipated. First I tried to drill into the offending nut and found that the drill bit wouldn't even scratch the surface. If it's hard, maybe it's brittle, so I put a carbide cutoff wheel in a Ryobi Dremel clone and attacked the nut. It took about 20 minutes but I cut a slot completely through one side of the nut, jammed a previously broken screwdriver in the slot and proceeded to beat the $%^$ out of it with a hammer. Once I widened the slot a bit, I put a 15/16th inch box end wrench on the 7/8 inch nut and it unscrewed without much of a fight. New parts delivery and torrential rain both are forecast for tomorrow, so the mower is put away for now.Round two happens tomorrow when I figure out how to get one of the spindle assemblies off the mowing deck.........I may just try to cut the whole assembly in half with a reciprocating saw.
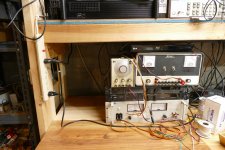
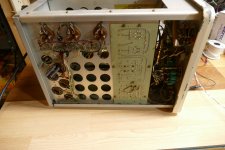
Now on to something a little more in line with diyAudio. There is an empty space on my workbench where an old reliable friend once lived. It's time to fix the Fluke.
Sometime around 2000 I bought a Fluke 407D power supply from a scrap dealer in California. It was advertised on Ebay as "broken, for parts only, does not work. No returns accepted." for $25. I was the only bidder, so I got it for $25 plus $45 shipping to get it to south Florida. I figured that I could fix it or use that multi tapped power transformer for a cool power supply design of my own. I was quite surprised when I plugged it in and it worked perfectly. It has worked good ever since, except for a loose switch and pot until about a month ago when I turned it on and it was sick. Now the output voltage is way above the settings and there is lots of ripple, so the control loop is broken.
I opened it up and it doesn't look repairman friendly. This thing is 50 to 60 years old, so maybe I'll stick all new tubes in it and see what happens. I think I have all of them except for the 807's.
Attachments

I built up a model railway dcc booster pcb.
It didnt work.
The circuit looked good and I didn't have any shorts or missed components.
I scoped the circuit and found opto coupler wasn't outputting anything.
So looked up its pdf file and I had forgotten to add pull up resistors to open drain outputs.
Tacked on a couple of pull ups to the two opto's and it burst into life.
The torrential rain predicted for yesterday brought along some high winds and strong gusts. In the middle of my autopsy of the Fluke the power went out, and just returned a few minutes ago. Of course my cheap inverter generator failed to start, so now there's something else than needs fixing.New parts delivery and torrential rain both are forecast for tomorrow, so the mower is put away for now.
Now on to something a little more in line with diyAudio. There is an empty space on my workbench where an old reliable friend once lived. It's time to fix the Fluke.
I opened it up and it doesn't look repairman friendly. This thing is 50 to 60 years old, so maybe I'll stick all new tubes in it and see what happens. I think I have all of them except for the 807's.
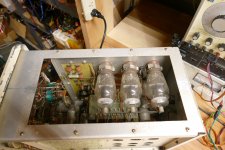
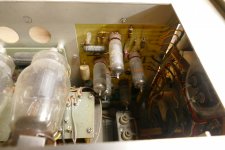
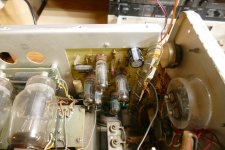
Back to the Fluke, the service manual tells me that the negative 250 volt source is important for proper output voltages. It can be tested from the front panel without opening the unit. Mine fails that test ad 202 volts, so I know where to start. Their trouble shooting chart says to test or change the tubes first, then "test" the resistors, which are mostly carbon comp. They do drift, sometimes a lot, but they rarely fail to an open overnight. This thing worked fine one day and was dead the next. I knew from experience that 53 year old twist-lok can caps that have lived in a hot box for their entire life can fail open overnight, so I decided to start there.
The bottom side of the cans are easily accessed from one side, so I took a SWAG and stuck a 47 uF 450 volt cap across the input filter in the -250 volt supply and the meter instantly jumped to 250 volts, and all other voltages returned to their proper values as well. I had found the dead part on the first guess. I was trying to figure out how to best fix it when the lights went out. There is no room to simply bridge the 47 uF across the can and put the box back together. It is also likely that the other cans are well past their life expectancy.
Attachments

The Fluke 407D is now back in its proper place on my workbench. I was contemplating making a perf board contraption containing caps to replace all the twist-lok can caps and mounting it in their place. Then I thought about how much work it would take, and about the dead generator and lawnmower waiting for me tomorrow and took the lazy way out. I left the open can cap in place, followed the green and grey wires to the PC board, drilled two small holes and wired a 47uF 450 volt cap in parallel with the dead 20 uF 450 volt cap. I then fired the unit up to see that it worked, but thought to measure the voltage across the cap. I got 495 volts across the 450 volt caps. The original cap was 450 volts, but the manual stated that the unit wants a line voltage of 115 volts and I get 127 volts. I removed the 450 volt cap and put in a 56 uF 500 volt cap.
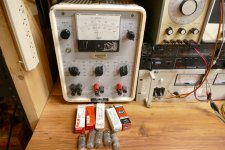
There were some issues calibrating the unit, especially with drift even after an hour cook. All the tubes appeared to be the originals as they were all either RCA's or IEC/Mullards. I popped in some new 12AX7's and 6AW8's and a 6AQ5, let it cook for half an hour, ran the 5 minute cal sequence and it is still rock solid.......done, put it back together. The 807 pass tubes look like they have been abused, probably because they have. Much of this thing's use has occurred with the current meter pegged. I don't have any 807's so they went back in. If problems appear I'll change the sockets and installed 6L6GC's I have plenty of them.
There were some issues calibrating the unit, especially with drift even after an hour cook. All the tubes appeared to be the originals as they were all either RCA's or IEC/Mullards. I popped in some new 12AX7's and 6AW8's and a 6AQ5, let it cook for half an hour, ran the 5 minute cal sequence and it is still rock solid.......done, put it back together. The 807 pass tubes look like they have been abused, probably because they have. Much of this thing's use has occurred with the current meter pegged. I don't have any 807's so they went back in. If problems appear I'll change the sockets and installed 6L6GC's I have plenty of them.
Attachments
Round three happened yesterday. I just bolted all the new parts in and put the deck back together. Mower works as expected, but still makes a racket. Fedex fumbled the delivery of the new muffler, so I began to put everything away yesterday as it was beginning to get dark....then I saw the real issue.Round two turned out to be far easier than I anticipated....... New parts delivery and torrential rain both are forecast for tomorrow, so the mower is put away for now.
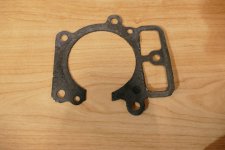
Late last year I was mowing and when I turned the mower off it made a loud backfire. Upon restarting the racket ensued, which I had assumed was the rusty muffler self destructing. Looking back the mower seemed to be down on power output, but with 22 HP I didn't notice the loss that much. Last evening I saw fire shooting out of the side of the engine when it was running. This is definitely not normal and can only be caused by a few things.
I don't expect everyone here to know what this is, but most can look at it and see that it is not right. Time for round four......
This was a head gasket. It seals the cylinder head to the cylinder itself. It should be one continuous piece. The burning fuel-air mixture is supposed to stay inside the cylinder, but when a chunk of gasket is missing the fire shoots out through the gap. Likely a small piece failed initially then more and more burned away trying to contain a very high pressure fire. This will also eat away at the metal cylinder head and engine block if continuously run. It took a couple hours to get enough parts off to get at the gasket. The head itself looked pretty bad, but I had a spare, so I swapped it and cleaned up the block surface the best I could.
I reassembled the engine, and it ran fine. Severe storms are on the menu for tomorrow, so reassembly and test maybe Saturday or Sunday.
Attachments
- Home
- Member Areas
- The Lounge
- What did you last repair?