Beginning of every season, ALL engines need inspection and checking ALL bolts for snugness/torque.
Even if they have split lockwashers under their heads.
They work loose regardless.
Even if they have split lockwashers under their heads.
They work loose regardless.
If you want to spend two hours taking off all of the plastic, heat shielding, valve covers and other stuff to check the head bolts for proper torque on your mower every year, go ahead. I'll run this thing for about an hour then retorque all of the bolts and put it all back together. Do you recommend going inside the engine to make sure the connecting rod bolts are properly torqued every year? Do you open the hood of your car every year and check ALL bolts?
This 17 year old mower was found abandoned on the property when we bought it 10 years ago. It is already well beyond its useful life expectancy and gets used to mow the "ugly" parts of the property that get flooded every year and new trash washes up or gets uncovered. I'm going to fix just what's needed to make it run and nothing else. It sees less and less use every year as we clean up all the buried trash on the property.
I used to build automotive racing engines that made far more power per cubic inch than this thing. I did pull the engine / transaxle every year for PM, but it was primarily to replace bearings in the trans that failed due to excessive power input coupled with my right foot and a propensity to pop the clutch. The engine itself usually got a fresh timing belt every year and a good going over. The valve cover bolts did need tightening but nothing else usually did. Smoking 5 Liter V8 Mustangs at the drag strip with an ugly looking 4 cylinder FWD Dodge that revved to 7200 RPM was worth the effort.
Note that this kind of performance is common today. It was not in 1985 when I built the car. It took a lot of help from an man named Shelby and I sent him a good deal of money for his magic parts......And we think our tube amps are expensive.

@Tubelab_com
No need to get all huffy over my comment.
I was mainly talking about the bolts securing gaskets, and mounting bolts, since gaskets are known to shrink and compress over time, and vibration causes others to work loose.
No need to get all huffy over my comment.
I was mainly talking about the bolts securing gaskets, and mounting bolts, since gaskets are known to shrink and compress over time, and vibration causes others to work loose.
How about a copper sheet gasket?
That may be more reliable than this synthetic material, if indeed it is available.
That may be more reliable than this synthetic material, if indeed it is available.
Not huffy, just don't see the need to retorque bolts yearly on things that were properly assembled and maintained. This machine was not properly maintained, and the first cylinder head failed due to overheating. The other cylinder lost a gasket last year which was probably bad for some time due to the overheating. I got a pair of used heads on Ebay for the first failure and bought a new gasket set, so I had a good used head and a new gasket. I will retorque the head bolts after a run in, but that should be all that's needed.@Tubelab_com
No need to get all huffy over my comment.
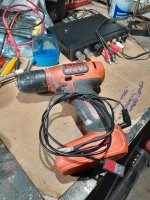
I bought this rechargeable drill years ago for $20. I always liked it but wondered how long it would last. The same drill now is more like $50 last time I checked.
The Achilles heel is the mini USB charging port. It's a very common point of failure on cell phones. So after a couple years of wiggling the plug it stopped working completely. The jack was completely detached from the board.
I installed a barrel jack in the drill and hacked a USB charger plug. It works great.
Attachments
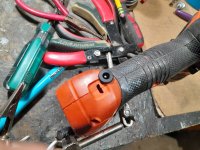
One of the downtubes from the handle/controls for the Troybuilt Pony developed a stress fracture. I bought a short piece of black iron pipe and made a stub to go inside, slipped the two sections back together and welded (sort of) it back. 33 years and it still starts on one pull.
Attachments

Sometime in the 1980's I wandered into an Ace Music store and left with a Fender Squire Stratocaster for about $130. I know that the guitar was alive and well as late as 2005, as I found dated pictures of me playing it. Sometime after that it broke in a rather rude manner and got parted out. The neck wound up on one of my DIY guitar builds, and some of the other parts got used elsewhere or used to fix other broken guitars. The red and white Strat was forgotten until I was watching a Youtube video last week and saw one just like mine. I thought about it for a while and couldn't remember exactly what happened to it, so I dug through some boxes marked "guitar stuff" that were hastily packed when I had to leave Florida on three weeks notice after living in the same house for 37 years. What was in those boxes? Lots of good stuff and several long forgotten unfinished projects.....and most of the pieces of the red Strat.
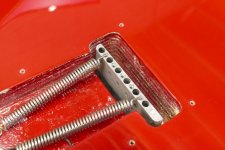
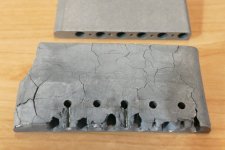
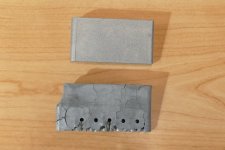
I also found the piece that caused the explosive disassembly which resulted in me throwing the guitar across the room in a friend's house, implanting a couple parts in my belly leaving me bloody. This piece is made of cast Manurium. It is screwed to the bridge which is mounted on the front of the guitar. There are six strings pulling the piece in one direction with 90 to 150 pounds of force. There are two to five springs pulling on the other end with an equal amount of force and a vibrato bar screwed into the cast piece to rock it back and forth changing the string tension, and therefore the pitch of the notes being played. You can see that the springs have bent ends that are simply inserted into holes in the casting. The obviously well made casting cracked at the point of insertion and several other places letting the springs fly, which ripped through the plastic cover plate leaving a couple of pieces sticking out of me and the guitar on the floor several feet in front of me.
The casting with all the cracks was the remains of the broken part. A new part is shown next to it. A new bridge, vibrato arm and springs were used in the reassembly process. I still need a new cover plate, but they are cheap. I used light gauge strings so I only needed two springs. From what I found in a large baggie, the guitar had three that were a bit stiffer than what's on there now. After making it all work, I find that the volume pot is mostly dead, and the switch is intermittent. Getting to those requires taking the strings off, so I tuned it and roughly dialed in the intonation, but I won't waste the time on a full setup until I decide if I will actually play this thing.
Attachments


Not sure if it qualifies as a repair but I replaced the CMOS battery on an Intel NUC desktop computer.
Getting access to the battery required some careful bending / tweaking / torqueing of the the plasic case, but I managed without any breakages.
Replaced the battery and tested for correct operation on the bench before re-assembling and all was working OK, so proceeded to put everything together again.
Breville IQ Kettle with temp control, my youngest son, still at home, working to almost complete is diploma in physic engineering, and soon to start his master in quantum mechanics, bought this kettle for his tea, while he study. The middle button, 200C setting led light was not coming on. He never return it, saying it was not worth it. I opened it, the driving smd SOT-23 transistor was cracked. It was marked ‘1B‘, checking smd marking website it was probably a NPN BC546 type transistor. i I had 817-40 in stock, installed it and bingo, repaired…
sB
sB
My newset Lenovo laptop, small thing I bought to manage my music server start loosing Wifi. Opened the thing, guess what? The wifi small module was barely inserted into the motherboard socket. Re-seat it correctly and no more Wifi problem. Took the opertunity to upgrade the RAM module at the same time. Windows 11 is huge in memory. Now it is working much better with an extra 32Gb of memeory.
sB
sB
Simple but extremely worthwhile for me: I cleaned for good the charging connector of my smartphone.
It drove me mad, several times, changing the cable, getting random behaviors and failures.
The actual trouble is : Tiny near invisible bits making bad contacts, clogged inside.
Must be cleaned lighting inside, using a thin bit of plastic tailored to gently tickle inside.
Contact cleaner spray is not enough and can ruin the phone if sprayed directly. It does help, though; Use with much care.
Now quick charging does work like a charm. You know what ? I am happy.
I use wet with alcohol small piece of cotton wound on to watch maker's tweezers.
Then decided that only OEM cables, or best quality, and same charger only, less issues, charging with different chargers and their cables was causing faults.
I had the charging ports on my Huawei G3 and Samsung M01 changed, they got worn out as I as using them as tethered modem at different places.
Now I use one as a wi fi hot spot, less issues, no contact wear.
With wireless charging and wireless ADB, I rarely need a cable now. Only to use fastboot etc.
A pcb where the relay didnt turn on.
Simple relay driver using MPSA42.
The driver signal to base was there.
Output to relay was 2v5 instead of 5 volts.
Turned out relay was taking more current than expected.
Reduced base resistor a little and it now works fine.
Made hundreds of these and never spotted the problem before.
Maybe low hfe transistor or a relay that takes a bit more current ?
I was visiting my aged rellies this weekend for a spot of R&R in the Country, and I called in on my friend Ollie (The World-renowned Danish HiFi Expert... and aren't they all Danes?) to see what he was up to.
He was in utter despair. His reputation potentially in tatters. He has built 6 new whopping MOSFET power amplifiers for a client, and 4 out of the 6 are broken when measured!

He was little aware that, like most of you DIYAudio members, I can fix most things. And have built the odd preamp and power amp myself. It starts with a visual inspection IMO. Look for differences between the working ones and the broken ones. You really don't even need to know the exact circuit details.
He told me, rather shortly, that I had no idea how complex these circuits are. 200 components in the power amp servo based driver stage. I didn't think that was much, TBH.
I saw a rudimentary but huge toroidal rectifier power supply and a green driver board connected to a pair of MOSFETS on whopping heatsinks.
How hard can it be? 200 x 10 seconds per component is about 30 minutes with the magnifying glass. I left him to roll his sleeves up and hopefully, get on with it.
3 hours later he phoned up. "Steve, firstly my apologies for being short with you. I have found the fault! You gave me ideas!"
It was a stinker, TBH. Ollie usually uses Mica and thermal compound heatsinks, but on this occasion the manufacturer used a cheap strip of cardboardy/rubbery stuff which did all 6 transistors in one hit. Utter rubbish. It had shorted the 6 small driver transistors to ground and fritzed the lot on a +/_ 70V rail!
Now I didn't solve it myself. He did. I merely got him off his backside for another go at it. But Oliie now treats me with respect and almost an equal, and let me in on many HiFi secrets subsequently.
This is a man who rubs shoulders with people like Troels Gravesen and Joachim Gerhard. So we are not talking minor league here. 🙂
He was in utter despair. His reputation potentially in tatters. He has built 6 new whopping MOSFET power amplifiers for a client, and 4 out of the 6 are broken when measured!
He was little aware that, like most of you DIYAudio members, I can fix most things. And have built the odd preamp and power amp myself. It starts with a visual inspection IMO. Look for differences between the working ones and the broken ones. You really don't even need to know the exact circuit details.
He told me, rather shortly, that I had no idea how complex these circuits are. 200 components in the power amp servo based driver stage. I didn't think that was much, TBH.
I saw a rudimentary but huge toroidal rectifier power supply and a green driver board connected to a pair of MOSFETS on whopping heatsinks.
How hard can it be? 200 x 10 seconds per component is about 30 minutes with the magnifying glass. I left him to roll his sleeves up and hopefully, get on with it.
3 hours later he phoned up. "Steve, firstly my apologies for being short with you. I have found the fault! You gave me ideas!"
It was a stinker, TBH. Ollie usually uses Mica and thermal compound heatsinks, but on this occasion the manufacturer used a cheap strip of cardboardy/rubbery stuff which did all 6 transistors in one hit. Utter rubbish. It had shorted the 6 small driver transistors to ground and fritzed the lot on a +/_ 70V rail!
Now I didn't solve it myself. He did. I merely got him off his backside for another go at it. But Oliie now treats me with respect and almost an equal, and let me in on many HiFi secrets subsequently.
This is a man who rubs shoulders with people like Troels Gravesen and Joachim Gerhard. So we are not talking minor league here. 🙂
If there is one thing I learned from software problems is never give up.
Break down the problem by eliminating parts and whats left must be the problem.
Similar to Sherlock Holmes' approach to problems.
Break down the problem by eliminating parts and whats left must be the problem.
Similar to Sherlock Holmes' approach to problems.
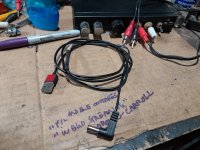
Today was a "you've got to be kidding!" repair. Wanted to clean up my main panel/home office telephone wiring. Had bought one of those Aliex 1-to-5 multi-line RJ11 adapters long ago. Installed it: would not work. Kept investigating, even snipped off RJ11 male to look for continuity and make direct terminations, no progress. Time to open it up: unbelievable! The 4 conductor cable had been soldered in mirrored order AND only 2 out 4 solder lugs for each jack had been soldered (not even just the middle 2). Brutal fail! All fixed now, but still ridiculous.
Home brewed tube amp back on the bench. Clean channel fine, filth channel intermittent again... like it was a few weeks ago.
Poking around with a plastic pen while injecting a signal, found I could cause the fault by wiggling the chanmel switcher board. Turned the signal off, and could hear a relay disengaging as I wiggled the board. Reflowed the connections to that relay.... and all.seems good again.
I hate intermittent faults!
- Home
- Member Areas
- The Lounge
- What did you last repair?