Here's a fun one:
Took the dryer apart tonight to clean out the inner exhaust ducts in an attempt to fix a damp-dry situation. But while trying to disconnect the door switch wiring, I pulled the whole switch apart. (Cheap little plastic thing)
Luckily none of the bits went too far, so I gathered them up and sat down at the table to figure out how it went together. Wasn't terribly difficult, just a little SPDT momentary snap switch with button actuator.
Removed a fair amount of lint cake from the trap duct, but not a lot really. Snapped the crappy little switch back into the door cavity & plugged in the wiring. Got it all back together & turned the Start knob - nothing. Dead as my Aunt Betty.
Main suspect of course was that damn door switch, but I couldn't figure out what was wrong - it tested fine with a meter. Plus, it used 2 different sized quick-connect terminals, so mis-wiring would've actually been somewhat difficult. AC line into the common terminal, NO back into the machine for power, NC up to the little (burned out) courtesy lamp. But wait - checking with the meter again, it was working backwards! But how could this be - NO & NC were 2 different size terminals, there's no way to wire them backwar- OOPS.
Removed & disassembled the switch (again), swapped the NO & NC contact/ terminal sections (which - surprise! - are perfectly interchangeable!), reassembled & she started right up. Sheesh...
After all that, the damn thing still isn't drying properly. Time to put the little USB camera to work in the basement ducts - tomorrow.
Last edited:
My preferred method of balancing a fan like that is to tape a coin to it.Ceiling fan.
Came with the house. Too large for the hall so someone trimmed the blades. It has always wobbled.
Not yet repaired but it is next in line.
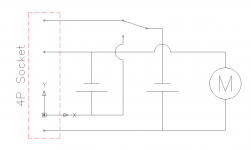
Remington hair clippers.
2 x AAA NiMH cells inside which are end of life.
Trickle Charging system - not the best idea for NiMH cells.
Also, trickle charging works best if battery is run flat - hardly an option when part way though trimming your barnet.
Option 1 - replace the cells and leave as is.
Option 2 - fit 4-pole plug (TRRS) as scheme & use external smart charger which I already have: Making up a charging lead consisting of a TRRS plug & 2 dummy cells to slot into charger.
Smart charger charges cells individually (not in series). The switch shown would be the existing clippers power switch.
What d'ya reckon? Would a short charging lead upset the voltage sensing of the smart charger?
Attachments
I fixed on of these today: DC AC Converter 12V to 110V 200V 220V 280V AC 150W Inverter Boost Board Transformer Power(6.5)|dc-ac converter 12v|dc-ac converterinverter boost board - AliExpress
First time I had one fail, also the first time I saw one using these MOSFETS that I've never heard of. http://dglxdz.com/UploadFile/2018122502/bc16560e8a88418196b9ab0a1caff803.pdf
Replaced them both with IRF3205 and it's back in business 🙂
First time I had one fail, also the first time I saw one using these MOSFETS that I've never heard of. http://dglxdz.com/UploadFile/2018122502/bc16560e8a88418196b9ab0a1caff803.pdf
Replaced them both with IRF3205 and it's back in business 🙂
Last edited:
BMW K100RS temperature sensor contacts cleaned and spark plugs replaced.
The sensor caused the injection to provide an extremely rich fuel mixture.
I use NGK spark plugs instead of Bosch.
Bosch dropped in quality after they moved to the "blue" design.
I prefere Made in Japan over German engineered and made somwhere else.
The sensor caused the injection to provide an extremely rich fuel mixture.
I use NGK spark plugs instead of Bosch.
Bosch dropped in quality after they moved to the "blue" design.
I prefere Made in Japan over German engineered and made somwhere else.
My brand new HiFiBerry amp wouldnt power the pi, as it's supposed to...
Struggled with it. 19V PSU, to 16V PSU... Separate power source for the amp and pi...
Finally took a good look with the headset magnifiers. C29, the 0.1 bootstrap cap was busted - this thing is about the size of a grain of pepper from my grinder. Fortunately it went across pins 1 and 8 of a reasonably sized IC and I was able to solder a leaded part (remember those?) across the pins.
HiFiBerry amp now powers the pi, with 19.3V in from a Liteon switcher brick.
Last edited:
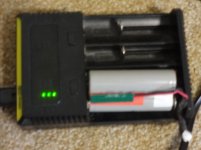
Took a swag at my Anker BT speaker. Had the proverbial "fast blink" on the charging light. Took a look at a YT video of someone successfully taking one of these apart - pretty straight forward. Dug out the batteries, a pair of 18650s. Busted open the plastic, stripped off the ends, one measures 4.23V, the other 3.47. Stuck the lower one in my lion charger while still in the pack and brought it up to 4.17. We'll see.
Attachments
Marantz pm32 amplifier. Both channels sound disappeared. Protection relay was off. Signal and power ground connection was missed. Soldered 10 ohm resistor to connect two ground areas on the main pcb.
My father washing machine.
A faulty ball bearing in the motor.
It is a 40 years old machine!
I don't know if it's a serviceable motor.😕
A faulty ball bearing in the motor.
It is a 40 years old machine!
I don't know if it's a serviceable motor.😕
Attachments

Last edited:
Any small-town electric motor repair shop can take a look at that motor and tell you if it is worth repair, replacement, or you should trash the whole machine.
It is "possible" it only needs a new ball(s) and a new retainer. More likely the ball groove is worn out, it wants a whole new bearing. If the shaft is badly damaged, repairs may cost more than a new motor. But the the mounting brackets may not transfer over to a different motor. The motor repair shop will know all this. (They probably keep all the laundry and bread dough machines in town running.)
It is "possible" it only needs a new ball(s) and a new retainer. More likely the ball groove is worn out, it wants a whole new bearing. If the shaft is badly damaged, repairs may cost more than a new motor. But the the mounting brackets may not transfer over to a different motor. The motor repair shop will know all this. (They probably keep all the laundry and bread dough machines in town running.)
Not strictly repair, but today I put an electronic flasher in the Corvette as a hyperflash fix (blinking too quickly under the low load of LED bulbs). Not as trivial as it sounds; not just a swap, you have to cut leads to stock hazard switch assembly and solder in relay socket pigtail.
Last week was wiring up the backup camera, transmitter and receiver, and running power for the GPS to a run power lead so it doesn't run down the battery. Also works without ever having to touch a button for GPS or camera.
Last week was wiring up the backup camera, transmitter and receiver, and running power for the GPS to a run power lead so it doesn't run down the battery. Also works without ever having to touch a button for GPS or camera.
Last edited:
Thanks PRR, In the end, all the damage cost me 9 euros. So much was the cost of buying 2 new bearings. A friend who handles a lathe helped replace the bearings. It is a great pleasure to see a machine of so many years working again.😎Any small-town electric motor repair shop can take a look at that motor and tell you if it is worth repair, replacement, or you should trash the whole machine.
It is "possible" it only needs a new ball(s) and a new retainer. More likely the ball groove is worn out, it wants a whole new bearing. If the shaft is badly damaged, repairs may cost more than a new motor. But the the mounting brackets may not transfer over to a different motor. The motor repair shop will know all this. (They probably keep all the laundry and bread dough machines in town running.)
My phono preamp needed a 5k1 resistor to pad the left channel. Now both channels are within 0.1% of each other 🙂
Had to replace two pots in a 6E2 meter circuit, too. Once failed open, the other had a cracked carbon element.
Had to replace two pots in a 6E2 meter circuit, too. Once failed open, the other had a cracked carbon element.
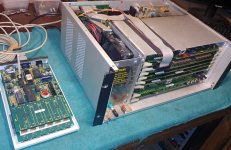
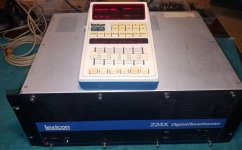
The Godfather of digital Reverb effects, Lexicon 224X + LARC (Remote Control).
Kept getting "mainframe link failed" error message. Could have been virtually
anything. Tracked it down to a faulty 4049 Hex Inverter / Buffer in the LARC
(Remote).
TCD
Kept getting "mainframe link failed" error message. Could have been virtually
anything. Tracked it down to a faulty 4049 Hex Inverter / Buffer in the LARC
(Remote).
TCD
Attachments
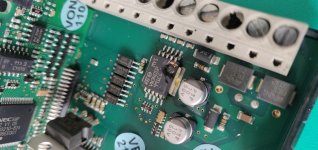
The PLC controlling a saw at work.
Some of the outputs wasn't working. The fault was pretty obvious when I popped the cover.
Ordered a new part from RS. Got it from the UK in less then 24 hours. Soldered it and got the saw up and running again.
The output got blown because of a buildup of aluminium dust inside the warning light.
Some of the outputs wasn't working. The fault was pretty obvious when I popped the cover.
Ordered a new part from RS. Got it from the UK in less then 24 hours. Soldered it and got the saw up and running again.
The output got blown because of a buildup of aluminium dust inside the warning light.
Attachments
- Home
- Member Areas
- The Lounge
- What did you last repair?