I tend to agree with the organic and non-fatiguing qualities of the Mtn View. I spent many long listening sessions with that one, as it had excellent preservation of tone as well as pace and timing. The instruments I'm more familiar with are acoustic and electric guitar and bass, plus piano, drums, flute and vocals. If an amplifier doesn't get those right, it won't last in my system.
Prior to building my first ACA, my system had been all-Naim electronics, with a modified NAP-250 as my power amp. The Naim gear tends to do really well with tone even with the basic models. Improvements with timing, clarity and imaging come with the more elaborate (& expensive) power supply options. The NP Class A amps have have given me new appreciation for organic and realistic sound quality. The M2x has proven to be a step above my last ACA build (the ACA-220 v2), mainly in dynamic headroom. It has also opened up some details in a few recordings that I am very familiar with.
Some of the IPS designs that I have in my queue include a couple variations on the Mtn View. I have my own take on the Moffett Field, as well as one that I am calling Fremont after the headquarters location of Linear Systems. This topology allows for some fun experimentation with devices and bias currents.

Regarding the power transformer, I believe our builders will save some time and effort by choosing one with built-in electrostatic shielding and a magnetic shield band, such as the Antek AS-4218. It is also important to include the 400VA steel case for this toroid. I used a 400mm deep chasis which allowed the transformer to be bolted to the base plate near the front of the amp, and had plenty of room for the diyAudio universal PSU board. I have had no issues with hum.
I believe 6L6 used the Modushop deluxe 4U chassis, which is 300mm deep. In this case I would recommend bolting the transformer to the inside of the 10mm thick front plate. This allows greater physical separation from the Edcor signal transformers, and appears to be a favorable orientation to reduce magnetic interaction.
Start of my build using a 300mm chassis
Drilled and tapped front plate to bolt the toroidal without drilling thru entire plate.
Remotely mounted Leds for + - supply and tapered the front side (pics later)
Bridge rectifiers sinked to faceplate as well

Last edited:
My bridge rectifiers are mounted on the front panel too, reduced the operating temp from 80C to 50C.
I removed my Sony VFET2 amp boards from my McIntosh style cabinet and replaced it with a single CRC PSU board and 0-18v 7A x2 transformer. This amplifier plays smoothly and I just love the way it controls the music. Right now using the Ishikawa board but in the process of building the MT and then I will try the Tucson and rest. This is one of the oustanding amps that one can build it and listen to hours together without any listening fatigue. Paired with my Salas DCG3/B1 Korg this makes my MA 7p drivers based Frugal Horns dance 😉
Here are the pictures.
Here are the pictures.
An externally hosted image should be here but it was not working when we last tested it.
An externally hosted image should be here but it was not working when we last tested it.
An externally hosted image should be here but it was not working when we last tested it.
I removed my Sony VFET2 amp boards from my McIntosh style cabinet and replaced it with a single CRC PSU board and 0-18v 7A x2 transformer. This amplifier plays smoothly and I just love the way it controls the music. Right now using the Ishikawa board but in the process of building the MT and then I will try the Tucson and rest. This is one of the oustanding amps that one can build it and listen to hours together without any listening fatigue. Paired with my Salas DCG3/B1 Korg this makes my MA 7p drivers based Frugal Horns dance 😉
Here are the pictures.


Wow! Nice build Manniraj, Very trick meters. Where did you get them? Any possibility of a closer pic of the meters? I love that “classic” meter look 👏🏻
Mtn View Redux
I finally received the parts that I needed to try a more robust mounting / connection scheme for my M2x IPS veroboard prototypes. The first board set that I tested was a version of the Mtn View that I've been itching to try for a while. The main goal of this update was to test an alternate voltage source to replace the infamous "do not substitute" red LED. Along with the new voltage reference, a few other component substitutions were made to ensure best performance and stable operation. I am happy to say that the sound of the new boards meets or exceeds what I had hoped to accomplish. The updated Mtn View conveys a sense of ease and flow to the music which invites extended listening sessions. While the boards took a few hours to settle in, once they did, they were a delight to listen to. Though I miss the cheery glow of the red LEDs, the sound of these boards more than makes up for their absence. I think that garyalex and I may be hearing very similar things with Mtn View vs Tuscon.
The new voltage reference is an LM4040C20 (2.048V, 0.5%). This is a part that is commonly used for precision analog to digital converters, and should be easy to source. The new voltage requires that R3 and R4 be changed to 182 Ohns and 90.9 Ohms respectively to get the desired bias currents. D1 and D2 were changed to higher precision Zener diodes, and I reduced the values of R1 and R2 to 3.9 kΩ to increase the available bias currents for the zeners and voltage reference. J1 remains a standard J112 and Q1 – Q3 remain as in the original. By running the zeners more in their "sweet spot" for current, I hope to ultimately create more stable current references for J1 and Q2.
The good news is that these part substitutions may all be performed with the original Mountain View PCBs. Please note that the LM4040 operates as a zener diode, and has its anode and cathode reversed from the LED. You may think of this as the TungstenAudio treatment for the Mtn View IPS – optional, but fun to try.
My own prototypes proved to be a lot of work to build, especially with the use of copper washers to reinforce the mounting holes, but have given me a means to try out many other ideas without having to do custom PCB layout and fabrication.
Attachments
Last edited:
Congratulations two times! First for your success, second for your bravery in making your own daughter boards. Good on ya!
Regarding the power transformer, I believe our builders will save some time and effort by choosing one with built-in electrostatic shielding and a magnetic shield band, such as the Antek AS-4218. It is also important to include the 400VA steel case for this toroid.
I have a junior rookie question.
Would wrapping the transformer in 3M™ Embossed Tin-plated Copper EMI Shielding Tape 1345 give a similiar result to using a steel case?
Or, am I overthinking this?
EDCOR - Copper Shielding
I am once again horsing around with different SMD opamps on the Tucson daughter card, and it occurs to me that other people might want to do the same. I went through my remaining stock of bare PCBs, building ten Tucsons (five different opamp types X 2 channels). So it's time to buy some more.
If you think you might want a few extra blank Tucson PCBs, "just in case" the mood strikes you to change opamps or to fiddle with SMD opamps, head over to the Swap Meet section of the site and visit this thread
FS: M2x daughter cards, type "TUCSON"
I'm selling them at breakeven, as a favor from one hobbyist to another.
MJ
The copper shielding tape is intended to reduce radio frequency electric field interference, but it won’t help shield the Edcor transformers from line frequency (60 Hz) magnetic interference. A steel case around the power transformer(s) is a more effective shield for the magnetic fields. Distance and different physical orientation can help too. The Antek AS series power transformers include some electric and magnetic shielding, and it helps to add extra measures to prevent interactions between the power and signal transformers in an M2.I have a junior rookie question.
Would wrapping the transformer in 3M™ Embossed Tin-plated Copper EMI Shielding Tape 1345 give a similiar result to using a steel case?
Or, am I overthinking this?
If you think you might want a few extra blank Tucson PCBs, "just in case" the mood strikes you to change opamps or to fiddle with SMD opamps, head over to the Swap Meet section of the site and visit this thread
FS: M2x daughter cards, type "TUCSON"
MJ
Is there a list somewhere of smd opamps that is good to try out?
I would not know which to try if I order some Tucson PCBs.
Has anybody tried this?
SMD 8 Pin SOIC Adapter (DIP Socket) - Electronics Projects Circuits
It could be used if footprint is DIP8 only?
I was looking for smd to DIP adapters. A lot of small PCBs showed up.....and the above.
The AD744 which is used for Norwood…...is AD744 a candidate for Tucson?
SMD 8 Pin SOIC Adapter (DIP Socket) - Electronics Projects Circuits
It could be used if footprint is DIP8 only?
I was looking for smd to DIP adapters. A lot of small PCBs showed up.....and the above.
The AD744 which is used for Norwood…...is AD744 a candidate for Tucson?
AD744 can most certainly not go in Tucson, it's why Norwood needs it's own PCB.
OPA1611 is the suggested opamp for Tucson SMD, and I enthusiastically endorse it.
OPA1611 is the suggested opamp for Tucson SMD, and I enthusiastically endorse it.
AD744 can most certainly not go in Tucson, it's why Norwood needs it's own PCB.
He's right. AD744 needs external compensation to operate at a gain of +1, which is what Tucson demands. Check the front page of the AD744 datasheet.
However, a brave and extremely motivated builder, who possesses above average skills soldering SMD boards by hand, could add the external compensation component to Tucson even without drill holes and PCB footprints. It might not be supremely easy but it could be done.
On the other hand, I wouldn't necessarily recommend this. The sound of an AD744 is already readily accessible in the Norwood board, as 6L6 remarks. And there are other JFET input SMD opamps in this world to try, besides AD744, most of which do not need external compensation to operate at a gain of +1. I personally am extremely pleased with the sound I get from Tucson using SMD opamps that have BJT inputs, including OPA1611 as is written right on the Tucson schematic. And others. I like the sound of a number of JFET input SMD opamps too.
Yes, I've built and auditioned numerous different Tucsons. I prefer to build up and then keep the entire PCB, rather than swap out N different opamp chips from a single PCB. The cost of the extra boards and extra passive components, is acceptable. To me anyway.
It's a hobby. Fool around! Experiment, play, try new ideas, have fun.
Ok......I will look for quality smd opamps that are stable at unity gain.
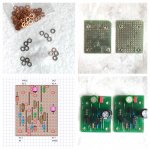
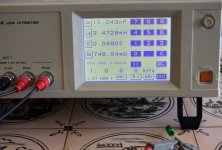
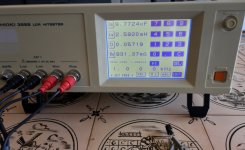
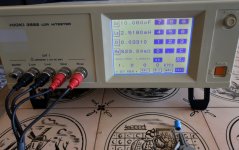
About the M2X 10uF signal coupling cap:
I made a measurement on 3 different Nichicon 10 uF capacitors:
ES (Green Muse) 10u/50V
KZ Muse 10u/100V
BT (industrial 125 C type) 10u/50V (blue color in picture)
I was surprised that the industrial BT seems to have much better specs than than the others (especially when compared to the KZ which should be the top audio cap series from Nichicon). The "picture" is the same also at 100 Hz and 100 kHz.
So......what do we pay for when selecting a "Muse type"?
For the "Korg" I used the BT's.....with very good results (at least to my ears).
I wrote to Nichicon (Japan) to get their view.....but never got a response 🙂
Attachments
That looks like a quick way to destroy an SMD opamp. In fact, more difficult than simply soldering the device onto a proper SMD footprint. The small adapter PCBs are a much better way to go.Has anybody tried this?
SMD 8 Pin SOIC Adapter (DIP Socket) - Electronics Projects Circuits
It could be used if footprint is DIP8 only?
I was looking for smd to DIP adapters. A lot of small PCBs showed up.....and the above.
The AD744 which is used for Norwood…...is AD744 a candidate for Tucson?
The folks who frequent the headphone amp forums have many opinions about what may be the best sounding opamps for audio. Most of these are dual devices, which are incompatible with the single opamp footprint on the Tuscon PCBs. However, there is a single opamp in the older DIP-8 package that looks interesting – the MUSES03. It's a pricey little critter, but has JFET inputs, low noise, very low distortion and is designed specifically for audio.
I've been working on a veroboard design to accommodate a dual opamp, but can't think of a worthwhile use for the second opamp in the package. It seems a waste to simply tie its inputs to the supply rails with resistors.
Last edited:
Is there a good source for these smd adapter PCBs which fits into a socket (with "socket pins")?
Most I have seen uses pins (square format) you normally use to solder into a pcb?
I will write down Muse03.....I have ordered 10 Tucson boards…..so I need a small list of interesting smd opamps to try out.
Most I have seen uses pins (square format) you normally use to solder into a pcb?
I will write down Muse03.....I have ordered 10 Tucson boards…..so I need a small list of interesting smd opamps to try out.
to MEPER #1813
Hello MEPER,
I did this action with the SOIC8 - DIP8 - adapters.
Remember my post # 1361 in this thread with pics.
After soldering everything looked fine. But I had to resolder all adapters.
But now they work perfect. And I can use single JFet Opamps in DIP8 and
with the adapters also SOIC8.
Greets
Dirk
to MEPER
Those adapters (SOIC 8 - DIP 8) are sold by SJÖSTRÖM Audio (very good quality) and many others.
You can also find them on that big platform with 4 letters (but then they are
most often from Chi...
Greets
Dirk
Those adapters (SOIC 8 - DIP 8) are sold by SJÖSTRÖM Audio (very good quality) and many others.
You can also find them on that big platform with 4 letters (but then they are
most often from Chi...
Greets
Dirk
- Home
- Amplifiers
- Pass Labs
- The diyAudio First Watt M2x