Cambridge Audio makes great products at an affordable price. I use their 200m DAC. It came with a small SMPS psu you plug into the wall (12 VDC out). I exchanged that with a silent 12 VDC linear PSU and I think I can hear a difference to the better. Good that ext. PSU was used so you can upgrade it. The Cambridge solution is one reason for the affordable price. They of course warns that only the original PSU should be used.......Hello,
This is all over the deep end.
For $200 you can purchase a Cambridge Audio RIAA Preamp.
As with most of these DIY projects the power supply will be the challenge and cost more than the amplifier.
Then after all that the Cambridge Audio RIAA Preamp will test / perform better.
It is for entertainment I guess, not emergency backup for FedEx or Visa computers.
Thanks DT
For what it’s worth, I’m already collecting a few different options to try. I’m hoping to present more than one solution.Okay Jim. We are all waiting for a full report on power supplies before moving forward! 🙂

As with most of these DIY projects the power supply will be the challenge and cost more than the amplifier.
I’ll take that challenge.
Yes, in some cases this will be true, as all roads lead leads to Rome, but the actual requirements of the PSU are not as exotic as you may think.
Then after all that the Cambridge Audio RIAA Preamp will test / perform better.
Maybe. Maybe not.
Will be very happy to find out.
😎
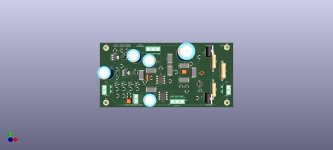
A look inside the MM/MC Cambridge Riaa:

Seems to be built around opamps also but it has no 4 x 2sk170 as input circuit?
Looks like an onboard small SMPS. Probably with good filtering and screened a little bit from rest of circuit.
I see no dip-switches for load of cartridge.
Seems to be built around opamps also but it has no 4 x 2sk170 as input circuit?
Looks like an onboard small SMPS. Probably with good filtering and screened a little bit from rest of circuit.
I see no dip-switches for load of cartridge.
It's good to hear from Wayne that his single case build worked well.
My plan is to be cheap and reuse my Pearl 2 external PCB. I'll have voltage to burn so I'll add some CRC and/or pre-regulation in the Pearl 3 case before the Pearl 3 boards.
For me, there's much to like about the Pearl 3: Optional balanced output, onboard load switching and the possibility of op-amp rolling. This is going be fun.
Thank you Wayne.
The Cambridge MC unit is $350 and it will not measure as well. The distortion is higher as is the noise. The eq response is six times worse. It’s probably pretty good for the money and looks finished.Hello,
This is all over the deep end.
For $200 you can purchase a Cambridge Audio RIAA Preamp.
As with most of these DIY projects the power supply will be the challenge and cost more than the amplifier.
Then after all that the Cambridge Audio RIAA Preamp will test / perform better.
It is for entertainment I guess, not emergency backup for FedEx or Visa computers.
Thanks DT
Building it is half the fun.
Total agreement about the fun.Building it is half the fun.
I am thinking of two parts:
The amplifier
The power supply, getting the buzz, hum and AC harmonics out is the challenging part.
Thanks DT
I am building the Pearl 2 and Pearl 3. Will post AP plots here.
Wayne was talking about that in BAF presentation - he asked some cartridge manufacturer for coils with center tap
And as I recall, Wayne replied to his own question: "they thought I was nuts"... or something like that...
The Cambridge MC unit is $350 and it will not measure as well. The distortion is higher as is the noise. The eq response is six times worse. It’s probably pretty good for the money and looks finished.
Building it is half the fun.
The proof is in the pudding.. A lot of people just need a quieter turntable, that's all. The grind of their bearing is covering up the noise from their preamp.
Right now my LP12 with Lingo/Trampolin/Karousel/Ittok/Grado Master 2 into a Pearl 2 set to medium gain and 47K load ( Moving Iron is impervious to impedance) into a CJ ET3SE, SissySIT and AN AN k/LX.
As you can see, this is a reasonable high gain system.
Today I was playing Pink Floyd's Animals... at the end of the side... I realized, again, that the lead out groove was SILENT. I was listening for it...
I doubt the Cambridge is as quiet as my Pearl 2. I hope the Pearl 3 is a quiet. This set up is very, VERY quite.
My previous (backup) phono preamp was a CJ PV9 with the teflon caps and Svetlanas... with gobs of gain and 100 ohms. It is noisier... not much, but I can hear the lead out groove.
The down side of a balanced cartridge is more electronics and noise.
I hope it doesn’t look like I was coming down so hard on Cambridge products, I just went and look at their spec sheet.
The insides look quite nice for the $.
I hope it doesn’t look like I was coming down so hard on Cambridge products, I just went and look at their spec sheet.
The insides look quite nice for the $.
I’ll take that challenge.
Yes, in some cases this will be true, as all roads lead leads to Rome, but the actual requirements of the PSU are not as exotic as you may think.
You know, I've been in quite a few projects where the budget in terms of R&D cost was highest for the power supply. Higher than the fancy digital stuff and the firmware!
Going to one chassis? What will poor Gianluca say about that?
I say, go to three chassis... One for the power supply, one each for the preamp boards. Red LED for right, White LED for left and Green for power supply. Make sure each box has it own front panel ON/OFF switch... just to make this.. ahem... complicated.
Use brass knobs for the adjustments... screw the dip switches.
And don't forget.. three gain settings for those of us running ~1mV cartridges ( 0.5V and 5mV is for uncomplicated people ).
Put some nice removable, clear acrylic covers over the op amps so they can be swapped without opening up the whole chassis.
What the hell? Otherwise, go buy a Cambridge phono thingie. The fun, is not only on building it, but on over designing it as well.
Last edited:
I assume such a complicated shunt regulator should be just a little more silent than standard voltage regulators? .....assuming that the P3 power consumption does not exceed that of the ZM Gemini......
complicated not, just big pcb area

power capability - present pcb allowing, say, 200 or so mA of programmed current
several times that, appropriate pcb design and augmenting few parts
as is, feeding 3 stereo Pearls 3
shunt regs are my Fetish (one of many), but I'm not twisting anyone's hand to think as Mighty Moi
I hope it doesn’t look like I was coming down so hard on Cambridge products,
it didn't look as that, and facts are facts
same as fact is that Cambridge Audio are not having Wayne
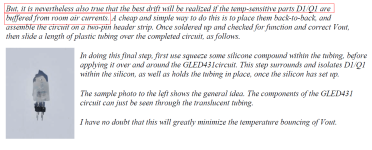
One additional thought for a chassis is totally sealed or at least keep air currents away from the input stage.
You can watch the drift by blowing on the input transistors.
You can watch the drift by blowing on the input transistors.
Walt Jung says the same thing about his "GLED431" ultra low noise voltage reference: keep air currents away.
_
_
Attachments
One additional thought for a chassis is totally sealed or at least keep air currents away from the input stage.
You can watch the drift by blowing on the input transistors.
If the devices are so heat sensitive... how long do they take to reach thermal equilibrium in a lab environment ( ~70F ) with no air currents flowing around them?
Should the PCB itself be built into its own oven, like high resolution metrology devices?
That could be a nice project. Completely sealed chassis with heating and cooling elements to maintain a constant temperature. Shouldn't be too difficult to do with Arduino. A little fan inside as well to distribute the air inside to avoid hot and cold spots. Overdoing it a bit perhaps, but this is DIY.Should the PCB itself be built into its own oven, like high resolution metrology devices?
^As much as I think over complicating things with a computer and a few LEDs and switches... is a splendid idea... I'd be concerned that doing such might introduce noise into the circuits.
I was thinking more along the lines of sealing the cabinet and putting some type of a small heat sink (if needed) on the outside to ensure that it stays on at the desired temp when in stasis... as in always powered on.
Assume a 70F indoor temp.
Perhaps incorporating an ON/STBY switch that disconnects the inputs and outputs.
I don't think you'd need cooling... just do the right calculation for the heat sink capacity.
Of course, a four chassis set up with Left, Right, Power and Temp Controller... with PC grade liquid cooling pipes attached to the cases and a heater put either inside, or also on the case, and controlled via the Temp Controller.... could be done with a simple thread running a Python loop... hmm... it will need a touchscreen and a web interface, eh? Raspberry 5, naturally.
Hot Pearl 3.
Last edited:
Hello out there,
and thanks to Wayne, offering this circuit.
I made a little board of this circuit and will test it in the near future... ,when the pcbs and parts arrive.
I have built a PEARL1, PEARL2 and a X-ONO-clone. All 3 phono-pres are great.
So, I am pretty sure, that the PEARL 3 will also be a fantastic phono-preamp.
I will test it with the TOSHIBA 2SK209 and the ONSEMI 2SK3557 (perhaps 2SK2394) in the inputstage.
Great that Wayne used the super-low-noise BJT from ZETEX (ZTX851). I like this recipe!
Have fun!
Cheers
Dirk 😉
Attachments
- Home
- Amplifiers
- Pass Labs
- Pearl 3 Burning Amp 2023