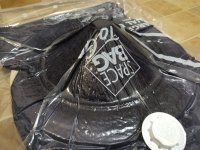
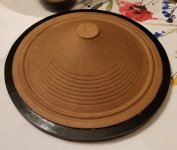
I picked up those Eminence speakers today and removed the soft parts from one of them. The pole piece is ~1.500" and the VCID is ~1.520" (kapton/polyimide former). Gap height is 8mm (the P12P is actually 9.5mm; I remembered incorrectly before). The basket is about 10mm deeper at roughly 95mm/3.75" from the rim to the top of the pole piece. Not really a problem since I can simply make the former a bit longer.
So they should work just fine for my purposes with some small changes to the voice coil assembly.
So they should work just fine for my purposes with some small changes to the voice coil assembly.

Oh yes, most probably you're right, as there's no reason why the iron bracket that connects the magnet's rear pole with the gap would change it' thickness on the way 😉!
Best regards!
Best regards!
"Normal" speaker plates are punched out of an obviously flat plate of low carbon steel, popular values are 6.35mm , "almost" 8 mm, 9.5 mm and in monster speakers such as some EV, up to 12,5 mm.
All sizes clearly coming from standard plate thicknesses in inches.
Now on a few high power full range speakers, almost all horn drivers and all tweeters, plates are turned to a lesser thickness near the gap, to better focus magnetic lines int a short or very short voice coil.
Old horseshoe alnico magnets, such as Jensen "P" series , place magnet slug inside of a "box" made out of folded steel strip, again constant thickness.
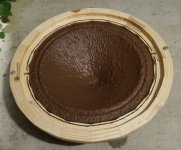
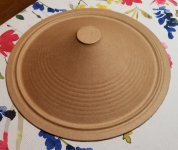
I've done a few more test cones since my last post. The vacuum press (just a vacuum storage bag intended for clothing) does a good job of eliminating air bubbles, so that problem appears to be solved. Attached are a few photos from the most recent test. Final dry mass of this one is 11.3g (input was 12.4g, so 1.1g of fines, fillers, etc were lost). There are still some minor surface imperfections on the front side of the cone which appear to be related to the lumps shown in the second photo. A deflocculant should help, but I haven't tried it yet.
I think I'm probably ready to start working toward making the pulp that I'll use for the real cones. I'm working on a design for a very small Hollander beater so I can produce my own pulp from raw fiber.
It turns out that it's difficult to find small quantities of softwood kraft half stuff (partially beaten pulp) as no one uses it for hand papermaking. I guess I could try asking a pulp mill, but I kinda doubt that they'd consider selling just a few pounds. I don't think I can reasonably produce good pulp from wood chips myself due to the temperatures and pressures that seem to be required in order for the kraft process to work properly, so I will be using a different fiber source that does well with simple sodium hydroxide pulping at atmospheric pressure. So far, I've experimented a bit with cotton, jute, and sisal. These three, along with abacá (aka manila hemp), can be sourced easily in the form of fabric or rope and apparently make very nice paper. From what I can find, sisal is probably the closest to softwood in terms of the mechanical properties of the finished paper, so that might be a good starting point.
Before anyone suggests it, I did actually try beating the fibers by hand like is done in traditional Japanese papermaking. Six hours (each) of beating only ~50g of fiber wasn't sufficient to produce a well-beaten sisal, jute, or cotton pulp, so I gave up on that idea. Apparently hand beating works well for kōzo, mitsumata, and gampi (fibers used to make washi), but not so much for the fibers I was planning on using. Hence the need for a Hollander beater 😉.
Attachments

Last edited:
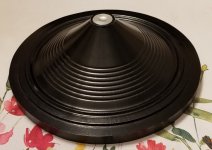
Is the mould in pic 1 (finished cine mould) just painted and sanded MDF? Nothing short of spectacular then.
Thanks! It's plaster over an MDF base, shaped with a 3d-printed running mold. More info in this post.
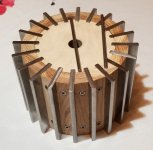
Small update: I'm making some (rather slow) progress on my beating engine. I've nearly completed the roll (see attached photos) and I plan to start construction of the bedplate, tub, yoke, etc. shortly.
The roll is 7" (17.8 cm) in diameter, 4.7" (12 cm) wide, and weighs 12.6 lbs (5.7 kg). I made the core from stack laminated birch plywood and used white oak for the wedges between each flybar. There are twenty 0.25"x1.5" (6.25x38 mm) flybars made of simple structural grade hot-rolled steel. Each flybar has two press-fit steel pins that fit into holes in an adjacent oak wedge. The wedges are held to the plywood core with two stainless steel screws. The roll will be fixed to the shaft (0.75" [18 mm] dia) with two steel pins.
If you're wondering why I'm not using stainless steel for the flybars, the answer is basically curiosity (and a little bit cost too). Stainless would've been more than three times the cost and I'm curious how well non-stainless steel will hold up. Commercial beaters used carbon steel flybars (or, for certain grades of paper, bronze or basalt) for 250 years or more before stainless steel became more common, so I think it'll be OK 🙂.
Attachments
Last edited:
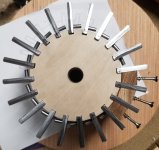
I ended up deciding to use a single pin to fix the roll to the shaft rather than two. Turns out that drilling accurate cross-holes like this is difficult (improssible?) with my slightly dodgy drill press (which has noticeable spindle runout and play in the quill). In retrospect, this should have been obvious. Despite my best efforts to center things, the hole in the roll core ended up roughly 15 thou (0.4mm) off center. However, by sheer luck, the corresponding hole I drilled in the shaft is off by almost exactly the same amount 🙂. So it fits nearly perfectly one way, but doesn't fit at all if you rotate the shaft 180°. Not ideal, but certainly acceptable.
I used a v-block against a fence to hold the shaft for cross drilling, but the location was not completely repeatable, probably mostly due to the aforementioned spindle runout and quill play. I drilled three holes in total; one test hole, one for the roll, and one for the pulley. All three fit, more-or-less, but two of them require significantly greater pressure to insert the pin.
Hopefully if I ever do something like this again, I'll have slightly better tools at my disposal.
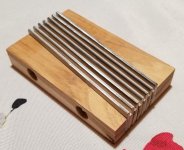
The bedplate is now complete. It is 2.9" (7.4 cm) long and 4.7" (12 cm) wide with seven 0.125"x1" (3.175x25.4 mm) steel bars and six 3/32" (2.38 mm) spacers set at a 5° angle to the roll axis. The wood parts are white oak. Two 1/4-20 machine screws hold the assembly together. The bars will be ground to conform to the shape of the roll later on.
Attachments

It's explained to some extent after the first paragraph in this post.
The short version is that they are parts of a machine I'm building for beating pulp. I intend to make my own pulp from raw fiber (probably sisal), and beating is an essential step in making paper with mechanical properties fit for a speaker cone. Paper made from unbeaten or barely beaten fiber is soft, bulky, porous, and absorbent with poor stiffness, tensile strength, etc. Good for blotting paper, but not so good for fine printing and writing paper or for speaker cones.
The short version is that they are parts of a machine I'm building for beating pulp. I intend to make my own pulp from raw fiber (probably sisal), and beating is an essential step in making paper with mechanical properties fit for a speaker cone. Paper made from unbeaten or barely beaten fiber is soft, bulky, porous, and absorbent with poor stiffness, tensile strength, etc. Good for blotting paper, but not so good for fine printing and writing paper or for speaker cones.
 ! Dumb me just didn't notice the coherence.
I'm really impressed can I ask "what additive are you using in your pulp??It's explained to some extent after the first paragraph in this post.
The short version is that they are parts of a machine I'm building for beating pulp. I intend to make my own pulp from raw fiber (probably sisal), and beating is an essential step in making paper with mechanical properties fit for a speaker cone. Paper made from unbeaten or barely beaten fiber is soft, bulky, porous, and absorbent with poor stiffness, tensile strength, etc. Good for blotting paper, but not so good for fine printing and writing paper or for speaker cones.
I bought the machine 2020 but never used it.
I do respect all the effort you put in me I bought the machine but haven't used it now 3 years.It's explained to some extent after the first paragraph in this post.
The short version is that they are parts of a machine I'm building for beating pulp. I intend to make my own pulp from raw fiber (probably sisal), and beating is an essential step in making paper with mechanical properties fit for a speaker cone. Paper made from unbeaten or barely beaten fiber is soft, bulky, porous, and absorbent with poor stiffness, tensile strength, etc. Good for blotting paper, but not so good for fine printing and writing paper or for speaker cones.
Do you know which additives are put in the pulp to make the speaker paper cones? It's because it's one of my hurdles to starting this machine
So far I've only used recycled paper processed into pulp with a household blender for my test cones, though I did make some dust caps with hand-beaten cotton, jute, and sisal fibers. The only additive I've used at this point is cooked (gelatinized) corn starch, which increases dry strength by increasing the number of hydrogen bonding sites. I'll probably eventually experiment with other additives such as alkyl ketene dimer sizing and maybe wet strength aids.
Public information about the precise additives used in commercially made cones seems to be limited. The most detailed document about guitar speaker cones I've found so far is this patent, which lists the following additives:
Public information about the precise additives used in commercially made cones seems to be limited. The most detailed document about guitar speaker cones I've found so far is this patent, which lists the following additives:
- Dye (for color, obviously)
- Sodium chloride (accelerates uptake of dyes)
- Polystyrene latex emulsion (binder and wet strength aid)
- Styrene-butadiene latex emulsion (binder and wet strength aid)
- Chitosan (binder and wet strength aid)
- Alkyl ketene dimer (internal sizing agent)
- Aluminum sulfate (retention/drainage aid)
- Cationic polyamines (retention/drainage aid)
- Anionic polyacrylamides (retention/drainage aid)
- Enzymatic biocide (to inhibit white-rot fungus growth)
- Nitrocellulose lacquer (for neck dipping)
Hi can I use cardboard box pulp for making speaker cones or do I need to use virgin pulpMaking cones requires specialized and expensive dies and machinery.
Absolute minimum, which is "acceptable", sort of, but only for dull woofers, unusable for Guitar, is a cone shaped fine screen/sieve , which you can turn in a lathe over a hardwood former, in those lathes which do not use a cutting tool but a polished iron ball at the end of an "oar", to push aluminum sheet metal into shape to make pots and pans.
It can turn a flat piece of glorified window screen into a cone shaped sieve.
Then you can pass very liquid cellulose paste suspension through it, water will go through and fiber will stay forming the cone, similar to handmade paper, then let air dry.
There are cones made that way, but they are too thick-heavy-soft-fluffy , have a characteristic "mountainous" back and are absolutely dull sounding.
Like I said, suitable only for woofers.
For Guitar you need way thinner and more rigid ones, let alone much lighter, so standard is to have male/female dies to press the original thick fluffy cone into a thin, strong and flexible one .... which are expensive
To boot, to rise production rate which otherwise would be abysmally slow is to attach overheated steam pipes to them so cone dries quickly, in seconds, and stays very compact and flexible.
Notice there are not too many cone factories worldwide, reason being they require quite an investment.
I have worked in an Argentine speaker cone Factory, basic process was same as this, my friend used an old house type bathtub to hold the paste, not kidding; it looks like "black dirty water", perfect for a Japanese Horror movie 😉
- Home
- Live Sound
- Instruments and Amps
- Guitar speaker cone profiles