Very nice job! May I ask what is the reason for one side pf beater to be lower and the other higher? And in which direction is the flow?
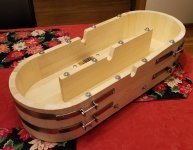
The flow is clockwise around the tub when viewed from above (as in photos 1 and 2). I made the back slightly higher because, during operation, a head is formed behind the backfall (not shown). See Fig. 9 (§3, page 16) in the book I linked in my previous post for an extreme example with a very high backfall.
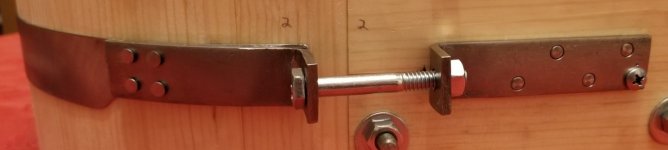
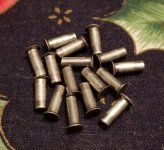
I completed the bands today. They are made from 0.031" (0.8 mm) thick sheet steel with 1/8" (3.2 mm) thick steel end pieces, fastened together with 0.116" (2.95 mm) solid steel flush rivets. I hot forged the L-shaped pieces using my box-of-dirt charcoal forge and cold forged the rivets from nails with a simple die I made. The pieces that are fixed to the side panels have four 3/16" (4.8 mm) press-fit steel pins (dowels?) that go about 1/2" (12.7 mm) into the wood. This is actually the first time I've done any hot forging or riveting, so I think they turned out pretty well 🙂.
Now on to the backfall, yoke, curb, etc... (this project is definitely taking longer than I originally imagined)
Now on to the backfall, yoke, curb, etc... (this project is definitely taking longer than I originally imagined)
Attachments

The backfall is done. It's just a bunch of scrap/reject pieces glued together. I used a chisel, gouge, block plane, and the hollowing plane I made earlier to carve it to shape.
It'll be interesting to see if the glue joints hold up to the water exposure. I used Titebond III which is a "waterproof" (ANSI/HPVA type 1 water resistance) crosslinking PVA, but the bottle also says it's not for continuous submersion.
It'll be interesting to see if the glue joints hold up to the water exposure. I used Titebond III which is a "waterproof" (ANSI/HPVA type 1 water resistance) crosslinking PVA, but the bottle also says it's not for continuous submersion.
Attachments

I got a bit lazy about updates. The beater is done now and it works quite well. Here's a short video of it beating 170g of cotton rag (an old bed sheet) in 7.8L of water (2.2% consistency). It does turn out that the maximum consistency (and therefore capacity) is a little lower than I originally estimated, but that's not a problem.
I decided to ditch the counterbalance system. Seemed like too much extra complexity for what might be a negligible improvement in repeatability. There are so many other factors that might impair repeatability[1] that I figured it probably wasn't worth the effort, at least for now.
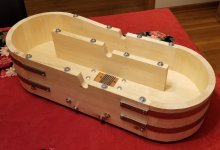
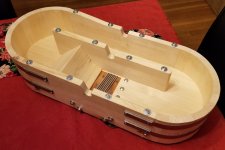
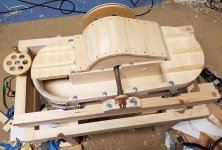
The first attached photo is the frame that everything sits on. There's a pivoting yoke that carries the roll and motor. The tub is bolted to the two middle cross pieces. The second photo is the assembled beater, less the top part of the roll bearing blocks. I actually have some pillow block ball bearings, but I decided to try wooden plain bearings for two reasons: 1) I was curious how well they would work, and 2) by making the bearing blocks split, the roll can be removed without upsetting the alignment between the roll and bedplate (useful for cleaning or other maintenance). The bearings are wax-impregnated hard maple lubricated with a general purpose lithium complex grease. There are two collars (also maple) that prevent the shaft from moving side to side. So far, the wood bearings seem to work perfectly fine. Time will tell regarding service life, but I can easily make replacements if they wear out.
The v-belt pulleys are made of Baltic birch plywood. The big one (9.25" or 23.5cm OD) I turned on a wood lathe while the smaller one (3.05" or 7.75cm OD) was turned directly on the motor shaft using an improvised tool rest. Commercially available pulleys are amazingly expensive in larger sizes.
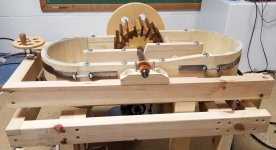
I rough ground the roll and bedplate with an angle grinder and then refined the shape with sanding belts. I wrapped the roll in sandpaper to grind the bedplate to a pretty good fit and then ran pulp with abrasive to complete the grinding-in process. I then filed off the burrs and rounded the leading edges of the flybars to about a 1/32" (0.8mm) radius.
Roll height is adjusted using the handwheel at the front. The threaded rod is 20tpi and the roll is almost exactly halfway between the pivot and the adjuster, so each full turn changes the height by 0.025" (0.635mm). There's a wing nut under the handwheel to lock the height setting.
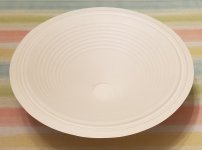
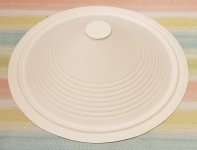
I made a couple more test cones out of the cotton pulp (photos attached). It turns out that reasonably well beaten pulp has more of a tendency to stick to the cone form than the blendered recycled paper I was using for tests before. I wasn't able to pull the dry cones off by hand like I could previously, but I discovered that a quick blast of compressed air lifts them right off.
I determined that I need a better mold (the cone-shaped screen) that holds a more accurate shape, so next I'm going to work on building a mold with reinforcing ribs at the back. This should allow me to transfer the wet web to the solid form with much less trapped air and generally make it much easier to avoid defects.
A better vacuum pressing setup would also be nice, I think, as a vacuum cleaner can't actually pull much vacuum (generally not more than about -7" Hg gauge pressure or -3.5psig, <25% of a hard vacuum). Proper vacuum pumps are a little pricey and they also typically pull a much better vacuum than is really needed for vacuum pressing. It'd also be nice to not have to worry about getting water or other contaminants in the pump, so I started looking into venturi vacuum generators. These can be purchased for not too much money, but, as usual, I was curious if I could make one myself. After a few iterations, I managed make a satisfactory one. Most of it is 3d printed with a normal hobbyist-grade plastic filament printer, but I made the motive fluid nozzle out of brass. Assuming my vacuum gauge is accurate, it will pull -26" Hg gauge pressure (-12.8psig, 1.9psi absolute, 100Torr, 13kPa absolute, or 87% of a hard vacuum), which is a little short of the -27" to -28" Hg that commercially available units typically do. Still respectable for a 3d printed part, I think, especially since I don't really know what I'm doing 🙂.
[1]: Water pH and mineral content, temperature, fiber cooking parameters, inevitable variations in stock consistency, and probably the biggest one: the fiber itself. Most non-wood fiber sources are apparently quite variable (wood a bit less so) and growing conditions and other factors can significantly affect the final product, especially if judicious adjustments are not made to accommodate.
I decided to ditch the counterbalance system. Seemed like too much extra complexity for what might be a negligible improvement in repeatability. There are so many other factors that might impair repeatability[1] that I figured it probably wasn't worth the effort, at least for now.
The first attached photo is the frame that everything sits on. There's a pivoting yoke that carries the roll and motor. The tub is bolted to the two middle cross pieces. The second photo is the assembled beater, less the top part of the roll bearing blocks. I actually have some pillow block ball bearings, but I decided to try wooden plain bearings for two reasons: 1) I was curious how well they would work, and 2) by making the bearing blocks split, the roll can be removed without upsetting the alignment between the roll and bedplate (useful for cleaning or other maintenance). The bearings are wax-impregnated hard maple lubricated with a general purpose lithium complex grease. There are two collars (also maple) that prevent the shaft from moving side to side. So far, the wood bearings seem to work perfectly fine. Time will tell regarding service life, but I can easily make replacements if they wear out.
The v-belt pulleys are made of Baltic birch plywood. The big one (9.25" or 23.5cm OD) I turned on a wood lathe while the smaller one (3.05" or 7.75cm OD) was turned directly on the motor shaft using an improvised tool rest. Commercially available pulleys are amazingly expensive in larger sizes.
I rough ground the roll and bedplate with an angle grinder and then refined the shape with sanding belts. I wrapped the roll in sandpaper to grind the bedplate to a pretty good fit and then ran pulp with abrasive to complete the grinding-in process. I then filed off the burrs and rounded the leading edges of the flybars to about a 1/32" (0.8mm) radius.
Roll height is adjusted using the handwheel at the front. The threaded rod is 20tpi and the roll is almost exactly halfway between the pivot and the adjuster, so each full turn changes the height by 0.025" (0.635mm). There's a wing nut under the handwheel to lock the height setting.
I made a couple more test cones out of the cotton pulp (photos attached). It turns out that reasonably well beaten pulp has more of a tendency to stick to the cone form than the blendered recycled paper I was using for tests before. I wasn't able to pull the dry cones off by hand like I could previously, but I discovered that a quick blast of compressed air lifts them right off.
I determined that I need a better mold (the cone-shaped screen) that holds a more accurate shape, so next I'm going to work on building a mold with reinforcing ribs at the back. This should allow me to transfer the wet web to the solid form with much less trapped air and generally make it much easier to avoid defects.
A better vacuum pressing setup would also be nice, I think, as a vacuum cleaner can't actually pull much vacuum (generally not more than about -7" Hg gauge pressure or -3.5psig, <25% of a hard vacuum). Proper vacuum pumps are a little pricey and they also typically pull a much better vacuum than is really needed for vacuum pressing. It'd also be nice to not have to worry about getting water or other contaminants in the pump, so I started looking into venturi vacuum generators. These can be purchased for not too much money, but, as usual, I was curious if I could make one myself. After a few iterations, I managed make a satisfactory one. Most of it is 3d printed with a normal hobbyist-grade plastic filament printer, but I made the motive fluid nozzle out of brass. Assuming my vacuum gauge is accurate, it will pull -26" Hg gauge pressure (-12.8psig, 1.9psi absolute, 100Torr, 13kPa absolute, or 87% of a hard vacuum), which is a little short of the -27" to -28" Hg that commercially available units typically do. Still respectable for a 3d printed part, I think, especially since I don't really know what I'm doing 🙂.
[1]: Water pH and mineral content, temperature, fiber cooking parameters, inevitable variations in stock consistency, and probably the biggest one: the fiber itself. Most non-wood fiber sources are apparently quite variable (wood a bit less so) and growing conditions and other factors can significantly affect the final product, especially if judicious adjustments are not made to accommodate.
Attachments


A few updates:
I made a vacuum bag out of clear vinyl to go with my vacuum generator. Seems to work well. Every source I've found on DIY vacuum bag construction recommends using a specialty vinyl cement to bond the material, but I discovered that a thermal weld done with an ordinary clothes iron works extremely well. I used parchment paper to prevent the vinyl from sticking to the iron or work surface.
Unfortunately, the first time I put the cone form under full vacuum, the paint delaminated in a couple places. I think the paint was already compromised, but it just wasn't obvious until I put it under a strong vacuum. I refinished it, then promptly cracked the plaster layer by accident... So, I need to make another cone form. This time I'm going to make it solid plaster rather than plaster-over-MDF like I did before.
I made a batch of sisal pulp in my beater to evaluate its properties, but I ended up beating it a bit too long (my beater works fast, apparently), so it drains quite slowly and shrinks a lot during drying. The resulting paper is very strong and crisp with high fold endurance, but the pulp may not be suitable for making cones due to the slow drainage and high shrinkage. It'd probably work well for a voice coil former though. After I finish the new cone form I'll do another batch of sisal pulp with less beating.
Since I'm making a new cone form, I have an opportunity to make some small tweaks to the cone profile. Based on my measurements, a Celestion G12M cone has a slightly lesser degree of curvature than what I originally chose for my profile, so I'm a bit hung up on whether I should bother with modifying that parameter (which would require some minor modifications to my mold as well) to be more in line with the Celestion. I think I have a vague idea what the effect might be, but I figured I'd ask if anyone here has any input.
I missed this thread when it started, but I'm fascinated by manufacturing materials, processes and such. A few years back I read this book, which is quite the history of paper for all its uses, not just for use in writing/printing, and I forget whether it mentions paper used in speaker cones.
There's also a paper museum near me, as well as some sort of paper research entity, both near/associated with Georgia Tech (I've been to the Tech campus many times, but not to either of these entities - I must make a pilgrimage).
https://www.amazon.com/Paper-Everything-Its-Two-Thousand-Year-History/dp/0307279642
Last edited:
The project has been on hold for a while, unfortunately. I did make some progress though:How did you fare (conewise) since your last posting?
- Completed the new cone form.
- Added reinforcing ribs to the screen mold.
- Made a new 100% wool press felt (hand knitted and then wet felted).
- Made a dedicated vacuum press with a flexible silicone rubber membrane. More even pressure compared to the vinyl vacuum bag.
- Made a pulley hoist system for lifting the screen mold from the vat. Consistent results are much easier to achieve this way, especially with slower draining pulps.
- Made a device for spraying cooked starch solution (much like a simple airbrush). The cotton I was using before seems to have something in it that helped it stick to the cone form; probably some sizing or finishing agent from the textile manufacturing process. The sisal pulp, in contrast, has virtually zero adhesion without an additive like starch. No adhesion means that the cone pulls away from the form and warps as it dries, making it unusable. A small amount of starch (~2% by dry mass) sprayed on the cone surface seems to be enough to fix the problem unless the pulp is rather high shrinkage.
- Did some basic inter-batch dry mass repeatability tests. I made seven cones with a target dry mass of 13g: five were within 0.1g, one was +0.3g, and one was +0.5g. Pretty good overall.
- Home
- Live Sound
- Instruments and Amps
- Guitar speaker cone profiles