picked up my Pioneer stereo receiver from mid-90's. It has 60w output, at least 3db more than my current Cyrus with 25w. That made a good bit of a difference! Voices more clearer on higher levels and more bass control.
So you have a two way OB, need more power and have two amps. Is the pioneer an integrated with volume control?
Why dont you just go active? Use a line level crossover to the Pioneer on the woofers and the Cyrus on the tweeters. Save power loss and buying s new amp.
There is just one final question left: How low down shall I make the front covers?
They look better without covers. If you must cover go to the floor for better looks.
Last edited:
Well, I want a single power amp due to space and complexity... So.. naaah... 😉So you have a two way OB, need more power and have two amps. Is the pioneer an integrated with volume control?
Why dont you just go active? Use a line level crossover to the Pioneer on the woofers and the Cyrus on the tweeters. Save power loss and buying s new amp.
They look better without covers. If you must cover go to the floor for better looks.

Since I use my brain daily at work, it seems that I do not use it in my spare time... As I understand it, I may have located the issue here.I have not tried foam, maybe someone else here has. I worry a little about your frame around the back of the baffle, it looks like you might catch a few resonances in there. Try a think foam piece under the top brace. See if you can kill and reflections or resonances that it might cause. And continue to tune the crossover, a number of builders found that the sound popped into place once they got the crossover adjusted to their room.
Replaced the R2 with an L-pad(yes, the other half was having a larger range up to 30 Ohms) and played along some hours. As I DID notice a difference, it was not very much at all in change. The difference was as I also read in previous posts, that the roll off and/or slope of the tweeter were adjusted.
The problem of mine is that voices are too sharp, especially at higher levels. Some of it became better when changing to a more powerful amp, but were still very present mostly on higher levels. So after turning my brain on eventually, I figured out that the crossover frequency for the tweeter calculated to about 3000 Hz, am I correct? So the problem is at the top end of the woofer as it deliver the midrange(and voices). A quick glance on the datasheet for it confirmed that the top end rolls of after a quite substantial peak. I assume the 0.4mH/15uF is supposed to take care of this, so perhaps I'd try to alter the values in some way to tame this. Perhaps my very narrow baffle is the culprit in this. Hopefully, this will fix the problem.
As I will getting a visit from my daughters friend today, I removed the speakers so the two 5 year olds would not damage them. Put my Wharferdale Diamond 225 (Bass reflex box, 6,5 in woofer) back and hooked them up. The difference in sound was noticeable. Yes, they have a more sleek midrange so voices are not so harsh, but BOY what a compressed sound! The bass had a punch but lacked refinement and no character were to be found. The Manzanitas have less bass, but delivers it with more character and ease that makes you wanna sit and just listen, listen and listen. They are worth the fiddling, that is for sure.
Good thinking! 😀 What is your woofer? I can't see it on your posts, Peerless, GRS or something else?
There is an optional woofer trap shown in the schematic, but I never used it on mine. Since I mostly used the Peerless woofer, its breakup didn't bother me until very loud levels. When I build with 2xGRS 15" woofers and 8" fullrange, there were other things that needed attention before the woofer top end. But I know that John likes the woofer trap option and uses it, especially with the GRS15.
If you can carefully listen to some music where the harshness bothers you, then disconnect the Vifa and listen only to the woofer, you might hear it there. This can be difficult without both drivers playing and interacting, but of you DO hear it, you'll know it's from the woofer or the woofer and baffle. Another thing to try is to build some wings for you baffles. They can be made of wood of even heavy cardboard. Basically you want to approximately double the width of your baffles. Testing that will let you hear what peaks might be caused by your baffle. The "new wider" baffle will have different peaks - and generally lower in frequency. That might help you hear what's coming from your baffle.
The wandering of the crossover point is why the L pad should be connected on both legs.
Changing the level should be separated from altering the crossing point.
It's like a bad tuneup on an old IC engine, if you change plugs, points, cap, rotor, and wires all at once, it will
not be easy to find why it runs badly, or fails to start.
I would add the woofer trap(I prefer to not call it a bass trap as it acts in the midrange) and use the L pad normally; once you are in the
ballpark you can add small resistance on the series leg to alter the point of crossing. When happy for a month, measure and replace the pad and added bits.
I use the 12" Peerless woofer, and i do use the woofer trap. Will do some experiments with additional wings, but I have merely narrowed the baffle down by 2" and thus increased the wings backwards in similar style. Perhaps this was enough to make the cone breakup to increase.Good thinking! 😀 What is your woofer? I can't see it on your posts, Peerless, GRS or something else?
There is an optional woofer trap shown in the schematic, but I never used it on mine. Since I mostly used the Peerless woofer, its breakup didn't bother me until very loud levels. When I build with 2xGRS 15" woofers and 8" fullrange, there were other things that needed attention before the woofer top end. But I know that John likes the woofer trap option and uses it, especially with the GRS15.
If you can carefully listen to some music where the harshness bothers you, then disconnect the Vifa and listen only to the woofer, you might hear it there. This can be difficult without both drivers playing and interacting, but of you DO hear it, you'll know it's from the woofer or the woofer and baffle. Another thing to try is to build some wings for you baffles. They can be made of wood of even heavy cardboard. Basically you want to approximately double the width of your baffles. Testing that will let you hear what peaks might be caused by your baffle. The "new wider" baffle will have different peaks - and generally lower in frequency. That might help you hear what's coming from your baffle.
You are right, to a certain point. I have the woofer trap in place already, and the L-pad is used as a variable resistor instead of R1 or R2 in the tweeter crossover section. Not as a conventional L-pad. What I think is my problem is the woofer trap misses the breakup peak, perhaps due to my altering of baffle size. Will try a few things to see if it changes to the better for me. 🙂The wandering of the crossover point is why the L pad should be connected on both legs.
Changing the level should be separated from altering the crossing point.
It's like a bad tuneup on an old IC engine, if you change plugs, points, cap, rotor, and wires all at once, it will
not be easy to find why it runs badly, or fails to start.
I would add the woofer trap(I prefer to not call it a bass trap as it acts in the midrange) and use the L pad normally; once you are in the
ballpark you can add small resistance on the series leg to alter the point of crossing. When happy for a month, measure and replace the pad and added bits.
Yes, that's why we use an L-Pad so that the crossover sees a basically constant impedance and the crossover point doesn't move.The wandering of the crossover point is why the L pad should be connected on both legs.
Changing the level should be separated from altering the crossing point.
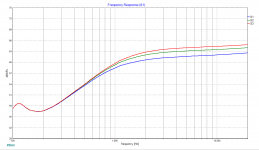
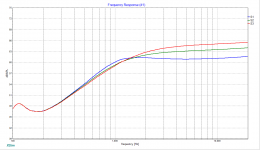
However changing R1 in this crossover doesn't change the crossover as much as one might think. See below a plot of R1 as 2.2R, 4.5R and 9R. You can see that the attenuation but the crossover point doesn't shift by much. That's because (I think) of the shelf filter of R2 L2
Attachments
Hi,
I was busy finishing another project (Iron Pumpkin pre), but now: the Manzanita
MDF, wood for the wings and thin ply for the sub-baffle are here, the xo-parts will arrive next week.
As I wrote, I will mount the TC9 into a sub-baffle; I have a router but a) I have absolutely no experience with it and b) no place to use it and Mrs. Plott wouldn't be amused when I make my trials in the living room
I will cut the holes with a jigsaw (much less dirt).
Now I prepared the sub-baffle for the TC9 (I will sand the edges in 45°), but I don't know (I can't decide), should I mount it from the back or from the front. It has a seal on the front which implies that mounting should be done on the back of the baffle. So it would be in line with the woofer again, and time alignment would no longer be a problem. If mounted from the front (on the baffle) the TC9 would be about 4mm further forward.
I kindly ask you for some hints
Looks like some nice cuts. You did those with a jigsaw?
If your sub-baffle material is thin then you can mount the Vifa onto the back of the sub-baffle. Then mount the sub-baffle flush with the front face of your main baffle. It's best if you can smooth the edges of the cutout for the Vifa.
Keep building and please post some more photos and progress!
If your sub-baffle material is thin then you can mount the Vifa onto the back of the sub-baffle. Then mount the sub-baffle flush with the front face of your main baffle. It's best if you can smooth the edges of the cutout for the Vifa.
Keep building and please post some more photos and progress!
Hi Pano,
many thanks. That's exactly what i did; my sub-baffle is - after some sanding down - only 3 mm thin, so the TC9 will be mounted from the back. This cutout was made with a circle cutter, the straight cuts with a scalpel along a metal ruler. It takes only a few minutes, because of the thin material.
For the cutouts in the front I used a jigsaw and then I smoothed/sanded the holes with P80 sandpaper. The hole for the TC9 is heavily rounded, so there are no sharp edges, and hope there will be no "screaming".
Now, some gluing in progress, sub-baffle already mounted 👍 Yes, it is really a fast and fun project
Last edited:
Some progress 😍
The baffle was painted with an acrylic paint, the wings with acrylic gloss clear.
The legs are parts of my old (first) diy audio rack.
The parts of the xo will come in two days or so, but I think I can't finish it this week, lot to do... will see 🙂


The baffle was painted with an acrylic paint, the wings with acrylic gloss clear.
The legs are parts of my old (first) diy audio rack.
The parts of the xo will come in two days or so, but I think I can't finish it this week, lot to do... will see 🙂
Last edited:
After some fiddling around, I tried different crossover settings, adjusted the crossover point up a bit, and no big revelations came to surface. So I decided that the design had to be finished and more fiddling is due to later, If I want. So for now, I am building them to be finished. When I see the original designs, I think that I may be suffering from a bit of cavity issues since the TC9 is closer to the side wing than original. I will put damping inside my speakers to at least reduce this, so mor pict to be added later. This is how they look now..

It is a regular polycarbonate glass 😊 Unfortunatelly, it will not be visible when I am finished. I intend to use black front cover fabric at the rear as well to protect it from prying child fingers and other...
/Arne
Did the last effort and put some damping in. If it gets too muffled, it can easily be removed.

- Home
- Loudspeakers
- Multi-Way
- Fast, fun, Inexpensive OB project