Edam,
The I/O Board gets it's power from the cable to the main board. The 17V power supply, supplies power for Both Boards. You do NOT need to short any inputs. The Delay circuit on the I/O board works for ALL Outputs. Remember to jumper the small connector for the I/O Board or you won't get any sound out.
The I/O Board gets it's power from the cable to the main board. The 17V power supply, supplies power for Both Boards. You do NOT need to short any inputs. The Delay circuit on the I/O board works for ALL Outputs. Remember to jumper the small connector for the I/O Board or you won't get any sound out.
I have the V 1.3
Ok, so the power comes from the flat cable and the little green plug marked 12V SW near the BC 550s and reg needs in fact need a jumper as I saw on the photographs here and there.
Thanks Rick, much appreciated.
Ok, so the power comes from the flat cable and the little green plug marked 12V SW near the BC 550s and reg needs in fact need a jumper as I saw on the photographs here and there.
Thanks Rick, much appreciated.
First switch on is coming very soon 🙂
little subjectiv review to come (after some hours of listening) ! Todays pre is a Yamaha CX-2 which use a discrete circuit for the CD/Aux line.
little subjectiv review to come (after some hours of listening) ! Todays pre is a Yamaha CX-2 which use a discrete circuit for the CD/Aux line.
Hello Guys,
What I hear is good... but only one channel is working !
I checked with source & amp plugs by swapping : this is the pre which is involved !
After a visual check I saw one LM4562 (the one near the cap C2r on the left of the board) had two legs non pluged on the dip 8 , but even repluged, it doesn't work !
The balance pot is increasing the volume of the working channel when I turn in to the right but doesn't low it so much when I tuurn the pot at the opposite ??
Any idea what to check first ? Aops ? My bet is this is Something which works bad on the I/O boards... one protection diode ?
The selection rotary switch seems to work well and I checked on two inputs and this is the same result ! One channel only !
I use only single ended I/O !
I had at the first beginning a problem! one of the main cap polarity was reversed and was wasted after boiling but without shortcuts or explosion !
After changing the faulty cap and put it in the good position I have +16.5V & -16.2V.
Many thanks if you can help me for what I should check first !
regards
Eldam
PS : the channel which is working is very good and I don't find the sound thin VS my Yamaha CX-2 Pre... The Douglas Self is transparent and smooth despite the ES Muse with which I had a doubt in the beginning !
Eldam,
I invite you to look for a cold or shorted solder joint. Use a strong light and a magnifying lens and touch each joint with a clean solder pencil. If you dab the joint with a rosin pen it will reheat more easily with less chance of damaging the PCB or parts.
I invite you to look for a cold or shorted solder joint. Use a strong light and a magnifying lens and touch each joint with a clean solder pencil. If you dab the joint with a rosin pen it will reheat more easily with less chance of damaging the PCB or parts.
Eldam
Check the IDC cable between the input board and the main board. I had to make a second one as I had botched the first one.
Graeme
Check the IDC cable between the input board and the main board. I had to make a second one as I had botched the first one.
Graeme
Depending on which two pins of the opamp were not seated, the opamp may have given up the ghost. A quick check to change that opamp for a known-good one like from the other channel.
Jan
Jan
Thanks Jan, Graemed,
Input/output cable was changed by 10 single wires. I just keep the flatted cable for the selector. I checked with the voltmeter/current buzzer !
I will check that.
For the aop, it was the pin 2&3 (left row) which were floating outside the dip 8!
I have two spares LM4562 🙂
Input/output cable was changed by 10 single wires. I just keep the flatted cable for the selector. I checked with the voltmeter/current buzzer !
I will check that.
For the aop, it was the pin 2&3 (left row) which were floating outside the dip 8!
I have two spares LM4562 🙂
The said faulty oap is working good. Btw it is on the RIGHT Row and the problem comes fron the LEFT Channel ine the ipper erea of the pcb!
I also resoldered all the joints and checked the caps polarities : all seems ok !
I'm going to swap the left row of oaps with the right one to see if the oaps are the gulties !
Maybe it was one of the reversed main Power cap at the first switch on which burned the left channel, I don't know but the 79015 reg involved seems ok with just 0.2 V difference with the positive rail !
Could it be one of the input orange relay ??? Or only one oap (not only the enterily Left row of oaps ?
Well I will swap Left with right oaps row to check !
to continue !
Attachments

Last edited:
fixed
🙂... The Douglas Self Pre is working !
And it works great ! This is an improvement versus the previous Yamaha CX-2 ! This last is good but the Doglas Self Pre have more resolution and transparency ! Soundstage is improved as well !
... ah a little thickness is missing vs the former, I have some habits with Yamaha ! But hey there are pots, no problemo... 5 minutes to set up... Et voilà, thickness is not missing anymore without loss of détails and transparency ! Great !
Dac is an improved AYA II (onz and half year of tweaking) with FIFO and all the IanCanada gears and reckloging, source is an ArchLinux player on a NAS through a Wave I/O, amp is a Chord SPM 1000 B, sorted Mosfet; speakers are improved Boston Lyndield 400 L which are resolving like a razor (35 hz-20 K Hz).
As you saw on photograph I use a R-Core PS because I had it ! It is 30 VA and dunno if it's better or worst than the Hammond : maybe the longer wires between the traffo and diodes bridges should be avoided ! I don't know if it's hearable !
I didn't solder the diodes bridges caps and I plan to to swap the 100 uF caps of the PS by Black Gate Standard and also to try some main caps from Panasonic and some else brand to play !
All my gratefullness to Douglas Self to share his design with us. This is an excellent design and tones pots ARE CHANGING EVERYTHING for the best ! Bravo : no loss of resolution and transparence : well done !
Big thanks to Carl Huff, a gentleman. Thanks for Jan for sharing his ressource with us and all the guys here for the help about casing and debuging. 🙂 !
The Preamp is Working!
Great news Eldam,
I am glad that you got it going. I hope that you enjoy it as much as I have.
Great news Eldam,
I am glad that you got it going. I hope that you enjoy it as much as I have.
🙂
Have you been hearing changes after a breaking period with the caps ?
The bass and uper bass registers are particulary good in my system. Subjectivly I have both a lower bass and uper bass tighter register ! With clearness/resolution these are the main improvements.
I enjoy it ! Main challenge now is to try to finish the casing with the technics I read here about marking and transparent print layer ! I'm a little more involved with wood casing than metal but dunno yet what to choose!
🙂
Have you been hearing changes after a breaking period with the caps ?
The bass and uper bass registers are particulary good in my system. Subjectivly I have both a lower bass and uper bass tighter register ! With clearness/resolution these are the main improvements.
I enjoy it ! Main challenge now is to try to finish the casing with the technics I read here about marking and transparent print layer ! I'm a little more involved with wood casing than metal but dunno yet what to choose!
Hi Eldam,
I've had mine in my main system for several months now, it continues to get better and better. Great preamp.
Paul
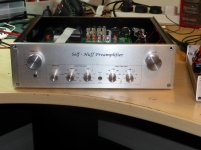
It's taken me a while but I finally put one into a chassis ...

Very elegant, as befits this magical design.
Graeme
The Final Version
Well, it took a lot longer than I expected and I did embed remote controls for mute and volume control. The only issue has been a bit of noise when the mute is operated (it breaks the connection to the output board). Otherwise, the construction has been trouble-free.
There are two outstanding points about this preamp.
1) It is so silent that I thought it was dead when I first tested it.. and this is with headphones!
2)The detail that it reveals way improves over my old preamp.
Of course, the tone controls have enormously helped with tricky material, but also have contributed to a better room-balance for my NS1000M speakers. The only thing left me to do is to reduce the sensitivity as the volume control cannot be operated more than about 30 degrees before the sound is just too loud.
This is my second Douglas Self preamp. My first, from 1976, is still working and sounds pretty good...but not as goos as this.
So, thanks to Douglas Self, Carl Huff and Jan Didden for getting this all together
Attachments


Last edited:
- Home
- Source & Line
- Analog Line Level
- Doug Self Preamp from Linear Audio #5