@dennis
@jeff
Thanks for the kind words.
The fabrication part of this hobby is my outlet as a frustrated artist.
It is time consuming, and the set of problems I create for myself can be difficult, but the satisfaction of saying it came from my hands makes it worth it to me.
It takes me quite a long time to finish projects. I sometimes tear them back apart and rework them so I’m satisfied with the functional design and aesthetics.
I’ll take the time to make almost anything.
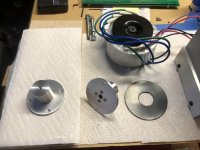
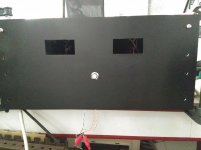
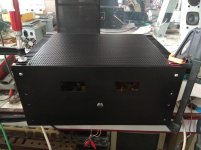
Here’s a pic of some transformer mounts for the F2J mono blocks I’ve been working on for some time.
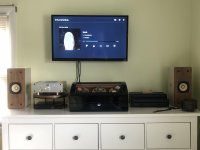
Also a pic in situ of that little chip amp I tore apart recently and turned into an integrated amp for a small bedroom system.
P.S. @jeff I wish those F3 boards you helped me out with would fit in the same mono block cases I had already started for the F2J. They are a little too long and require a different solution. I may just pull the heatsinks off the top of the cases with the amp boards and use the cases as separate power supplies when I get to the F3.
@jeff
Thanks for the kind words.
The fabrication part of this hobby is my outlet as a frustrated artist.
It is time consuming, and the set of problems I create for myself can be difficult, but the satisfaction of saying it came from my hands makes it worth it to me.
It takes me quite a long time to finish projects. I sometimes tear them back apart and rework them so I’m satisfied with the functional design and aesthetics.
I’ll take the time to make almost anything.
Here’s a pic of some transformer mounts for the F2J mono blocks I’ve been working on for some time.
Also a pic in situ of that little chip amp I tore apart recently and turned into an integrated amp for a small bedroom system.
P.S. @jeff I wish those F3 boards you helped me out with would fit in the same mono block cases I had already started for the F2J. They are a little too long and require a different solution. I may just pull the heatsinks off the top of the cases with the amp boards and use the cases as separate power supplies when I get to the F3.
Attachments
Last edited:
....
P.S. @jeff I wish those F3 boards you helped me out with would fit in the same mono block cases I had already started for the F2J. They are a little too long and require a different solution. I may just pull the heatsinks off the top of the cases with the amp boards and use the cases as separate power supplies when I get to the F3.
If you're not in a hurry I'd be happy to modify the board design next time I get bored....
If you're not in a hurry I'd be happy to modify the board design next time I get bored....
Thanks Jeff. That is very kind of you to offer.
A “hurry” is no where to be found in my universe of DIY.
These are very nice boards and I already ordered the needed matching channels. It would be a shame to not use them.
Eventually I am going to need some bigger cases for other amps I’ve collected boards and parts for anyway.
Cheers
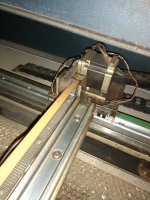
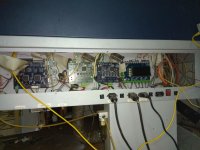
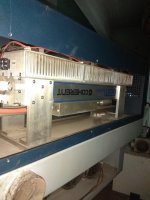
I have a friend you help me with this laser engraving machine.Unfortunately this time is fault and i would try to repair it.Hi Thimios,
Very nice work! Could you provide more info about that laser lettering?
Not an easy work at all!
Attachments
Last edited:
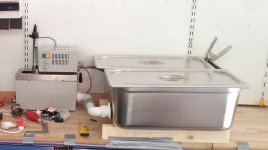
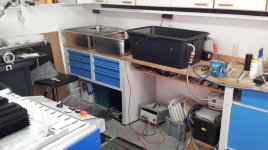
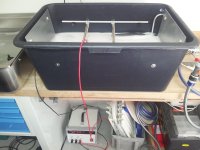
aluminium anodizing in my friends garage
In 2013 my friend and I have anodized parts for several bigger amplifier projects ourself
The pictures show the setup:
Have Fun, Toni
In 2013 my friend and I have anodized parts for several bigger amplifier projects ourself
The pictures show the setup:
- acid bath for cleaning
- distilled water
- anodizing bath
- coloring bath
- sealing (in boiling destilled water)
Have Fun, Toni
Attachments

Last edited:
If current is too high you will actually strip the anodization coating. 6 amps per square foot is the recommended current. Depending on the size of the tank and the acid mix this could require over 20VDC.
For some reason i was thinking that anodizing was just another plating process. After a quick read i see its completely different. /facepalm.
"
- Plating is a thin coating of a metal on another metallic substance - such as silver plated copper.
- Anodizing changes the surface of a metal through an electrochemical process without changing the composition of the metal."
I build all of my project cases from scratch. I do source raw heatsinks for bigger amps.
My formula is pretty much always the same.
I use wooden “cheeks” which are most often Maple. I’ve taken to sheathing the inside with copper.
Everything else is made from scrap aluminum, brass or bronze that I purchase at a metal supplier that has a large “scrap barn” by weight. The more you buy the cheaper the price.
The aluminum is cut as needed with a table saw, jig saw etc.
I have a lathe and mini mill for anything requiring machining.
Everything else is drilled etc. and then wet sanded unidirectionaly in the kitchen sink with a piece of rubber under it to prevent sliding around and scratching.
I’m a minimalist concerning finishing and simply coat everything with a good wax and buff it to a satin finish by hand.
Outstanding work there. Though you could use a bit of improvement on cutting out square holes. 😉
Getting a nice even surface finish on aluminum can be a real pain. I can't tell you how many times i've had it just about perfect, only to carelessly mark it somehow after wet sanding and lapping a piece on this big glass plate i have with a few different grits of 3m PSA lapping film. It also works amazingly well for sharpening planer blades, chisels, and knives. And it sure beats spending a ton on diamond hones.
Anodizing is basically causing the aluminum to oxidize at a fast rate. Aluminum oxide is very tough and sucks up dye very well.
Anodised and painted.
It's enough for me.
It's enough for me.
Attachments
Last edited:
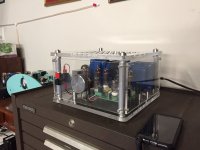
A first plan for my new enclosure.
All parts are from donation.
Thank you all!
All parts are from donation.
Thank you all!
Attachments

Last edited:

Looking good so far Thimios! Are those the updated Simpelstark boards with the corrected op amp layout?
No Jeff, unfortunately.Looking good so far Thimios! Are those the updated Simpelstark boards with the corrected op amp layout?
I think that is the one with the wrong op amp layout.
I'll send you a pair of the updated boards next week.
Oo Jeff you are so geneodurus!
Thank you!!!
Thanks to all of you!
Without your help never i could continue.
Last edited:
Do you have all the other pieces to assemble the boards?
I will see what exactly need for the new version and i will report soon. 🙂
- Home
- Amplifiers
- Solid State
- Building your own amplifier enclosure