I like the MDF enclosures as well. Would there be any advantage to lining a wood or MDF enclosure with aluminum foil tape or light aluminum sheets?
As advantage there is shielding. But even my phonostage in mdf enclosure has no shielding.
Attachments

Last edited:
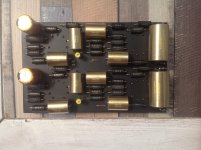
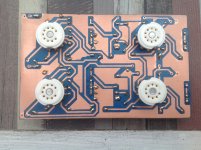
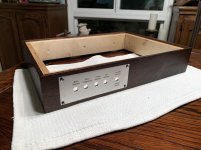
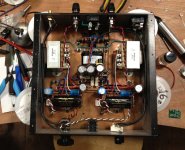
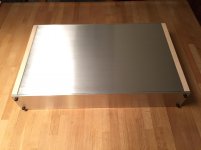
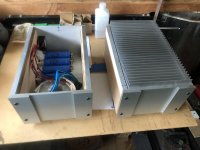
My amp chassis is coming together nicely. Just waiting for the perforated aluminum plate i plan on using for the bottom and possibly the top to arrive, then i'll figure out how ill mount the rear connections (6x banana jacks, RCA in, Bluetooth antenna.
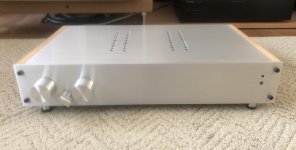
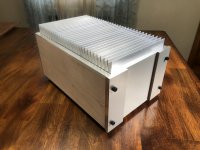
As for the box, I went with 1/2" Baltic Birch Plywood (the real stuff that only comes in 5'x5' sheets. if it comes in 4'x8' it's "birch plywood" and only has a hardwood veneer) and attached to that is 1/4" Walnut. I went this route because of the added stability the inner plywood would give, and i just love the look of real walnut. As of now its been dyed using TransTint Coffee Brown (mixed with denatured alcohol, not water), and I wiped on two coats of General Finishes Arm-R-Seal oil based varnish. It will get a few more coats in the coming days.
The front plate is made of 1/8" aluminum plate and the labels are done by first making the template in Photoshop, flipped horizontally, then printed on my laser printer. I then cut out the template, tape it onto the aluminum, and take a clothes iron to it with a towel and the heat causes the toner to transfer onto the metal. Then soak the face plate in water so the paper washes off, then dry and clear coat. Yesterday i spent some time testing a few methods involving electroplating. Gonna check a few more ideas in the morning.
Attachments
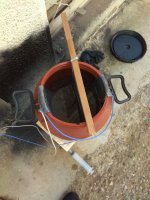
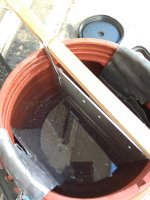
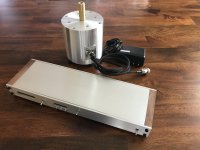
My anodizing bath.
Attachments
Last edited:
My anodizing bath.
Some way to agitate the acid mix can be a handy addition to stop hydrogen bubbles from forming on the surface as you are anodizing. I have a small air line with a bunch of pin holes in it at the bottom of my tanks. A fish tank bubbler pump is enough air to do the job.
Hi Jeff,thanks for the tips!Some way to agitate the acid mix can be a handy addition to stop hydrogen bubbles from forming on the surface as you are anodizing. I have a small air line with a bunch of pin holes in it at the bottom of my tanks. A fish tank bubbler pump is enough air to do the job.
Do you make anodizing at home ??
I would like to learn how to do anodizing ...
Try Caswell Plating on the inter webs. Or, look on youtube. There is a plethora of home anodizing information using a car battery.
My first ever tube project made from mdf and aluminum plate. It wasn't anodized, only treated with steel wool. It remains shiny after ten years. It will tell you if somebody touched it.😀 But it only needs a wipe with a soft cloth to restore.
Attachments

Some way to agitate the acid mix can be a handy addition to stop hydrogen bubbles from forming on the surface as you are anodizing. I have a small air line with a bunch of pin holes in it at the bottom of my tanks. A fish tank bubbler pump is enough air to do the job.
What i use for that is a home made magnetic stirrer. Nothing fancy, just enough to keep the fluid moving around.
My first ever tube project made from mdf and aluminum plate. It wasn't anodized, only treated with steel wool. It remains shiny after ten years. It will tell you if somebody touched it.😀 But it only needs a wipe with a soft cloth to restore.
Nice work! I think my next attempt will be electroplating using nickel. Key thing i've found with electroplating is to first plate with copper. It has to do with preventing galvanic corrosion when combining dissimilar metals. Copper tends to be the 'shellac' of the plating world.
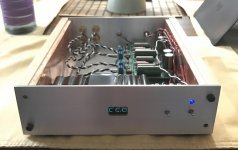
Custom case for a Bottlehead SEX. Copper was "aged" in a vinegar and salt bath, and then sealed with lacquer. Sides & transformer housings painted with automotive wrinkle-finish paint. (Note: don't bake them in the oven afterwards. You'll end up with oven rack lines on them. 🙁 )
Attachments


Try Caswell Plating on the inter webs. Or, look on youtube. There is a plethora of home anodizing information using a car battery.
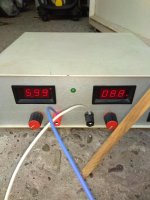
I've always been under the impression that low voltage ( <6v ) and high current is best for plating since it's electron transfer which is driving this process. IIRC it's something about Faraday's law of electrolysis, but i got my degree in political science so take anything i say with a huge handful of salt.
If current is too high you will actually strip the anodization coating. 6 amps per square foot is the recommended current. Depending on the size of the tank and the acid mix this could require over 20VDC.
Thank you all for the perfect explanation on anodizing procedure. Here is how they look.
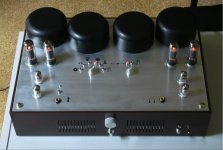
My SX class A.
In the first picture the front braced but no anodized not painted yet,after 2 or 3 years! 😀
In the second picture the back plate anodized and painted.
I do agree with rayma, extra bracing required, esp for the transformer weight.
Top and bottom is 3mm steal.
Isn't enouph?
I prefer to anodize and paint because after this prosedure, the laser lettering is an easy and robust work as you can see at picture.
Attachments

Last edited:
My first ever tube project made from mdf and aluminum plate. It wasn't anodized, only treated with steel wool. It remains shiny after ten years. It will tell you if somebody touched it.😀 But it only needs a wipe with a soft cloth to restore.
Btw, I see you've provided a phono preamplifier. Where are the tubes for it? Or is it SS?
Best regards!
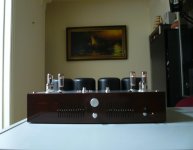
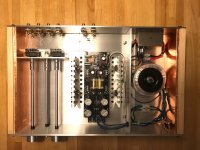
That project represents my transition from solid state era to tubes. And a strong "analog" protest to a rapidly "digitized" world. All that from my point of view i.e. limited knowledge. So, EL34 pentode push pull paired with solid state preamp. Inputs for phono, tape, aux, -OK for CD and PC too- and even mic. And a graphic equalizer - 12 bands per channel- with opamp gyrators. Don't let the looks to create false impressions though. It was nothing exceptional soundwise.
I prefer to anodize and paint because after this prosedure, the laser lettering is an easy and robust work as you can see at picture.
Hi Thimios,
Very nice work! Could you provide more info about that laser lettering?
As yet reported in another thread, I salvaged two huge sinks by dumpster diving last saturday. Following the valuable hints given in this thread, I'll be able to build my own cases with them. Thank you so much!
Best regards!
Best regards!
Attachments


I've always been under the impression that low voltage ( <6v ) and high current is best for plating since it's electron transfer which is driving this process. IIRC it's something about Faraday's law of electrolysis, but i got my degree in political science so take anything i say with a huge handful of salt.
Yes that's probably true, but anodizing is not like plating metal. For anodizing you may need higher voltages as the oxide thickness increases because its an (albeit imperfect) insulator. Titanium for example requires upto 90V to get the full gamut of colours (which depend on the oxide layer thickness). Higher voltages mean the current density has to be reduced to prevent overheating.
The dependence of oxide thickness on voltage helps to stabilize the thickness of the coating (plating metal can be much more uneven due to variations in current density around edges and details of a piece).
I build all of my project cases from scratch. I do source raw heatsinks for bigger amps.
My formula is pretty much always the same.
I use wooden “cheeks” which are most often Maple. I’ve taken to sheathing the inside with copper.
Everything else is made from scrap aluminum, brass or bronze that I purchase at a metal supplier that has a large “scrap barn” by weight. The more you buy the cheaper the price.
The aluminum is cut as needed with a table saw, jig saw etc.
I have a lathe and mini mill for anything requiring machining.
Everything else is drilled etc. and then wet sanded unidirectionaly in the kitchen sink with a piece of rubber under it to prevent sliding around and scratching.
I’m a minimalist concerning finishing and simply coat everything with a good wax and buff it to a satin finish by hand.
Attachments
-
 EBD7F27F-8A11-474C-8DB7-8221BA0AF703.jpg411.2 KB · Views: 478
 -
 CAC5D549-D7BD-4F34-9680-5972EA1B58B3.jpg879.4 KB · Views: 487
 -
 99DEEF9F-0E54-40D6-A725-3C5D5E1B8A6C.jpg976 KB · Views: 415
 -
 2D349C8F-0E3A-4288-97A0-3D20CF7EDE1B.jpg571.4 KB · Views: 401
 -
 041FA38D-064E-4D79-B058-08873771B5BF.jpg820.4 KB · Views: 394
 -
 B2C55665-5B62-44DF-97DB-D642015E3B96.jpg955.6 KB · Views: 433
 -
 D14F5B49-909D-405F-89B0-604C5D7C0DDF.jpg637.3 KB · Views: 398
 -
 1E8F7BBC-0CEB-4B0E-AB6E-B8A5FCEB69E3.jpeg713.8 KB · Views: 417
- Home
- Amplifiers
- Solid State
- Building your own amplifier enclosure