
I haven't yet I was lucky enough to source some NOS ZTX951 and mouser has ZTZ851 now so I will replace those transistor pairs first. I only installed to test the offset.
Thanks, and really the compliments should go to you Andrew for this amazing piece of kit!
Hi Fireanimal,
How many of those ZTX's did you measure to get a matched pair? And do you have any other matches your willing to part with?
Chris, you can build your X-Altra using BC550/560 for the MC front end. It will be about 11 dB noisier but that simply puts it in the same territory as an AD797 or similar MC based preamp. Later when the Zetex devices become available again, you can change them out And meet the full noise spec of <250 pV/rt Hz spot noise.
Note, this will not affect the MM side of things at all - that will meet full spec if you use the recommended components which I believe are readily availabl.
Note, this will not affect the MM side of things at all - that will meet full spec if you use the recommended components which I believe are readily availabl.
Thanks Andrew, im building this one for my Dad and want to collect all the parts before more go oos. There are a couple of parts that are unavailable at the moment, could you recommend a any replacements? See below.
GRM2195C1H123FA01D for C78,C81,C84,C87
WP424SRDT for D10,D11.D12
And does anyone know if ZTX851STZ is the same as ZTX851
GRM2195C1H123FA01D for C78,C81,C84,C87
WP424SRDT for D10,D11.D12
And does anyone know if ZTX851STZ is the same as ZTX851
Chris
Heres the ZTX851STZ data sheet on Mouser - looks like a bog standard ZTX851 to me https://www.mouser.co.uk/ProductDetail/Diodes-Incorporated/ZTX851STZ?qs=MQZxQ7B7MZJRGPP/f3Qn8A==
For the 0.012F NPO/COG capacitor, this will work - again from Mouser https://www.mouser.co.uk/ProductDetail/Murata-Electronics/GCM2195C1H123GA16D?qs=QzBtWTOodeWUxWAHZ4NdVw==
For the RED indicator LED's, RS have them in stock here https://uk.rs-online.com/web/p/leds/2471139
Hope this gets you going!

Thanks for that, just a couple of questions ( for now!) The dip switche that @fireanimal used are different to the one on the bom, I take it that's for ease of use, could either of you point me the direction part number? Also the filter does it matter what wire I use here, I.e shielded?
Chris, I used 12 way through hole piano DIP switches from RS but it seems they are now only available as SMD (https://uk.rs-online.com/web/p/dip-sip-switches/1774325?gb=s)
Here is a Mouser equivalent https://www.mouser.co.uk/datasheet/2/626/grhls01225_1-2289385.pdf and the associated part number page is https://www.mouser.co.uk/ProductDetail/Grayhill/76PSB12ST?qs=ls7QRyWmRk6duToY3C%2BZ0w== and Mouser part# 706-76PSB12ST
(Note that the incorrect product picture is shown on the Mouser product page)
Do no use stacked 4 and 6 way switches unless they specify the overall dimensions as being the same as a complete 12 way switch - I got caught out by that on an earlier build.
For the filter switch, it does not have to be shielded, but you must twist the wires tightly and make sure they run along the RHS edge of the preamp looking from the front. This is to ensure no hum is picked up from the transformer.
I recommend you use 0.5mm flexible sleeved wire.
I recommend you use 0.5mm flexible sleeved wire.
Ah, ok so this switch?
https://www.radwell.co.uk/Buy/TE CONNECTIVITY/ALCOSWITCH/2-435802-2?redirect=true
https://www.radwell.co.uk/Buy/TE CONNECTIVITY/ALCOSWITCH/2-435802-2?redirect=true
Switched this on for first voltage check today and they seem OK to me apart from the raw 10v is there a mistake in the assembly instructions? Line 13 says check 25v next to C45 for 25v +/-3 volts and check 10v next to C56 for 10v+/- 30mv should the 10v check read next to C46 check for 10v +/- 3v?
May be I am wrong...on pcb, the Left and right system gain dip switch isolated grounds are reversed at switch end. Practically should not make ant difference I suppose.
Chris, your link is not working for me - can you repost it?
hadihf, I need to check it because Andy Lowe raised this same question. You are probably right - the labels for the flying leafs to the switch bank on the silk screen on the bottom side of the board are reversed.
hadihf, I need to check it because Andy Lowe raised this same question. You are probably right - the labels for the flying leafs to the switch bank on the silk screen on the bottom side of the board are reversed.
Hi Andrew try this mouser one https://www.mouser.co.uk/ProductDet...switch/2-435802-2?qs=JFPmFzpscO4UqIr5Ntubeg==
What connectors can be used for the powerline in on the pcb or is it best to solder?
What connectors can be used for the powerline in on the pcb or is it best to solder?
Chris - that looks good! I'm just adding it to the BOM. 👍
For the PCB to power inlet, I just soldred the connections. Use good quality well insulated wire and cable tie the live and neutral wires together to keep the loop area small from the inlet to the PCB as small as possible. Make sure the mains wire is kept to the left (looking from the front) and well away from the right hand side of the PCB.
🙂
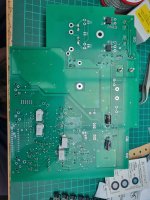
Soldered the rest of the IC's on today table below shows voltages these look ok? 10v and 25v for the regulators drop to 6v and 21v respectively does this seem correct?

Chris,
Important note: if the preamp is picking up noise, the readings will be all over the place. For your measurements, leave the MC input OPEN and SHORT the MM inputs right at the input connector. This will ensure the preamp willbe quiet enough for good DC readings.
The U27 and U18 pin 6 voltages look very high. They should be a few mV (not more than c. 20-25mV) on pin 6. U7 pin 6 also very high. These voltages look like U7 and U17 pin 7 should be 5-10mV max.
I assume the voltages you are quoting for Q1-Q4 are the collector voltages wrt 0V - if so, they are correct. The +10V, +-5V readings are all correct.
Don't forget to check the MC input offset as follows: measure the voltage across the input connector (ie between the input socket ring and centre connector) with U28 and U29 open. You will get 10's of mV of offset. Then flash U28 and U289 closed and remeasure - you should get 0.00mV
Last edited:
Thanks Andrew,
Without shorting the MM inputs as I don't have the phono's installed yet measuring noting the voltages down properly this time, they are as follows
U27 Pin 6 is 3mv
U18 Pin 6 is 3.1mv
U7 - Pin 6 is 1.3mv
U17 - Pin 6 is 0.060mv
Measuring the MC input from socket ground to both inputs I get around 3mv Q1-4 are matched.
Voltage across R61- R82 is around 5.2v I am using the Jfe Opamps I think I read this is acceptable?
How do these measurements stack up?
- Home
- Source & Line
- Analogue Source
- Bonsai’s X-Altra MC/MM Phono Preamp