I prefer spirawrap, its easy to add to existing harnesses without disconnecting anything as it twizzles on easily. Not quite as neat, but quick and simple.
I am listening to Ahmad Jamal's "Ahmad's Blues" album and the stereo imaging and sound stage are superb. Great engagement and dynamics. Pure listening pleasure. This amp is really a keeper...
Ahmad Jamal - Ahmad's Blues (1959), CD, Chess 1994, Germany
DR Peak RMS Duration Track
--------------------------------------------------------------------------------
DR15 -0.10 dB -18.20 dB 4:06 01-Ahmad's Blues
DR14 -0.10 dB -16.46 dB 4:16 02-It Could Happen To You
DR17 -0.10 dB -20.56 dB 3:46 03-I Wish I Knew
DR15 0.00 dB -18.78 dB 7:40 04-Autumn Leaves
DR12 -0.91 dB -16.10 dB 4:16 05-Stompin' At The Savoy
DR16 -0.10 dB -19.51 dB 4:47 06-Cheek To Cheek
DR19 -0.10 dB -22.62 dB 3:26 07-The Girl Next Door
DR17 -0.10 dB -19.88 dB 3:52 08-Secret Love
DR15 -0.10 dB -17.92 dB 2:19 09-Squatty Roo
DR16 -0.50 dB -18.37 dB 4:02 10-Taboo
DR16 -0.10 dB -23.25 dB 3:18 11-Autumn In New York
DR17 -0.10 dB -19.43 dB 4:44 12-A Gal In Calico
DR17 -3.06 dB -24.40 dB 2:38 13-That's All
DR15 -0.10 dB -18.54 dB 3:40 14-Should I?
DR17 0.00 dB -20.67 dB 3:12 15-Seleritus
DR13 -0.90 dB -16.19 dB 5:07 16-Let's Fall In Love
--------------------------------------------------------------------------------
Number of tracks: 16
Official DR value: DR16
🙂You can not believe that the recording is from 1959. You seem to be in the jazz club and they are playing for you!
Last edited:
How many surface mount devices? Man, I don't know if I can solder those without melting them.
These are large 1206 size ones and large MELFs. 4 on each snubber and 3 to 5 on amp depending on choice of silver mica or SMT. You won’t melt them. Watch some YouTube videos on how to do it or get some solder paste and touch tip of iron to paste while holding part down with pressure from a tweezer.
“ For a 20w build is the Antek AS3218 combined with the SLB the way to go?”
Hi spiggs,
I freshly powered up my stereo Alpha Nirvana prototype build with a single transformer and SLB power supply.
The Antek AS-4220 trafo I’m using is good for 23.5vdc with this setup, I think you’ll be OK with an AS-4218 for your 20v build.
Hi spiggs,
I freshly powered up my stereo Alpha Nirvana prototype build with a single transformer and SLB power supply.
The Antek AS-4220 trafo I’m using is good for 23.5vdc with this setup, I think you’ll be OK with an AS-4218 for your 20v build.
X a pure gem 😀😀
Attachments

Last edited:

Vunce convinced me to build up a true production SLB power supply. I had been using the verification build prototype which only has 1.6mm FRP, half the copper thickness at 1oz, and most importantly, lacks the star ground hub which has 8 Faston spade connectors concentrated in a small area. So I built one last night, traded it for 2hrs of sleep 🙂 Did not get a chance to try it yet, but I do know immediately it feels heavier and the soldering iron had a hard time melting to solder for the pins due to the thickness of the copper planes. I did not have that problem on the verification build. Hoping that this takes the residual mains hum noise peaks down even lower.

Attachments

“ For a 20w build is the Antek AS3218 combined with the SLB the way to go?”
Hi spiggs,
I freshly powered up my stereo Alpha Nirvana prototype build with a single transformer and SLB power supply.
The Antek AS-4220 trafo I’m using is good for 23.5vdc with this setup, I think you’ll be OK with an AS-4218 for your 20v build.
Thanks Vunce.
These are large 1206 size ones and large MELFs. 4 on each snubber and 3 to 5 on amp depending on choice of silver mica or SMT. You won’t melt them. Watch some YouTube videos on how to do it or get some solder paste and touch tip of iron to paste while holding part down with pressure from a tweezer.
How many surface mount devices? Man, I don't know if I can solder those without melting them.
ro9397,
I’ll be happy to solder the SMD’s for you if you take on the project and you are absolutely stuck. No worries.
But honestly I would watch a few videos on YouTube and order a simple kit from Ebay. It’s diy after all! We all were once there!
Best,
Anand.
Well said Anand!
Very kind offer also.
At first, I was not very fond of surface mount devises either. But a nice pair of tweezers, magnifying headgear and a fine tip for my solder station has made basic smd work a breeze. Just go for it!! 🙂
Very kind offer also.
At first, I was not very fond of surface mount devises either. But a nice pair of tweezers, magnifying headgear and a fine tip for my solder station has made basic smd work a breeze. Just go for it!! 🙂
Vunce, seeing you have done some SMD soldering with a normal fine tipped iron. Can I ask if you use a lead free solder paste or normal fine solder for say the SMD resistors on the Alpha Nirvana helper Mosfet boards as an example?
Any other members feel free to offer advice here, thanks.
Cheers,
Gary..
Any other members feel free to offer advice here, thanks.
Cheers,
Gary..
Hi Gary,
I use Kester ‘44’ Sn60Pb40, 0.015” diameter solder with a Hakko T15-BLL tip for SMD work. I put a dab of flux from a syringe on each pad of the component location. Apply a small solder bump on one pad, grab the component with tweezers and lay one side on the solder bump the other side is on the pad with flux. Then clean and tin solder iron tip and touch the solder bump while holding the component in place with the tweezers. 1-2sec the bump melts perfectly around the component end and the pad. Since the component is now held in place, clean and tin iron again and repeat for the other side, done!
XRK uses a more advanced technique with a pan, hot plate and paste. I’m still in the stone ages 😀
Cheers!
I'm still closer to you Vunce. I typically apply a drop of solder to one pad, heat it and slide the component into the molten solder. A little downward pressure with the tweezers gets it flat to the board. Then apply solder to the other pad. I will admit to having a good ERSA temperature controlled soldering iron and use the smallest chisel tip available. And I prefer leaded solder. I also use solder paste and a hot air gun from time to time for the leadless devices.
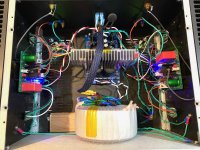
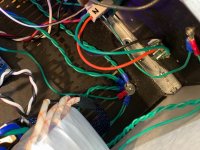
I installed the new v2 SLB into the Alpha Nirvana, and while I was at it, cleaned up the wiring a bit. I put the chassis and earth grounds all on one bolt on the chassis rather than a screw terminal block just to simplify. The Mains AC from the EIC to the trafo is now in the braided PET tube. Here are some photos.
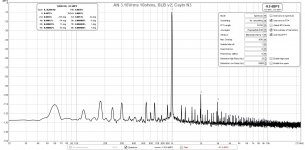
A measurement at 1kHz and 3.16Vrms into 10ohms as before with the Cayin N3 as source reveals that the THD has gone down to 0.0036% and the 60Hz bump is now down by -7dB over the last setup. So overall, there seems to be an improvement.


FFT with 3.16Vrms into 10ohms:

A measurement at 1kHz and 3.16Vrms into 10ohms as before with the Cayin N3 as source reveals that the THD has gone down to 0.0036% and the 60Hz bump is now down by -7dB over the last setup. So overall, there seems to be an improvement.
FFT with 3.16Vrms into 10ohms:
Attachments

Last edited:
I'm still closer to you Vunce. I typically apply a drop of solder to one pad, heat it and slide the component into the molten solder. A little downward pressure with the tweezers gets it flat to the board. Then apply solder to the other pad. I will admit to having a good ERSA temperature controlled soldering iron and use the smallest chisel tip available. And I prefer leaded solder. I also use solder paste and a hot air gun from time to time for the leadless devices.
This is my method too (no access to a hot air gun). I bought some lower melting point solder to minimise the amount of heat and duration required.
Just be careful that the component is flat before you move to the other side as any downward pressure can crack the first solder joint if the component is hovering above the board..
It is frustrating being in a room where everyone seems to be smarter than everyone else.......
HD (High Distortion)
HD (High Distortion)
Tips on how to get started on SMT/SMD soldering
First tip is to watch some videos on YouTube. SparkFun has good ones.
I use a very basic $50 hot air rework pencil. Variable speed airflow, variable temp, changeable nozzle diameters. Very handy to preheat large copper planes to make removal and desoldering of bulk caps or large transistors. This on top with a $10 hot plate and old skillet to preheat board to 130C works very well. Wherever you point nozzle, SMT part with paste becomes liquid in 5 to 10 seconds. Hold for another 10 seconds to fully wet then move on. That way, parts are only exposed to full melt temp for under 20 seconds.
CO-Z 858D Rework Station, LED Display SMD Soldering Rework Station with Hot Air Heat Gun Set, LED Digital Temperature Display Screen Electric Desoldering Welding Iron Kit for Electronics Repairing https://www.amazon.com/dp/B01MR2IWBN/ref=cm_sw_r_cp_api_i_3aq6DbW89K5FZ
An IR thermometer is essential to set board temperature.
Etekcity Lasergrip 774 Non-contact Digital Laser Infrared Thermometer Temperature Gun -58℉~ 716℉ (-50℃ ~ 380℃), Yellow and Black https://www.amazon.com/dp/B00837ZGRY/ref=cm_sw_r_cp_api_i_mfq6DbEQX5853
This lets you see what you are doing.
Beileshi Head Magnifier LED Illuminated Multi-Power Helmet Magnifying 1.5X 3X 8.5X 10x Magnifying Tools for Watch Repair, Arts & Crafts or As General Reading Aid https://www.amazon.com/dp/B018DLMHFI/ref=cm_sw_r_cp_api_i_ngq6DbXMB21W0
The most important thing is a good tweezer. I have used this same Swiss made Technitool for 20yrs. They are expensive but worth it. You can order directly from Technitool. Model 00-SA-0. Amazon also has them:
Tweezers, High Precision, 4-3/4in, Thick https://www.amazon.com/dp/B076F83XPQ/ref=cm_sw_r_cp_api_i_Jqq6DbDB9ES81
Some real Pb/Sn no-clean solder paste (use piece of shrink tube to cap when not is use):
CHIP QUIK SMD291AX REWORK SOLDER PASTE 5CC 63/37 NO CLEAN SOLDER https://www.amazon.com/dp/B0186IM0P0/ref=cm_sw_r_cp_api_i_Qoq6DbKT9C221
Good solder braid wick (NTE brand is superior to others very fine braid) to clean pads off when reworking:
NTE Electronics SW02-25 No-Clean Solder Wick, 4 Blue.098" Width, 25' Length https://www.amazon.com/dp/B0195UMPDK/ref=cm_sw_r_cp_api_i_Krq6DbA2ATBHH
And Kester 186 liquid flux (lasts forever because only drops are needed). Use a piece of shrink tube to cap needle when not in use.
Kester 186 Liquid Soldering Flux, RMA Rosin, 2-ounce Bottle https://www.amazon.com/dp/B01MR49JY1/ref=cm_sw_r_cp_api_i_Csq6DbE624ESZ
With the above - you can SMT solder almost anything. I have done very large 500+ part projects this way. However, when doing more than 50 parts use an automatic paste dispenser tool/gun. Or your hand will cramp from using manual hypo syringe.
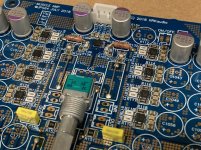
Here is an example of the type of solder joint quality you can achieve using this method. Also, cutting edge components increasingly do not have exposed pins. The “pins” or pads rather, rest under the chip along with the thermal pad (so called VSON format). Here, solder paste and hot air is mandatory. Here is my Muscle Amp 8x parallel OPA1622 headphone amp.
First tip is to watch some videos on YouTube. SparkFun has good ones.
I use a very basic $50 hot air rework pencil. Variable speed airflow, variable temp, changeable nozzle diameters. Very handy to preheat large copper planes to make removal and desoldering of bulk caps or large transistors. This on top with a $10 hot plate and old skillet to preheat board to 130C works very well. Wherever you point nozzle, SMT part with paste becomes liquid in 5 to 10 seconds. Hold for another 10 seconds to fully wet then move on. That way, parts are only exposed to full melt temp for under 20 seconds.
CO-Z 858D Rework Station, LED Display SMD Soldering Rework Station with Hot Air Heat Gun Set, LED Digital Temperature Display Screen Electric Desoldering Welding Iron Kit for Electronics Repairing https://www.amazon.com/dp/B01MR2IWBN/ref=cm_sw_r_cp_api_i_3aq6DbW89K5FZ
An IR thermometer is essential to set board temperature.
Etekcity Lasergrip 774 Non-contact Digital Laser Infrared Thermometer Temperature Gun -58℉~ 716℉ (-50℃ ~ 380℃), Yellow and Black https://www.amazon.com/dp/B00837ZGRY/ref=cm_sw_r_cp_api_i_mfq6DbEQX5853
This lets you see what you are doing.
Beileshi Head Magnifier LED Illuminated Multi-Power Helmet Magnifying 1.5X 3X 8.5X 10x Magnifying Tools for Watch Repair, Arts & Crafts or As General Reading Aid https://www.amazon.com/dp/B018DLMHFI/ref=cm_sw_r_cp_api_i_ngq6DbXMB21W0
The most important thing is a good tweezer. I have used this same Swiss made Technitool for 20yrs. They are expensive but worth it. You can order directly from Technitool. Model 00-SA-0. Amazon also has them:
Tweezers, High Precision, 4-3/4in, Thick https://www.amazon.com/dp/B076F83XPQ/ref=cm_sw_r_cp_api_i_Jqq6DbDB9ES81
Some real Pb/Sn no-clean solder paste (use piece of shrink tube to cap when not is use):
CHIP QUIK SMD291AX REWORK SOLDER PASTE 5CC 63/37 NO CLEAN SOLDER https://www.amazon.com/dp/B0186IM0P0/ref=cm_sw_r_cp_api_i_Qoq6DbKT9C221
Good solder braid wick (NTE brand is superior to others very fine braid) to clean pads off when reworking:
NTE Electronics SW02-25 No-Clean Solder Wick, 4 Blue.098" Width, 25' Length https://www.amazon.com/dp/B0195UMPDK/ref=cm_sw_r_cp_api_i_Krq6DbA2ATBHH
And Kester 186 liquid flux (lasts forever because only drops are needed). Use a piece of shrink tube to cap needle when not in use.
Kester 186 Liquid Soldering Flux, RMA Rosin, 2-ounce Bottle https://www.amazon.com/dp/B01MR49JY1/ref=cm_sw_r_cp_api_i_Csq6DbE624ESZ
With the above - you can SMT solder almost anything. I have done very large 500+ part projects this way. However, when doing more than 50 parts use an automatic paste dispenser tool/gun. Or your hand will cramp from using manual hypo syringe.
Here is an example of the type of solder joint quality you can achieve using this method. Also, cutting edge components increasingly do not have exposed pins. The “pins” or pads rather, rest under the chip along with the thermal pad (so called VSON format). Here, solder paste and hot air is mandatory. Here is my Muscle Amp 8x parallel OPA1622 headphone amp.
Attachments
Last edited:
- Home
- Amplifiers
- Solid State
- Alpha Nirvana 39w 8ohm Class A Amp