Hi, few quick tips in case you have to rebuild: put driver (or acoustic center of multiple) to midway of the longest dimension and lowest mode inside doesn't happen, assuming innards are symmetric including wadding which makes sure the acoustic center of the box to that of the driver(s). Drivers opposite sides of the box would reduce vibration.
Last edited:

@wolf_teeth
Sure - convenience, mainly. I've made several small BR subwoofers before, and the port is always a pain. It's generally too long to fit inside the box and requires bends to reach the external plane you need. Port resonances, among other issues, are something I can't be bothered to deal with in this build. I mentioned at the beginning (due to a child replica I have co-produced) that time is a premium commodity.
I can simply add another driver to compensate for the port contribution at a relatively low cost of £40, and my X-max remains the same as it would with a single driver - but with lower extension.
My designs are always DSP-centric, so that isn't a concern. I also have a chunky STA-400D with Hypex modules delivering 270W per channel peak, so again, not an issue.
Furthermore, I am designing for my room, not a product with standard design parameters. A bass reflex drops off quite quickly at the bottom, whereas with this LT-sealed box, I can tailor the Q to achieve the lowest reasonably attainable flat response while accounting for in-room boundary gain.
I suspect the gentleman at the SDC show learned a lesson about free space, half-space, etc., that day.
Cabinet damping:
Slabs of 50mm rockwool stacked to about 250mm in length.
System Q went from 0.77 to 0.64
Standing wave seems to be irradicated.


The dip at 55hz is a function of my perfectly square workshop...


Slabs of 50mm rockwool stacked to about 250mm in length.
System Q went from 0.77 to 0.64
Standing wave seems to be irradicated.
The dip at 55hz is a function of my perfectly square workshop...
I did some measurements in listening positions using the test cabinet as per post 51.
Low passed at 120hz to give an idea of what the reality of the output will be. Looks like there is some good meat to work with and 10hz lower than my previous set up. At normal listening levels the cone barely shift 1mm so I could potentially go lower but don't see the benefit. Big peak of room energy at 52hz.


Low passed at 120hz to give an idea of what the reality of the output will be. Looks like there is some good meat to work with and 10hz lower than my previous set up. At normal listening levels the cone barely shift 1mm so I could potentially go lower but don't see the benefit. Big peak of room energy at 52hz.
Recoil and Mass
This system isn't designed for SPL; it will hit 80db once in a blue moon or with an accidental slip of the volume control. However, I did notice some driver/cabinet recoil when real voltage was applied.Possible Solutions:
- Dual opposed woofers – No, the cabinet is too slim.
- Offset dual opposed woofers – No, looks ugly.
- Mitigation: Add mass – Nice to me you Chandler Bing - BING!
Cabinet Mass:
The test cabinet is made from standard MDF, which weighs approximately 5.3 kg, but I’m making the final cabinets from Finsa Fibracolour, increasing the weight to 6.9 kg. That should help a little.Ballast Mass:
This ties into my anti-tipping solution - adding a 20mm (≈2.5 kg) layer of very heavy ballast at the bottom of the cabinet. This will lower the center of gravity and, with modest outriggers, should create a fairly toddler-resistant structure.What to Use as Ballast?
Some options I am considering:- Resin and steel shot – Expensive.
- Resin and lead shot – Even more expensive.
- Flat steel bar bonded with resin – As expensive as lead.
Any suggestions?
These two elements aren't a complete solution, but they should help mitigate the issue.
A few weight plates of suitable dimensions from Decathlon or Ebay? Secured with resin or adhesive.
https://www.decathlon.co.uk/p/secon...sc-weight-2-kg-28-mm-very-good/_/R-p-348894-B
https://www.decathlon.co.uk/p/secon...sc-weight-2-kg-28-mm-very-good/_/R-p-348894-B
@wolf_teeth @AlmaAtaKZ
Thanks guys! This is such a weird problem to have...
Gym weights all come in the wrong dimensions so would have to be hacked up and secured in epoxy.
Steel shot is actually hard to get hold of in a small enough pellet size and is quite expensive. Lead shot is even more expensive.
Reclaimed lead might be the cheapest as sellers on ebay seem to melt it down in to ingots and then I could epoxy it in place.
It seems there is a Hoffmans iron law on ballast. Cheap, heavy or convenient. Pick two.
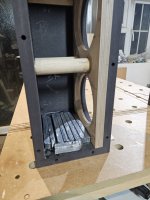
I think I have solved it...
Just ordered a 245x145x18mm slab of lead. Sawn in half, screwed and epoxied in place this will fit perfectly.
Maths says this should way about 7kg but the seller claims 5kg so we will see. Decent solution for £20.

Just ordered a 245x145x18mm slab of lead. Sawn in half, screwed and epoxied in place this will fit perfectly.
Maths says this should way about 7kg but the seller claims 5kg so we will see. Decent solution for £20.
Photo Dump Update
Notes:


Notes:
- Use a low-tooth-count hacksaw blade for lead slabs - I learned that after almost finishing with a 24T blade. Ninny-muggins mistake.
- Black MDF laughs at dust collection.
- Glue-ups are never not stressful.
Attachments
Great build and documentation!Photo Dump Update
Lead covered by 2mm thick layer of epoxy. I added some mica as a little treasure treat for when I open the box in years to come.


Sanded and Ready for Paint & Varnish
A quick note for anyone working with Valchromat/Fibracolour - this stuff produces incredibly fine dust that gets everywhere...
One of the biggest challenges (which I forgot about) is how much faster it abrades compared to birch ply. You can see where I had to fill in a concave area after over-sanding without realizing it.
Another issue is contamination when using it alongside other materials. The black dust easily embeds itself in lighter woods, like birch, and can be difficult to remove. Just like last time, I had to sand and shape the birch and Fibracolour separately, making sure to finish the birch last to eliminate any traces of black dust.
It’s definitely something to keep in mind when working with this stuff.
Got covered in black valchromat dust today, too. Indeed, dust on steroids.
A bit of late night painting. The lazy susan I made for taking polar measurements is a god send...

- Home
- Loudspeakers
- Multi-Way
- 3-Way Co-ax Floorstander