is that humming in the speakers? or the traffo humming?
i have built three of these 2A3's and all were quiet as quiet can be...
i have built three of these 2A3's and all were quiet as quiet can be...
When I wrote that I doubled C2 it means I increased from 50uF to 100uF yet there was no change to the hum.
Yes, but it looks like you need to at least double that again. 220uF or even 330uF.
I got a bunch of 800uF 330V electrolytics at one point. I used them in an amp and they seem to work very well. The B+ in that amp is +300V, which is cutting it pretty close.
2H is a small value choke. Little 50uF caps used to be used with 7H chokes. According to that calculator, and using values of a typical vintage choke and cap combination, if R = 145, L = 7H, and C = 47uF, the corner freq is about 8.8Hz (still kind of high) and there's quite a bit of ringing in the impulse response (Q = 2.66).
--
Is all this for an LC filter?
Last edited:
Member
Joined 2009
Paid Member
The hum is mechanical, I've only put together the power supply so far and the load is a resistor between B+ and ground.
I took the choke off the chassis and put it on the bench. It buzzes alright. But if I pick the choke up by grabbing the mounting flanges with some insulated pliers and suspend it in mid-air the noise almost disappears. So it's mechanical buz being transmitted from the choke to the chassis. It may be solved with some rubber grommets between the choke flanges and the chassis. I'll take a look at that after dinner....
I took the choke off the chassis and put it on the bench. It buzzes alright. But if I pick the choke up by grabbing the mounting flanges with some insulated pliers and suspend it in mid-air the noise almost disappears. So it's mechanical buz being transmitted from the choke to the chassis. It may be solved with some rubber grommets between the choke flanges and the chassis. I'll take a look at that after dinner....
The hum is mechanical, I've only put together the power supply so far and the load is a resistor between B+ and ground.
I took the choke off the chassis and put it on the bench. It buzzes alright. But if I pick the choke up by grabbing the mounting flanges with some insulated pliers and suspend it in mid-air the noise almost disappears. So it's mechanical buz being transmitted from the choke to the chassis. It may be solved with some rubber grommets between the choke flanges and the chassis. I'll take a look at that after dinner....
this is the reason i avoid steel chassis, i use aluminum instead...
you can use damping materials like rubber to lessen the effects of buzzing
under the choke mounting...
in one case i was asked to look into, it was the steel bottom plate that was buzzing,
my fix was to use a 6mm plexiglass plate in tandem with the bottom plate...
i also use 10 x 10mm aluminum angle stock to reinforce the chassis if heavy
traffos will cause the top of the chassis to bend some...
Member
Joined 2009
Paid Member
a 6mm rubber padding should do it...
mounting bolts not tightened and double nuts...
this is quite interesting, i never had any issues with my chokes,
i must be doing something right....😉
mounting bolts not tightened and double nuts...
this is quite interesting, i never had any issues with my chokes,
i must be doing something right....😉
Don't you need some kind of vacuum system for that to work or else all you do is coat the outside ?
Send it to me, I have professional machines under my sup. Can place your chokes in it and bake them 😉
Anyhow, what did you do with your SKA amp? Just curious, this is where it started , a s.e.t. 845 and a SKA amp
Member
Joined 2009
Paid Member
I tried mounting the choke on rubber grommets but the hum is still too annoying - good enough for experiments but not for a final build out when the time comes. I used a pencil to probe for the vibrations, holding the wooden shaft and pressing the point against the choke at different places. There was one spot where the vibrations could be readily felt and no other spots that I could find. This one spot was on the ver top of the choke, on the metal strap with the manufacturers label. Holding the pencil point against the side of the laminations or the plastic bobbin didn't feel vibrations. I may take the choke apart tonight.
How does baking them help - will they smell nice and make you hungry like chocolate chip cookies ? 😀Can place your chokes in it and bake them
I only ever built a mono version of my SKA (TGM7) with a massive power supply and I use it as my daily amp for past year. I never built a stereo version although I have all the parts because I mostly listen in mono. Also, my TGM8 needs to be heard properly - I have only heard that one in mono although I have two channels built and a box waiting for the two modules! After I made my TGM8 I stopped doing much in the way of new amplifiers, along with TGM7 these two amps are so good that I no longer believe I can design or build a better sounding SS Class AB amplifier, the law of diminishing returns on my time and effort. Hence I've hung up my 'iron' on SS for the most part and am back here playing with tubes just because they're fun ! However, I may be tempted back to a SS design for the purpose of making a hybrid amplifier - I have some ideas I never got around to.Anyhow, what did you do with your SKA amp? Just curious, this is where it started , a s.e.t. 845 and a SKA amp
Last edited:
Member
Joined 2009
Paid Member
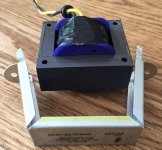
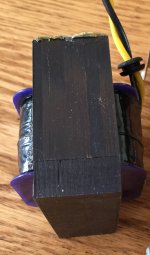
Well I took the mounting bracket/flange thing off the choke. Photo's show what I found inside. If you look carefully you'll see it isn't the best quality job you could imagine. The I-laminations are slanted sideways and there are a couple of places where they have internally delaminated.
I powered up the circuit with the 'naked' choke installed and sitting on a pair of rubber grommets on the bench top. It was quiet - so no issue with the 'naked' choke. Of course, I could still feel the vibrations on the top of the I-laminations through a pencil point.
I'm not sure a soaking in varnish will be beneficial, but I suspect that I need to fill the void between the laminations and the mounting bracket.
Attachments
Last edited:
I'm not sure a soaking in varnish will be beneficial, but I suspect that I need to fill the void between the laminations and the mounting bracket.
RTV from a local auto "parts" store?
Member
Joined 2009
Paid Member
WTF is RTV ?
https://en.wikipedia.org/wiki/RTV_silicone
Well I took the mounting bracket/flange thing off the choke. Photo's show what I found inside. If you look carefully you'll see it isn't the best quality job you could imagine. The I-laminations are slanted sideways and there are a couple of places where they have internally delaminated.
I powered up the circuit with the 'naked' choke installed and sitting on a pair of rubber grommets on the bench top. It was quiet - so no issue with the 'naked' choke. Of course, I could still feel the vibrations on the top of the I-laminations through a pencil point.
I'm not sure a soaking in varnish will be beneficial, but I suspect that I need to fill the void between the laminations and the mounting bracket.
i do not see the slanting as a biggie...when you dip in varnish, make sure you complete the assembly.....
you may find out that the bracket does not hold well, so putting a cardboard cut to the size of the bottom side will help....
since your choke came off as a single piece, you can wrap the sides entirely with cardboard in such a manner that you are still able to put back the bracket...
Attachments

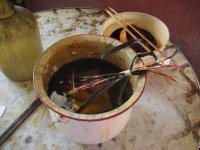
got to love the smell of that varnish 🙂
I have a VIP machine which is around -6 atm , still can put all your choke in a batch and bake it to 250 F
I have a VIP machine which is around -6 atm , still can put all your choke in a batch and bake it to 250 F
got to love the smell of that varnish 🙂
I have a VIP machine which is around -6 atm , still can put all your choke in a batch and bake it to 250 F
it sure is a lovely smell....😀
i hope to be able to diy a VIP machine someday....i'll get there soon...
but since the heat index here can be in the high 40's in summer, air drying polyurethane varnish is all i need...
Member
Joined 2009
Paid Member
Yikes, I want to do some electronics not smelly chemistry!
For now, I put some blutack on the choke put back the wrap and squeezed it down gently in a vice - it's much improved, sitting on grommets. Would varnish be any better ?
For now, I put some blutack on the choke put back the wrap and squeezed it down gently in a vice - it's much improved, sitting on grommets. Would varnish be any better ?
Increasing C1 (1uF) will smooth the ripple which will substantially reduce ripple current through the 50uF cap and in turn reduce the 120Hz current through choke. That might get it to quiet down a bit.
Member
Joined 2009
Paid Member
Bigun, try the snubber cappacitors, put 220nf caps 1kv ,
solder at each entry point of the choke, join the other leads together and connect to ground
Ref: Morgan Jones book on tubes,
Varnish will kill any vibration in the egg + snubber caps, a sleeper
solder at each entry point of the choke, join the other leads together and connect to ground
Ref: Morgan Jones book on tubes,
Varnish will kill any vibration in the egg + snubber caps, a sleeper
No!!!
Never use Y caps if you don't have a SMPS that requires certification!!!
They create dirty currents through ground loops.
It is a common mistake of those who does not think about how filters work.
Never use Y caps if you don't have a SMPS that requires certification!!!
They create dirty currents through ground loops.
It is a common mistake of those who does not think about how filters work.
- Status
- Not open for further replies.
- Home
- Amplifiers
- Tubes / Valves
- 2A3 driver