X
You did use this peace of script for youre duct length? it has 4 inch..
| *** option to put chambers with ducts leading to horn injection point ***
Enclosure 'Driver Chamber 1' Node=111
Vb={Vol_driver_chamber} Qb/fo={Q_ch_front} Lb=0in | keep chamber very flat - circa 1 in from cone to port.
It do not so much when changing.
I go make the bass part en see what happens with the excisting horn.
Last edited:
That piece of 'ENCLOSURE' script represents the front driver chamber formed by the cone and the horn wall leading to the injection duct. The duct code starts with 'DUCT'.
I'm curious, what is the material cost of the printing plastic used for a pair of baffle mounts for your horn?Ok, good to know. Having used PL Premium at $4.50/cartridge - it seems like the similar stuff in Gorilla Glue which costs way more per volume. Why use GG when there is cheaper PL Premium?
I also like how viscous and non-runny the PL stuff in the caulk gun is too. I use a ball of plastic putty as a cap on the tip after done to prevent from hardening inside. Works for a while.
From the product description of PL Premium, the only advantage I can see Gorilla Glue having over it is it expands while curing, which can drive the glue deep into porous materials (like wood), creating a deeper bond. That "advantage" also requires serious clamping (or screwing), and clean up of the goo that expands out of the joint.
That said, the GG expansion properties could also be used to good effect for filling the gaps between the horn and driver baffle, reducing the accuracy needed for fitting. Problem is figuring how much expansion pressure is created for glue amount, it might deform a thin plastic horn. If allowed to expand too much, it is not much stronger than "Great Stuff" expanding foam, which comes in two densities, the lesser expanding foam would probably be adequate for adhering a baffle on a horn, but getting the "feel" of the expansion takes some getting used to, too little and not enough fill, a little more and you have an expanding blob..
I prefer working with wood 😉.
Art
The PLA filament comes in 1kg spools and price per kg is typically $23 to $30. The horn wall adapter used 200g of filament or 1/5th of $23 = $4.60 ea.
The PL Premium does indeed expand as well, maybe not as much but it oozes out and I am told also fills in voids in rotted wood for instance. For really tight joints make sure it has place to escape or it will deform or burst joint.
Here is example of 1kg spool of 1.75mm PLA filament.
Robot Check
The PL Premium does indeed expand as well, maybe not as much but it oozes out and I am told also fills in voids in rotted wood for instance. For really tight joints make sure it has place to escape or it will deform or burst joint.
Here is example of 1kg spool of 1.75mm PLA filament.
Robot Check
Ok, good to know. Having used PL Premium at $4.50/cartridge - it seems like the similar stuff in Gorilla Glue which costs way more per volume. Why use GG when there is cheaper PL Premium?
I also like how viscous and non-runny the PL stuff in the caulk gun is too. I use a ball of plastic putty as a cap on the tip after done to prevent from hardening inside. Works for a while.
good luck with that "works for a while". Perhaps so, but seldom long enough. I've got a tube that I resealed as best I could six months ago but I'm not too optimistic.
I'm curious to see how your 30% partial infill works for dampening. I had a bad experience with a reflection from the back wall of a chamber meeting the primary wave at the mid chamber port hole and causing a null. I fixed this by changing dimensions so the reflection was out of band - moved higher. But here, you can't do that - in band is all the way up to 20 Khz. Instead you need to make the chamber deep enough to hold enough damping to kill the reflection before it returns.
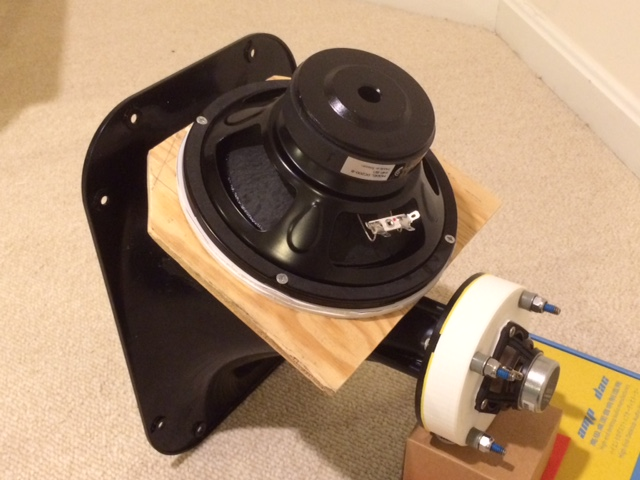
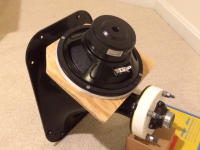
Woofer 1 installed on LTH142
Here is one of the DC200-8's installed on the LTH142 waveguide. The 2in hole saw drilling from the driver board intersects with a much larger cross sectional area on the horn wall. A very large hole is on the horn and I hope this doesn't mess with the polar response. Perhaps I should have drilled perpendicular to the horn wall to minimize the hole and have that intersect with the port from the driver?
One thing is clear is that the woofer when mounted this way is very low profile - it only adds 1in the overall height of the waveguide when viewed from the front. This makes for a very compact speaker considering there are two 8in woofers. In a conventional direct radiator, 2 x 8in woofers would add 16in in height to the baffle. Here we will have a 17in tall baffle that has the waveguide and woofers.
Woofer on top:

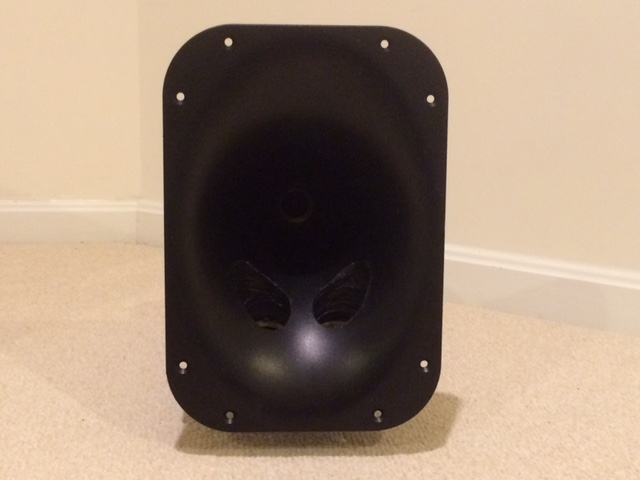
Front view with woofer on the bottom:
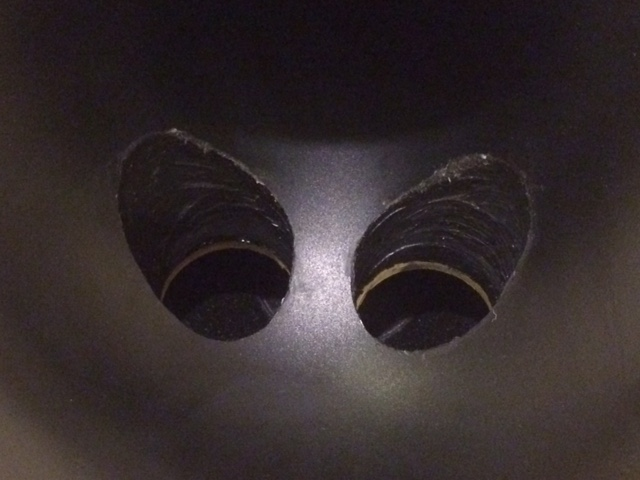
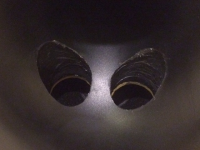
Closeup of the bass injection holes on the horn wall:
Here is one of the DC200-8's installed on the LTH142 waveguide. The 2in hole saw drilling from the driver board intersects with a much larger cross sectional area on the horn wall. A very large hole is on the horn and I hope this doesn't mess with the polar response. Perhaps I should have drilled perpendicular to the horn wall to minimize the hole and have that intersect with the port from the driver?
One thing is clear is that the woofer when mounted this way is very low profile - it only adds 1in the overall height of the waveguide when viewed from the front. This makes for a very compact speaker considering there are two 8in woofers. In a conventional direct radiator, 2 x 8in woofers would add 16in in height to the baffle. Here we will have a 17in tall baffle that has the waveguide and woofers.
Woofer on top:
Front view with woofer on the bottom:
Closeup of the bass injection holes on the horn wall:
Attachments

Last edited:
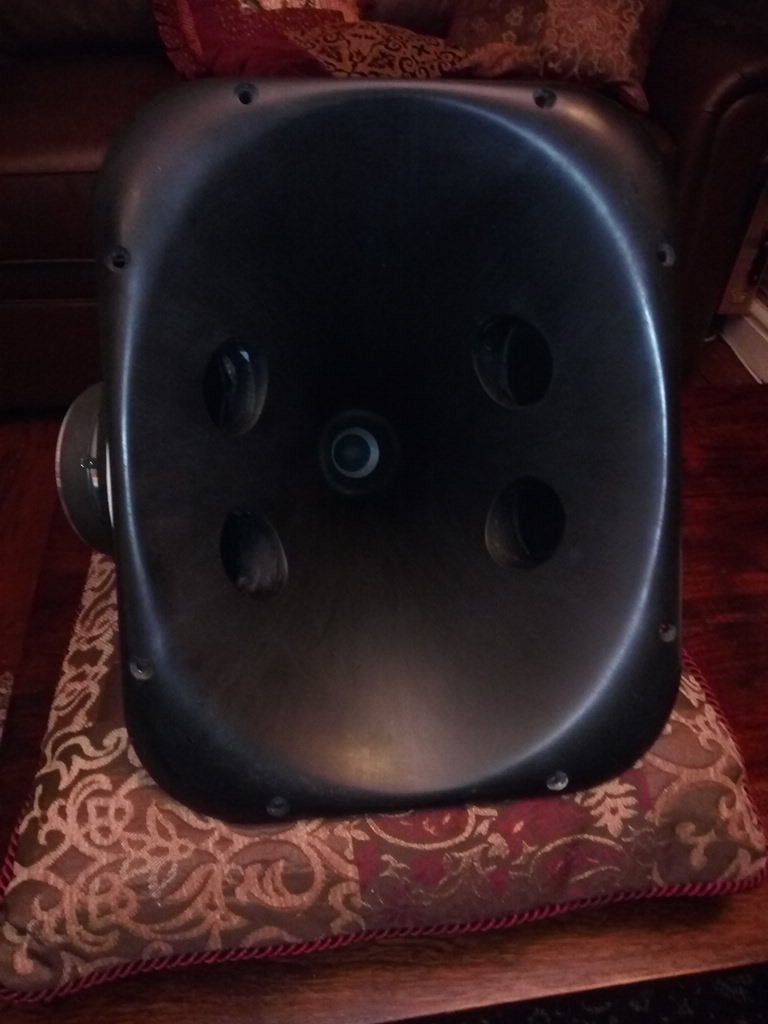
No, that is just a foam core gasket to provide clearance for the surround to keep it from bumping the plywood mount board.
Still have to print the volume filler.
Still have to print the volume filler.
good luck with that "works for a while". Perhaps so, but seldom long enough. I've got a tube that I resealed as best I could six months ago but I'm not too optimistic.
I've read POR15 paint is similar to gorilla glue in substance. That paint also cures due to moisture. As soon as you have opened the can, the shelf life is limited. The advise for that paint is to store the used can in the freezer. But I agree, 6 months would be asking a lot.
X, those holes do look pretty big compared to bushmeister's horn...
Hoping it won't make that much of a difference in smoothness of the HF...
Hoping it won't make that much of a difference in smoothness of the HF...
That piece of 'ENCLOSURE' script represents the front driver chamber formed by the cone and the horn wall leading to the injection duct. The duct code starts with 'DUCT'.
I already did see it.
I have ordered 8 inch woofers from divine, cloth surround, the phillips are difficult to implement because of very high qts.
regards
X, those holes do look pretty big compared to bushmeister's horn...
Hoping it won't make that much of a difference in smoothness of the HF...
X looks like cat eyes😀
I have to make holes in mine, but not yet now or I need 12 cm for both or divide this because of two for one woofer. holes are so big.
regards
X, those holes do look pretty big compared to bushmeister's horn...
Hoping it won't make that much of a difference in smoothness of the HF...
It's the fact that I have my holes on the small end and my tractrix profile appears to expand at a rather large angle there that the cosine(theta) effect is bigger. I may be able to repair it by patching in a piece of plastic to cover up the extra wide portion of the hole. On the other side I will drill in perpendicularly to keep hole small.
But first lets measure the polars and see the "damage done".
Has bushmeister finished his stereo pair? If so I must have missed his listening impressions... Will be interesting to see his final verdict.
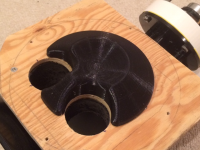
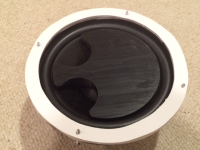
Woofer cone volume filler
Here is the custom volume filler plug for the DC200-8. I left as much clearance as the two foam core gaskets used to prevent surround bumping. But I fear the cone moves more than the surround extends out as manually pushing on the cone I can feel that it bottoms out - may have to either print a thinner one or add one more foam core gasket. Alhough, the bottoming out may just be misalignment between the plug and the driver axis. The print turned out really nice though.


Speaking of 3d printing, I just realized that I actually have the digitized contour of the horn at the location where holes are too big (well, apart from a small offset as I have the digitized exterior contour). I could just print a plug with a wall and injection hole of my liking and repair the hole. I could even give the hole a custom shape.
Here is the custom volume filler plug for the DC200-8. I left as much clearance as the two foam core gaskets used to prevent surround bumping. But I fear the cone moves more than the surround extends out as manually pushing on the cone I can feel that it bottoms out - may have to either print a thinner one or add one more foam core gasket. Alhough, the bottoming out may just be misalignment between the plug and the driver axis. The print turned out really nice though.
Speaking of 3d printing, I just realized that I actually have the digitized contour of the horn at the location where holes are too big (well, apart from a small offset as I have the digitized exterior contour). I could just print a plug with a wall and injection hole of my liking and repair the hole. I could even give the hole a custom shape.
Attachments
Last edited:
Has bushmeister finished his stereo pair? If so I must have missed his listening impressions... Will be interesting to see his final verdict.
He has been busy making the stereo pair so that is why so quiet on the forum. I hear some BB sheets should be arriving soon... 😎
I think we would all love to get some more listening impressions, but my experience is when a speaker measures this flat, with a nice flat phase, low HD, and an IR and SR that looks great, plus controlled directivity with smoothly varying polar plots... well it *has* to sound great. 😛
As the surround is held in place at one side I'd say the cone would indeed move more than the surround. The print looks great though. You can always make a new one with less height if it doesn't work out. Too bad about not cutting the holes perpendicular.
I guess lesson learned and good of you to show it for others yet to come aboard and try for themselves.
I guess lesson learned and good of you to show it for others yet to come aboard and try for themselves.
If you'd give some advice, for one 8" driver per side (two per speaker), what would be the diameter of one hole? Let's say i have not decided on what specific driver the 8" will be.
I plan to leave the enclosure open on the back side for the 8" drivers, to fire back, as in a dipole, as Xrk did on one of his builds.
The xo points for the 8" are 120Hz and 320Hz.
Thank you!
I plan to leave the enclosure open on the back side for the 8" drivers, to fire back, as in a dipole, as Xrk did on one of his builds.
The xo points for the 8" are 120Hz and 320Hz.
Thank you!
- Home
- Loudspeakers
- Multi-Way
- A Bookshelf Multi-Way Point-Source Horn