OK gentlemen. I am interested enough to do a simpler "pre-designed" (e.g. you guys already have done the heavy thinking and research) horn. Probablly xrk971's Trynergy. Or even a simpler (?) Maltese a la Weltersys.
A Little Bit of Tymphany
I have on order some of the all-purpose Tymphany TC9FD00-04. Will these really go down to 250 Hz? Won't even need to make a Synergy then 🙂
I'm "good" for existing sub woofer ("good" in the sense that it works mostly, not "good" as in build quality.) For your amusement, I still use the Frankenclosure of few years past as sub/foot rest.
http://www.diyaudio.com/forums/subw...build-his-1st-tapped-horn-11.html#post3878733
Currently I am worming my way through the " Presenting the Trynergy - a full range tractrix synergy" epic 🙂
Thanks for your efforts in these designs -- and in suffering poseurs like me 🙂
If you have that driver already, sure go ahead and try it. The foam core Trynergy is actually an easy to make horn if you follow the pdf plans. It builds itself. The getting ancilliary stuff like woofer mounts, rear chambers, etc take a lot of time. Good luck!
Or go this route and buy a COTS WG and an SB65 and know that it will work with not much construction to do. Using Bushmeister's method a big dollup of Bondo auto body filler should work well for the woofer interface.
Thanks. What about the ScanSpeak Discovery you did mention?
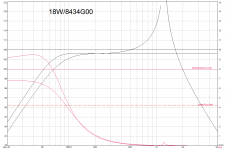
Thanks remind me 18W/8434 is less diameter and then probably easier to implement, drawback is not so much freedom to place two side by ports inside less piston diameter than xrk971 in Akabak predict need to be a bigger diameter to keep air speed in port low and not make audio able port fluff. Seems 18W/8434 can take 128 watt as seen below where excursion limit is in danger area but when EQed to the Q 0,7 82Hz trace plotted there too plus a electric high pass Q 0,7 82Hz to form a LR4 82Hz target then excursion with 128 watt feeded should be okay, below is one driver so with one more and 1/4 wave rule should throw 113dB.
Attachments
Byrtt,
Those Monacors are nice at 90dB! Should work well. In look, they sort of resemble the DC200's I plan on using except polycone vs paper cone?.....
They look nearly as clones, good spotted.
These are photos of the part fresh off the printer with no post cleanup or sanding - as is.....
Wow...

The longer port made the first peak after the dip higher as well as the general bandpass peak is higher. But all that is easy to EQ. I need higher extension on bass in order to cross over with main full range horn. 500Hz works for LR4 but I need BW2 slope for Harsch XO. May need to move to 600Hz.
Think there is a typo 🙂 in above where it say BW2 should say BW4, the second order slope part in a Harsh XO is a BS2 high pass acoustic slope from tweeter.
Last edited:
xrk971,
: ) if you still have TEBM46C20N-4B from camparison thread round 5, think would be worth a quick test on the other Faital waveguide, Xmax 4mm and Qts 0,46.
: ) if you still have TEBM46C20N-4B from camparison thread round 5, think would be worth a quick test on the other Faital waveguide, Xmax 4mm and Qts 0,46.
Attachments

Last edited:
Sorry I don't have the Tectonics BMR anymore. Might have been interesting but something about that driver did not sound good in the tests - at least as direct radiator.
Yes typo - woofer needs BW4 and tweeter needs BES2.
Yes typo - woofer needs BW4 and tweeter needs BES2.
I just glued the woofer adapter to the horn using Loctite PL Premium polyurethane glue. This is the first time I have used this stuff - but have heard that it is perhaps the strongest and best adhesive for gluing almost anything together. When applying it, you wonder if it will work as it feels like thick grease. As both surfaces are non-porous, I used a mist of water on the glue surfaces to cure it faster per the instructions. It is moisture activated. The second woofer adapter is being printed.
If anyone has had good experience gluing two plastic surfaces together with PL Premium, please let me know.
If anyone has had good experience gluing two plastic surfaces together with PL Premium, please let me know.
I use Akfix705 a 2 part supper glue and spray activator on large scale 3d printed models. The glue part is very thick, spreads well and does not run, use this on the printed part and the spray activator on the horn.
There won't be time to reposition and once bonded they never coming apart.
Sent from my GT-I8200 using Tapatalk
There won't be time to reposition and once bonded they never coming apart.
Sent from my GT-I8200 using Tapatalk

I just glued the woofer adapter to the horn using Loctite PL Premium polyurethane glue. This is the first time I have used this stuff - but have heard that it is perhaps the strongest and best adhesive for gluing almost anything together. When applying it, you wonder if it will work as it feels like thick grease. As both surfaces are non-porous, I used a mist of water on the glue surfaces to cure it faster per the instructions. It is moisture activated. The second woofer adapter is being printed.
If anyone has had good experience gluing two plastic surfaces together with PL Premium, please let me know.
Hi X I think the Loctite glue you use is enough good for your purposse.
For this application I will use Henkel-Pattex Nural 25 (Nural 25 Pegamento extra fuerte auto). its a German Brand easy to find in Europe countrys but i dont know if in US you can find them.
They are stronger prof glue for most "plastic" materials I ever used and plus have specific vibrations resistence and hot until 150 celsiuss degrees.
This is only some info for anyone that want a good and checked glue for that purposses.
I am very anxious to see the evolution your building that seems very acourate and professional and I'm sure will give you great results.
Your build here and the Bush too looks so gorgeous.
Regards
Last edited:
After letting the PL Premium cure overnight - the bond feels *extremely* strong. It does appear to be compatible with both ABS and PLA. I am confident this will work well. I can see why people really like the Loctite PL Premium as a general adhesive to make 135dB tapped horns. I think the bond is even better than epoxy as there is no way you can peel off the PL glue. It has to be physically cut or scraped off the base material.
On the second print I ran into a problem with about 20% left to go. Windows OS in all its wisdom forced a system patch and reboot in the middle of a job. Not to fret as I can print the last section (basically a small 1in tall side saddle) and glue it onto what has been printed thus far. Just stupid that's all - yes, I should have had the option selected to only allow this with my permission. I did have that option selected - there are patches where they think it's so darned critical - they push it anyway without your confirmation. I can print the "repair" pieces at same time as driver volume plugs. My fault for forgetting to turn the network adapter off before leaving the PC alone. Without the network on it would not have pushed a patch and reboot.
I also made the 11/32 plywood mounting board as a 9.375in wide x 8.5in deep board and I temporarily screwed it onto the adapter to check alignment and fit of woofer. The 9.375in width will be the main speaker housing internal width so it will also serve as bracing by being screwed into the side walls of the speaker enclosure. The adapter itself will serve as a hole saw guide to cut into the main horn wall. Make note to self: hole saws have a kerf on the blade that is wider than the stated nominal diamete. So this thing will partially rip up the 3D printed port tube walls as it makes its way to the main horn wall. That will have to be re-sealed with black latex caulking. Should have made 3D printed ports 2.02in dia. Lots of little lessons learned as I go.
Main lesson is Loctite PL Premium is an awesome adhesive and I will use for more projects. It is messy though as it expands as it cures - it oozes out a bit. I can see using this to glue a quarter to a concrete sidewalk for grins.
Also made some progress in measuring the response of the Boss D10F. More info here in its own thread: http://www.diyaudio.com/forums/full-range/285614-boss-d10f-phantom-good-fast.html But in summary, although it reached f3 of 47Hz in 1 cu ft test box, the measured sensitivity was only 90dB which was consistent with the DATS predicted sensitivity of 89dB based on TS parameters measurement. The TS provided Qts and Vas lower than advertised so that was good. But as 94dB was main reason - not going to work. Also the woofer is very rough above 200Hz so really a true subwoofer not a woofer for FAST.
Last edited:
It depends on the plastic. If the horn is polyethylene, it can't be adhered to with glue only welded as some other plastics due to their extreme resistance to chemicals. Sometimes with epoxy you can get a 'grip' bond of the mated surfaces are porous enough for the epoxy to latch on to like hook and loop. Other types of plastics do well with cyanoacrylate formulas.
They did say does not work with polyethylene. Too slippery. I bet Teflon doesn't work either or polypropylene. But PVC is good to go as that was specifically mentioned as compatible.
Don't forget to mist glue with water before attaching parts together that are non porous. It would probably never internally cure?
Don't forget to mist glue with water before attaching parts together that are non porous. It would probably never internally cure?
Holy hell, 66 pages in 3 weeks. Took me 3 days to go through all of it. In any case I have had an interest in a synergy style horn for a while. I'll be waiting to see if this can work with the larger full ranges.
Holy hell, 66 pages in 3 weeks. Took me 3 days to go through all of it. In any case I have had an interest in a synergy style horn for a while. I'll be waiting to see if this can work with the larger full ranges.
Welcome on board! It's a fast moving international collaboration train. We don't just discuss but we make stuff and show the evolution of the designs at record speeds 🙂 You will have to wait for Byrtt if you want to see how the larger 3.5in drivers work in the 2in throat horns. If you are ok with 2.5in driver, the SB65 is the way to go. It appears to work with either the XT1464 of LTH142 waveguides.
After adding the SS26W discovery to my 3-way (should arrive next week or so) I was thinking of upgrading the 10F ND25FA-4 mid tweet combo with the 5" satori and the SB26ADC-000-4 tweeter. Troels measured sublime dispersion and extremely low distortion for that tweeter: SBAcoustics-tweeters
I haven't found much builds with the 5" satori yet so I'll be sure to make a thread about it when I start.
That leaves me with 2 10Fs to play with, I was thinking about a PC desktop system but if I can use it for a synergy style horn that will be way cooler and it'll be interesting to compare the 4-way with very wide dispersion to a narrow dispersion horn system in my room.
Satori's are very nice and I have heard good things about them, but the 10F is a fantastic mid, perhaps the best if you are ok with 87dB sensitivity. It has a sublime vocals capability. With that said, it also works well in a horn and will reach a solid 20k when horn loaded as I found. You should buy an inexpensive 2in throat horn and find out. I think the JBL 2386 has a non-constricting design that may work better with less diffraction compared to some of the other designs. You can find a used on on eBay for not too much.
http://www.sound-image.com/wp-content/uploads/JBL_2386.pdf
They are available used in the US for $40. I think the 10F/8424 would reallt excel in this horn.
http://www.sound-image.com/wp-content/uploads/JBL_2386.pdf
They are available used in the US for $40. I think the 10F/8424 would reallt excel in this horn.
I waited for the results of your driver comparison before getting the 10F and I like it a lot. I can always go back to it and use the satori in a desktop system 🙂 (might as well call it a near field monitor then)
I'll see if i can find the JBL 2386 on the cheap.
I'll see if i can find the JBL 2386 on the cheap.
Current design for LTH142 Point Source Horn
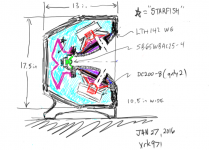
Here is sort of what I am envisioning as the enclosure for the current LTH142 based WG horn.
I will provide details of the "Starfish" rear chamber for the SB65 in a later post. Basically a very low profile 5-point radial Dagger that will be 3d printed. I will use the sparse 20% solid fill as the damping material and see if that works.
Overall speaker will be 10.5in wide x 17.5in tall x 13in deep (not including short legs extending from side panels).
Attachments
It will- all the Gorrilla Glue I have purchased eventually turned into a cylindrical brick in the bottle before I have used (the majority) of it.Don't forget to mist glue with water before attaching parts together that are non porous. It would probably never internally cure?
Water speeds the curing process.
It will- all the Gorrilla Glue I have purchased eventually turned into a cylindrical brick in the bottle before I have used (the majority) of it.
Water speeds the curing process.
Ok, good to know. Having used PL Premium at $4.50/cartridge - it seems like the similar stuff in Gorilla Glue which costs way more per volume. Why use GG when there is cheaper PL Premium?
I also like how viscous and non-runny the PL stuff in the caulk gun is too. I use a ball of plastic putty as a cap on the tip after done to prevent from hardening inside. Works for a while.
- Home
- Loudspeakers
- Multi-Way
- A Bookshelf Multi-Way Point-Source Horn