Rare Markaudio drivers

Every year Markaudio creates a new driver for asian enthusiast publication 'Stereo' magazine. The OM-MF519 driver was published as part of the magazine last year - https://stereo.jp/?p=4020. These drivers are never for sale in the West even though I occasionally get a request for them. I have got hold of 4 pairs which I can sell on though. They are based on the popular CHN-50 driver with a larger magnet. If you want a pair contact me directly, they are yours for £40 per pair inc VAT, plus shipping or you can have all 4 pairs if you want to make some sort of array maybe for £150 inc VAT, plus shipping. What would you build if you had them?

'We have built a gentle rise into the low and high frequency response, as seen in some of our more expensive drive units, to enhance positioning flexibility. The sound presentation is forgiving, without glare, and the Thiele / Small parameters, with a generous 3.5mm (1-way) Xmax are balanced for ease of use.

The low-mass voice coil, suspension and shallow profile magnesium alloy cone are unique designs for the CHN50. The pressed steel frame is designed to be very open and allow airflow to be as free as possible to the rear of the cone. Response extends from resonance to beyond 20KHz, and the impedance rise at higher frequencies is only modest, due to the careful motor design.'


Fs 106.25 Hz
Vas 1.30 L
Imp 4.000 Ohm
Qms 2.53
Qes 0.68
Qts 0.53
B×l 2.55 T×m
SPL 85.6
Sd 0.0028 m2
Cms 1.16 mm/N
Mms 1.93 g
Mmd 1.85 g
Pwr 7 watts (Nom)
Xmax (Mech) +/- 3.5mm

OM-MF519-response.jpg


OM-MF519-dimensions.jpg


OM-MF519-scaled.jpg

QSpice returns a Fatal Expression error - help to problem solve appreciated

Objective: I'm learning to use Qspice to test amp design demo by JohnAudioTech.
Approach: using the demo amplifier demo in QSpice to learn expressions to use
Problems: I've a missing expression that I cant figure out;
If I insert to IN sine 0 100m 1K as the per the demo more errors occur.
I've posted a screenshots of errors. Help to guide me to problem solve would be much appreciated.
Thanks
Terry

Attachments

  • error.01.PNG
    error.01.PNG
    39 KB · Views: 145
  • error.02.PNG
    error.02.PNG
    28.8 KB · Views: 108

Mains DC and surge filter causing sibilance on hifi

Hello, I am using an audio 25A AC power surge protection and DC block audio filter on my phono preamp 24v AC and turntable which is also AC. While it improves both it does cause a little bit of sibilance or high frequency hisssssss on some records.

Main parts specifications:
Circuit board: double-sided FR4 105X48X1.6MM spray tin dosage 1PCS.
Bridge reactor: CBJ5010 50A 1000V 3 PCS.
Blanking capacitance: 16V2200UF diameter 13MM dosage 9PCS.
Varistor: 20D561K dosage 1PCS.
Thin film capacitance: 2.2UF MKT 250V dosage 1PCS.

Can I change the value of the caps or do something else to filter this out?

Mains filter.jpg

kitchen solution?

It looks like I spend a lot of time cooking for my ravenous kids.

So, I am looking at diy solution for kitchen sound, at the moment I have repurposed old bookshelf speakers which are horizontally on top of the top kitchen cabinets, near the ceiling, against the wall of the rectangular shaped kitchen. This doesn't sound that good to be honest, as expected.
For a kitchen solution, I expect:
These speakers should be a bit rugged, to weather kitchen grease which happens despite the hood.
They probably should be near the ceiling, angled downward because all the shelf or counter space is used for food?
and also they should compensate for near wall positioning.

Any hints as to how to design these boxes or other solutions for this kind of setup?

Amplifier Wire Colour Coding Best Practice

G'day Guys,

A question of best practice.

Is there a standard set of wire colours that can be applied across an amplifier?
I follow IEC colour coding for the mains side:
Live = brown
Neutral = blue
Earth = green/yellow.

For signals:
Right = red
Left = black
Signal ground = white

What happens when one gets to power supply wiring on the DC side?

I typically use:
B+ = brown
B- = blue
0V = green or yellow

Is there an industry standard or convention for DC power supply wiring?

What do other people around here like to do?

DIY phono preamplifier : earthing scheme proposition

Hello fellow DIYers !

I'm in the very last stages of my MM/MC preamp clone and I would like to validate the earting/grounding scheme before the PCBs get sent to the fab house. My design handbook states that the central point of a star-grounding arrangement for the whole system should be right at the most sensitive input stage of the amplifying chain to reduce the length of its negative terminal to ground, including the mains ground. That means the phono stage input in my case.

This build is kind of a "scrapbox challenge", re-purposing a TV set-top box steel chassis and a power transformer with EI-lams. A challenge as far as avoiding induced noise from the environement and mains ground but I know it can be done as I have a Rotel MM/MC preamp here that is built just like that and is dead silent. I use the same precautions Rotel did : shielding the power transformer and having the power supply as far as possible to the sensitive circuitry. I won't even consider a separate power supply chassis for this project.

See diagram below. The main elements in the chassis are positionned at their correct place and about to scale.

Janus Phono Stage Model 1 v.1.0 Earthing Scheme.jpg


Key points:

- The two PCBs at top right of the chassis drawing are identical amplifier circuits for each channel; It is a discrete BJT fully symmetrical bipolar design which helps in reducing common mode noise sensitivity.

- Since mains power is fed by transformer and as the output is capacitor-coupled, there are four "grounds" in the system: Mains earth, power supply ground, input ground and output ground.

- Input and output grounds are NOT joined on the PCB but rather their RCA sockets are tied together using a piece of bare copper wire. This is duplicated for both channels.

- Likewise, power is fed to the PCBs using two distinct sockets and their common ground is not tied on the board but routed to the power supply star point (screw terminal at bottom right). This power supply ground star point is then tied to both input/output RCA sockets pairs, from which point a wire goes to the main ground post.

- All AC power wiring is twisted. I may also twist the signal input/output wiring (not shown on diagram).

- The power transformer is rotated at 45° to the chassis corners for maybe a bit of magnetic field cancellation by reflection... Not sure if that's such a big thing but it is recommended in my handbook and made the layout cleaner anyways.

- The power transformer secondary has no center tap so the power supply ground reference point is set with two 1% metal film resistors (middle left).

- Two strips of copper-clad phenolic board act as a non-magnetic shield to the AC power and regulator sections. Each strip is grounded separately directly to the chassis' integral ground screw.

- Power supply and preamplifier PCBs sit on 10mm nylon standoffs with nylon screws to reduce possibility of noise coupling. If push comes to shove more copper-clad board pieces can be added below and over the boards to completely surround them with non-magnetic shielding.

- There is a manual link between the chassis ground screw and the preamp ground post. The preferred mode of operation would be to have the chassis ground separated from the preamp star ground, with the power amplifier ground screw tied to the preamp as the whole system link to mains earth. However if the preamp is used standalone and connected to a "floating" input such as a battery powered laptop for example, the ground link is shunted and the preamp mains becomes the path to mains earth.

- The signal path is sketched on the rightmost board. The parts layout is quite packed and derived from the original amplifier, which was on single-side PCB and used a lot of 0-ohm resistor links across the board. I get away with those by using a 4-layer stackup, taking care to cross superimposed traces at 90° and avoiding close paralleled traces.

Sorry for the very long-winded post, this is my first phono preamp build and I wanted to be as precise as possible. I think I have covered all the bases, does that makes any sense to you? Are there obvious No-No-s?

As always, thanks in advance for any insights!
- Joris

DIY Multi-room audio solution using Raspberry Pi boards

Good day everyone! I am designing a system that can stream audio to a net of wireless speakers connected to a central Internet streaming hub. I'll leave a few pics down below that might explain the structure a bit better, but in essence I'm looking for a DIY-friendly way of building and connecting a number of speakers to a Raspberry Pi powered main hub running Mopidy. Key features of the design have to be the following:
  • Reduced costs (I'm a broke Uni student with somewhat limited access to expansion boards and components, I can provide more info about my "limits" if necessary);
  • Decent but not stellar audio quality (the design could very well be just a proof of concept, I can refine the details later down the line if I decide to stick with the idea);
  • No restraints on the coding side of things, our workgroup can manage software decently well;
  • Reliable speaker connectivity, based on Raspberry Pi Pico W boards or similar solutions;
  • Individual speaker control via the hub.
I'm open to your suggestions, mostly because I have no idea regarding how to set up an manage a local speaker network 😅.
Thanks in advance

Attachments

  • IMG_0476.JPG
    IMG_0476.JPG
    88.9 KB · Views: 535
  • IMG_0475.JPG
    IMG_0475.JPG
    236 KB · Views: 495

DIY 200-Watt Portable Bluetooth Speaker Build – Seeking Feedback and Suggestions on Battery Set-up.

DIY 200-Watt Portable Bluetooth Speaker Build – Seeking Feedback and Suggestions on Battery Set-up
20240120_171258.jpg


Hey everyone,

I've just completed a DIY project where I built a 200-Watt portable Bluetooth speaker. I have chosen the components to suit two 100-Watt speakers I had from an old Panasonic unit, with a focus on loudness and battery life. The housing/box for the speakers are quite large, so I knew this would be a ‘not so portable’ set-up.

Here are the components:

· Battery Pack: 2x 12.8V 7Ah lithium deep cycle batteries (configured in series for a total of 25.6V).
· Speakers: A pair of Panasonic sb-ak230 speakers that are 100-Watts each and an impedance of 5 Ohms (speakers are from an old Panasonic unit I had).
· Amplifier: A class D 200W Bluetooth Amplifier Board ‘TPA3116 DAMGOO 100W+100W Audio Amp Board with LC’ that operates between 5V and 28V.
· DC Meter: A 200A 6.5-200V DC Power Battery Meter with External Shunt.
· Off/On Switch: A Narva Off And On Metal Toggle Switch with an Amperage rating 20A at 12V, 10A at 24V.
· Wiring: 15A Twin Core Power Cable.
· Connections: Narva 4mm Clear Electrical Terminal Female Blade Connector
Total Cost: $600 dollars AU. This is very expensive where I could go and buy a great portable bluetooth speaker from the shops or online, that would be louder, more portable and have better sound quality- but I did it as a fun project and to learn as well.

Sound Quality and performance:
This set-up is very loud. I did not expect it to be. As for the sound quality, I think it sounds just as good, if not better, than when it was attached to the Panasonic unit that I bought back in 2005. There is a lot of bass, but it is well balanced and not overpowering. Even near or at max volume, the sound does not distort. Although. the highlight is the battery life. According to my DC meter, I have used 3.42 Ah of the 7Ah the battery pack has. Now this is based on the 2.67 Watts of power that is currently being used while listening to a song, with the volume dial roughly a quarter way out of the max volume. So far, the speakers have been running for 50 hours and 37 minutes. Of course, the running time of the battery pack will vary, and will last a lot less the louder I make it. But so far, a quarter way of the volume is plenty for a small gathering.
The next thing I will need to do is make a housing for the battery pack, amplifier, DC meter, etc, and attach it to the speaker’s housing.

200-Watt portable Bluetooth speaker build information:
I arranged the two 12.8V 7Ah lithium deep cycle batteries in series to meet the voltage requirements to work with the two 100-Watt speakers. So far, I am taking out each individual battery to charge them. The people at Jaycar told me that I would be able to attach a 12v lithium battery charger inp arallel to the batteries which are in series, However, a friend of mine said that I can do this but won’t be able to charge the batteries whilst having the speakers on to play music at the same time. I could buy a 24V lithium charger for this set-up, but they are very expensive.

The next issue I was worried about is that I don’t have a Battery Management System (BMS) for this set-up. The people at Jaycar also said that the 12.8V 7Ah lithium deep cycle batteries have their own built-in BMS and that I wouldn’t need one. After researching online, apparently the built-in BMS in these batteries may not work when they are configured in series.

I am seeking feedback on this build as this is my first project I have done regarding a portable Bluetooth speaker. I understand that some of the components are excessive regarding the power running through the circuit. Here are a few points I'm particularly seeking feedback on:
· Circuit Design: Any suggestions for improving the efficiency or safety of the current circuitry?
· Battery Management: Ideas for charging the batteries while using the speakers at the same time.
· Sound Quality: Recommendations for enhancing audio quality, maybe through equalizer settings or additional components?

I've attached some photos of my setup and would appreciate your insights, critiques, and ideas for further improvements. If you've done something similar or have expertise in electronics and audio systems, your input would be valuable.

Attachments

  • 20240120_171026.jpg
    20240120_171026.jpg
    264 KB · Views: 348
  • 20240118_160425.jpg
    20240118_160425.jpg
    134.4 KB · Views: 337

USB Card Recap & MKP Bypass

So I think I'm finally ready for the asylum. I took my USB 3.0 card, recapped it with better electrolytics and bypassed them with 2.5% WIMA MKP 1nF on 220uF 16v. I had an identical card I replaced the stock (cheap) electrolytics with Tantalum, I was listening to that one for a while but always thought it wasn't as good as the plain electrolytic one. Now playing the electrolytic/WIMA MKP card, I seem to get more bass, maybe better channel separation and spatialized sound. What is it, am I nuts?

To bias, or not to bias?

This may be a stupid thing to bring up, but I just want some opinions. What do people here think about whether cathode biased amplifiers are "self biasing" or should be biased when changing brands of the same tube type. I have seen it both ways and done it both ways, but finding a real consensus and a real rule of thumb concerning it has eluded me, although I haven't really researched it much.

I just was reminded of it when looking at the schematic for the newer Kustom Defender 5, MOD version. It calls for a 270 Ohm resistor when using a Shuguang tube and a 220 Ohm resistor for a Sovtek tube. Do you all think the different tubes necessitate biasing? I stole the amp, unused for a song and haven't even plugged it in yet, but I have heard it's a pretty good little practice amp, and at least Kustom is nice enough to send one a diagram...so I checked it out.

What makes a good audio power transformer?

What makes a good audio transformer?

With the development of the chip amp, we are hearing some odd reports (ie: bigger and and more robust power supplies not sounding as good as ones less endowed) so...

What do we look for in an audio transformer and is what we look for different in a Class A amp or an amp that uses bias versus an amp that is operating completely Class B?

B&W 600i

Looking for replacement mid-bass drives, right one is rattling. Not original, they were replaced like 15 years ago, not sure if I have much trust that they were replaced with the most appropriate ones, internet market wasn't such a big thing at the time, and I remember driving a bit to the importer. (Monacor SPW-165/4).
Can't even remember if I threw away the old ones.
And thanks, first post here.

Attachments

  • Screenshot 2024-01-05 210643.jpg
    Screenshot 2024-01-05 210643.jpg
    71.2 KB · Views: 113

Order of in-series filters within the crossover

I designed the crossover network for my midrange driver (of a 4 way speaker) with a second order high pass filter (Capacitor plus inductor in parallel) followed by a first order low pass filter (simple inductor), followed by a resistor. All in series.

I assumed that the order of the 2 filters in series was not important. But when I switched their position (low pass filter first), I got different frequency and phase responses.

Is there a preferred order of the two filters for a midrange driver or is it only a question of taste?

I appreciate any advice.

Decades pass … Still use PV 22A

Haven't posted in a while. Here is my dilemma:
Still, after all of these years, I can't find a single driver that covers 600 to 14k better than an old aluminum Peavey 22A. The titanium version doesn't sound nearly as good (or measure as smooth either) I too find this hard to believe. I do need to keep this a 2 way. One must spend 400 to 1k per driver to find such a driver. Other than above tge 14.5 k I have no issues. I have been able DCX2496 myself all the crossover/eq that I need. Still like to do better high end reasonably. Have I missed a driver lately?
Thanks

Onkyo M-505 Recap Project

Hi again. I am going to replace all of the small electrolytics in my M-505 power amp as a few are leaking.

The main caps appear to be good, so I am not touching them for now.

I want you'all to take a look at the schematic and capacitor list and tell me which grade of cap you would put where if you were looking for a warm, fatigue free but transparent and totally balance sound with good soundstage and imaging.

The cap list is as follows:
2x 10uf 35v
2x 10uf 50v
1x 33uf 16v
4x 47uf 6.3v
2x 47uf 50v
4x 100uf 16v
4x 220uf 6.3v
1x 220uf 16v
4x 220 35v
1x 1000uf 16v

The amp has all Nichicon capacitors, so I will likely be sticking with those unless Elna Cerafine or Silmics will work better in a few places.

All capacitors must have low ESR and low impedance.

You can read more about the amp in question here: https://audio-database.com/ONKYO/amp/integram-505-e.html

Attachments

Replacement capacitors for Nakamichi PA-7II + CA-5II

Next week I will be picking up a Nakamichi PA-7II + CA-5II set, which I am planning to recap.

For the PA-7II power supply caps (4x33.000uF) I have found these:
https://www.it-tronics.de/en/screw-...-850c-e36d101hpn333mdb7u-d63-5x117mm-33000uf/

- Does this seem like a suitable replacement for the original ones?

For the smaller ones - limiter + amplifier PCBs in PA-7 and to replace the electrolytics in CA-5II - I was planning to use Nichicon audio grade, but sadly these don't seem to be available anymore.

- What should I be looking to use instead? I need something that is readily available from DigiKey.

Thanks already. Any help is much appreciated!!

bipolar (BJT) transistor families for audio power output stages

hallo everyone
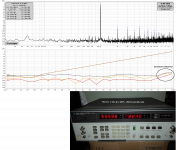
there are many technologies by manufacture to reach perfect data so as high linearity and transit frequency. The newest is "BiT-LA" (ST) and older versions are "M.E.T" (TOS), "LAPT" (Sanken), RET (FUJ) and EBT (NEC). I think, there are many more versions without especially abbrevation. Until this day I don't find a describtion about the advantages and the disadvantages between all this technologies. Perhaps one of you knows books or websites especially about this topic.
For me it is amazing, that the currently types of old motorola MJ series (e.g. MJ21193/MJ21194 without DC-SOA in data sheet) provides perfect sonic transmission by only 4 MHz ft. What is in real life the advantage for 10 times higher values of ft for audio power applications (possibly depending on whether the emitter follower or common emitter is used)?
In additional very helpful for me are to know the exactly titles of orig.data books and application notes from NEC and Fujitsu. Then I can order copies of this books by my tele rent library. Because the titles of all my own data books are very unspecifically (eg "power Devices" "discrete Power" "Bipolare Power" or "High Current Transistor"), I need the exact title of data book for order copies. Perhaps one of you knows orig. data books from NEC and Fujitsu between 1977 and 1987 about transistors for audio.
Thank you very much for your replies - I hope, you can understand my not perfect english

At follow a little overview from me about currently available so as no longer available BjT's for audio power amplifiers:

1) ST-Microelectronics "BiT-LA"
(bipolare junction transistor linear application - planar technology with an advanced base island layout)
http://www.st.com/stonline/products/families/transistors/power_bipolars/related_info/2stcxxx.htm (ST)
2ST5949/2ST2121 250V 17A 250W hfe: 35-160 25MHz TO-3/TO-204
2STC5200/2STA1943 230V 15A 150W hfe: 35-160 30MHz TO-264
2STC5949/2STA2121 250V 17A 220W hfe: 35-160 25MHz TO-264
2STC5948/2STA2120 250V 17A 200W hfe: 35-160 25MHz TO-3P
2STC4467/2STA1694 120V 8A 80W hfe: 70-140 20MHz TO-3P
2STC4468/2STA1695 140V 10A 100W hfe: 50-140 20MHz TO-3P
2STC2510/2STA2510 100V 25A 125W hfe: 40- 80 20MHz TO-3P
2STC5242/2STA1962 230V 15A 130W hfe: 35-160 30MHz TO-3P
2STW4466/2STW1693 80V 6A 60W hfe: 50-120 20MHz TO-247
2STW4468/2STW1695 140V 10A 100W hfe: 50-120 20MHz TO-247

2) TOKYO SHIBAURA ELECTRIC CO (Toshiba) "M.E.T"
Multi Emitter Transistor
http://www.semicon.toshiba.co.jp/eng/product/transistor/index.html
TO-3P(L) = TO-3P Large =TO264 TO-3P(N) = TO-3P (N=Normal)
2SA1939/2SC5196 80V 6A 60W hfe: 55-160 30MHzTO-3P(N)--
2SA1940/2SC5197 120V 8A 80W hfe: 55-160 30MHzTO-3P(N)--
2SA1941/2SC5198 140V 10A 100W hfe: 55-160 30MHz TO-3P(N)--
2SA1942/2SC5199 160V 12A 120W hfe: 55-160 30MHz TO-3P(L)--
2SA1943/2SC5200 230V 15A 150W hfe: 55-160 30MHz TO-3P(L)..
2SA1962/ 2SC5242 230V 15A 130W hfe: 55-160 30MHz TO-3P(N)..
2SA1986/2SC5358 230V 15A 150W hfe: 55-160 30MHz TO-3P(N)--
2SA1987/2SC5359 230V 15A 180W hfe: 55-160 30MHz TO-3P(L)--
2SA2120/2SC5948 200V 12A 200W hfe: 55-160 25MHz TO-3P(N)--
2SA2121/2SC5949 200V 15A 220W hfe: 55-160 25MHzTO-3P(L)--
2SA1302/2SC3281 old type, see MJW1302A/MJW3281A from onsemi
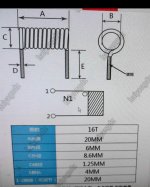
2SA1095/2SC2565 160V 15A 150W hfe: 40min 60MHz RM60 (34,3x16,3x5,3mm), old type, gr/bl
http://www.datasheetcatalog.net/de/datasheets_pdf/2/S/A/1/2SA1095.shtml
http://www.patentstorm.us/patents/4297597/description.html
http://www.patentstorm.us/patents/4339765/description.html
http://www.pat2pdf.org/ (4297597) and (4339765)

3) Fairchild - Toshiba
(also "M.E.T" = Multi Emitter Transistor ?)
www.fairchildsemi.com/ds/2S/2SC5200.pdf
http://www.fairchildsemi.com/pf/FJ/FJL4315.html
http://www.fairchildsemi.com/sitesearch/fsc.jsp?command=eq&attr1=AAAFamily&attr2=Power+BJT
FJL4215/FJL4315: see Toshiba 2SA1943/2SC5200
FJA4213//FJA4313 see Toshiba 2SA1962/ 2SC5242

4) a. ON (Single Emitter ? - I don't know)
http://www.onsemi.com/PowerSolutions/parametrics.do?id=796
MJ21195/MJ21196 250V 16A 250W hfe: 25-75 5MHz TO-3/TO-204
MJ21193/MJ21194 250V 16A 250W hfe: 25-75 5MHz TO-3/TO-204
MJL21195G/MJL21196G 250V 16A 200W hfe: 25-75 4MHz TO-3PBL (TO-264)
MJL21193G/MJL21194G 250V 16A 200W hfe: 25-75 4MHz TO-3PBL (TO-264)
MJW21195G/MJW21196G 250V 16A 200W hfe: 20-80 4MHz TO-247
MJW21193G/MJW21194G 250V 16A 200W hfe: 20-70 4MHz TO-247
NJW21193G/NJW21194G 250V 16A 200W hfe: 20-70 4MHz TO-3P
MJW21191G/MJW21192G 150V 8A 100W hfe: 15-100 4MHz TO-247
4) b. ON -Toshiba "M.E.T" = Multi Emitter Transistor
MJL1302A/MJL3281A 250V 16A 200W hfe: 75-150 30MHz TO-3PBL (TO-264)
MJL4302A/MJL4281A 350V 15A 230W hfe: 80-250 35MHz TO-3PBL (TO-264)
MJW1302A/MJW3281A 230V 15A 200W hfe: 50-200 30MHz TO-247
NJW1302A/NJW3281A 250V 15A 200W hfe: 75-150 30MHz TO-3P
NJW0302G/0281G 250V 15A 150W hfe: 75-150 30MHz TO-3P

5) Sanken "LAPT" (Large Area Parallel Transistor)
http://www.sanken-ele.co.jp/en/prod/semicon/ptr/ptr_u/ptr_01e.htm
2SA1380/2SC4886 150V 14A 80W hfe: 50min 50MHz TO-3PF (FM100)
2SA1186/2SC2837 150V 10A 100W hfe: 50min 60MHz TO-3P (MT100)
2SA1303/2SC3284 150V 14A 125W hfe: 50min 50MHz TO-3P (MT100)
2SA1386/2SC3519 160V 15A 130W hfe: 50min 40MHz TO-3P (MT100)
2SA1294/2SC3263 230V 15A 130W hfe: 50min 35MHz TO-3P (MT100)
2SA1215/2SC2921 160V 15A 150W hfe: 50min 50MHz MT200
2SA1216/2SC2922 180V 17A 200W hfe: 30min 40MHz MT200
2SA1295/2SC3264 230V 17A 200W hfe: 50min 35MHz MT200
2SA1494/2SC3858 200V 17A 200W hfe: 50min 20MHz MT200


6) Fujitsu "R.E.T." (Ringemitter Transistor) all types old
http://www.datasheetcatalog.net/de/datasheets_pdf/2/S/A/1/2SA1078.shtml (driver stage ft 140 MHz TO220)
2SA1003/2SC2323, TO-3 (no original Datasheet)
http://www.datasheetarchive.com/2SA1044-datasheet.html
2SA1043/2SC2433 120V 10A 150W hfe: 35-200 60MHz TO-3, old type
2SA1044/2SC2434 70V 10A 150W hfe: 35-200 60MHz TO-3, old type
www.classiccmp.org/rtellason/transdata/2sa1075.pdf
2SA1075/2SC2525 gr/bl 120V 12A 120W hfe: 60-200 60MHz RM60 (34,3x16,3x5,3mm), old type
2SA1076/2SC2526 gr/bl 120V 12A 120W hfe: 60-200 60MHz RM60 (34,3x16,3x5,3mm), old type
http://www.patentstorm.us/patents/5786622/description.html
http://www.pat2pdf.org/ 5786622

7) NEC E.B.T Transistor (Emitter Ballast Transistor) all types old
2SA1141/2SC2681 blue/bl 115V 10A 100W hfe: 60-200 80MHz similar TO247 (no orig. NEC datasheet)
http://www.alldatasheet.com/datasheet-pdf/pdf/107746/ETC/2SA1141.html (datasheet ETC clone)
http://www2s.biglobe.ne.jp/~ii_on/recycle2/tr1/img/DSC02881.JPG (Foto)
2SA1227/2SC2987 gr/bl 140V 12A 120W hfe: 60-320 50MHz similar TO247
2SA1227A/2SC2987A gr/bl 140V 12A 120W hfe: 60-320 50MHz similar TO247
http://www.datasheetcatalog.net/de/datasheets_pdf/2/S/A/1/2SA1227.shtml (only short form data)
http://www.niji.or.jp/home/k-nisi/a-10.html (used in integrated amp NEC A10)
http://homepage2.nifty.com/~mhitaste/audiotop/dcamp_parts/dc_ampparts010.html (supplier)
http://www.patentstorm.us/patents/6403436.html
http://www.pat2pdf.org/ 6403436

8) Matsushita/Panasonic MESA (RET, MET or EBT?) all types old
(outfit like Mesa table hill skyline Arizona)
2SA1064/2SC2488 150V 8A 100W hfe: 40-280 50MHz TO-3
2SA1065/2SC2489 150V 10A 120W hfe: 40-200 50MHz TO-3
http://www.datasheetcatalog.com/datasheets_pdf/2/S/A/1/2SA1065.shtml

5532 / 5534 op-amp alternatives ? switching out part...

Hi,

I have a streamer that uses the 5532 / 5534 (whichever part is single channel) in the output. What is a typically no hassles swap-out part for this op-amp? If you believe opamps have a "sound" then one that might sound a little warmer and smoother would be ideal.

a gentlemen on a forum put 1611 in place of it and said the improvement was worth it.

  • Locked
Miro AD1862 & JLSOUNDS i2soverUSB Stack

Sold

One set of Miro AD1862 DAC + JLSounds i2sOverUSB stack.
In my opinion, this is the most direct and best combo for the gem, AD1862.
Sounds wonderful. It is a full, completed DAC, opa1656 op amp on adapter board ( dual to two single) is included on board the IV stage. You can also use two single op amps of your own.
You need 5Vdc for the USB part of the JLSounds card ( wire installed), +5/-5V and +12/-12V directly to the DAC board.
Case it up with transformers, PSU, connectors and you are ready to rock and roll.
If you are wondering why I am selling this gem - I think some members here are aware that i usually buy enough parts to do up a few boards.
I am keeping one set for myself.

I am asking USD$290 for this DAC , and i will cover the worldwide registered shipping with tracking available.
I am only ready to accept Paypal Family and Friends as payment.
I have shipped 40 packages to US, UK , asia and Europe, not a single glitch so far.

More information of this DAC here :
https://www.diyaudio.com/community/threads/dac-ad1862-almost-tht-i2s-input-nos-r-2r.354078/
https://www.diyaudio.com/community/...s-input-nos-r-2r.354078/page-128#post-6836256

Attachments

  • 20240121_111334.jpg
    20240121_111334.jpg
    451.4 KB · Views: 275
  • 20240121_111516.jpg
    20240121_111516.jpg
    331.5 KB · Views: 258
  • 20240121_114048.jpg
    20240121_114048.jpg
    417.8 KB · Views: 250
  • Like
Reactions: Vunce

Which DHT tubes for an electrostatic tube amp?

Sorry if this is considered as cross posting, but I guess this specific question might get more feedback in the Tubes/Valves section than in the thread over in Headphone Systems.

I am in the process of designing a push-pull amplifier for electrostatic headphones using directly heated triodes (or triode strapped pentodes) in the output stage. The goal is to swing +/-650 Vpk at a bias of approx. 20 mA or so (+/-325 Vpk swing at each tube). See here for full details.

Which DHT tubes would fit the bill?

GU-81m tube amp schematics???

Hello,
Anyone have schematics for gU-81M?I have some tubes with sockets and i like to use them.I don't care if it will be hybrid or to drive it with a solid state amp to not use a lot of tubes.Just something simple to hear some watts of music from this tubes.I dont have experience with tube amps.But have the experiencfe with the high killing voltages from other projects.
Any help please?

Thank you
George

Long-term hobbies

I have been thinking about my hobbies over the past half century.

My initial interest was electronics, in particular, audio electronics. Audio was a great way to learn about electronics. However, improvements in audio are subject to diminishing returns. Once one reaches that point, one stops (usually).

Computer hardware design has been another great hobby (as well as a profession). It was within reach of a hobbyist in the 1970s and early 1980s, but hasn't been a practical hobby for a long time.

That leaves computer programming. Software is unbounded in the scope of the problems that it solves. Programming has been an enduring hobby because it is both practical and has no limits on creativity.

What do you think? Do you guys have other long-term creative hobbies?
Ed

For Sale Monolith Magnetics Chokes, PT and OPT

Hi everyone,

I am selling my Monolith Magnetics PS chokes, power transformers and output transformers. The following are available. Spec sheets attached.

All products are in excellent condition. Minor scuffs on the power transformers. Further photos available upon request.

These were purchased in June 2020.

SX-11 NANO output transformer, primary 5K, 4/8/16. (Quantity 2)

C65/10H130 power supply chokes (130mA, 10H) (Quantity 4)

MC20290 mains power transformers see attached for specs (Quantity 2)

Individual part types can be sold separately, but best pricing is for the full lot. Either way is fine.

At the time of purchase, I spend $4800 for all products listed above. I have paid receipts available.

Taking reasonable offers, please no low balls. FOB from zip code 17404 in the United States.


The MC20290 is AVAILABLE
The SX-11 Nano is sold

Attachments

  • IMG_0251.JPG
    IMG_0251.JPG
    405 KB · Views: 388
  • IMG_0253.JPG
    IMG_0253.JPG
    451.4 KB · Views: 377
  • Screen Shot 2022-07-21 at 6.27.40 PM.png
    Screen Shot 2022-07-21 at 6.27.40 PM.png
    85.4 KB · Views: 401
  • Screen Shot 2022-07-21 at 6.27.34 PM.png
    Screen Shot 2022-07-21 at 6.27.34 PM.png
    3.5 MB · Views: 440

Are there commercial available Amplifiers with optimized Snubber Network on Secondary Winding of its Power (Mains) Transformer ?

After reading the thread under
https://www.diyaudio.com/community/...rmer-snubber-using-quasimodo-test-jig.243100/
and further information concerning the steps for correct designing of a snubber network (for remove any ring-ring and RF stuff on the secondary side of transformer) under
https://github.com/analoghifi/Transformer-Snubber/blob/main/docs/related/Power Tips Calculate an R-C snubber in seven steps.pdf
and
https://github.com/analoghifi/Transformer-Snubber/blob/main/docs/related/Soft Recovery Diodes Lower Transformer Ringing by 10-20X.pdf
I wonder, why I don't find such snubber networks in commercial amplifier devices.

In most cases there are to find only a bridge rectifier (sometimes realized by single diodes) and big electrolytic capacitors for provide the necessary peak current.

In the attachment you will find any circuit extracts of different snubber versions from various vintage amp models, but all without the necessary RC network (i. e. without a capacitor with resistor in serial connection).

Was this completely unknown at those days, that such snubber networks on power transformer as described in the above mentioned URLs are important for better SNR (as I know, the capacitors connected in parallel to the bridge rectifier diodes are always helpful to get a better SNR for AM - i.e. LW-MW-SW - reception without the typical rattling) ?

Is it possible that these snubber networks are often not necessary due to a special design of the power transformer ?

Thank you very much for comments.

Attachments

  • NAD 216 snubber.png
    NAD 216 snubber.png
    102.3 KB · Views: 136
  • Braun Regie 550 snubber.png
    Braun Regie 550 snubber.png
    400 KB · Views: 123
  • Braun Regie 450 snubber.png
    Braun Regie 450 snubber.png
    84.4 KB · Views: 112
  • Braun Regie 350 snubber.png
    Braun Regie 350 snubber.png
    282.7 KB · Views: 121
  • TFK TRX2000 Snubber.png
    TFK TRX2000 Snubber.png
    160.6 KB · Views: 118
  • SABA 9240 Snubber.png
    SABA 9240 Snubber.png
    370 KB · Views: 107
  • Braun Cockpit 250 snubber.png
    Braun Cockpit 250 snubber.png
    100.8 KB · Views: 110
  • Accuphase E206 snubber.png
    Accuphase E206 snubber.png
    234.1 KB · Views: 115
  • Braun Regie 501 Snubber.png
    Braun Regie 501 Snubber.png
    332.4 KB · Views: 106
  • B&O Beocenter 8500+9500 snubber.png
    B&O Beocenter 8500+9500 snubber.png
    147.4 KB · Views: 97
  • Grundig RTV500 snubber.png
    Grundig RTV500 snubber.png
    395.2 KB · Views: 108
  • Snubber Optimizer.png
    Snubber Optimizer.png
    26.4 KB · Views: 111
  • snubber network for power transformer.pdf
    snubber network for power transformer.pdf
    1.3 MB · Views: 91
  • Quasimodo_V4_TH_photo.jpg
    Quasimodo_V4_TH_photo.jpg
    173.2 KB · Views: 122
  • snubber network design - Quasimodo_jig_revA.pdf
    snubber network design - Quasimodo_jig_revA.pdf
    817.4 KB · Views: 65

For Sale Single Ended Output Transformer

FS: 1 pair of Onetics level 1 for 45 output transformer never used from my personal stock. Asking $300.00

1 pair edcor CXSE 5k:8 ohm 25 watt output transformer. Never used. Asking $230.00

PT built by heyboer 650VCT @ 200ma, 6.3v 2A, 6.3v 2A with dual primary for 120v/240v. Asking $100.00

I accept paypal and will be shipped from Chicago.

Thank you

Attachments

  • EA7AA5C3-4FE2-45AC-ACE9-F5323F800B8E.jpeg
    EA7AA5C3-4FE2-45AC-ACE9-F5323F800B8E.jpeg
    630.8 KB · Views: 100
  • 95CAA2B2-77A1-4616-A777-04F77491D576.jpeg
    95CAA2B2-77A1-4616-A777-04F77491D576.jpeg
    528.3 KB · Views: 102
  • B288CF2B-A329-426F-8940-D49C9080F3BC.jpeg
    B288CF2B-A329-426F-8940-D49C9080F3BC.jpeg
    380.1 KB · Views: 100
  • 5454E725-EEAC-4F09-B0C4-FC2F9A162A53.jpeg
    5454E725-EEAC-4F09-B0C4-FC2F9A162A53.jpeg
    418 KB · Views: 88
  • 5363811D-7569-41AC-808F-307B4607D61F.jpeg
    5363811D-7569-41AC-808F-307B4607D61F.jpeg
    443.2 KB · Views: 85
  • 11667343-3DB6-40DA-BCA3-11A3C67611F6.jpeg
    11667343-3DB6-40DA-BCA3-11A3C67611F6.jpeg
    457 KB · Views: 95

DIY 768 kHz 3x8b segmented current mode R-2R DAC module

Hello,

This is my recent project I still work on. It's current-mode R-2R DAC module with 0,1% resistors, but with fairly good results (see below).

24-bit resistor network is divided into three 8-bit segments, with fine-tunable reference voltage for lower two segments, in order to get best linearity with used resistors.


It doesn't have any programmable parts, just regular components that anyone can buy and solder on PCB.


For my prototype I use I2SoverUSB as digital interface. I2S lines are connected to DAC board, and output is filtered analog signal with 2 Vrms full scale output.


At first, I made just board with digital logic for ladder driving, resistor ladder, I/V converter, and low-pass filter, (picture bellow). But, it showed up that sample and hold circuit is required for deglitching, so I made it as additional smaller board.


This is how it looks:
attachment.php


attachment.php


attachment.php


And this is what i get:

Left channel THD:
attachment.php


Right channel THD:
attachment.php

96 kHz signal at 768 kHz sample rate, at S/H circuit output

attachment.php


At low-pass filter output:

attachment.php


2nd order 40 kHz Butterworth filter
12 kHz square wave signal, at low-pass filter output
attachment.php


Complete schematic is not a secret, but it's still a work-in-progress

Attachments

  • IMG_20201227_095832.jpg
    IMG_20201227_095832.jpg
    690.7 KB · Views: 3,695
  • IMG_20210211_063338.jpg
    IMG_20210211_063338.jpg
    627 KB · Views: 2,890
  • IMG_20210220_155105_2.jpg
    IMG_20210220_155105_2.jpg
    599.9 KB · Views: 2,941
  • L_thd_all.png
    L_thd_all.png
    744.8 KB · Views: 2,783
  • R_thd_all.png
    R_thd_all.png
    743.4 KB · Views: 2,731
  • 96khz_na_768khz_sh-out.png
    96khz_na_768khz_sh-out.png
    7 KB · Views: 2,793
  • 96khz_na_768khz_lpf-out.png
    96khz_na_768khz_lpf-out.png
    6.5 KB · Views: 2,769
  • 12khz_lpf.png
    12khz_lpf.png
    7.2 KB · Views: 2,721
  • Like
Reactions: inyashd and eplpwr

Another MEH, but with a little cardioid action...

So this has been a 10+ year project in the making. Kids, moving and other hobbies got in the way but it's back now.

The long and short of it is as follows,

12" dayton horn with 2 sb10pgc21-4 drivers and a sb26 Tweeter per side.
The enclosure is egg shaped, sort of and will have active cardioid dispersion via a single side vented vifa ne265 driver. How you ask? More details to come but I think it's a unique configuration, at least one I have never seen before. Driver mounting plates cut out of aluminium and hot glued on.

20230218_152020.jpg
20230218_152027.jpg
Ready to fill the gaps with construction adhesive, i bought the wrong one but it seems to be sticking ok.
20230218_152032.jpg
20230218_155210.jpg
Horn has been dampened with rubber base tile glue, its a rough job and im not proud but it will be fixed, sort of..Next pics are a jig i used to cut the throat to height and the drivers mocked up in position. I modified the tweter faceplate and am about to glue it to the horn. It will still just guve me access to remove the tweeter if need be.
20230224_101825.jpg
20230224_101820.jpg
20230224_101838.jpg

Attachments

  • 20230223_170500.jpg
    20230223_170500.jpg
    391.8 KB · Views: 150

Kikad custom edgecuts - howto?

Hi everyone.

I've designed a small power amp, and now its time to make the pcb.
I decided that I do not want to use any brackets for the outputs. Instead I want to have cuts into the pcb where the leads of the outputs go.
While trying to do that, I run into a problem.

Maybe one of you has the answer to this, or a better way to do it?

First of all, I use Kicad 7.0.

Trying to make these cuts, i created small rectangles on the edgecut layer and placed these between the output leads.
This seems to work at first. Then I add the remaining edgecut, and when I close the gap the smaller onces, Kicad closes the cuts behind the outputs.
One the first image one can see some of the smaller rectangles, and the bigger one. When I close the gap, something goes wrong.
One image 3, one can see what I am trying to do.
Image 4 shows what happens when I close the edgecut gap.

What am I doing wrong? Now thinking about make a custom footprint with long pads, and just use a normal edgecut rectangle that cuts through it.

Regards
Jørgen

Attachments

  • Edgecuts 0.png
    Edgecuts 0.png
    13 KB · Views: 211
  • Edgecuts 1.png
    Edgecuts 1.png
    45.5 KB · Views: 121
  • Edgecuts 2.png
    Edgecuts 2.png
    48.1 KB · Views: 106
  • Edgecuts 4.png
    Edgecuts 4.png
    32.3 KB · Views: 111

Linn Forum is permanently closed - who have save all the Threads arround the LP12 ?

Unfortunately this forum was not just closed temporarily - go to
Linn — Forum Announcement
Is the official Linn Forum closed for maintenance?- Vinyl Engine
and
The Linn forum is officially dead -
It is not clear for me, why access to the previous information and threads was denied.

Additional I note, nothing was archived under
Linn Forums
Linn Forums

Maybe there are other internet archives organisations like
https://web.archive.org
or one of the members have save all articles.

Thank you for advices.

Should an adjustable L-Pad act the same as resistors with same value?

For a little background, I'm building an active, multi-way speaker, and I'm using pro audio coaxial speakers for mids and highs.

I want to knock down the sensitivity of the horns. They have a sensitivity of 107db.

To this end I bought adjustable L-Pads from Parts Express (the 100watt version) to quickly gauge how much of a reduction I need. I decided -10db is the point where I stop noticing the amp hiss from the seating position. (It's still audible close to the speaker, but it's in the acceptable range.)

The adjustable L-pad is rated to -10dB and 8ohms. I measured resistance values and used an L-Pad reverse calculator to confirm that it was a reduction of 10dB.

Then I bought resistors for the same -10dB reduction @ 8ohms. That's 5.8ohms series and 3.7ohms parallel. I wired them up, but they don't give the same reduction as the adjustable L-Pad.

The adjustable L-Pad set to -10db is 8ohms series, 8 ohms parallel. So I used a combination of resistors to match the 8 ohms for parallel and series. But it still doesn't match the adjustable L-Pad. (I did measure the resistors individually, and they are correct.)

When the values of the adjustable L-pad and the resistors is the same, the adjustable is significantly quieter in terms of hiss. To make the adjustable match the resistors, I set it to what should be -7db.

I guess I'll leave it there. Any ideas about why the adjustable L-pad reduces hiss more than resistors of the same value? And how do I get the reduction of hiss I'm looking for without using the adjustable units? I don't want them to be adjustable in the finished speaker.

Kicker DXA250-4 Protect

I'm working on this amp that appears to have a bad channel, the amp powers up but it cycles power and never completely builds rail voltage.

Thermal camera shows one pair of output transistors (Q303/309) getting slightly warm when the amp tries to power on, all of the others are cold.

Measuring the components for that channel and comparing it to the others, I find that Q301, Q310 (mbsa06/56) read <20kOhms across emitter and collector - I remove them and my transistor tester show acceptable values. With Q301 and Q310 removed and measuring the same points, it still reads <20kOhms. The other 3 channels read >200kOhm for those two parts.

I've checked the remaining components for that channel and they all compare close to the other channels. Any suggestions on what to check next?

Attachments

  • IMG_1530.JPG
    IMG_1530.JPG
    658.4 KB · Views: 93
  • IMG_1529.JPG
    IMG_1529.JPG
    797.5 KB · Views: 88
  • IMG_1527.JPG
    IMG_1527.JPG
    707.8 KB · Views: 100

Linn and 3rd party Upgrades for all Generations of LINN's LP-12 (LP12) turntables and Diy Clones - Overview wanted

A small overview here:

Various Parts
https://expert.ripcaster.co.uk/index.html
https://www.missinglinkcables.co.uk/vinyl-passion-turntables
https://milnerton.southafricanlisted.com/audio-video/linn-sondek-lp12-parts_1253444.html
Preowned Parts
https://lp12bits.com/products/linn-lp12-fluted-plinth-preowned-ref-004578
https://lp12bits.com
Tonarm Board/Subchassis One Piece
https://www.ebay.com/str/herculesmoselp12upgarde?_trksid=p4429486.m145687.l149086
Enhancement Kit with Stage 2 Mods
http://srm-tech.co.uk/epages/4c0089...923-2265-416e-a207-cc9dd8b06028/Products/LEK2
Ultimate Enhancement Kit with Silent Base
http://srm-tech.co.uk/epages/4c0089...23-2265-416e-a207-cc9dd8b06028/Products/ULEK1
Serene-upgrades (Armboard, Subchassis Plinth, Subchassis Crossbrase, Top-Plate; Soprano Full Set: €6,288.75)
https://stackaudio.co.uk/serene-lp12-upgrades/ (formerly http_wtpaudio_co.uk)
https://www.audioalternative.com/linn-lp-12-upgrades/
https://the-ear.net/how-to/stack-audio-serene-lp12-upgrade/ (review)
https://theaudiophileman.com/serene-linn-upgrade-kit-from-stack-audio/ (review)
https://theaudiophileman.com/wtp-serene-linn-sondek-lp12-news/ (review)
https://www.stereonet.com/uk/news/russ-andrews-now-has-stacks-of-lp12-parts (review)
Radically new, low-mass rigid Sub-Chassis and ARM board design ( Funk Vector Link)
http://tecsart.com/en/brands/the-funk-firm/products/1/the-funk-vector-link-upgrade-lp-12.html
https://web.archive.org/web/20080216232158/http://www.thefunkfirm.co.uk/V_Link.htm
https://www.enjoythemusic.com/superioraudio/equipment/0808/funk_vector_link.htm (review)
KAROUSEL Bearing
https://blog.audiot.co.uk/blog/tag/Linn+Sondek+LP12
Mober Bearing
https://www.feicuixigua.com/archive...Turntable-Bearing-Design/0s2baagdccaff9g.html
https://www.stamfordaudio.co.uk/product-page/mober-bearing-crossbrace-for-linn-lp12
https://hifi-unlimited.blogspot.com/2021/10/more-mober-for-linn-sondek-lp12.html (review)
https://www.enjoythemusic.com/magaz...rgistic_Research_Record_Weight_Mat_Review.htm (listening tests)
Karousel- vs. Mober-Bearing
https://www.hifiwigwam.com/threads/...ring-with-mober-stainless-sub-platter.103775/
Line-Up of six Plinth Variants from first launched
https://pinkfishmedia.net/forum/threads/lp12-plinth-extravaganza.110447/
Plinth
https://lovemalamk.live/product_details/69655787.html
SkeletaLinn (Skeleta-Subchassis)
https://www.stereonet.com/forums/topic/72075-skeletalinn-v2/

But I think, there are a lot of other suppliers of interesting upgrades. Thank you for posting further companies.

P.S.: also of interest:
Clone Linn LP12 (large amount of images)
https://www.dddac.com/otherprojects_dd12.html
URL Collection for Diy versions
https://www.diyaudio.com/community/...art-suppliers-bearing-spindle-platter.390368/
Setup Manual from Linn and exploded views
http://ukhhsoc.torrens.org/makers/Linn/LP12/Setup_Manual.pdf
https://community.naimaudio.com/t/anatomy-of-an-lp12/1477?page=2

Plate amplifier Imax

Hi, I use the Linkwitz closed-box Excel sheet to design a bass speaker. Thing is, for that sheet I need an estimate of Imax for the Dayton SPA300-D plate amplifier I’m looking at. I wonder if the rough estimate below is correct.

SPA300-D, Class D, 300W into 4 ohms, no info available on rail voltages, current limits etc.

Given 300W into 4 ohms I get 34V (P=V^2/R)

This in turn give me about 24V RMS (34V*0.7)

Given 300W and 24V RMS I get about 12A (P=I*V)

Is 12A the Imax I should enter in the closed-box sheet? I remember Linkwitz saying somewhere that Imax is higher than the continuous power limit, perhaps as much as twice that.

HP 204 Oscillator Issues - Help!

I have two Oscillators, an HP204C and an HP204D.
..
The HP 204C has issues with the Main 300uF Capacitor (at least I think it is 300uF - it is so bad I can hardly tell what it is - but I can make out what looks like 300uF and I believe it is a 6VDC Cap). This cap is on the Power Board, not the Main Oscillator Board. I bought this off the eBay waistland. Seller said it was untested (but did not tell me they had been inside and pried the cover off because one of the screws was broken off. Also did not tell me they broke two of the NICAD Battery Terminals.. Still, I am going to fabricate new terminals out of Brass stock. My main issue is the set screws on the Frequency Dial seem to be stripped - or they are not Hex capable (and Torx Bits do not work either). Does anyone know what size and type of set screws are used on the HP204C?
..
Second Oscillator seems fine inside, but the Frequencies are nowhere near what the dial says they should be. This oscillator also has set screws that will not loosen. Maybe it is because I am using Hex Bits and not the correct ones. Once again, I need to know what the correct size bits and type so I can figure out what size drill bit to use to drill them out. If I get too large a bit I run the risk of screwing up the hole threads... if I get too small, well small bits break more readily, that and too small a bit will result in a screw carcass that cannot be forced out after drilling..
..
I tried downloading copies of the service manual - no help they just give an HP Part number for the dial and no info on what tools are required (so picking the wrench from a non existent tools list is not gonna happen).
..
Such a quandry. I would really like to get these up and running. Help - please (pretty please).
..
I tried calling my associate in Macon, Georgia (he is near the Macon Airport, just north of WR AFB. His phone is no longer valid ( makes sense since I haven't talked with him in 12 years). He was my Go To Guy for HP parts - His Warehouse was a 300,000 Sq Foot barn chock full of HP stuff. I now live in Phoenix, Arizona - that and my Aircraft is in Depot Repair so simply popping down to Georgia is not gonna happen either. If I find a good number for my associate I will surely post it here later (everyone can use an HP Parts Source.)

...
My associate here in Phoenix is Jay Hoyl, but he does not have HP parts anymore. His son does not subscribe to seniors mentality that HP parts should be saved on scrapped fear... Oh well - I seem o be striking out everywhere...
..
Still... Help....

For Sale The SuperCables CookBook First Edition by Allen Wright published by Vacuum State Electronics

I have a copy of The SuperCables CookBook by Allen Wright First Edition published by Vacuum State Electronics which I no longer have use for and am looking to sell. It is in very clean condition, with no annotation inside and perfectly bound on original ring binder. The front and back covers have light marking on them. I am attaching images of the book. VSE are no longer in business, so here's a good opportunity to buy this excellent and informative guide to making audio cables, which I have done successfully using the book myself. I live in London, UK and would prefer postage to UK. Price £40 + postage.

Attachments

  • IMG_5432.jpg
    IMG_5432.jpg
    389.6 KB · Views: 151
  • IMG_5433.jpg
    IMG_5433.jpg
    498.2 KB · Views: 136
  • IMG_5434.jpg
    IMG_5434.jpg
    445.7 KB · Views: 140
  • IMG_5435.jpg
    IMG_5435.jpg
    499.2 KB · Views: 169

For Sale Advance notice of a garage sale

Recently I've come to the realisation that I have collected far too many bits and drivers and I'm simply not going to live long enough to use all of them.
And also I'm pretty happy with what I've already built
Local sale only as shipping anywhere is simply not cost effective.
Most drivers are new in box or unused. Some lightly used, some in need of repair [ new surrounds] Manly old-school Vifa, but many Jaycar drivers from when the stock was OK, including a lot suitable for OB use.
Sale in a few months or so
I'll put the cash received into a cruise for my beloved on the new Cunard Queen Victoria

Mac Sonoma 14.2 problems - also Office 2021 instal

I am using an iMac (2020) 27" Retina 3.3GHz with a 1Tetra HD. and loaded and installed the Sonoma update a week or so before Christmas and intended to install MS Office 2021.

However I have had nothing but problems! 😡

1) WEB. I was unable to post on any programme (Safari 17.2.1) until today - other than 'like' button use on some ADIY posts. My broadband service is British Telecom.
2) Many (approx 50%) emails have been lost and I have not been able to send any other than locally! These two have cleared today but I have lost very many mails.
3) I do NOT wish to use iCloud yet cannot seem to get rid of that most annoying message which appears on the top right of the screen. If I delete the message two further
screens appear and need to be closed - at which the first message reappears!!!

Any ideas on solving any of these problems?

Having always been a Mac user I find that the current software is no longer easy to use and appears to be more interested in linking to iPads, watches and phones than in providing
a sensible work station. I have 4 old desktop Macs in the garage and 2 cinema screens - I may be driven to using one!

Reforming electrolytic capacitors

How to reform electrolytic capacitors, several years without power mine mono blocks consisting of 16 caps of 47.000uF 100V, a couple of days ago fired again the monos and listened the typical sound of backfire at the loudspeakers.

I looked information at the web & at diyaudio but nothing unclear how to proceed.

TIA for help.

N.B. the real VDC in circuit is 55V (wrong) IS 32VAC SO AFTER THE RECT. WILL BE 45VDC APROX.

The Potential of CBT for Low-Frequency Sound Reproduction in Rooms

Hey All,
I've been diving deep into the world of speaker design and bass response. Have you ever wondered why horns and larger speakers seem to have more "impact" than smaller ones, even when the SPL is the same? Let's unravel this together!

Currently, I'm working on designing a 40-400Hz woofer for my unity-based horn setup, and I've been experimenting with a ripple tank simulator (check it out here: https://www.falstad.com/ripple/) to simulate low-frequency room interactions and different configurations.

What I've noticed is that regardless of the subwoofer type, a single point source in the corner generates an initial wave followed by the entire room being excited. This leads to room modes dominating the sound we hear. However, when using multiple point sources across the room, I observed the excitement of every room mode, showcasing the complexity of bass propagation.

Screenshot from 2024-01-20 14-23-46.png
Screenshot from 2024-01-20 12-59-36.png


Now, let's investigate dipoles with baffle. They seem to produce a constant wave until they intersect, creating room-mode-like ripples.

Screenshot from 2024-01-20 13-55-38.png


But what if we replace that with a larger, continuous radiating source, like a wide-mouth horn? The result is a more directional sound wave along the wall, possibly explaining the "dynamic" sound of bass horns.
Screenshot from 2024-01-20 11-20-43.png


By angling the horns toward the listening position, interference can occur in the middle.
Screenshot from 2024-01-20 13-48-23.png


However, placing them further into the room, where the physical size of the horn positions the exit more towards the center, the direct waves seem to still dominate over room reflections. Note that this effect is particularly noticeable in the listening position in the center of the room.
Screenshot from 2024-01-20 13-51-40.png


(continued)

Attachments

  • Screenshot from 2024-01-20 11-17-55.png
    Screenshot from 2024-01-20 11-17-55.png
    190.3 KB · Views: 61
  • Screenshot from 2024-01-20 13-48-23.png
    Screenshot from 2024-01-20 13-48-23.png
    169.2 KB · Views: 60
  • Screenshot from 2024-01-20 13-05-08.png
    Screenshot from 2024-01-20 13-05-08.png
    209.5 KB · Views: 77

Shure A15BT on a guitar cable

Hi,

I was given a Shure A15BT, which is used to adapt impedance. https://pubs.shure.com/guide/A15BT/en-US?_gl=1*d0cy6h*_gcl_au*MTM3NTE4MDEyMy4xNzA1NjM4NzEy

With 2 XLR(M & F) to 1/4 TS cables, I built a guitar cable with it.

With the 7500 ohm side coming from the guitar and an overdrive pedal, and the 33,000 ohm side going into the Guitar amp, it sounded louder and with more presence.

The overdrive pedal has a 1k output impedance.

In order to better understand what is happening, id like to ask: am I raising the impedance of the guitar pedal output or lowering the impedance of the guitar amp? Both or neither?

Any initial tips would be useful for me to further investigate, and see how I could best use this item.

Thank you

Baffle Step vs Driver Efficiency

Curious if anyone here has threaded the needle with this. Use these drivers for example...

2: 8 ohm, 86 dB efficient woofers wired in parallel (should make them 92 dB).
1: 8 ohm midrange, 87 dB

Essentially in this configuration there would be 92 dB of efficiency from the combined woofers, paired with 87 dB efficient midrange.

Seems like this would be a bass heavy mess until baffle step loss is considered. I know how baffle step loss works, it's generally 6 dB, but that's not static, it starts at roughly 1khz and ends up 6 dB down near roughly 80 Hz.

My question is... Once baffle step loss is considered, do you guys think that 87 dB mid will work with the 92 dB woofer configuration, crossed at 350 to 400 Hz?

Also pertinent... Lets assume we won't do a 3.5 way xover, keep it a 3 way to get an easier answer.

Scanspeak D3404 and Aurum Cantus AST2560

My current speakers, shown Here have the D3404 tweeters. They are good for the frequency they cover but they start diving down at 10k and really drop like a stone at 14k. (Close mic’d) As you can imagine they have a laidback sound quite rolled off in the highs. I’ve ordered some aurum cantus ast2560 aero striction tweeters to play around with to see if I can use it as a super tweeter crossed over at around 12 or 14k. Anyone have experience with this AMT adding it as a super tweeter? As you can tell my speakers do not have room to place it next to the other tweeter so my first thought is to add it on the side of the speaker (in a dipole) toward the back angled out to the first reflection point to disperse it enough so it is not competing with the main tweeter but more of a background fill firing out and back… thoughts? They will be here in a few days.

FS: Fostex FE126NV, Fostex FF165WK, Lot of many drivers Dayton Visaton Etc.

Selling the following units:

2 Individual Fostex FF165WK 6.5" Full Range Drivers New $40 and $50: www.ebay.com/itm/276294825998 // www.ebay.com/itm/276294826697

1 Pair of Fostex FE126NV 4.5" Drivers New $60: https://www.ebay.com/itm/276294847247

Lot of many high premium speaker drivers Dayton, Visaton, etc. Mostly New $1 starting bid: https://www.ebay.com/itm/276293479786

Is there a simple way to determine the frequency response of a microphone?

Hi all,

my name is Detlef from Germany and I hope to find help here, although I'm not sure if I'm in the right place.

I'm working on a project (hobby) that involves determining the audio characteristics of a historical base station microphone (Turner+3, CB radio/HAM radio) and reproducing them with current electronic components.

The idea is to feed the microphone with a suitable sweep or noise signal via a loudspeaker that is as linear as possible and then carry out an FFT analysis with my oscilloscope on the microphone capsule and the preamplifier stages. I'm not interested in dB-accurate measurements, but rather in visualising the filter characteristics of the individual stages as an approximation.

Firstly, I tried to find the most linear loudspeaker in my inventory. I used a USB measurement microphone (UMM-6) on my laptop, REW and my best speaker. As expected, the linearity result was not optimal.

The next step is to optimise the linearity. Here I thought the possibilities of the REW equaliser module would be a good way to generate a correction file for a software DSP. CamillaDSP seemed to be a good choice as a DSP....

Unfortunately, the two applications REW and CamillaDSP seem very complex to me at this point at the latest, so that I cannot see any usable result due to the unmanageable abundance of parameters to be set.

I would therefore like to ask you to give me a little help. A much simpler solution would be best, which unfortunately I have not yet discovered.

Thank you in advance.

Best regards

Detlef


(Translated with DeepL)

Off the shelf or hand made inductor

Hello,
I would greatly appreciate some help or advice determining the size of inductor L1. (see schematic)

This schematic is for a Bryston 3B-SST amplifier, main board. This is what the BOM listed for L1: enameled wire, 1.6-1.8mm. I contacted the seller for more information and they provided me with these specifications. (see image)

From the information provided I believe I could make the inductor (have never made one before) or is there a way to determine the inductance to buy an off the shelf inductor?

I’ve done some research on making an inductor coil and it doesn’t look too be to difficult.

So, should I make it? And if so, is there anything they left out, from your experience, that would prevent me from making a suitable inductor?

Thank you for your time, Mark

Attachments

  • IMG_0291.jpeg
    IMG_0291.jpeg
    261.7 KB · Views: 103
  • IMG_0288.jpeg
    IMG_0288.jpeg
    160.9 KB · Views: 106

Newbie questions: what's behind an expensive DACs + how to implement a tube in it

Hello everybody,

I've recently bought a Topping E50 to be used in a second system, while keeping my old Musical Fidelity VDACii.
The E50 is very different, transparent, clean, wider... there's more of everything, except some musicality on mids that the VDACii has.

My question is:
I don't have the possibility to buy not even try DACs above 1000 euros, but I would like to understand: what makes them so expensive?
What is the plus thay can give compared to cheaper ones? Distortion numbers are impressively low even for those cheaper DACs.

Second part of the question is:
I would like to build a USB-only DAC, buying boards for the digital part, and then implement a tube preamp/buffer for it.
Everything in the same case. What would be your suggestions? What is the state of the art for the DIY? FPGAs?

Thanks in advance,

Kind Regards

Roberto

NOS, Oversampling... and now Hybrid(?)

This is not another debate about NOS Vs oversampling (OS) so please don't let it become a reason to have this thread closed. At some point I had to try NOS out of curiosity and next step was to find a way to cure its disadvantages when playing at 44,1kHz sampling rate, i.e. high frequency roll off and aliasing byproducts. I have very little to do with digital theory so I tried something different. Compared to what has been posted in this forum, this one is caveman's technology.😱 Hopefully, I'm not wasting your time with something that isn't at least amusing...

The idea is very simple. I made a sketch to demonstrate it. Suppose these are frequency response graphs. The first from top is a NOS DAC (red) and the next is an OS (green). The sketch is rough omitting details for convenience. Both need to be in phase and then are fed to a differential amp. At the output we should get the blue graph which is a copy of the ultrasonic images together with the difference between NOS and OS. Then this is mixed with another NOS in opposite phase from the original. The final outcome (pink) is a mix of NOS and OS. But since we already started from the green why should take all this twist? Call it diy fever. Certainly subjective affair... NOS has something that is pointless to determine yet ruined by the SinX/X function. Whether this method works is another story. If it is, the hybrid output should be filtered, equalized and reconstructed while retaining the properties of NOS. Is that the impulse response or anything else?

Anyway, to make it work it requires a DAC that gives NOS and OS outputs time aligned and a differential amp with sufficient CMRR at high frequencies. I built something based on DDDAC for the NOS part and another DAC with PCM1794 working in OS mode. Some very simplistic measurements suggest that the outputs are time aligned. It seems to me that the digital filter introduces a delay that it is restored by the phase registers in the DDDAC but I can't tell for sure. For the diff amp I used an INA https://www.analog.com/media/en/technical-documentation/data-sheets/AD8129_8130.pdf which by contrast with typical INAs has very good CMRR in the ultrasonic region. THD is not the best but it gets better when the signal is lower that 500mV which is the case here. I put it all together according to the schematic attached.

Seems to work for starters... It is delivering nice sound! But I guess this is not what you need to know. I tried to measure it with very limited equipment, basically a soundcard. Still far from being properly evaluated. Continued in next post.

Attachments

  • NOS Filter.JPG
    NOS Filter.JPG
    118.5 KB · Views: 597
  • Filter Schematic.JPG
    Filter Schematic.JPG
    138.7 KB · Views: 590
  • Like
Reactions: analog_sa

Low impedance danger of bass filters

Hi Thanks for reading I've seen a few three-way speakers that use 400-500uf shunting caps in the bass filter.
IE A second order crossover comprising of large series inductor and a parallel connected 400-500uf capacitor.
Why does this large capacitor not damage the amplifier because of low impedance dangers?
The average reactance of a 400uf capacitor at 400hz is about one ohm, add that to the one ohm or so reactance of the inductor and you have a reactance of about 2 ohms, a possible low impedance danger ?

For Sale project DAC TDA1541 with tube output

Due to the fact that I have to many unfinished projects, I want to sell one complete project DAC TDA1541A with tube output.

What is included:
- DAC PCB with TDA1541A and all components (very good quality WIMA, Elna, Lelon etc.) needed to use it with SPDIF RCA input. The DAC can be delivered in non-oversampling mode or with SAA7220 (buyer decide on this);
- complete PCB for tube output
- one pair of NOS tubes 6N2P-EV;
- two power transformers 220v only (one for DAC and one for tube output).

In this stage you need to find an enclosure to finish the project. The DAC was tested and it sounds fantastic due to the tube output.

The price is 200 USD + transport 25 USD. We can use paypal for payment.

I am sending only in European Union.

For any details, please ask.

IMG_0909.jpg


IMG_0910.jpg
  • Like
Reactions: kb2wyl

Valve preamp identify

Hi.

I recently get valve preamp with point to point connections and I cant figure out which valves been used there . Socket is 9ba but filament and high voltage are on different pins then for example 12ax7 . Psu give 170v dc and 6.3v dc but is adjustable and going for over 300v dc with pot . I've build few amps , preamps solid states , but never did anything with tubes and I'm interested to give a try . According to parts been used there it should be good preamp .I've drawed circutry but not sure I've did it right 🙂
If anyboby know that circut please advice .

Attachments

  • IMG_20231126_121753_084.jpg
    IMG_20231126_121753_084.jpg
    446.9 KB · Views: 292
  • IMG_20231126_121716_217.jpg
    IMG_20231126_121716_217.jpg
    371.6 KB · Views: 284
  • valve preamp.png
    valve preamp.png
    18.8 KB · Views: 289

1988 Amp with 0.150 vDC offset (150mV)

Should I just give up?
I've been trying to figure out why the dc offset is so high on this old amp, it's on both channels.
Things I've done:
Closely matched the LTP c1815's and the a949's. I have a few NOS of these so they are not the fakes.
All resistors are 1% and very close match, of course except R8,15,16,17.
All electro caps are new and are Panasonics or Elna.
The Finals are good.
The bias I have it at 20 or 25 mA
It plays music OK.
Only thing I can think of trying is replacing R7 (1.5k) with a 2k multi turn pot and try to adjust it for 0dc offset.
The last few days I've been reading just about everything on LTP, current mirrors, VAS...Ugh.
I figured I draw the schematic and maybe someone can see something I'm missing and before I try the multi turn pot idea.
Please be as harsh or as nice as you want... I can take it...
Scott

Attachments

  • 1988 Amp.jpg
    1988 Amp.jpg
    166.4 KB · Views: 389

Mini speaker using SPK Audio F02A-4 (2" full-range)

I build several mini speakers, but this F02A is the end of the line.
It does not produce heavy bass, but I adjusted it to emphasize the bass feeling.
PVC sheets and wallpaper were used for the finishing.
Mini size is also interesting.

HB-05F-ML-12.jpg


[ Air-Recording ]
Ballad of the runaway horse / Jennifer Warnes
Login to view embedded media
[ Air-Recording ]
The Morning Lies Heavy / Allan Taylor
Login to view embedded media

Attachments

  • HB-05F-ML-02.jpg
    HB-05F-ML-02.jpg
    150.2 KB · Views: 145
  • F02A+HB05F-ML-02.jpg
    F02A+HB05F-ML-02.jpg
    106 KB · Views: 158
  • HB-05F-ML-07.jpg
    HB-05F-ML-07.jpg
    84.6 KB · Views: 169
  • HB-05F-ML-08.jpg
    HB-05F-ML-08.jpg
    124 KB · Views: 149

CD tray moves reluctantly and its not the belt

I had a number of CD players where the tray didn't consistently open/closes.
Usually once it moves it will do its job but to get started in/out it needs a little kick.
The CD tray moves manually pretty stiffly even after lubricating.
I don't see any wear or tear.
The tray belt is not slipping and works properly (tried anyway different new ones but same issue).
Could the reason be the tray motor even though it moves once its in motion ?
Or is there a way to give it more power ? It looks like there is not enough torque.

FM antenna design

I'm trying to get better reception and build my own antenna. I've tried out a square full wave loop design I made out of some copper wire and a prebuilt dipole I picked up at the local electronics store to try it out. FM radio gets similar quality signal with or without dipole or square antenna, with just the coax connector on the radio without the antenna. I’m wondering why thats happening. Its an older model Radio Shack with the 300 ohm connector on the back for the vhf/uhf coaxial adapter. My goal is to try to pickup some of the weaker FM stations in Toronto.

How have you guys measured your reception strength? Has anyone else out there experimented with this by trying different antennas or receivers? What worked best for you?
Projects by fanatics, for fanatics
Get answers and advice for everyone wanting to learn the art of audio.
Join the Community
507,639
Members
7,882,073
Messages

Filter

Forum Statistics

Threads
405,939
Messages
7,882,073
Members
507,639
Latest member
xwiggen