Amplifier loses stability on loading

Hello everyone!

I decided to design a 30W RMS 2 channel amplifier using smd components for the input,the vas, the driver stage and the mje15028/29 bjts for the class ab output stage. For the input stage transistors i have used the dual bjt in package transistors BC847/57BS, the bc847/57 for the vas, and the BCX53/56 transistors for the driver stage. I have set the gain to 27db and the miller cap to 120p. Tail current is set to around 2mA and the vas current to around 6mA. I have set the vbe multiplier to around 1V at the point before output transistors start conducting. Pi filters at the rails, the resistors are shorted because i didnt have the component on hand but no big deal.

I have soldered all the component by hand, and i have measured the current source resistors and they seem to be within spec. I also have soldered 2 boards to see if i have made a soldering mistake but the same issue.

The issue that i have is that when the output is not loaded the amplifier is outputting a nice and clean signal and within spec. Once i add a resistive load at the output , even a 100omhs resistors the amp loses stability and starts oscilating.

I also noticed that when signal is 0 and i have a load connected i have a stable few milivolts noise each second. Noted!

What i have tested:
1) tried to slightly increase the miller cap. no noticeable difference.
2) i have disoldered the output bjts and drive the output with the drivers as i can do that and see if it is mje issue. no difference.
3) applied load directly at output resistors to see if its feedback or an output trace inductance issue. no difference
4) i have added 100p caps by hand between output and various nodes. no difference.

I am struggling to find the issue for days and i have soldered/disoldered to test different stuff, so that's why the board looks like frankenstein!

Anyway, i have attached scope meaurements, pcb layout/schematic.
If i have made an obvious mistake or you have encountered a similar instability issue it would realy help me.

Thanks in advance!

Best regards
Patsaoglou P. GR

Attachments

  • pcb.PNG
    pcb.PNG
    42.8 KB · Views: 182
  • sch.PNG
    sch.PNG
    22.8 KB · Views: 174
  • 20240131_161255.jpg
    20240131_161255.jpg
    348.8 KB · Views: 175
  • 20240131_160523.jpg
    20240131_160523.jpg
    609.2 KB · Views: 118
  • 20240131_160452.jpg
    20240131_160452.jpg
    334.6 KB · Views: 113
  • 20240131_160231.jpg
    20240131_160231.jpg
    367 KB · Views: 112
  • 20240131_160209.jpg
    20240131_160209.jpg
    679.9 KB · Views: 114

A new S.L.O.B. is in the making

After being radically inspired by X’s design, the XSD, I began looking at ways to lightly tweak the build and appearance. I set out and ordered the 16 woofers and started running them in in my garage while I waited for the weather to improve so I could start the woofer base slot build…..MDF is terrible stuff and has been banned from the workshop unless cut outside.

So I checked on the drivers again and the measured FS is still much higher than the spec. When manually exercising the cone and surround it’s apparent that these are just really stiff little pistons. I’ve been at this sport for a few decades now and for all the cost value savings and the design complexity….well…..I just can’t see using them for a home hifi application. Yes, the slot will attenuate the distortion but nothing can account for the slug like operation. These will be repurposed for something else….too expensive to ship them back and not a lot invested to begin with…….a pair of box loaded bass arrays for the garage/workshop maybe…..who knows.

On to the topic……X’s design XO obviously won’t work with a different woofer so I’m going to have to build on his excellent platform and take what experience I can to move in my own direction. DSP will have to be the end solution here. In keeping with sizing of the XSD, I’m fortunate to have a little more baffle width to play with so the change will start with 4 12” woofers instead of 8 6.5s. Overall height is maintained with a slightly wider and deeper baffle. Cost goes up though overall……but so does bass extension and efficiency using these

https://www.parts-express.com/Dayton-Audio-SD315A-88-12-DVC-Subwoofer-295-488?quantity=1

4 in series/parallel will result in close to 98db 2.83 so a very easy bass array to drive.

Reducing distortion in an Onkyo A-5 power amp by 35dB(!)

Hi, jpc2001 here. You may remember me from such threads as Stabilizing the TA7136P-based preamp in an Onkyo A-5.

This A-5 integrated is a gift that keeps on giving. Not only can you turn its preamp into a world beater with a few cheap parts, you can do the same for the power amp.

Here's the schematic and stability plots for this mod. It features:
  • Hugely improved stability. The factory design has quite bad phase margins, like 25 degrees.
  • Hugely reduced distortion. The factory design is good for a -65 or -70dB distortion floor, with the worst case coming at larger amplitude outputs. The revised design is better than 100dB at all levels, when driving 4 ohms.
  • Not that much cutting and drilling is needed. The biggest change here is the EF2 output becomes an EF3. The factory left unpopulated pads for caps across the drivers' base and collectors. We can use these for 2 out of the 3 terminals of a predriver.
The result sounds great -- super detailed yet not at all forward; higher frequencies are perhaps understated a bit. Maybe balanced really is beautiful? It reminds me of the schematics of some McIntosh amps: the MC402 is similar. Though the use of TPC here, and the Mac's use of a degenerated input stage, are differences. Other than that, they're almost the same. (Shh, don't mention the missing 355 watts per channel.)

It's surprising to get this level of performance without the use of a current mirror load for the IPS, and without a buffered or cascoded VAS.

I'll review the changes in more detail in the comments.

Attachments

  • a5_stability.png
    a5_stability.png
    36.3 KB · Views: 335
  • a5_mods.png
    a5_mods.png
    36.8 KB · Views: 394
  • Like
Reactions: nfsgame

Interested in Valves

Hi,

So I am interested in having a hi-fi valve amp, but don't know that much particularly about the subject, I do have a couple of guitar valve amps and definitely appreciate the difference in the warmth of the sound they put out.

From what I can see hi-fi valve amps are very expensive. I am not opposed to a kit if it was significantly cheaper, I have built guitar effects pedals in the past so have some electronics construction abilities. I have never touched surface mount though, only through hole components, and cannot design circuits, just copy diagrams.

I've noticed some hybrid amps available that describe the valves being used as input buffers, what does this actually mean? I assume it's not that the preamp stage is valve like with many hybrid guitar amps? Would an amp with valve input buffers and the rest solid state still have a much warmer sound than an all solid state device?

Can anyone suggest any reasonably priced but good sounding amps/kits? I've seen some Chinese made valve amps that are very competitively priced, are these good amps or to be avoided, or are there any brands, models that are particularly good?

Anyway thanks in anticipation of any help that anyone can give me.

Cheers

Owen

Combining 3 sound systems to make one big stereo system, how to wire

Hi All,

First time on the forum. I have been searching the web to find the solution to a problem I have but have not found a definitive answer and hoping someone as the knowledge to steer me in the right direction.. it's probably a very simple one and i may already have the answer but want to check before I waste my money or worse burn something out.

I have a standard 2 channel Class D receiver (Aiyima A07 pro) which drives a pair of floor standing speakers in stereo. The receiver has a jack socket line out and I would like to use this line out to feed an additional two self contained stereo 2.1 active speaker boxes/units that I have built (each has a 2.1 class D receiver with left and right woofers and a sub).

I want to wire it so that one of these unit plays only the left channel and the other only the right channel and in effect make one large stereo system with stereo bass. Can anyone suggest the best way to connect the line out (jack stereo) from the master receiver so that the only the left output channel is given to both left and right input channels of one of the slave receivers (which has stereo jack input but would effectively only play one channel through all drivers) and only the right output channel to both left and right input channels of the other slave receivers (which also has stereo jack input).

I have attached and annotated picture to help describe the desired setup. (also a picture of the finished setup... though only one of the slave boxes is pictured in this photo)

Can you simply take the left channel output from the master receiver, split it, and then feed it to both the left and right channels on the (left) slave receiver (and same for the right channel to the right slave receiver) or is it more complicated than that?

I'm sure this is a very weird illogical setup (if only used in this configuration) but I have it this way because both of the salve speaker boxes can also be battery powered and I sometime detach them from the system and take them to off grid places to play mini sound system sessions.

thanks in advance

Attachments

  • diagram.png
    diagram.png
    1.2 MB · Views: 87
  • IMG20240118175526.jpg
    IMG20240118175526.jpg
    371 KB · Views: 70

Dohmann Helix Mk I Power Supply and Motor

The power supply and motor were removed from my Dohmann Helix by Mark Dohmann when it was recently upgraded from a MK I to a MK II. The power supply case, internal parts are all in excellent cosmetic and operational condition thought the motor will need to be rewired.

These would make a fantastic addition to a DIY project.

Asking $500 OBO for the lot plus shipping.

Payment by wire or PP F&F.


Here are links to the motor drive and motor.

Delta ASD-B2-2023-B AC Servo Drive 01.01 ASDA-B2

https://www.deltaacdrives.com/Delta-ASDA-B2-User-Manual.pdf

DELTA Servo Motors ECMA-C20401RS

Attachments

  • IMG_4353.jpeg
    IMG_4353.jpeg
    370.6 KB · Views: 169
  • IMG_4346.jpeg
    IMG_4346.jpeg
    311.7 KB · Views: 161
  • IMG_4351.jpeg
    IMG_4351.jpeg
    246.4 KB · Views: 157
  • IMG_4347.jpeg
    IMG_4347.jpeg
    377.8 KB · Views: 158
  • IMG_4345.jpeg
    IMG_4345.jpeg
    359.8 KB · Views: 157
  • IMG_4348.jpeg
    IMG_4348.jpeg
    397.1 KB · Views: 152
  • IMG_4349.jpeg
    IMG_4349.jpeg
    308.7 KB · Views: 163

audio out from desktop computer or back of TV

It seemed like in the 60s and before, if you had an amplifier, it needed a preamp and the preamp input usually came from a turntable or casette deck or radio. Now days, everything is "integrated" and I have been trying to take the audio from either my TV or my desktop computer and use it as input to my guitar amp or my old Kenwood receiver, but from time to time, they cut out and/or fade in volume or both and then get scratchy and sound is choppy or all of the above. Not always, but sometimes and I dont want it sometimes at all.
Is the audio signal from my desktop computer or TV enough to be considered "preamp" out?

E1T decade scaler tubes

Anyone here interested in some E1T tubes?
The E1T is a remarkable tube. In the first place it is a miniature cathode ray tube with a Pierce electron gun, two deflection plates and a fluorescent screen. When the voltage on the deflection plates is varied, the electron beam scans over the fluorescent screen lighting one of the green windows next to the numbers. But it is more than just an indicator device such as a nixie or numitron tube. The E1T is not only an indicator, it is also a counter! Without the need for external active components it can count pulses at a rate up to 40 kHz, while counting rates up to 1 MHz have been demonstrated under laboratory conditions. So in modern day language the tube contains a memory of 3.5 bits. The memory is realized in a very clever way. The Philips Researchers placed a screen with slotted apertures in the path of the electron beam just in front of the fluorescent screen. When the beam passes a slot, one of the numbers is illuminated, though only very little current flows though the aperture. However, when the beam hits the screen in between two slots, the full bundle current is now carried by the screen. With a simple feedback circuit this current is used to adjust the voltage on the deflection plates so that the beam stays “locked” in one of the slot positions. By applying a short AC pulse of well defined amplitude to one of the deflection plates, the beam is forced to the next stable position. All in all a very clever construction, but not an easy one to manufacture.

Attachments

  • 20240127_172638.jpg
    20240127_172638.jpg
    282.4 KB · Views: 75
  • 20240127_172328.jpg
    20240127_172328.jpg
    408.5 KB · Views: 60

Wondom JAB3+ Input overload

Hello,

This is my first DIY project. I picked up the Wondom JAB3+, ICP5 programmer, etc. and I have had success connecting with SigmaStudio.

I have a problem with the board and volume. When I test using the supplied volume POT, and I turn the volume up to max, the board appears to overload, causes a red error light to come on and sends an awful "chirp" to the speaker before locking up entirely. I have to power cycle, then the board is back to running normally.

Has anyone had that experience? Is there something I can do in SigmaStudio to catch this before it happens? I understand the concept of a compressor and even set up a test program with one at the tail end of the workflow. The problem I am running into with the compressor is that the loudest volumes sound awful and I can hear the compressor kick in and out.

I've thought of putting in a dB reducer at the input side, but that just makes the top level volume too low.

Do I have a faulty board? Do I have to make changes in SigmaStudio? Anyone else have similar issues and was able to resolve?

Thanks,
Joe

NAD 7020 Stubborn repair

Hi members,decided to reach-out as I am "hitting a wall" with the repair of a NAD 7020 amplifier section.
This is the second version with the separate boards via connector.
Here is a summary:

Disclaimer: someone was previously messing around with this unit, so I got it non functional:
  • Entire unit has been recapped.
  • Tuner section and preamplifier are now working fine.
  • Voltages on power supply are within specs.
  • Amplifier driving stage not sure if working properly.
  • Previously the output stage transistors were all shorted, they have been replaced with 2N3055G & MJ2955G (epitaxial).
  • The BD139 have been replaced with 2SC2690A.
Now the bad part: I powered-up slowly using a variac to attempt to set the BIAS and DC Offset. Both are showing unrealistic figures as you turn the voltage up slowly. Note: I am aware of the differences between original Hometaxial devices and modern epitaxial, for that reason I have cut the emitter traces and added emitter resistors (0.33 ohm 3 watt), then cut the collector trace and added 1 ohm resistor. I have disconnected the phono board, the MPX, the soft-clipping circuit to try isolate the problem, but nothing changed. I have now decided to connect with you solid state experts, thanks

Attachments

Hammond 374BX wiring question

I can read schematics, no problem figuring out how to wire this for 120VAC input, getting 375 per leg out into rectifier, 5 VAC for rectifier filament, 6.3 VAC for input tube heaters.

Question is, what to do with all the REST of the wires.

I’d like to clear out all the excess spaghetti from inside my amp build (Skunkie Designs 300b SE) and was thinking about trimming all unused wiring back into the transformer case, putting on some heat-shrink tubing and just running leads I need.

Any other ideas (that do NOT involve buying a 274BX)?

I bought this as it was on Stephe’s BOM and other folks recommended it over the EDCOR (which Stephe eventually replaced as it shorted out), now I have the upper plate of my amp drilled to fit the 374 and don’t want to spend the money/lose the money for the smaller transformer and less wiring.

Thanks in advance.

Norm

Hartke HA5500

have this amp for repair. switches off after a 15min operation.

Output offset is about 2.2V, weakly adjustable with the offset pot. so any speaker connected draws DC current, heating up the sink.
The fan near the transformer was mounted reversed, so it drew air out of the cabinet, instead of blowing in, as the heatsink blower blows the air out.

the input pair has only a beta of 35, and that is far to small for the bias resistors and the 4mA collector current. Will try the NTE 2696 suggested as a replacement for the 2SC3200.
These transistors measured 502 and 565 beta. keep ya posted...

My fear is that in overload the input BE diode is zenering clipping resulting in beta degradation.

Marantz PM-15S2 faint right channel crackle

Very recently I acquired closed back headphones that revealed a problem with my 11-12 year old amp, a Marantz PM-15S2.

Day one of the new headphones revealed nothing out of the ordinary.
Day two I noticed faint hiss in the right channel.
Day three, the hiss had changed into a continous crackle of which I made a recording and attached the result here. The following days, the crackle has remained unchanged.

I have done some eliminating already, but will leave the results of that for a later post. First I'd like to present you the sound I am hearing.

There was quite some processing needed to present you with something you would be able to hear without straining your ears. So please note that this sound is very faint in reality, but once you know about it, it will be very noticeable during low and silent parts in the music.

Any feedback and insights are welcome!

Attachments

PA5 Power Supply

Really like the performance of the PA5, while sounding extremely clean it does have a bit of thinness in the midrange. Inspired by PA5 modification thread, I decided to try a little power supply tinkering on my recently acquired PA5 to see if sonic improvements could be made at low to moderate cost with simple, tried and true mods. First, let me say this is all done using a simple multimeter, soldering iron and my ears--no scope or APx analyzer, basically subjective. Unlike most amplifiers the power supply is separate with a fairly long (1m?) umbilical cord consisting of 2-wire 18AWG stranded wire. My first thought was to shorten the umbilical to lessen its added resistance in the power supply to the amp. I shortened it about 50% with a slight improvement in lower midrange solidity (worth doing). Next step was to replace the umbilical with one made of 14AWG UPOCC stranded copper using the same connector at the amp. This was a very nice improvement overall with a fuller sound--improved lower midrange fullness and punch (worth doing as I already had the wire). Sound is now quite good and I could easily have stopped right here.
Thought about replacing the connector at the amp end with a lower impedance one but there is not much room. If you want to try this, maybe get a small diameter connector that protrudes out from the chassis instead of inside.

Higher cost improvements: Next I wanted to add some very low ESR 50V or 63V caps (bypassed with WIMA polys) to the power supply output to improve the sound and this requires a larger box for the power supply. Found an easy to drill ABS box on Amazon for $10. Caps can be found on Amazon like these or even better some like these. I usually buy 10 to get a better price each and use them all in parallel for even better overall ESR. You will also need connection for DC and for AC. I like these. Had some 16 gauge tin plated copper buss wire on hand and wired it up. Another real nice sonic improvement that gives you that fuller lower midrange along with the superb transparency. But the cost is going up.

Even higher cost improvements: As you can see in the PA5 Modification thread there are some subjectively higher quality, higher current switching 36V supplies that could be used with the PA5. I first tried a Mean Well RPS-400-36 ($100), very well made and a good reputation in the DYI community. Put it in my ABS box and off I go. While the stock PA5 supply is 38V (mine was 38.25V) you can adjust the Mean Well (MW) up to 37.5V so output was close. Sonic performance was good, about the equal to the stock supply. For me it almost was a keeper as it provided a bit for confidence in longevity vs. the stock supply which looks from visual inspection to be built to a lower standard. problem was the Mean Well produced a high frequency whine heard from the speakers. It could only be heard from about 12" away, but I knew this would not sit well with me over time as the stock supply is dead quiet. Back goes the MW, so next I tried the 36V Recom Power switcher at 37.3V output. While physically smaller than the MW, this one has the transparency of the stock supply all the way down through a full midrange and is dead quiet. So definitely a keeper and costs less than the MW. Quite happy with the sound/performance. But what about a nice linear supply?

Even higher cost improvements: Had an empty power supply chassis sitting around that would be perfect for a very hefty 400W linear power supply. Nothing special simple design using a 28V Antek transformer, bridge rectified along with some low ESR caps on the output similar to the switcher mods. Output ended up being 39.3V (under load) which is little higher than the switchers but within safe use margin. On first listen I reduced the volume by 1 dB for a similar perspective as to what I had been recently hearing. Only been powering the PA5 a couple days, but first impression is sounds very similar to the Recom but maybe, just maybe it has slightly more body while providing a more analog feeling. May just be bias listening. Will give it some time and go back to the Recom to confirm or deny.

P.S.--I also have this switcher on order for comparison. Will stop then as project funds are currently depleted.

You will of course notice I have not mentioned bass performance. This is because I crossover my KEF LS50 Metas to servo-subs between 100-200Hz. My system is all digital files from PC to a Holo DAC upsampling with HQ Player.

I did not expect to start a thread so I didn't take any pix along the way. At the urging of member "daniboun" I have started this thread to see if anyone else had interest in this fun. If anything seems unclear--just ask.

Chris H.

First Build

Hey team,

First time builder and first time poster! I have come up with a basic set of designs that I think might work to create a two way passive speaker system and was wanting to get some feedback. I fear I may have missed some glaring and obvious issues but would really appreciate the communities help in making this project work! I have attached a rough draft of the speaker design plans, however I also had a few questions.

1. Amplifier choice? what power and ohm should I be looking at based on my design?

2. Resistors are rated for 10 W, does this effect the amplifier choice?

3. Does the complex crossover design add a significant change in resistance due to the larger number of components? should I try to calculate and determine how this will effect the output?

4. One driver is rated for 8ohm and the other 4ohm, with the crossover design will this be alright?

5. Winding inductors? is this the best cost effective solution?

6. My Port length is longer than my box length, can I fold it in on itself and create a port with the same width and volume as the theoretical port length and cross section would have?

Many thanks,

Attachments

Cannot get any pre-amp to work

Hello, I have a Music Hall MMF-1.5 and it has a pre amp. When trying to add any external pre amp, I get major distortion and inaudible music. I am deactivating the TT pre amp by selecting LINE (not Phono) and I'm plugging the pre amp into a line input (CF) on AVR (NOT PHONO). When using my TT pre amp and plugging into the Phono input on my AVR, sound is good, no distortion, no humming.

Amy ideas?

Hi from Italy!

Hello everyone,

I'm a new member from Italy. From Venice area, for anyone interested.

I'm new to the diy audio world, but after suddenly discovering "sound systems" some time ago, I've encoutered this forum more and more while doing some research, so it makes sense to stop lurking and at least show myself as a member of this forum.

I am currently trying for the first time to use WinISD to design a box (I've built a couple of boxes starting from the available plans before) and, while the internet is full of information about box design, I am very indecisive, so I will make a post regarding that topic in order to clear my head, hopefully.

Have a good evening,
Dan
  • Like
Reactions: audiosteve

Any upgrades for Amp Camp V1.2 ?

Many years ago when this amp v1.2 was made available , I succesfully put together a kit and have enjoyed it immensley since then . Just recently I checked and adjusted the bias ( it was still within limits but tweeked it a bit) and I wondered if there are mods to this initial version that would sonically improve its performance. I really dont understand the "workings" of this amp but I am capable of putting things together and so having said that I welcome your input. Regards
Paul

Boyuurange A50 300B Review + Mods Series

One of my viewers offered to drop ship one of these made in china HiFi 300B amplifiers me to review and make a DIY video series on how to modify them to improve the sound and power output. Given this popular amp uses the same basic schematic I found to be problematic on my own DIY 300B build, I suspect it will respond well to the same changes I made to my own build.

I haven't see anyone do a real technical review on these, just a "I plugged it into my system as a solid state amplifier user and it sounds like XYZ" kind of thing, so I hope this will be informative and helpful for folks that either own one or plan to buy one.

The first video is a basic unboxing, and I will be adding more content as I test and dive into this thing!

Boyuurange A50 Tube Amp Unboxing + Full Review - YouTube

Another SJEP Giveaway

It's been a minute since I gave anything away, so I figured this would be a nice way to close out the first month of the year. As mentioned in past posts, I'm grateful for all of the goodness and generosity that happens daily in the Pass forum. This giveaway is just a small way to say thank you to everyone for sharing your knowledge, projects, time, energy and kindness.

Giveaway:
1 pair SJEP120R100 (used, but work perfectly)

Rules and conditions:
One entry per person (obvious, but worth saying). I'll pay for the shipping. As long as USPS will ship to your country/address, you meet the criteria. Ideally these would go to someone who hasn't had the good fortune of acquiring Semisouth parts, but ultimately I don't care – if you'll use them, sign up.

How it'll work:
To enter, just copy the list of entrants, paste into a new comment, add your DIYA username to the bottom of that list and post. In 48 hours or so, I'll make a comment saying that entries are closed. I'll take the final list of entrants, paste them into an online randomizer, and the name that appears in the top (#1) position will be the winner. From there, that person simply needs to PM me their mailing address and I'll get them posted.

UPDATE: DIYA member steve jones has generously offered to pitch in a pair of NOS unsoldered SJEP120R125s for a second winner! So, from the randomized list of entrants I generate on/around 12:00pm EST 28 JAN, the first name to appear will receive my pair of SJEP120R100 and the last name will receive Steve Jones' pair of SJEP120R125.

(amended to include a pic of Steve's Semisouth pair)


Good luck!

Attachments

  • IMG_3782.jpg
    IMG_3782.jpg
    376.1 KB · Views: 311
  • steve-jones-ss.jpeg
    steve-jones-ss.jpeg
    565.8 KB · Views: 254

For Sale Panasonic CD-4 Strain Gauge Cartridge Head Amp (System Disc Demodulator)

This is the head amp - or preamp if you prefer – you will need for Panasonic Strain Gauge Cartridge, the most common model being the EPC 451C. The legendary Panasonic Strain Gauge cartridges sound incredible, but unless you have the CD-4 or a custom made amp you can’t use them. Most of the CD-4 units you’ll find out there are good for parts or really in bad shape, maybe they’ll power up. NOT THIS ONE. It’s been bench-tested by an experienced audio engineer. I’ve been using it and it sounds great with my EPC 451C. Price is firm. Buyer pays shipping and Paypal fees.

Price: $249.00
20230813_125653.jpg
20230813_125336.jpg
20230813_125323.jpg

New approach to amplifier protection

I am trying to figure out a new way to protect my amplifiers. The old VI limiting always adds non linearities to the signal as it approaches the limit, or even much earlier in some cases, which is very undesirable in my mind, or ears. While I’m sure someone else has already tried this, Id really like to figure this out.


My solution works great at removing the non-linearities and still protects the amplifier (sort of) but the trip point is kind of slow (1 or 2 ms) and the current reaches 60 amps before the protection cuts off the signal. Mind you the test I did is all on Multisim not real world, but I’m building it now.


What I’d like to know is if this is a dead-end path? I just need to figure out some way to cut off the signal earlier, or I could double up the output devices. IDK any suggestions would be awesome.

Attachments

Slot loaded TL?

I originally planned to construct slot loaded open baffle bass arrays with 5 pairs of 8" drivers per side. Due to new room constraints- I won't be able to place them 3' from the wall. I wonder if something like the sketch below would work- kind a slot loaded TL or ripole with the openings at the ends instead of at the rear. I would use 5 pairs stacked with the slot in the middle and the ends open at 90degrees to the slot. Any thoughts or comments on the viability of something like this? Thanks in advance.
slot loaded tl?.jpg

need help on picking caps Nichcion UKZ or Panasonic

im looking for 10uf 25v caps

the nichicon ukz look good but there only 1000h at 85c

where Panasonic are about 3000h at 105c

i have heard that the nichicon's are the better sound quality
but Panasonic looks to have a better lasting life

i also might change theme to 50v if they fit

this is used to replace most caps in arcam alpha 6 there a lot of 100uf caps with different voltages from 25 to 100v i have went nichicon for the 100v so should i just go nichion for all of it?

Mark Levinson No. 335 - Dead output channel

Hello,

This ML-335 has been dead (one output channel) for a while and the mountainous task of sending it off to get repaired, left it sitting in a box for may year. But I want my amp back! My brother encouraged me to open it up and see if we can find what's up.
Note: This unit had a channel go out ( don't recall which side ) within the first year I had it ( bought new ) and it was repaired under warranty; early 2000's - let's say 20 years ago.
And, before I go any further: I am not an electronics expert. I have a Fluke multi-meter and a soldering iron and have repaired things over time; nothing this complicated.

Back to this week: 2023-09-20.
When I opened the top up, things looked a little dusty ( 18 years of use ) and something jumped out immediately ( picture ). I have been scouring the internet to find information via google and happen'd upon this forum, you guys seem to know things ;-) .

Screenshot from 2023-09-20 11-31-44.png


Question:
Do any of you know what part this is?

There seem to be other one's that look (size, color, labeling) the same but, I cannot assume they are the same. I have been unable to find this component on the schema shared in other posts - i.e. seeking help.


ML335 2023-09-20 11-38-48.png


Thoughts, advice?


Additional images: Left channel (on the right viewed from the back)

ML335 2023-09-20 11-34-12.png


Other components seem fine, although you can see they have endured some heat over time.
ML335 2023-09-20 11-39-29.png


Regards and thank you,
Erik

Audio Innovations Alto

Wanted...Help with schematics/service manual or bias current setting.

Despite hours of searching I can find nothing on the web about the Audio Innovations Alto, there's only the odd passing comment even on this site.

I bought one not working and on inspection found previous repair bodging that had damaged a number of pcb tracks and very bad soldering where new transistors had been installed + some wrong equivalents. Anyway cut a long story short - fixed all that re-wiring tracks as necessary, replaced all the caps etc and got it running and sounding OK.

Problem is I can find no information about setting the bias and normal procedures for what I presume is a fairly standard class B design don't seem to be working. There are two trimmers per channel and I would normally expect one to control DC offset and one bias current. The amp runs ok and doesn't get too warm if I leave them as found but that gives output offsets of 200 and 500mv ish. Adjusting the trimmers will get that down to near zero but then the output transistors get very hot, very quickly and Collector current is climbing indicating runaway.

Only unusual design feature I've noticed is 3 (i think) signal diodes arranged in a sandwich between pcb and output transistor heatsink. N.B. Each transistor has separate board mounted sink with bias transistors attached. What's that about?

Can anyone help, does anyone have one of these amps they can take some measurements off. There may yet be something else wrong I haven't located yet.

Thanks.

VituixCAD issue with enclosure design

Hello and thanks for this great piece of software. However, I am having a couple of issues with the enclosure designer.
1. When I add a driver, enter all of the specs that I have and then click on the button to the left of the "Calculate T/S" button, a popup tells me most of those entries are missing!
2. In the driver configuration drop down, whether I enter 1 or 2 drivers, the box measurement results are the same although the graphs do change.
Could someone please tell me what is wrong.
Thanks
Peter

flat cone vs concave cone

Concave cones are currently the most common for speakers such as subwoofers, woofers and midranges, but what would be the advantages of a midrange or woofer with a flat cone?

At least, I think flat cone midranges have better sound distribution and phase response.
As for subwoofers, I think the shape is not important, as due to wavelengths and frequency response, phase issues and sound distribution would be affected by other issues, but now structurally the shape starts to be important, as different shapes contain different ways of distributing the force applied at the center of the cone.
And about the woofers, depending on the diameter, weight of the cone and the frequencies that will be reproduced, questions about the shape of the cone will be more important, as it will be reproducing both the bass, the mid-bass and the mid-range.
  • Like
Reactions: Ixnay

Basic Advice on Enclosure Requested

Hello,

Because of an upgrade from a 2TD, I have 2 crossovers and 2 LD25K drivers from CSS. Rather than the MTM, I was thinking of buying two midwoofers (LDW7) and building a ported bookshelf speaker (one midwoofer, one tweeter each). I have built a couple of speakers from kits but have no idea about designing an enclosure. In looking around I found the speaker box enclosure calculator on this site, entered the Vas, Fs, Qts and it spit out .9 cubic feet with a 7 inch long 2 inch port. My newbie ask is if there is advice about dimensions and locations in order to put all three holes (2 drivers and port) on the front. Thanks.

Dynavox LW6004PMR first impressions

Available at PE for About $70 odd, this is not a cheap driver.

I saw it a few times but never found any user input for the driver. Lots of people asking about it but no real feedback, so here I am with the first "subjective" impressions:

1) Build Quality: Pretty solid build. This is one heavy 6.5" driver with a realitvely small magnet (in terms of weight of magnet vs basket). The weird thing is that the fit and finish are not what you expect from a $70 driver... Paint overflow is evident in a few places. Binding posts are not very robust. It seems like a kit was bought from an OEM and put together (bolted up) in a basement somewhere... On the flip side, the materials that count, VC former/ Cone/ Spider/ Surround are all good build quality. And thats the important part.

2) Installation: Not the easiest to install, the rear can be described as 3 thick metal rings bolted to one another by hex bolts. (See the picture at PE). However due to the thickness of the rings, the rear air gap (exhaust) is constricted due to limited space. Thus when mounting on a thich baffle, you could suffocate the driver. Best mounted flush or thin baffle (use 1/8" aluminm baffle ?) If you solder the connections to the driver make sure the wire does not twist and break the posts away, they are not very robust as mentioned.

More later:

For Sale Matched tubes - 300B 12AX7 12AT7

I have several tubes that I enjoyed in my Elekit TU-8600, but no longer use and I need to thin out my storage drawer. Prices do NOT include shipping, but most will fit safely in flat rate USPS boxes. I am located in the US. My zip code is 66213 (Overland Park, KS). If you send me a PM with your address (or just zip in the US), I can run some shipping numbers.

Attachments

  • IMG_4416.JPG
    IMG_4416.JPG
    495.9 KB · Views: 109
  • IMG_4415.JPG
    IMG_4415.JPG
    467.9 KB · Views: 93
  • IMG_4414.JPG
    IMG_4414.JPG
    588.2 KB · Views: 88
  • IMG_4413.JPG
    IMG_4413.JPG
    408.8 KB · Views: 83
  • IMG_4412.JPG
    IMG_4412.JPG
    374.5 KB · Views: 86
  • IMG_4410.JPG
    IMG_4410.JPG
    418.7 KB · Views: 83
  • IMG_4409.JPG
    IMG_4409.JPG
    433.6 KB · Views: 86

Max voltage for TDA7388

Quick question - maybe someone can help me understand the datasheet for the TDA7388.

I am a bit confused by the datasheet as it lists TWO "Max" ratings for the Vcc:

VS Operating supply voltage 18 V
VS (DC) DC supply voltage 28 V

This chip is typically meant for car audio applications it seems - but my application would be possibly running it from a 20 volt DeWalt battery (18v nominal, I know).

I especially do not understand what the difference between "VS Operating supply voltage" and "VS DC Supply voltage" is.

They further list the VS(pk) (peak) voltage as 50v for 50ms.

The application is an amplified portable speaker that has 4 channels (3-way xover) and this chip looks like it would fit the bill perfectly except for the possible voltage limitation.

Linn Monaural Power Amplifier Klimax Solo 800 - simplified Schematic and Theory of Operation wanted

Attachments

  • f27ffadf370e86d1754b1b92f53c41744d354e1f.jpeg
    f27ffadf370e86d1754b1b92f53c41744d354e1f.jpeg
    271.4 KB · Views: 69
  • 9adc84c651cdefdcbbb733b0c759c5dfeb3b389c_2_690x388.jpeg
    9adc84c651cdefdcbbb733b0c759c5dfeb3b389c_2_690x388.jpeg
    104.5 KB · Views: 61
  • 165e68ea4b9829063dd1f417374241815a7d691a.jpeg
    165e68ea4b9829063dd1f417374241815a7d691a.jpeg
    343.3 KB · Views: 65
  • Klimax-Solo-800_Top-Down_HR.png
    Klimax-Solo-800_Top-Down_HR.png
    346.6 KB · Views: 61
  • Klimax-Solo-800_TopPlate-CU_HR.png
    Klimax-Solo-800_TopPlate-CU_HR.png
    644.2 KB · Views: 56
  • Klimax-Solo-800_Black_RoundelCU_HR.png
    Klimax-Solo-800_Black_RoundelCU_HR.png
    811.4 KB · Views: 51
  • Klimax-Solo-800_FinsCU_HR.png
    Klimax-Solo-800_FinsCU_HR.png
    458.3 KB · Views: 48
  • Klimax-Solo-800_Rear_HR.png
    Klimax-Solo-800_Rear_HR.png
    690 KB · Views: 57
  • Klimax-Solo-800_Silver_3Q_HR-e1706531214531.png
    Klimax-Solo-800_Silver_3Q_HR-e1706531214531.png
    240.4 KB · Views: 50
  • Klimax-Solo-800_Black_3Q_HR-e1706531165362.png
    Klimax-Solo-800_Black_3Q_HR-e1706531165362.png
    158.3 KB · Views: 59

Wiring dual mono DAC PCB boards

What would be the best way to hook up a left and right side pcb for a dac. Some diy designs on this forum have this set-up, but also the Andrea designs on The Well audio, and even Metrum and Rockna and more. And i do to 😉 The dac grounds and digital grounds on each pcb's are hooked up regarding datasheats: grounds connecteed below the chip.
Each power supply has his own winding.

example:

wiring dual mono.jpg


Let's hook up te separate PSU's. All good now Al grounds are still separated:
wiring dual mono2.jpg


Now, connect the digital reciever. Now the grounds connect through the spdif signal wires. The digital reciever becomes the star ground point. That don't looks the best point, or not?
wiring dual mono3.jpg


If you would connect a ground link between left and right dac boards then factual you create one pcd regading grounds with a better more low impedance ground?:
wiring dual mono4.jpg


And you can even connect chassis:
wiring dual mono5.jpg


What do you guys think? Am i overthinking this ideal ground point and stick to image 3 or hook-up like one of the last images?

Balanced phono test question

Hi team,

I want to do a little experiment for my own interest.

I'd like to see how a balanced connection from an MC phono cartridge compares to an unbalanced connection when picking up noise.

I figure I can get an old, broken MC cart and then wire the right side to an XLR cable and the left side to another XLR but drop one of the pins. I could then run the cable over a transformer or similar and see what I hear out the other end.

My question is - how do I go about connecting grounds here? Or is my experiment doomed to fail?

Thanks!

Troubleshooting noise at preamp section of a mixer (Soundcraft EFX8)

Hey guys,
I recently got a soundcraft EFX8 mixer in for general servicing. All the faders were in pretty bad condition so almost all the channels were scratchy and noisy. Replaced them all and all the channels are working fine except for one.
So the channel in question produces a high frequency hiss, its not consistent and changes in range. So here are things I have done so far,
1. Replaced the gain pot(P500A).
2. Jumped the connection on the "insert".
3. Replaced the quad op amp IC500A.
None of the above rectified the problem. Before replacing the opamp I did scope around and here is what I found- I can clearly see the trace jumping around at pin 1 of IC500. I checked pin 2 and pin 3 and I did not measure any anomalies there. I have done other troubleshooting things like measuring the voltage rails, looking for dired joints, checking for proper ground connections and tap test. I have also compared measurements against a working channel but can't see anything obviously wrong.
One other thing I would add is while I had the op amp desoldered and out of the circuit I did scope around pin 2 and pin3 pads while I was running a 1khz test tone. The DC offset at pin 3 was 2V higher than pin 2. I am not sure if that's significant or not.
I was hoping you could give me some other things to look for. I have attached a pdf of the schematic of the input section.
Thanks

Attachments

For Sale Iron Pre SE essentials kit without transformers

For sale is an Iron Pre essentials kit, but without the transformers. This is a kit I had ordered from the store, but the transformers are no longer available.

$70 including shipping to the CONUS. International orders will require a small additional charge for shipping depending on your location.

I cannot accept Paypal, so would have to arrange payment through Venmo, Zelle, or check/MO.

Toshiba SA 7100 protection mode

Hello All, first post so I hope it is in the right place. The receiver is in protection mode as subject indicates, however I'm focused on Q803 and Q804. The collector voltage on Q803 should be 28V. I'm getting only 2.2V. The voltage from Q804 Base to R812 is 24v but I get only the 2.2v from the other side of R812. I have no idea where and why I'm loosing 21.8 v. can some one please take a lo
protection.png

Kegger / Skunkie KT120 Monoblock iron layout

After much deliberation, this project is the one that got me motivated...
This is my first DIY amp,
I purchased all of the Iron from Thermionic labs figuring if there OPT is as good as its suggested, there may be a benefit by going all in...

One thing worth mentioning right off, the 5H choke is considerably (and alarmingly) smaller than the 193H Hammond...
I emailed TLabs (the name is a bear to spit out never mind spell) and was assured, that the itsy bitsy choke was in fact every bit what was needed....

So, laying out the Iron (on my own, and before the Sun rose this am...) I have came up with the following...

Layout-M.jpg


This evening, and still feeling accomplished, I compare to Stephe's layout and notice the choke 90 to the PT in the rear,
with the OPT 90 to the choke...

I thought I read where in these pages today that the coupling between the PS and Choke was not as important as the say the choke or PS with the OPT...

I feel silly asking, but honestly thought my layout had much less chance of cross talk because the lines of flux had not interfered with the OPT in any way.

Anyway, this next image is more similar to what Stephe had done...
Are they both equal, is one clearly better than the other and if so, which one ?


Layout-2-M.jpg

L20 AMP。use only two NJW0302G

To reduce the four than before to 2. But it is more low price and easy installation.

And NJW0302G power is bigger, overall output power 200 W 8 R (+ 65 V)
Would not reduce the output power.

Please note that blue PCB genuine original,

Designers LJM.

I will name L20SE life for it, to distinguish them from.
😛

Attachments

  • IMG_3018.jpg
    IMG_3018.jpg
    313.1 KB · Views: 4,411

For Sale ATC SCM75-150 pair and Scanspeak D2608/913000 pair plus wave guides

The atc mids have sold !

Hello everyone !

I have a nice pair of 8 ohm atc scm75-150 ( non s version ) for sale in great shape . I picked these up from a member here about 3 months ago and had planned to build something like the atc scm110 , but I have so many projects going already plus remodeling a house I don’t really have the time . So I’m putting them back up for sale here for someone with the time!

I’m asking $1075 for these , I also have some scanspeak D2608/913000 and their wave guides I was going to use with these $300 for these , or I if you bought all of it as a package I would do $1265 for everything .

If you are in the U.S. I’ll ship these free to you . If you are out of the country I will need some money toward shipping , but I will try to help you out , my family has a fedex business account through their business , so I get a little bette rate than an individual.

Thank you for looking and don’t hesitate to reach out

Best,

Ethan

Attachments

  • E8449DC2-9FDE-41EE-9A86-04C4B103BA01.jpeg
    E8449DC2-9FDE-41EE-9A86-04C4B103BA01.jpeg
    479.7 KB · Views: 108
  • 9B95BB6A-108B-428B-B659-FE378E60B329.jpeg
    9B95BB6A-108B-428B-B659-FE378E60B329.jpeg
    743 KB · Views: 107
  • 481E3C4A-814F-4D85-865B-35760DA346A0.jpeg
    481E3C4A-814F-4D85-865B-35760DA346A0.jpeg
    445.2 KB · Views: 105
  • 3A2F540F-DEF3-44DF-8A54-283B2106E4BA.jpeg
    3A2F540F-DEF3-44DF-8A54-283B2106E4BA.jpeg
    392.7 KB · Views: 97
  • 1B1CE420-11B1-427C-8724-E4F1AE866A3F.jpeg
    1B1CE420-11B1-427C-8724-E4F1AE866A3F.jpeg
    534.7 KB · Views: 105
  • 028D9B0D-7245-4DDB-B0A5-139DD42B37FC.jpeg
    028D9B0D-7245-4DDB-B0A5-139DD42B37FC.jpeg
    943.4 KB · Views: 102
  • D8F18B3F-1A23-425C-9E7B-63A8552C9E30.jpeg
    D8F18B3F-1A23-425C-9E7B-63A8552C9E30.jpeg
    361.3 KB · Views: 92
  • ABB926A5-A371-4CA0-AD67-90F1F5AA1CAB.jpeg
    ABB926A5-A371-4CA0-AD67-90F1F5AA1CAB.jpeg
    360.8 KB · Views: 104
  • A7CD448D-83A2-424B-9D0E-23D97F3EBD41.jpeg
    A7CD448D-83A2-424B-9D0E-23D97F3EBD41.jpeg
    354.3 KB · Views: 93
  • 7C30BA3D-D9C6-458D-AFC9-9F0CF8EDE657.jpeg
    7C30BA3D-D9C6-458D-AFC9-9F0CF8EDE657.jpeg
    456 KB · Views: 90
  • 73C77FFF-5A39-49D4-BD86-1EE4EC14C322.jpeg
    73C77FFF-5A39-49D4-BD86-1EE4EC14C322.jpeg
    242.9 KB · Views: 96
  • F46BD07E-3061-461D-93C1-EF699110651B.jpeg
    F46BD07E-3061-461D-93C1-EF699110651B.jpeg
    337.2 KB · Views: 97
  • 58A8382D-4CC3-4308-99B1-B3234DB588BD.jpeg
    58A8382D-4CC3-4308-99B1-B3234DB588BD.jpeg
    259.9 KB · Views: 95
  • 59117994-ED38-4F28-B6D6-F83B9287742C.jpeg
    59117994-ED38-4F28-B6D6-F83B9287742C.jpeg
    271.9 KB · Views: 94
  • 345E5F05-F982-4C37-B56F-CDA6F5C97F6E.jpeg
    345E5F05-F982-4C37-B56F-CDA6F5C97F6E.jpeg
    397.7 KB · Views: 111

Rotel RCD-855 tray malfunction (it opens but it won't close)

Hi, I cannot continue the old thread. My post from about for years ago is this one: My Post

I had the issue that the CD spun up backwards (counter-clockwise), I then changed the two spindle motor transistors (T102, which is an 33825 and T103, which is a 32825) and the CD spins up the correct way around now. The flex cable which connects the pickup to the board seems to be a bit finicky, therefore I got "Error" lit in the display for a brief moment after pressing "Play" while the CD spun up just for a moment. I cleaned the contacts of the flex cable with 99% isoprophyl alcohol and after the current assembly it works every time (it would read the CD's TOC after it's switched on and it would play the CD).

The remaining issue is with the tray motor. It cannot spin the other way around to close the tray. Currently, the tray is removed to test the behavior further. It seems that the player gives the command to close the tray, but the motor won't spin up to make it happen.
There's just one micro switch on the board which controls the tray motor. It also works as a sensor for the player to know if the tray is currently in motion. The switch gets pressed constantly when the tray is closed or when it's open as far as possible. I now describe what the player does at the moment:

Power on with the micro switch pressed - TOC is read (if the switch isn't pressed the TOC won't be read since for the player the tray is between the closed and open state)
Open/Close and letting go of the micro switch starts the tray motor
Pressing the micro switch stops the tray motor, for the player the tray is now open
Open/Close and letting go of the micro switch does nothing
Pressing the micro switch makes the player read the TOC again, so for the player the tray did close and the CD is ready to play

At first I thought that my test setup (I didn't screw the CD mechanism back in, I just let it sit in it's place on the main board) screwed with the micro switch and the mechanic which lets go of it and presses it again in-between the tray movement. But after screwing it all together correctly the player still won't close the tray unfortunately. Could there be another bad transistor? I'm unfortunately not good at reading service manuals, there are several transistors on the board since I had a bit of a hard time finding the two I wanted to change. I could at least try to find out which transistor is for the tray motor.

Edit: According to the service manual I found here (on page 12 on the far right), T110-T115 seem to be responsible for the tray motor.

But maybe someone had the same issue before and the culprit is something else entirely.

UPnP/DLNA stream from analog source with RPi

Hi everybody,

I'm looking for a possibility to make my turntable available as UPnP/DLNA stream, using a RaspberryPi. I have a phono-preamp with a digital output (Pro-Ject Phono Box V USB) that under $ lsusb shows up as:

Bus 001 Device 005: ID 08bb:2904 Texas Instruments PCM2904 Audio Codec

I tried to replicate this solution, but it didn't work and OP seems not to be around any more. Any suggestions?

Help with 3 way

Howdy everyone. I've recently finished up the construction of a 3 way speaker and have run into some problems. The tweeter and mid sound excellent, but I think I messed up on the woofers cabinet. I think I did the porting, driver placement, and dimensions wrong to where I'm getting some sort of resonances in the ~200hz area and some others as well. I've tried a lot of dampening and plugging the ports but that hasn't helped. It kinda feels like I put a lot of work into these for nothing as this problem totally ruins the speakers. Is there any saving this build?

My drivers are the sd315a, dc130, and d27. internals LxWxH is 28.5x14x13", port is 4"x 10" on the front

I had an impedance sweep posted here but it is not accurate, and too many folks were only looking at the first chart posted and not the rest in the thread and getting data mixed up so I removed it.

Rush Cascode designed power amplifiers

After i started to repair vintage amps and building some diy amp projects , both tube and solid state. i have started getting a big interest in different types of amplifier designs,
A week ago i got my hands on a norwegian made amplifier that was in a need of repair, a Doxa Signature MK1 . and i saw right away that this amp had a unusual design, after some searching i found out this type of design is called Rush Cascode and no tail pair.

I have searched to find more power amps with similar design but i have not found something similar

So, have any of you guys seen a similar design , diy or commercial built?


i add the schematic i found online to this post , its not 100% correct but most the essential parts is correct.
i will reverse engineer it and make a complete and correct design at a later time if there is interest.

I wonder what Nelson thinks about this type of design, fun to hear his opinion too.

Attachments

Floorstanding proven project under 1000

Hi im looking for my first DIY project.
For now i decided to go with troels dicovery 861 but maybe someone have some decent recomendation instead?

What im looking for:
  • 2.5 or 3 way FLOORSTANDING
  • relatively simple cabinet
  • proven project
  • kit that can be ordered in europe
  • under 1000 EUR/USD
  • i kind of listen to all sorts of music, soul, rock, electronics etc so particular genre is not that important
  • ideally some decent bass so i dont need dedicated subwoofer

Noob Cabinet design questions...

Hi,
This is currently more of a thought exercise on designing and building cabinets for full range speakers.

I don't have a specific driver in mind... and my questions are pretty basic.
I was looking at the Fyne F1-8s (8" coax) in a compact 'bookshelf' speaker. (Their F1-5s are the same design in a smaller package and are bookshelf speakers)

They have a downward ported base, and I think I know how I can do that... Its the cabinet itself that I need to focus on...

I want to CNC the cabinet in layers. I can calculate the number of layer and use either MDF / Plywood, or a mix of both.

My first question is shape. While the Fyne's have the driver in a cylindrical shape protruding from the cabinet, the cabinet is also shaped a bit like a tear drop.
Now does the internal shape matter? I mean I could design the speaker to have the internal walls follow the same contour or be a box inside. (So side walls would be thicker.) This would reduce the need for internal bracing. Or I could make it where I follow the contour, and then do internal bracing...
(The bracing opens up some other questions in term of creating box tubes... ) In terms of ports, I plan on 3D printing.

The other thing I am curious about is dimensions. It seems that w CoAx or full range drivers, the rule of thumb is that the cabinet should be 2x the diameter?
(e.g an 8" driver has a cabinet depth of 16". )

Again this is just a thought exercise. (For now) If I go w a smaller speaker driver, will have to pair it w a small powered sub.

And other thoughts... Two listening rooms. My office (11x13) ish or the main room (living/dining combo) 17x40 ish.
All types of music... and not very loud.

Also just to add.
One of my nephews is a Mech E and I plan on bribing him for his help w the cad drawings and what not.

Any and all input is appreciated.

For Sale Ian Canada dac/streamer base, new

Greetings guys

A project I started, but couldn't finished, not because of the quality of the products, but because my main need was a Roon serveur, and sadly no rasp can do that today, no matter how great the Ian Canada products are.
So the package is complete, all the Ian canada parts are new, never used or powered up.
Base : raspberry 4 2go
with :
  • StationPI pro
  • FIFO Q7
  • Dual mono ES9038Q2M dac
  • ESS sabre controller with display
  • Two clocks accusilicon 90 et 98 MHz

All those where ordered in Europe through Audiophonics, so I do have the bills🙂
I'm asking 600€ with the rasp included, and the shipping is included for Europe. I'm open to discussion for US or other countries shipping (like 50/50 for the shipping cost🙂 )

Deanorth

center tapped PT secondaries in parallel

Hi--- basic question here. Suppose you have a 250-0-250 center tapped power supply rated at 25ma on the center tap. Here's the transformer in question:

https://www.ebay.com/itm/145533351712

Is it possible to run these in parallel as two separate 250V supplies at 25ma apiece, or do the secondaries need to be isolated to do that? Realizing I don't understand the difference between those two cases as well as I thought, and using the search bar is leaving me with more questions.

Thanks!
-Erik

PDFs on transmission lines: Augspurger, MJK

Hello guys!

I have been reading some TL-articles from MJK and also in Vance Dickason's Loudspeaker cookbook (7th ed.).
Many interesting things in there that I didn't know, I was quite delighted to learn so much stuff. On my quest to keep learning I want to ask you guys:
Does anyone of you maybe have some articles written by MJK or, preferably, Augspurger on the TLs?

Especially Dickason's Loudspeaker-cookbook made me very interested in Augspurgers side on this. To be more precise: The articles he wrote for the "Speaker Builder" Magazine in 2000 where he contributed one article per magazine during the year, from an introduction to a more detailed text, I think.

I have already scoured the interweb, but came up with nothing usable. Maybe someone can help me out?

question on using Lundahl Filament Choke LL2733

Hi everyone,

I have a question regarding a different use of Lundahl Filament Choke LL2733. It consists of 2 windings, so instead of using two chokes, I'd like to know if it's possible to use Lundahl Filament Choke LL2733 as below:

Filament filter.jpg


If it's ok then how much is the inductance of each winding and is total inductance of the windings remain the same?
Thanks,

PSU Sanity Check

Team DIY,
I’ve built First Watt style PSU’s from the DiyAudio Store and traditional 5AR4 based tube amp PSU’s, but this is my first power supply like this, so I’m looking for a sanity check. My inspiration for this PSU was a video from Doug De Young. It was very helpful for me.

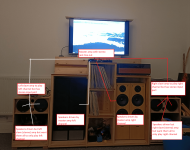
The amp this will be included in will consist of a pair of E86C input tubes followed by 2 pairs of 6L6 GC output tubes. Each dual triode input tube will be paralleled (using the whole tube for one channel) and each pair of 6L6’s will be paralleled, such that a pair makes one single-ended channel, not push pull. Output tubes will drive a pair of Hashimoto H-20-3.5U output transformers.

My hope is that I can provide a schematic and explain my intentions in the design and then ask for any input you may have. Thanks in advance, I feel like I’m asking for a lot.

This is a class A design.

It will be running on US 120V, 60Hz power.

The load current will be 360mA for both channels combined ((4 E86C plates @ 13mA)+(4 6L6 plates @ 72mA)+(4 6L6 screens @ 5mA)) with B+ at 320V.

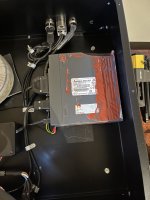
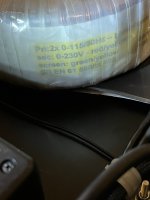
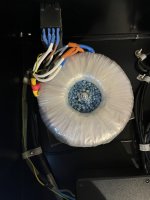
I haven’t picked a transformer yet, but in my simulation, I’m using a 1:2.33 ratio to step up from 120V to about 280V. I’m not including the heaters below. They’ll be on dedicated secondaries as normal, so not as much to think about there.

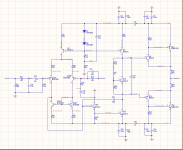
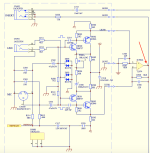
In the schematic below, NTC1 is a 0.18 Ohm resistor. That’s not for real. I’m having trouble modeling a CL-60 (I don’t know the Steinhart-Hart parameters - a, b, and c), but it has 0.18 Ohms of resistance at full current. I put the resistor in here to simplify simulation.

C1 is a typical first filter cap, if a little large. The bridge rectifier allows up to 240A of surge current, so with a CL-60, I’m well in the comfort zone. R1 and C2 provide filtering for the gate of Q1, but also create a soft-start effect. It takes around 20 seconds for C2 to charge and let the gate come up to full voltage. Because Q1 is in a source-follower configuration, bringing the gate up slowly also brings output voltage up slowly. This might make the CL-60 redundant, but for the cost, I’d rather include it. R3 is a typical gate stopper resistor. D1 is a 9V Zener. The idea is that if the gate goes 9V positive relative to the source, the Zener will allow excess voltage to bypass Q1 and not exceed the Vgs rating (+-20V). R4 drops about 1V, which falls just under Vgs(th) of Q1 (2-4V). That should turn Q1 off in the event of a short (runaway current drops voltage at the Q1 gate via D1, but Q1 source stays 1V higher, limiting current somewhat while it turns off).

Because my intent is to build an over-the-top filtered supply, it’s split into right and left rails at this point, with overkill filtering on both. CLCLC filters get predicted ripple down in the picovolt range (Not sure I buy it, but that’s what the simulation says. It should be good, at any rate.), but ultimately, space constraints may remove 2 chokes and caps.

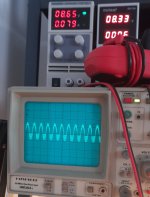
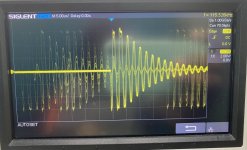
Here’s the circuit in simulation:


x50Fjy8CfV5BheZ1lt9R6v6NCCeLU5afkiy2By9lQz-rhl-jntSERXIqI4uy60nitWafRCvZrmRROgqLKI1upQUzo8-qyAChqxmHmnhBZmN0YV4zGZHEmpZZh3jfg9ZgkbC_GkBh7Ie-6sfrzVRUQC4


Very colorfully, at the bottom, you can see about 319V, 180mA at the load. P-P is the ripple that’s left. At the top right, “Wire” refers to the small segment that’s selected between the supply on the left and the filters on the right. 319V at just under 360mA is very close to the target.

One problem I’ve noted is that this software (oddly) doesn’t account for any DC resistance (and therefore voltage drop) across the chokes. I’ll have to account for that as I select the chokes and can calculate the voltage drop.

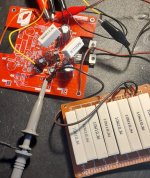
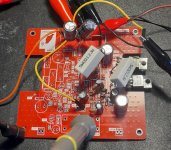
I’m happy to provide datasheets for parts that I have selected thus far. I haven’t ordered any parts yet, so if I’m off somewhere, I can correct.

I appreciate any feedback you’re able to provide!

Ryan

R-Core transformer question

I'm putting a small first system together for my youngest son. I've already selected a tube amp and speakers from what I have on hand. I wanted to put together a simple preamp to go with them.
I bought a Zerozone M7 line stage board kit and the recommended R-Core transformer.
I haven't used R-Core's before. The board has connections for the two orange 14v heater winding wires, and the two blue B+ wires. There is a wire marked "N:yellow/green". A dumb question, but
Is this a center tap? I can't get any readings using an ohm meter. Not reading to the frame either.
There isn't any connection for a center tap on the board.
Below is a picture of the transformer and the end of the board where the wires connect. I'm used to heavy iron core and toroidal that come with diagrams of the windings.
Thanks.

Attachments

  • 20240129_084023.jpg
    20240129_084023.jpg
    254.7 KB · Views: 143
  • 20240129_084711.jpg
    20240129_084711.jpg
    371.4 KB · Views: 121

Confused by Specs (Small Subwoofers)

I'm considering adding some sub-bass to my friend's restaurant system. In truth it's just a small cafe. Low power reinforcement is all that's required. It's a cafe, not a car-boot, or a night-club. I want to use 2 x 8" (vented) drivers.
Can somebody tell me why these cheap Monacors are not a good choice?

https://cdn.shopify.com/s/files/1/0809/2387/files/sph-210.pdf?5823
Projects by fanatics, for fanatics
Get answers and advice for everyone wanting to learn the art of audio.
Join the Community
507,635
Members
7,881,655
Messages

Filter

Forum Statistics

Threads
405,928
Messages
7,881,655
Members
507,635
Latest member
tom.mccann