DIY sub with limited speaker choices

Hi,

I'm on a journey to improve my system in my living room.. It is reasonably large room with a total volume of 140m3.
Current equipment:
  • Receiver: Anthem MRX 520
  • Front: Kef LS50
  • Sub: 10inch Whaferdale SW 150 (that's the one I want to replace!)
  • Back: Kef egg (not using them much)

I'm mostly listening to music but do enjoy a good movie now and then. Not playing loud (wife and kid are limiting the db!). I'm looking to improve the sub to bring a bit more low and presence to the room. The current sub is good for music but I think a bit small to move enough air for the room.

I'm based in New Zealand, and everything (when there's something) is very expensive here. I wanted to go with a SVS SB-1000 pro which cost 1500 NZD (=920USD!!!)

I like woodworking and DIY and have all the tools, so can definitely build my own sub. Problem, we only have car speaker drivers available here and shipping cost and tax duty doesn't make import possible (for a 15 inch, it cost more than 300 USD to ship, + 15% tax)
My aim is to build something better than the SVS-SB1000 with the same budget.
I found 2 potential drivers:

Powered with a Behringer NX3000D, and a box made of plywood (I don't like working with MDF!).

I'm more into bass details rather than power, so was thinking it is better (and easier) to go with a sealed design.
I don't want to go higher than 120 liters for the box.

Below the WinISD results (blue the alpine, red the rockford).
Also attached my oddly shaped living room with potential placement for 2 subwoofers (in red)
The 15 inch is of course the clear winner in term of SPL, and could for sure benefit from a bigger box (I might be able to slightly extend the box and stuff foam inside to gain some volume ....).

And this for the same price than the SVS (I'm not counting my own time involve in the building process, because I do like doing this 🙂 )

Now the questions:
1) Do you see a problem with those results or using those drivers for home use?
2) With the behringer integrated DSP, could I get a flat frequency from 25hz (ideally 20) to 120? is 100db loud enough?
3) Both those driver are around the same price, so I'm wondering if the alpine is better built and would provide a more detail sound? Or is it just, bigger is better, go with the rockford? I'm not looking for power here (my current 10 inch very old SW 150 isn't reaching max power (I think 🙂 )
4) Or should I just go with the SVS-SB1000 because it would provide a better sound?

Thanks for reading and for your advice.
Alex
1657749181548.png
1657749201285.png
1657749223249.png

Need help with B&W CDM 1 SE’s

I have a pair of 25 year old CDM 1 SE’s driven by a Bryston B60 amp. To my ears (admittedly aging) they sound flat with little base and muted highs. I have read that the ferrofluid in the tweeters is known to dry out and requires changing every decade or so. Would doing this make a significant difference, or just a subtle one?

I’ve also seen several entities which advertise upgrades for the speakers at a cost of $300-$400 dollars. If anyone knows what parts would be required, and whether it would be a worthwhile thing to do an upgrade of the crossover, I’d love to hear ideas and feedback.

Wharfedale 12" refoaming

Hi all,
I have a couple of wharfedale 12" drivers that needs refoam/rubbering. What should be a straightforward job is complicated by the presence of an aluminum ring glued (very securely) at the top of the voice coil former preventing the application of shims to center the voice coil once the surrounds are removed.

These aluminum rings are not coming out. I tried heating to 200 degrees with a SMD rework hot air gun, freezing to -50 with freezer spray and cellulose thinners and nothing loosens the adhesive enough to remove the rings without ripping the entire voice coil out of the cone.

Does anyone have any tips on how to deal with this situation?

Thanks

Roth Audio Music Cocoon MC4

Please help
Roth Audio Music Cocoon MC4
I looked everywhere on the forums and couldn't fine anything ( google also with no luck)
I have a brand new Roth Audio Music Cocoon MC4 that blown up after 5 minutes of power on and for the last 4 years was on the shelf waiting for me to fix it, and by the looks that day is here.
To the problem:
Power transformer burned out (was replaced with original) inside the amp the short circuit and dc power board has 2 big resistors ( would say 1W) and a couple of capacitors are bulged.
My problem that the resistors are completely scorched and I can't identify them
Will take some pictures and check the voltages on the power supply (external)
Does someone know this little amp ?
If this is the wrong place ( it is a hybrid amp ) please move to the correct place

Correct fuse value/type for MiniDSP 2x8?

Hi everyone:

I need to put a new fuse into my MiniDSP 2x8. The PCB has "1A" silkscreened beside the fuseholder

In the Manual, it reads:
2.2.1 DC Power connectivity
miniDSP 2x8 requires a 12V regulated power supply of at least 1.5A (18W)

However, I seem to remember seeing somewhere that this board should be powered with 2.5A to work properly?

So, can someone please clarify what the correct fuse value should be?

Does it matter which version of the board it is?

I assume it would be a slo blo as well?

Thanks.

Quick impedance matching question

Hi all,
I recently put together 6 class D amps to power a pair of 3-way array speakers. After much troubleshooting (thanks again) it was determined that the inputs could not share a ground without introducing noise from unaligned switching currents. The solution I found was using input transformers (Monacor FGA-40HQ) to float the ground on inputs. Two questions:
1. I am assuming the best placement of potentiometer will be on the secondary, not in front of the primary, right?
2. These xos have 12k/12k Ohm impedance. What resistance pots should I be considering. I have usually used 50k or 100k, but is there a protocol around determining this so as to maximize fidelity across the frequency range?

I should add, the source is a Behringer DCX, which lists output impedance as 160 Ohms at 1kHz.

Thanks for your help.

Gary

Parallel-NFB Push-Pull 6L6 Amplifier Idea - Please criticize it!

I have a beat up old Dynaco Stereo 70 that's been pretty well stripped down to its transformers and tube sockets. I'm trying to settle on a parallel-NFB 'Schade-style' circuit to build into this chassis.

Since the chassis is small, I'd like to keep things as simple and compact as possible.

Basically, I'm trying to adapt the DCPP 'Engineer's Amplifier' to push-pull 6L6GC in the original 'ultralinear' configuration with Dyna A470 OPT. with the original Dyna power transformer delivering about 430V B+. So far, I have this:

1657495147574.png


Looking at the load lines, I don't understand why the voltages I see in LTspice aren't matching those in the 6CB6 data sheet. The voltages LTspice calculates for the 6CB6 LTP do match what's on the DCPP schematic.

LTspice is predicting 0.055% THD at 1W out into 4 ohms, and 25W at clipping from 1.5V peak input.

Once I settle on a decent circuit I'd like to make a set of PCBs the same size as the Dyna ST70 PCBs. I know it will be a tight fit.

What do you think? Did I do it wrong?

Doug Self 16 dB passive attenuator

Hi,
it's not clear to me what could be the values of R57 / R58 resistors of the "16 dB passive attenuator" illustrated by Mr. Self at page 394 of "Small Signal Audio Design".

1659265875772.png


The only hints reported my Mr. Self is that the input impedance of the attenuator is around 10 Kohm, and output impedance is 1.4 Kohm.
I looked for more details throughout his past articles in Electonics Word + Wireless World, and Linear Audio, but no success.

You guys have any ideas about those values?

Any help would be appreciated!

Angelo

The resurection of a classic Amp

You know when a project goes too far...

I've been on the hunt for an old amplifier for a while. It started out life just needing a new amp, but I got drawn to old kit: dancing VU meters, big knobs and glowing fronts. An opportunity came up to by a pair of old Rotel RA-314's - both broken. There was just something about them: wooden cased, glowing VU meters, aluminium fronts. 1979 vintage I believe.

IMG_20220604_130104109.jpg

IMG_20220604_130053390_HDR.jpg


Of the pair, one wasn't too far gone and came back to life quite easily: just needed a new volume pot and output fuses. Suprisingly, everything else checked out. The capacitors are all original, none of them showing signs of obvious fatigue or failure. The casing needed some TLC - some of the wooden joints were splitting so a delicate application of glue and polish. This has been running in the living room over the last month or so just 'doing its thang' quite merrily.

The second one was in a far worse state. The obvious spots were a badly bent chassis (how?) and some dry joints from where someone else had attempted to re-cap the thing. The chassis was easily dealt with by a lot of hammering and reshaping, but making a start on the dry joints exposed a far worse problem. In the process of someone in the past re-capping the entire PCB, the sheer number of tracks ripped or broken started to become apparent. Every time I laid new metal down, another one was spotted. After the 6-or-7th repair, it started getting silly. The final nail in the coffin was the sticky brown crystaline crud around one corner of the input PCB. If I was a suspicious character, I'd suspect someone had poured a can of coke over it. Judgement day had come for the venerable amp.

At this point, I should have stopped. I've already got a working amp. But: look at it: look at its face and tell me it should be thrown in the bin! There was nothing else for it - new electronics!

IMG_20220730_161315632.jpg
IMG_20220730_165739439.jpg
IMG_20220730_165747197.jpg


This is way more than just a power amp replacement. It's the full source-select, tone control, RIAA, VU Meter driver, PSU, everything.

Chewing over the options, I wanted to keep the thing functionally-original, but improving in the process.

For the Amp, having a nice big transformer and heatsink to play with (the only things left which still works) rules out putting Class-D in there - voltages are just too wrong. Chip-amp was a distinct possibility, but worldwide component shortages put paid to that. Class-AB here we go. For the input selection and tone controls, definitely room for improvement here: everything on the original ran the audio through the front panel pots and switches. Nice when its new, but boy does it age badly. Seriously considered putting a CODEC in there: routing everything in-and-out of digital, but again didn't feel right for the amp. In the end, an analogue tone control processor was chosen. The VU Meter driver was the obvious elephant. Not something I've any experience with, so it took a little googling to come up with something. Into schematic design here we go...

...and about a month later, the beast went live at around 11am this morning!
IMG_20220730_161003897.jpg


Five PCB's to be precise: Pair of amplifiers at the rear. Mid Left is the PSU board, front left if the VU Meter driver with the Preamp/Tone/select processor on the right (mounted at a 45deg angle to fit).

As for sound-quality, I admit, I'm biassed, but "oh my god" springs to my lips. I mean the old Rotel amp was good, but this thing blows it clear out the water. Quite possibly the best thing I've ever heard: including some decent Denons, Arcams, Yamahas and my previous TriPath experiments (which is saying something).

The amps are based on ESP Sounds P3A schematic, but using different components (and a very different layout). OnSemi's matching-pair MJL3281/MJL1302 output transistors providing the grunt. The preamp is a TDA7440 audio processor doing the heavy lifting. Its driven from a little microcontroller (MSP430) to perform the front-panel reading and parse in I2C. The joy of an MSP430 is that they don't expose any high-frquency digital outside their own chips: even the clock source is integrated. I have put some feeds in for a future IR remote control expansion, but thats for another day.

All in all, it's been over a month of plotting, scheming and soldering, but I'm now a very happy bunny indeed.

* The old Rotel - nice as it is, will be finding a new home soon.

* I'll publish the schematics for the PCBs in seperate posts

* I've also got a whole pile of spare PCBs and a few component sets if anyones interested (UK Postal based)? See other posts...

All in all, I wanted to write this to inspire the love for old HiFi kit and say "don't bin it" - everything is usually possible!!!

Mat

RATA supersound & Ansar supersound capacitors

Not sure if these will be of use to anyone, now I have tested each one and they are all pretty close to their values, I’m no expert but what I mean is if it says 68uf then it would have measured 68 something or 67 something, make sense?

how about £40 before I put them on the devilbay.
+ p&p

I also have some vintage inductor coils but I don’t know how or if I can measure their values .
DA86F5A5-D4CA-4DAE-A55A-6FC65994869B.jpeg
4D24E2DB-7C42-4FA5-BD6F-58BE7ECD19F2.jpeg
F42BC324-5918-4014-B4BA-14AEA77F5297.jpeg
6C96A664-F5B6-44C9-B1C0-505DF5BCD135.jpeg

What are my options for i2s input?

For my first diy audio project, I'm intending to build myself an esp32 based lms player. It seems to make sense to run i2s from the esp32, but that got me to wondering, aside from the MAX98357 boards, what sort of options have I got for i2s input and mono output. Ill be wiring the amp to a single Cambridge Audio S20 speaker, which will take around 70w, so a bit more wattage would be nice, either as mono or bridged from a 2 channel chip amp. Ideally also aiming for sub £20 or cheaper for this amp project.

Philips ISP ISP5021

Hi All,

I have been asked to look at a Philips ISP ISP5021...............
( https://www.dutchaudioclassics.nl/For-sale-Philips-ISP-IS5021-sound-enhancer/ )

It has failed on one channel and I have discovered it is the Right channel Volume Control which has physically broken and failed at zero Volume.
The tiny spiggot which should protrude from the actual knob and mate with the Resistor actuator has snapped. I have attempted a repair and have been slightly successful but it is not as 'smooth' any longer, in feel and operation.

I can find no service manual, Hi-Fi Engine etc etc.
I have approached Dutch Audio Classics (Link above).

The control is an ALPS unit. 5 Pins and not a conventional Variable Resistor.
It operates in the Digital Domain, I think, and varies a Voltage or Current. I think maybe Current as I can see nothing changing when 'scoping the Pins (on the good channel).
One Pin sits at 5V and the rest appear 0V but the LHC works fine.

I wonder does anyone have a service manual for this and can give me the part number? Who knows, I may be able to find one somewhere.
(Picture of disassembled control attached)

Thanks,

P.

Attachments

  • WhatsApp Image 2022-07-31 at 12.51.03 PM.jpeg
    WhatsApp Image 2022-07-31 at 12.51.03 PM.jpeg
    148.8 KB · Views: 130

Lost in transit UK Hermes an upgraded Rotel 980BX needing repair REWARD?

Hi anyone out there in UK. My highly modified but faulty Rotel rb980 went missing somewhere between
Merseyside and Bishop Stortford on a next day delivery. May thanks Hermes. ??????
It had approx 22 vishay resistors in the circuit and right hand channel is defective. It has Per Anders improvement already fitted which means very few people
will be able to understand the new circuit with its cuts and addition. ALSO Inside the original Rotel white box where loads of parts ie Vishay Used resitors only some
of which will be usefull for most amplifiers.
Please be aware of any attempt to onsell related parts.
Many thanks in anticipation.

LM3886 availability

Apologies in advance if this has been discussed elsewhere. If so, I wasn't able to find it.

Owing to the the Great Pandemic Availability Void, we're all used to parts being hard to find. But some things are faring far worse than others, and the LM3886 seems to be among those. The distributors I checked that have expected shipment dates don't show them being available again until around this time next year.

So, two questions:

  • Am I right in assuming that the LM3886 won't be available again for about a year, or does someone know something different?
  • Does anyone know why this part is being affected harder than most? This is mostly to satisfy personal curiosity.

Request for Tannoy Cheviot crossover help

Hope everyone is staying well during this horrible pandemic situation. I need your guidance to upgrade my newly acquired Tannoy Cheviot. I bought it in a quite good condition. the drivers are in perfect condition and surrounds are changed. The cabinet is in good condition. It performs very well, specially with the instrumental music or jazz or blues, but I am not happy with the performance once I play a rocks for heavy metal. It seems the sound is little dry and the lower end is kind of shy; like the nodes of kick drum or bass guitar are not satisfactory also the top end is little harsh in my ear. I am using a DIY tube preamp and DIY First watt m2 power amp. My DAC is Soekris DAM 1021. I also have DIY finalist speaker (jim holtz) that is powered by Parasound Halo A21 and P6 power and pre. It is a fantastic combination.
I want to upgrade the xo of Cheviot. I have opened the Cheviot to get the value of the capacitors, but failed as the writing on the capacitors are not readable. Can someone please help me with the crossover schematic of the Cheviot or tell me the value of the capacitors that I need to change. I tried to find it on the web but could not get except a circuit diagram of xo of hpd315 driver. I need circuit diagram of Cheviot in particular. I know that Cheviot has hpd315A driver in it.

Attachments

  • 3969442486_74a7be5b55_b.jpg
    3969442486_74a7be5b55_b.jpg
    195.1 KB · Views: 734

  • Poll Poll
Interest Check - Custom Fane 15" Full-Range

Which version of the 15" full-range unit would you prefer?

  • A - Upgrade the magnet only

    Votes: 15 37.5%
  • B - Upgrade the magnet, swap to cast aluminium basket

    Votes: 9 22.5%
  • C - Bigger magnet, aluminium basket, bigger voice coil

    Votes: 13 32.5%
  • D - None - the original is fine.

    Votes: 3 7.5%

Hi all,

I'm running an interest check first of all.

The Fane 15" full-range driver looks pretty good in a lot of ways, but the T/S parameters make it difficult to work with unless you're willing to put up with a very large cabinet - Qts = 0.7 and Vas is 203L.

I'm thinking of organising a group buy for some upgraded units, and wanted to check interest levels.

I can see a few options here:

A - Same moving parts, just add more magnet
B - More magnet, cast aluminium frame
C - More magnet, cast frame, bigger voice coil aiming for more cone excursion and power handling.
D - Don't bother, the original is fine

I'm not looking for solid commitment or money at this point, but a rough idea of how many you might want to order would be good.

The T/S parameters I'm aiming for are simply to increase BL and drop Qes. That'd mean they'll be much happier in smaller cabinets, and also gain some efficiency.

Here's a quick sim of what we get if we go from the current BL=10.9 to BL=18.9:

59f09e_50954a3a682e441f95b72da660a30379~mv2.jpg


This is in a 35L cabinet tuned to 73Hz. I know which I'd prefer.

With the increased BL, you could also go for a larger cabinet in the 100L range, which would give a response that slopes down towards the bass (probably matching room gain curves quite well) with LF extension into the 30Hz range before it rolls off.

So, I can see the improved version being useful for a few different markets:
- High-efficiency home HiFi - add a small valve amp and you're done.
- Professional Audio - stage monitors, main PA, etc.
- High-power home theatre surrounds.

A quick summary of the upgraded product:

- 15" Full-range unit
- Powerful motor means it'll be happy in compact enclosures
- Exceptionally high efficiency - 102dB @ 2.83v in 2pi.
- No need for a crossover
- Possible option for cast aluminium basket
- Uses existing recone materials
- Possible to get very deep bass, but larger enclosures would be needed.


I think that's everything. I've (hopefully) set up a poll so you can tell me what you think of all this.

Cheers all,
Chris

LM3886 gain of 5 as difference amp?

Hello everyone,

I have been learning about balanced signals lately and was wondering if attached schematics makes sense. I have drafted TINA TI simulation and it seems to behave just fine. However, it would be helpful to hear some input before assembling it.

Will it be ok to use LM3886 with the gain of 5 assuming it is acting as a difference amp - essentially combining inverted and non-inverting signals by adding their voltages together? Datasheet specifies minimum stable gain of 10, but uses non-inverted schematics.

For example, 3V on both inputs would give 6V in total - that is then multiplied by the Gain = 5 set by external feedback resistors?

Attached is schematics and simulation files.

Thanks,
Pavlo

Attachments

LC AUDIO ZAPSOLUTE MK4.2

For sale 4pcs Lc Audio ZAPSOLUTE MK4.2 fully working and assembled amplifier boards, 50W class A made by Lars Clausen (NewClassD)
Free additional board with purcahse of 4 pcs (not working - there is small fault on it)
Please send me an offer.

For sale TRIPATH TA0105A reference board as well.

Offers accepted for that as well!

An externally hosted image should be here but it was not working when we last tested it.

TDA7293/4 spice model

I would need the spice model for the chips in question.
I don't need it to be very precise, I just need to simulate the power limit band gain, which I can't do with a simple 741.
In practice I have to simulate only the buffer (inverting) for a loudspeaaker of 4 ohms and a certain current.
Does anyone know any where I can download the model from, or in the extreme case how can I replace it with an equivalent one?

For Sale CSS Criton 1TD drivers w/ premium XO

Hi all,
With heavy heart I'm selling my brand new set of CSS drivers for their Criton 1TD bookshelf speaker.
The set consists of:

2 x LDW7 midwoofers
2 x LD22 tweeters
All high end components to assemble the premium crossover to CSS spec
Nothing else, no cabs

Note that the LD22 tweeters are NOT THE X VERSION. They are the 22mm tweeter that cost about $80 each new, while the newer X tweeter is 25mm and costs $161 each.
I paid about $480 for the drivers, plus $250 ish for the crossover components.
Willing to sell all for $500 plus shipping.
If there's any interest I'll upload pics.
Please reply here and send me a message with your zipcode.
Only reason for selling is my upcoming move.
Thank you for looking.

TDA2005 Bridge Gain setting

Hi everyone. I'm planning on building a small 20+20 W stereo amplifier using two TDA2005, each one in bridge mode.
Looking through the datasheet, I found a couple of application circuits. The first one (attached as TDA2005_Bridge.jpg), seems to be the most commonly used circuit, but with the components of the figure, it has a gain of 50 dB, which I think is way too high if I want to use the amp with my phone or an MP3 player. As far as I've read in the forum, it would be better if the gain is around 30 dB.

As I understand, in this first circuit, both amplifiers are configured with the same gain, excep the top one is in a non inverting configuration, and the bottom one is inverting. Each one has a gain of around 167 V/V, and because they're bridged, the total gain is 334 V/V = 50 dB. In this case, both take the same input, the input audio signal.


There's another circuit in the datasheet, titled "Low Gain (34 dB)" (attached as TDA2005_Bridge_LowGain.jpg). The gain is still a bit high, but a lot better than the 50 dB from the first one. Except that in this one, the top amplifier has a gain of 28 V/V, and the bottom one has unity gain, but it's inverting the output of the top one, not the input signal, so the total gain is 28*2 V/V = 56 V/V = 35 dB. NOTE: R6 has the wrong value in the datasheet, it should be 1 k, not 1 ohm.

Now, I have two options: The first option is just using this second circuit. But I'm worried that one of the amplifiers has such a low gain (unity) while the other one is doing all the voltage amplification. My experience so far is limited to OpAmps, where unity gain wouldn't be an issue, but I've read around here that power amplifiers usually need a minimum closed loop gain to work properly, higher than unity.

The second option is to change the two 12 ohm resistors on the feedback loop of the first circuit, to, for example, 100 ohm, so the total gain would be 32 dB, and then each amplifier would have the gain set at 20 V/V, "sharing" the gain.

Now, the question is: ¿Which one would you think is the best option?

Attachments

  • tda2005.pdf
    tda2005.pdf
    633.5 KB · Views: 111
  • TDA2005_Bridge.jpg
    TDA2005_Bridge.jpg
    51.1 KB · Views: 326
  • TDA2005_Bridge_LowGain.jpg
    TDA2005_Bridge_LowGain.jpg
    65.8 KB · Views: 266

Sunfire True Subwoofer popping and grounding issues

I have a Sunfire sub that sounds great when the volume doesn’t go up too much, but as soon as the sub gets moving a good bit (and I mean a decent amount of output) it starts making a popping noise from the driver every time it “hits” the bass note. The amplifier was recapped about 2 years ago, I used it for about a year and it was then given to a friend who used it for about a year when he complained of the popping.

A little reading led me to a couple of answers, one being that the nuts around the controls needing tightening. Sure enough the nuts were loose along with most of the screws holding the plate amp and the driver/passive. After tightening everything it didn’t seem to help.

The other answer I found was that these amps have problematic ground planes and the recommendation was to solder a wire from the grounds of the rca inputs and control potentiometers directly to the ground of the power cord input which has a 2” wire that is bolted directly to the plate amp face.

Using my meter I measured the resistance between the power cord ground to the control pot grounds and its a dead short, 0.1-0.2 ohms. On the other hand the ground to the input rcas to the input power ground is measuring a little over 550 Kohm. The inputs are on their own tiny board and of course there is a dead short between the rca ground and the speaker level input/output ground and the scope ground attachment.

I look a little close at the input board and see there are two “grounds”, one labeled WP2 and the other WP3. WP3 is wired directly to the chassis/faceplate, so it has a dead short to the power cord ground. WP2 is wired to the ground of the RCA inputs, speaker in and out grounds, and scope ground. The only thing between WP2 and WP3 is C46 which is a 33nF film and R91 which is a 560 Kohm resistor (hmmm, explains my resistance reading).

So to perform this persons fix I would just need to remove R91 or C46 and put a jumper in and that would be equal to soldering a wire from the RCA input ground to the power cord ground.

Does this seem right to anyone? Could that be the cause of the popping noise? Anyone with the popping noise figure it out? I just don’t want to wire a wire in between the grounds before hearing from others on the subject.

Thank you,
Dan

Attachments

  • A1A03A12-B202-4D90-9AD1-4C1DF2683E21.jpeg
    A1A03A12-B202-4D90-9AD1-4C1DF2683E21.jpeg
    389.1 KB · Views: 283
  • A58B2CAD-4D96-40FA-A3E1-1D2AA3C79210.jpeg
    A58B2CAD-4D96-40FA-A3E1-1D2AA3C79210.jpeg
    368.6 KB · Views: 304
  • 42EC9C56-18B9-4F14-BF89-A1A8E45E56ED.jpeg
    42EC9C56-18B9-4F14-BF89-A1A8E45E56ED.jpeg
    277.6 KB · Views: 241
  • 7D2F1F03-97C2-46C8-8DE4-70179C947B74.jpeg
    7D2F1F03-97C2-46C8-8DE4-70179C947B74.jpeg
    475 KB · Views: 265

Stacked Power Supplies

I'm working on an all-mosfet amplifier where I'd like to run the front end ten (or more) volts higher than the output stage, so it can drive the output stage rail-to-rail.

I noticed that my benchtop lab supply is configured as two floating supplies that can be connected in series, so I was wondering, could the same thing be done with a small PCB-mounted transformer, to boost the main supply by ten volts or so for the front end?

Here's an example of what I have in mind. A pair of floating 10V low current supplies are "stacked" above/below the main power supply rails for the output stage.

Stacked Power Supplies 1.png

Another option would be connecting the secondaries in series, sort of like having an extra set of taps on the main transformer. I saw this configuration (extra taps on the main transformer) used on some Adcom GFA-5XXX MOSFET amplifiers to boost the front end, with ten ohm resistors between the secondaries (presumably for a good reason, but I'm not quite sure what their purpose is).

Stacked Power Supplies 2.png

Finally, on the Adcom GFA-5800, I saw an example of stacked supplies with two transformers in a rather unusual configuration: the primary of the transformer that boosts the voltage for the front-end is connected to the secondary of the main transformer for the output stage. I've been puzzling over what benefit this might provide, but the answer eludes me (maybe the turns ratio just worked out and it was most economical?).

Stacked Power Supplies 3.png

I would be interested in any pros or cons for these different options. Maybe the whole thing is a dumb idea? This would be going on an AB amp, so the main supply might have some voltage fluctuation. Regulating the front end is also an option, but my main goal is to keep it simple and easy to understand, so I would like to avoid that.

Is 0.2mm thick Mica Insulator sheeting to thick Sanken transistors?

Hello,

I am in the process of recapping my Luxman M03 and have removed the RHS board from the heat sink. My question is I am unable to source the MT-200 mica insulators for the 2SA1216 & 2SC2922 transistors here in Australia however can obtain a 0.2mm Mica insulation sheet (can take up to 500'C) to cut to the required shape. The Mt-200 of the shelf are apparently 0.12mm thick and I would like to know if the additional 0.08mm would cause any thermal issues with the Sankens?

Regards

Drop-in USB-to-I2S for classic CD players

I need a quick-n-cheap solution to adding a USB port to a classic CD player.
"Classic" being any CDP with TDA1541A (maybe with a 7220 digital filter) before it.

There are quite a few (cheap and pricey) ready-to-go PCB "kits" from Asia on eBay or Ali/Taobao.

My only concern is the that these kits are made for more-modern DACs that can deal with the "high" data speed these kit converters spit out.

I want something that sounds decent -- but has same data speed as now-classic, e.g., TI PCM2706.

Thx!

Original Mackie MR8 Schematic

The college radio station where I DJ has a pair of Mackie MR8 powered monitors in the aux production studio. They look to be the original vintage, with some sort of ragtag discrete amplifier for the woofer section. They have hum problems, so we'll be recapping as a matter of course (the original caps were doo-doo). HoweverI want to understand the guts a little better, and the only schematic readily available is for the Mk3, which has ICs for both woofer and tweeter amps. Does anyone know where I can find a schematic for the original MR8? The whole setup looks bargain-basement, with liberal use of 4558s in the filter section, if I can trust the Mk3 schematic as compared to the original.

Original Bass List Shiva TS Parms

As former Bass List member, I purchased four of original Shiva from first production. Does anyone one have the TS parameters for these? I'm assuming there have been some improvements over the years. -Btw, I used my four in 2' diameter X 6' sonotubes tuned to 15.5hz if memory serves. Preparing to pull them out for low-q acoustic suspension experiment. I ran across a nice paper possibly by Dan Wiggins? Maybe my vintage Shivas can be substituted? Thinking about building two subs with two Shiva each with q~0.5. TIA!

Modding Azur 640A

Guyz,

I've just opened the hood of my Cambridge Audio Azur 640A and find out that it only has 4400 uF per power supply rail (consist of 2 x 2200 uF/50v in parallel, means for all channel it has 8 pieces of 2200 uF). From what I've read, it is not at all sufficient for 640A's 65 watt power. No wonder if the bass is a bit weak. If I remember correctly the "rule of thumb", my 640a need at least around 6500 uF.

Question :

What will be the best way to upgrade this : for each rail :replace with 2 x 3300 uF / 4700 uF, or 1 x 6700 uF, or even jump to 10000 uF.

What will be the sonic difference if I arrange 2 caps in parallel than using 1 big cap with approximately same total value ?

Is it good to use BC components (type 037/056/057/154/114), caps for this upgrade ? This is the only brand I can get easily in France for almost all range of capacity & voltage with reasonable price. I lived in Indonesia before, and it was easier and CHEAPER to buy audio grade caps.....(and everything else off course, nothing is cheap around here)

Does somebody knows if Farnell France receiving oder in small quantity for poor people like us ? I just found some interesting Panasonic and Rifa on their catalog.

I'm new to this DIY audio stuff, so help me please....

Line array prototype (with waveguide and CBT shading)

I built a prototype of a line array segment. I developed a waveguide to avoid the bad horizontal directivity of Keele's CBT line arrays.

I used 1" fullrange drivers (Aurasound NSW1-205-8A) which should be used above 300 Hz. The woofer section was not part of the study. The concept I have in mind consists of a 1m long line with woofers beneath and above. This should expand the narrow vertical directivity. CBT-like shading (amplitude and delay) works quite well even with only 7 drivers and symmetry around the driver in the middle.

The paper is in german only. But I think the measurements speak for themselves. 😉


Line array prototype with waveguide and shading (german)


Prototype with 8 drivers (36 cm high):
attachment.php


Horizontal directivity:
attachment.php


Vertical directivity (with truncated CBT9 shading):
attachment.php


The vertical horns dramatically reduce lobing above 9 kHz as you can see in the paper. In professional designs like the Seeburg GL 16 this is a standard feature.

When there is further progress I will let you know. 🙂

Attachments

  • Line array 1.png
    Line array 1.png
    391.9 KB · Views: 14,321
  • Line array 2.png
    Line array 2.png
    30.4 KB · Views: 6,178
  • Line array 3.png
    Line array 3.png
    54.3 KB · Views: 4,153
  • Like
Reactions: mvs0

Preamp with Tone Control, Source Select - PCB/Kits available

Following my forray into resurecting a classic amp (see here), I've got a few designs to share.

This design is a full tone control and input selector pre-amp with RIAA stage. Based on the TDA7440 chip, which is an I2C controlled device, its got an onboard microcontroller which translates front-panel controls into I2C commands. SMD components, but all very hand solderable. Film capacitors used in the audio path.

6 channel input with BCD switch, otherwise 4 channel.
Bass, Treble, Balance adjustments
RIAA preamp
+/-12V supply input

All sounds amazing!

I've also put an interface into the board to allow IR remote control input. Haven't done the programming for this yet, but its very do-able (I did something similar with an Apple Remote a few years back).

preamp_3d_v1.JPG


Schematic attached!

I've both both PCBs and a few component sets going spare from my build. For the microcontroller, I've also got the kit to supply them pre-programmed as needed. If anyones interested, let me know.

Attachments

Class AB Amp Design - PCBs/Kits available

Following my forray into resurecting a classic amp (see here), I've got a few designs to share.

Class AB amplifier. It's a re-take on ESP Sounds Project 3A but with a few different components, based around the MJL3281/MJL1302 matched-pair transistors from OnSemi. Built for surface-mount components, it keeps the circuit neat and inductances down. All perfectly hand-solderable.

Should be good for 100W easily - 200W depending on heatsinking. Designed around a +/-30V supply, but this can be pushed to +/-40V.

The sound quality is, quite frankly, amazing. See the attached schematic.

amp_3d_v1.JPG


Schematic is attached, along with Bill Of Materials.

If anyone wants to give this a go, I've got plenty of spare PCBs and enough components to kit a few boards worth. Let me know and I'll send more details. UK based.

Attachments

Speaker Sensitivity

Good afternoon everyone. I have a simple question to ask you.
I intend to build Paul Carmody's AMIGA MT kit sold by Part Express.
But the doubt has entered me, since my amplifier is Marantz PM6006 that delivers 45+45 watts at 8 ohms and the sensitivity of this speaker kit is 84 dB.
I have some B&W DM602s that have 90 dB of sensitivity and I have never gone past 12 o'clock on the volume of the Marantz, after that the volume becomes unbearable.
The question is, will this Marantz Pm6006 be enough to move these AMIGA boxes, with 6 dB less sensitivity?
https://www.parts-express.com/Amiga-MT-Tower-Speaker-Kit-With-Knock-Down-Cabinet-300-7124
I appreciate your opinions.

White cathode follower analysis and design

I'm trying to design a simple OTL headphone amplifier. It could be a simple common cathode amplifier loaded to White's follower.

Common cathode amplifier can be designed using load line technic. But how to design cathode follower properly? Especially the White's one. How to choose proper supply voltage for example? In many articles I've read design procedure starts with some predefined supply voltage.

Idle current is an easier aspect. Lower tube works as voltage controlled current source so idle current can be adjusted by changing it's working point. On the other hand upper tube's grid voltage depends on this current in quite complicated way. In MOSFET source follower, for example, Vgs depends on current too, but local feedback always pulls it close to Vth. Tube has no Vth concept. Thus it gives us another question: how to calculate follower's grid voltage? And how to deal with it? Should I make it as low as possible, because lower voltage gives us more transconductance?

My DC biasing test circuit:
W4vjeA6.png


6AS7-G curves:
RL4oEzu.png

6GW8/ECL86 based line amp

So I have ben thinking about building a beefy line amplifier with balanced output. Minimum 24dbu in 600ohm and still have acceptable distortion figures. And I also wanted to try something different. So I started looking at the ecl86 tube. It has a triode and a pentode so there is some gain if needed and I could use some feedback.

For a balanced out I opted using a transformer at the output. Galvanic Isolation is nice with tube circuits. And I like transformers. Carnhill makes this nice transformer the VTB2290 Primary 9600ohm and secondary 600 or 150. specs are in the carnhill catalog http://www.audiomaintenance.com/downloads/carnhill_design_guide.pdf

It has a gap so standing DC current should be no problem. A first draw of the circuit is this: http://www.aman-nai.be/6gw8output.pdf

So a triode input stage coupled to the output pentode wich is strapped as a triode using the 100ohm resistance the output has autobias and there is feedback from the secondary of the transformer to the cathode of the triode input stage.Gain is around 18db input to output. I did a simulation in ltspice. At an output of +4dbu in 600ohm the predicted distortion is 0.0076% At an output of +4dbu in 10k the predicted distortion is 0.0013% At an output of +24dbu in 600ohm the predicted distortion is 0.079% At an output of +24dbu in 10k the predicted distortion is 0.015% now and altough this has to be taken with some grain of salt as I don't know how much the transformer can handle.

Clipping in 600ohm is at 33dbu 3.19%THD Clipping in 10k is at +35dbu (don't touch the output it has 120v pp) 1.57%THD Now again take this with a grain of salt. at 1Khz I think this could be really possible but at 20Hz I don't think the transformer can handle that high level. Still +24dbu should be perfectly possible.

The output tube disspates a little more then 8W. It is specified for 9W so that should be ok. Supply voltage is 300v

Any ideas or comment are welcome. It is still in the design phase 🙂

48v Military Spec NOS Relays FS. UK.

I have five 48v 2500r DPST times four ( 4 DPST switches) relays, I'll never use them. They're ex MOD RAF, never used, NOS. They may be useful for a mixer build or other signal routing application. I'm after a fiver each, or £20 for all five, postage would be £3.35 in the UK, can post abroad.

Drop me a message if interested, Andy

Attachments

  • Relays.JPG
    Relays.JPG
    161.5 KB · Views: 93

Set me straight on WT3 compatibility with Windows 10

Hi everyone:

I need to test some woofers, and I use to use a Dayton WT3 on a Windows 7 box. That Windows 7 box is now old and decrepit. I'd like to be able to run my WT3 / DATS software on Windows 10.

I read through quite a few threads here, but found exactly nothing that was clear to me.

- Does DATS run properly on Windows 10 using WT3 hardware? When I try it, it complains that the shorted tested leads have a resistance, so it will default back to the default resistance setting.

- If it can run properly, which version do you need to run it properly on Windows 10? The latest version I have is DATS V2 (v 2.1.1)

- Are there specific procedures to get it to work right on Windows 10, cause I still have all the instructions you had to follow to get it to work on Windows 7.

- I'm very familiar with computing concepts, having been an IT tech. for many years. The audio stuff...not so much.


Thanks

FLAC Audio

My system is an Arcam CD player, triamp amplifier, separate hf,mf and low frequency speakers,no crossovers.
I would like to use a FLAC file player and am bewildered by all the different systems in use.
My preference would be to have a standalone controller not linked to windows or similar operating system, FLAC files stored on memory cards,stick or other solid state memory, output from the controller as spdif to external dac. I can't seem to find anything.
It would be similar to a cd player except it would use FLAC files from an external source.
Is this achievable. I have assembly programming experience with some C.

NOStalgia - the all-FET JLH/PLH Class A amplifier

What to do when you have two large heat sinks (0.3 K/W) and a large toroid (2x18 V, 500 VA)? The answer came to me when reading Mr. Pass' article about the PLH amplifier, see http://www.passdiy.com/pdf/PLH_amplifier.pdf. Mr. Pass started with the JLH amplifier from 1969, the schematic of this amplifier is shown, at http://www.tcaas.btinternet.co.uk/jlh1969.pdf, and made his own MOSFET two stage amplifier (omitting the input transistor). So I decided to try an all-FET three stage amplifier.

Attachments

  • jlh.jpg
    jlh.jpg
    77.5 KB · Views: 4,265

My very first build.

Hello guys, i'm in the process of building my first and new pair of 3 way speakers, i'm planning on do it on the holidays to keep my mind buisy and entertained.
The speakers will be pluged into my topping d90 and purifi eval1 amplifier, the frontend or the digital transporter is an odroid n2 with coreelecOS.
For the measurements i have a motu m2 and a calibrated behringer ecm8000
I already have a pair of bliesma T34B-4 gathering some dust on the shelve, (since last year) and pair of augerpro 6.5' circular waveguides are already being printed.
That said i'll most probably will go for the PTT6.5M08-NFA-01 and cross it at 2.1/2.2.
My main doubt is on the woofer, since i can't be to greedy on the cabinet size, i was more inclined to an 8inch driver but i can go for a 9.5 like the WO24P-8, and cross it at 400/500.
In your opinion is there a better driver on the 8-9.5' range better than the WOP24P to pair with this combo?

Two 52 way x 2 heavy duty switches suitable for attenuator. UK

As above two heavy duty SW's suitable for amp attenuators, I've already made one up but it needs further work or re-doing to your spec. The measure a 3 1/4" cube, shaft is 1 1/8" long. Asking only £10 for the two, postage £3.35 in the UK.

PM if interested, Andy.

Attachments

  • DSC00320.JPG
    DSC00320.JPG
    106.9 KB · Views: 107
  • DSC00321.JPG
    DSC00321.JPG
    161.6 KB · Views: 101

marantz CD 94 mk2 servo board

If you go to the Philips Marantz web site and look at this image, you'll see what seems to a "bodge" or "afterboard" -- that green PCB, which according to the service manual is a servo board.
https://www.dutchaudioclassics.nl/i...kII-sale/groot/marantz-cd94-mkII-sale-029.jpg

QUESTION; why is this servo board so complex? What in the CDM transport needs so much heavy duty processing?

You can download the full SM at hifiengine.

Screened & ceramic valve bases - UK

As above, out of old test gear so used but still in good condition, will need a clean but all are good quality and have good pin contact.
I have 6 ceramic B9A with clips - £1 each.
1 ceramic 7 pin - £1
3 McMurdo B9A screened cans/valve base - £2 each. I have more of these if there's demand.

Postage £3.35 within UK, drop me a PM if interested, Andy.

Attachments

  • DSC00304.JPG
    DSC00304.JPG
    77.7 KB · Views: 82
  • DSC00303.JPG
    DSC00303.JPG
    64.3 KB · Views: 81

What is the best cabinet design for Altec Flamenco drivers?

I have a pair of Altec Flamenco speakers where the cabinets (IMO) are not worth saving, but the drivers & xover seem to be in great shape (sound good). This brings up the question "What should I do with the drivers?" I could sell them. Or I could build a pair of speakers.

If I build a pair of speakers what is the design which will provide the best SQ for HiFi?

Fluro Ballast as DIY choke?

Replaced about 10 fluro light fittings the other day, these had some exceptional looking ballasts in them considering the fittings were over 30 years old and on all day.
Quality made in Australia ballasts, I thought could I use these as cokes in power supplies? has anyone tried this? they would fit well under a conventional chassis.
An externally hosted image should be here but it was not working when we last tested it.

Is this choke can be use as input choke after rectifier?

Hi there

My transformer secondary is 2x18vac

My application need 30-40vdc 1-1.5a

Hence to lower the b+ I want to apply choke immediately after rectifier

The choke spec is
5mh and 0.3ohm. No idea the current rating. But from the wire is more than enough. At least 1.5mm

Can i use these chokes as input choke which followed by 82mf -1ohm resistor-82mf ?

I attach the picture of the choke compare with to-3

Thanks in advance

Regards
Erwin

Attachments

  • 20220727_161454.jpg
    20220727_161454.jpg
    241.1 KB · Views: 110

A version of an O2 Desktop Amp (ODA)

Update 8/11/2014

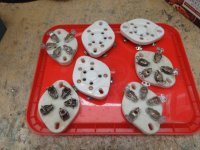
V2.1 of this ODA project PC board is now available. The materials for V2.1 of this ODA project are at the same Google Drive link immediately below, except at the folder 80x160mm -> 7_9_2014 V2.1. One of the sub-folders has a description of the changes between V2.1 and V2.0. The V2.0 build photos in posts #278 - 290, #301, #302, and #368 still apply since there were so few differences betweeen V2.1 and V2.0. I have a full set of V2.1 build photos posted at the V2.1 Google Drive link, with a text file for each photo section that talks about any differences between the two versions.

Update 4/10/2014

V2.0 of this ODA project PC board is now available. The part of this thread for V2.0 starts at post 272. For all the files go to the Google Drive link here: Go to the 80x160mm folder -> 3_19_2014 V2.0.

https://drive.google.com/folderview?id=0B67cJELZW-i8VmhVNk5PODNtZnc&usp=sharing

Go to the 80x160mm folder -> then the folder "ODA 3_19_2014 V2.0 fabricated" . There you will find:

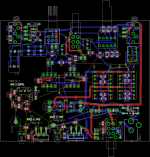
* Layout and schematic in both png and PDF format. The PDFs can be zoomed up as large as you want to clarity.

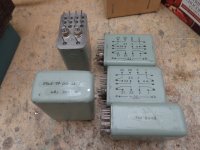
* Bill of Materials (BOM) - the stuff you need to buy from Mouser or Digikey. Mouser has all of it but the LT LDO regulators, which you have to get from Digikey. Mouser is out of the pot at the moment but Digikey has those too.

* Gerber files. These are the board layout files you can send to any board fabrication house to have a run of your own boards made. I've been using Seeed Studio in China but OSH park is another good one.

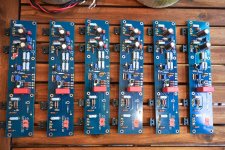
* Build instructions. Plus I've posted a step by step photo log of the build in this thread.

I would advise using this V2.0 rather than any of the past versions at this point since it adds the DC output offset null feature. If you are working on a past version board, please be aware of the one marking error, C51 has polarity reversed ont he board marking. Be sure to flip it. That error is fixed in V2.0.

Please note: the ODA designed evolved over time from the first post in this thread, below, to what is shipping now in V2.0. The current version uses 3 NJM4556AL chips per channel in parallel (6 op amps total per channel), no longer uses an OPA627 at all, uses LME49990 chips for the gain stage, and many other changes. You may want to start with post #272 first to get up to speed on the current stuff, then go back and read some or all of the earlier posts for historical background. 🙂

*********************************************************************************************************
*********************************************************************************************************


NwAvGuy/RocketScientist never did get around to publishing his O2 Desktop Amplifier (ODA) before he disappeared last year. For fun I've taken a few guesses on what might be in an ODA and whipped one up. 😀

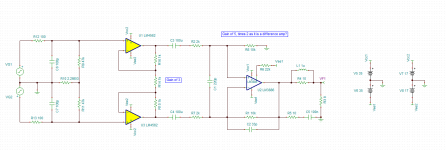
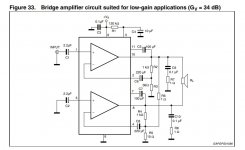
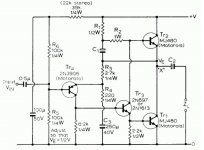
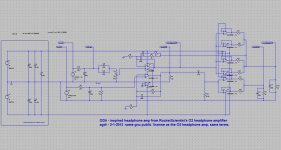
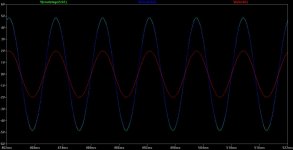
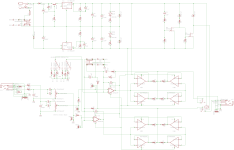
Below is an LT Spice sim of the ODA circuit on the top half, one channel, and the regulator O2 circuit on the lower half for comparison. From the plots the two outputs are virtually sitting on top of each other, green and blue, which they should be. The next two below are the schematic and about 2/3 of the way through a layout. Once the Chinese PCB shops open up in a week after the holiday I'll get one fabbed and stuffed. Once I finally get a working design I'll post the layout in the wiki section here for anyone who might want to DIY it. Since RocketScientist released his O2 under the gnu license, and this design is a derivation, I'll list it as being covered by the same gnu license for public DIY use.

This goal of this ODA design is to maintain the same basic design philosophy that NwAvGuy/RocketScientist used, but to try to bump up the performance slightly in most areas. Plus add some features that people have posted about and a few of the O2 mods I posted.

I know that one of RocketScientist's goals with the O2 was to make it cheap to be readily affordable. I've kind of thrown that one out here with an eye towards some improvements. 🙂 The OPA627 chips alone are $20 for the low end and $30 each for the high end. I don't have a dScope or AudioPrecision analyzer, so the final result here has not been properly measured, which of course was sort of the whole point of the O2, so fair warning.

Here is a summary:

Best new stuff:


  • · Up tp +/-16Vdc power rails with adjustable regulators for up to a 11Vpeak swing. Useful for high impedance headphones.
  • · Lower noise voltage regulators, LT1963A and LT3015. Probably won’t make any audible difference, though.
  • · Twice the output current capability and power dissipation - 280mA per channel. Useful for low impedance and low sensitivity headphones.
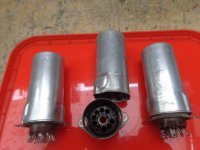
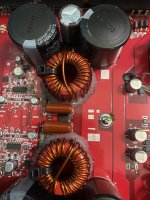
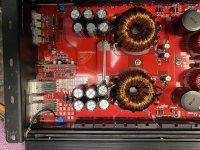
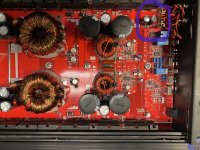
  • · 4 NJM4556A chips to handle the current and +/-16Vdc dissipation, two per channel. Uses the SIP 8 pin inline version, NJM4556AL.
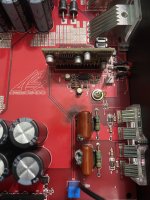
  • · NJM2068 replaced with OPA627, which is now in a feedback loop with the NJM4556 chips to null out DC offset and reduce distortion even further. DC output offset voltage should be around 0.3mV = 300uV per channel.
  • · Has input RCA jacks and output ¼” Neutrik jack in addition to better (Switchcraft) 3.5mm jacks.
  • · Bass boost circuit – switchable on/off.
  • · Rotary gain switch with 4 gain settings.
  • · Relay-based no-thump circuit that waits 2 seconds to switch in the headphones and then drops them out quickly on power switch-off.
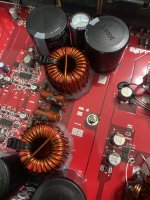
  • · Should have even lower background noise than the O2 headphone amp at high gain settings. 4 layer PCB with full middle ground plane.
  • · Volume pot is on the input now rather than the middle of the circuit, so it can attenuate “hot” sources as much as needed. Still no pot turning noise.
  • · Coupling cap is on the input, 4x as large to work with the 10k pot vs. 40.2k resistor in the O2, to block all incoming DC from the source.
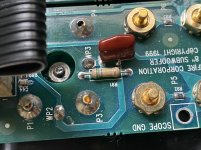
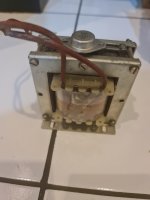
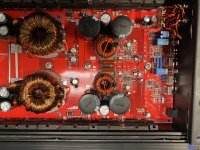
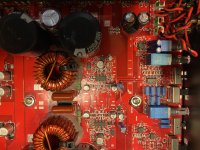
This version of the ODA uses the B4-080 case. In the layout below all the power supply stuff is now in the lower right corner, including the power plug. Having the power plug in back is something a lot of folks have posted about. The voltage regulators now line up along the back edge and are heat-sinked to the back panel of the aluminum case, one of the O2 mods I posted. So no finger-burning regulators in this one, although the transformer is now limited to 14Vac or 16vac, nothing higher or lower due to the input limitations of the new regulators.

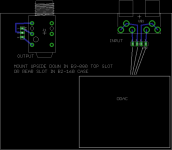
The 3.5mm jacks are higher quality Switchcraft jacks, with actual springs inside and not just springy metal, another thing a lot of folks have posted about (bad jacks). I've used vertically oriented jacks to make better use of the vertical dimension and leave more front panel space. I've included 0 ohm surface mount jumpers on the back of the board to disable the grounds on the input jack switches if using the RCA jacks - no more cutting board traces as with the O2 to add the external jacks. The design has a companion top board that slides in the top slot of the B3-080 chassis, upside down. That board has a Neutrik 1/4" output jack and RCA jacks that can be wired for input or preamp out. The top board also has space to mount a ODAC.

New stuff on the front panel now includes a rotary 4 position gain switch. Gains are 1x, 2x, 4x, and 6x. There is a bass boost switch for boost on/off. The resistors can be selected for any level of boost, such as 3dB, 6dB, etc. Another one of the O2 mods I posted. The power LED is now on the back panel, one for each supply rail to help diagnose dead power supplies. The unit has a (pico)fuse now too on the AC input and the power switch shuts off the entire power supply now.

I've included the output relay mod I posted for the O2 which delays the headphone output turn-on by about 2 seconds, then switches the relay out quickly when the power is shut off to prevent thumps.

The rest of the new stuff is in the middle. The gain stage now uses an OPA627 with a feedback loop wrapped around 2 NJM4556AL (SIP 8) chips in parallel on each channel, for a total of 4 op amps in parallel now on the output. The pot in the middle had to go to allow the feedback loop (DC) to function. The pot and coupling cap are now on the amp input, with the cap value adjusted up 4x to account for the 10K pot.

The new arrangement should nearly null out (around 300uV vs. 3mV for the O2) any DC offset on the output of the amp, given the exceedingly low 100uV max input offset voltage of the OPA627 and its tiny 5 picoamp input bias current, which results in nearly zero IR drop across the input resistors. This also means the pot won't have any substantial DC through the wiper even though there is no longer the coupling cap on the wiper as with the O2. Just another way around the silent-pot design issue. 🙂

The cap is still there feeding the pot though to block incoming DC from the source. Highly not recommended to bypass that. I've made sure the frequency response still matches what RocketScientist's design had on the low 10Hz end.

A by-product the the new negative feedback loop design should be even slightly lower distortion. RocketScientist had pointed out that the distortion figures of the output chips swamped that of the NJM2068 input chip. Essentially made the output chips the limiting factor on distortion. They were just a necessary evil to get the high current. The NFB loop should lower that output chip distortion a small amount. The OPA627 has excellent distortion numbers.

The design uses both surface mount and through hole components and has parts on both sides of the board, so it probably isn't a novice level of soldering type of DIY build, unfortunately.

Attachments

  • ODA and O2 circuit.jpg
    ODA and O2 circuit.jpg
    126.2 KB · Views: 9,347
  • ODA and O2 plot at 100Hz.jpg
    ODA and O2 plot at 100Hz.jpg
    50.6 KB · Views: 8,796
  • ODA 6_10 bottom PCB circuit.png
    ODA 6_10 bottom PCB circuit.png
    76.1 KB · Views: 8,843
  • ODA 6_10 bottom PCB layout.png
    ODA 6_10 bottom PCB layout.png
    50.5 KB · Views: 8,742
  • ODA 6_10 top PCB.png
    ODA 6_10 top PCB.png
    8.1 KB · Views: 8,420

Line level and power supply sharing same GND

I have a digital piano with LINE OUT. I also have a mini amplifier named "pam8610" (cheap and very common) which has LINE IN. I have 2 power supplies, each one with 12V and 5A. When I connect each power supply to each device (one power supply to the piano and the other power supply to the mini amplifier) everything works just fine: when I play the piano the sound goes to the mini amplifier and then goes to the speaker.

HOWEVER, when I connect both devices (piano and mini amplifier) to the same power supply while keeping the LINE connected, my piano turns off immediatly, something is really wrong. If I disconnect the LINE and use the same power supply, no problem happens (but of course no sound is produced because the LINE is not connected).

Using a multimeter, I discovered that the GND of the LINE OUT is the same GND of the power supply (continuity test in the multimeter). I dont know if this is common practice, but for some reason my piano provides the LINE OUT with the same GND of the power supply. So, when I use the same power supply to power the mini amplifier and when I connect the LINE, some kind of short is happening. Using 2 separated power supplies, everything works fine.

Do you guys have any idea how can I fix this or what is going on?

IMPORTANT: I am pretty sure I am not overloading the power supply, because my piano turns off even without playing any sound... as soon as I connect the power supply to the mini amplifier, the problem happens.

Do crossovers affect a drivers T&S parameters?

Let’s say that I’ve designed a low frequency alignment for a bass unit using theory, simulation and finally tweeking by ear, arriving at something I’m happy with (eg, an IB enclosure of 25 litres). I recently read that when I add a low pass crossover, the loading on the bass unit will modify the units T/S parameters, which I’m concerned will alter the loudspeakers bass alignment. For example, increasing Qtc by 10% could require an enclosure volume of 33 litres for the same bass alignment. Is this true and if it is, how is this normally dealt with?

DIY Schroeder Tonearm

Does anyone have any drawings of parts for the Schroeder tonearm? I am drawing it up by making educated guesses but would appreciate any real measurements I can get. Also, does it use 2 magnets pulling each other or one magnet and a piece of steel? Also if anyone knows any reference drawings of getting the tonearm length for a given pivot to spindle distance it would be appreciated, Thank you

DLH Amplifier: The trilogy with PLH and JLH amps

This very simple design has all the ingredients to satisfy even the most demanding DIYers. The output power in pure class A operation is 15.52 W at 2 ohms and 1 KHz, or 7.76 W at 4 ohms and 1 KHz, or 3.88 W at 8 ohms and 1 KHz. THD is only 0.025 % at 15.52 W and 1 KHz (2 ohms). THD is only 0.0024 % at 7.76 W and 1 KHz (4 ohms). THD is only 0.00091 % at 3.88 W and 1 KHz (8 ohms). Voltage gain = 8,9 dB.

Only two stages. Four transistors. Very few components. Its performance is surprisingly good, despite its total simplicity.

High bandwidth. Ultra low distortion. Input in single ended configuration. Output in single ended or push pull configuration, entirely adjustable by the position of a trimpot. PSRR: 61 dB across the entire audio bandwidth.

I want to hear comments from those who intend to build this simple amplifier.

regards

Here are the first dirty tests. The microphone does not reveal all its high quality. The tests were between 1A and 1.3A of bias current, levels at which the amplifier should give lower quality than stipulated. The loudspeaker impedance tests = 4 ohms:

Amplificador HDC 20W (Clase A) Parte 4 - YouTube
Amplificador HDC 20W (Clase A) Parte 5 - YouTube
Amplificador HDC 20W (Clase A) Parte 3 - YouTube
Amplificador HDC 20W (Clase A) Parte 2 - YouTube
Amplificador HDC 20W (Clase A) - YouTube

Attachments

  • Fourier Analysis at 1W 8 ohms.png
    Fourier Analysis at 1W 8 ohms.png
    29.5 KB · Views: 7,447
  • DLH Amplifier.jpg
    DLH Amplifier.jpg
    119.7 KB · Views: 7,772
  • Transient Analysis.jpg
    Transient Analysis.jpg
    275.7 KB · Views: 7,419
  • THD vs Frecuency.jpg
    THD vs Frecuency.jpg
    135.6 KB · Views: 6,584
  • THD vs Output Power.jpg
    THD vs Output Power.jpg
    142 KB · Views: 6,394
  • PSRR vs Frecuency.jpg
    PSRR vs Frecuency.jpg
    248.4 KB · Views: 4,817
  • IMD at 2 ohms.jpg
    IMD at 2 ohms.jpg
    462.5 KB · Views: 4,531

Has anyone built a Hafler quad decoder?

I haven't seen this in these forums...

This is an interesting article and it describes the Hafler quad circuits, plus others. Pretty simple actually.

https://midimagic.sgc-hosting.com/quadmuse.htm#evmatmul

As it turns out I got four matching speakers laying around and the amps to drive them ( four Acoustic Energy AE1s and a bunch of amps...)... I was thinking of trying something like this is my office. I mean, I got two quad receivers but they are huge and won't fit on my desk... but a small decoder like the ones he described might be a fun project.

FS: Aleph J populated boards and Antek AN6218 transformer for PASS DIY build

----------SOLD----------

I'm selling 3 pairs of Aleph J populated boards and 2 Antek transformers 600VA 18V (come with hardwares but no screw). Boards are sold as pairs. Transformer is optional or can be sold separately.

MOSFET are measured and matched from a whole factory tube (48 MOSFET). Matched Toshiba 2SJ74BL are genuine parts from Spencer. Quad matched, 10.65mA, 10.68mA and 10.73mA.

All of them are pulled out from perfectly working a 6 channel amp:
https://www.diyaudio.com/community/...rated-build-guide.241729/page-87#post-4641691

Measurement
https://www.diyaudio.com/community/threads/aleph-j-illustrated-build-guide.241729/post-4641659

I would like to sell them to experienced DIYer, and I will not offer any post sale support. MOSFET might have to be re-soldered to fit your heatsink holes perfectly.

Please make an offer. Thanks!

----------SOLD----------

Attachments

  • aleph 1.jpg
    aleph 1.jpg
    273.9 KB · Views: 224
  • aleph 2.jpg
    aleph 2.jpg
    289.5 KB · Views: 223

Crescendo C3000.2D

Got this amp in and noticed 1 of the rail caps vented .

I replaced the rail caps and went to power the amp up and another cap that connects to the negative regulator vented .

Also noticed there is a burnt trace on the bottom of the board .

Any ideas what might cause this ?

Attachments

  • 6DF4122E-10F8-4AA5-8DEB-822826BE582A.jpeg
    6DF4122E-10F8-4AA5-8DEB-822826BE582A.jpeg
    753.9 KB · Views: 89
  • 06656C55-63AC-4DEF-827A-3D7A49084EAA.jpeg
    06656C55-63AC-4DEF-827A-3D7A49084EAA.jpeg
    634.6 KB · Views: 108
  • CFE82A5D-45A1-4F3F-AF17-B7673AAB122F.jpeg
    CFE82A5D-45A1-4F3F-AF17-B7673AAB122F.jpeg
    572 KB · Views: 86
  • EFE993F5-DD81-4BF7-9566-1D45E2DBC13D.jpeg
    EFE993F5-DD81-4BF7-9566-1D45E2DBC13D.jpeg
    736.5 KB · Views: 113
  • 88A96E07-7C60-4E62-B358-7CCA23D7A3A8.jpeg
    88A96E07-7C60-4E62-B358-7CCA23D7A3A8.jpeg
    691.3 KB · Views: 91

Difficult Mounting Anchor Points for Amps. What materials?

Hey everyone,

I'm bummed I have to ask for help but I find myself just totally lost. There is nothing for me to reference in my car. I drive an E46 Coupe, so the equipment gets mounted in the back left corner of the car. The bottom floor isn't flat. The left wall (towards the quarter panel) is not flat. Without two points to create some "squareness" it's hard to engineer a mount. What's worse, is I also have two pieces of equipment from the car (radio and navigation module), and the navigation module can't be mounted vertically because of course it can't - it has a CD in it. It's also poorly shaped because the wheel

Here is everything I have to mount:
  • Stock Radio
  • Navigation Module (7.375 x 6.5 x 2.375)
  • JD 400/40 4channel amp (9.5 x 7.5 x 2.125)
  • Alpine S-A60M (8.0 x 8.125 x 2.25)

The stock mounting isn't ideal.
It has a tiered shelf, pictured below. The radio sits in the middle of the vertical mountings, and the stock amplifier mounts to the far left/quarter panel, but the stock amp is 1.375" thick. When mocking in the Alpine amp back there, it would touch the chassis. When mocking an amp in the most inward position, I'd have to do a lot of trimming if the metal bracket and there still isn't a home for the second amp. Also, the amps would be stuck below the navigation module, which would potentially trap a lot of heat.

I proposed a new design where the radio and navigation module where would be stacked on top of each other horizontally and then have the amps on top, mounted vertically. Each of the amps are roughly 5lbs, so that's 10lbs mounted vertically. I track the car, and in my last track day I was holding 1.3 sustained G's, so that mount front the horizontal section to there vertical has to be sturdy. I just don't know how to go about this and am tempted to take it to an audio shop. That would just feel like defeat and ANY help from an overall solution to designing one would be appreciated.

Attachments

  • IMG_0213.PNG
    IMG_0213.PNG
    7.5 MB · Views: 116
  • IMG_0140.jpg
    IMG_0140.jpg
    551.3 KB · Views: 111
  • IMG_0215.PNG
    IMG_0215.PNG
    751.6 KB · Views: 119
  • IMG_0214.PNG
    IMG_0214.PNG
    706.4 KB · Views: 111
  • IMG_0138.jpg
    IMG_0138.jpg
    484 KB · Views: 115

Martello enclosure for FR88EX

I have a pair of drivers and want to make a pair of reflex desktop speakers which don't have visible ports. This is a kind of follow on from here:

http://www.diyaudio.com/forums/full-range/173553-fr88ex-based-micro-onken.html

I'm aware that I'm pushing my luck a bit with a narrow box and the alignment is not quite what I wanted, the ports are a tad long, but it's close.

Oh yes, Martello is a kind of small and simple castle and I remember somewhere there being downward ported speakers that are known as castles :usd:

Driver Review: Comments: This is without a doubt the highest performing 3" I've come across, at least on a few fronts. The motor is an underhung neodymium design and the cone is thin (and fragile) formed aluminum. The only negative is a slightly ragged top end that may take some filter work if used full range, but I'd generally recommend a cheap and small neo tweeter placed close and crossed over high. There's a lot on the positive side, like high sensitivity, a clean low end and smooth midrange response. The frame is cast with ventilation under the spider, but users will have to pay close attention to airflow behind the cone - It's even more important to chamfer the inside baffle opening and in this case likely use a thinner baffle material as well. Tested June 2009. [Zaph: http://zaphaudio.com/smalltest/]

Another Martello build here: http://www.diyaudio.com/forums/full-range/188569-fountek-fr88ex-3-build.html#post2564558

Attachments

  • Martello_v0.10X.jpg
    Martello_v0.10X.jpg
    253.2 KB · Views: 9,707

HT receivers for active speakers

has anyone used multichannel HT receivers to power active speakers?

At the moment I am prototyping a 2 Way OB and applying the filtered/equalized line level signal to the multichannel input of a 6.1 channel Onkyo amplifier. It has individual level control for each amplifier, and the master volume of course.

Pity the multichannel input is only 5.1, so I cant access the center back amplifier at the moment. Looking at the amp schematics I have some ideas to access this channel and keep some of the level control as well as the master volume. Further option is to feed the signals directly to the power amplifier board. I saw some HT receivers with 6.1 (or higher) multichannel inputs, so these wouldnt need any hacking.

I know there is a lot of cheap amplifier boards on ebay, but I like the idea of recycling and to already have everything packed in a nice box (with input RCAs, speaker binding posts, level and volume control...)

Anyone has tips and tricks how to reuse these relatively inexpensive (I paid USD 50) "obsolete" receivers in active speakers?

cheers, Erik

can't order from diyAudio store

I was about to order some heatsinks from the diyaudio store, just like many times before, and like many times before, it automatically pre-populated my name, email, phone and address...when I go for next page to pay, it says it can not ship to the address I provided.
Well, I do have the same address last 5 years, and I purchased a dozen times from the diyaudio store, to the same address, so I am not sure what the problem is.
Any suggestion?
Projects by fanatics, for fanatics
Get answers and advice for everyone wanting to learn the art of audio.
Join the Community
507,708
Members
7,885,272
Messages

Filter

Forum Statistics

Threads
406,089
Messages
7,885,272
Members
507,708
Latest member
ahmadmusowwir