Member
Joined 2009
Paid Member
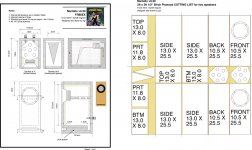
I have a pair of drivers and want to make a pair of reflex desktop speakers which don't have visible ports. This is a kind of follow on from here:
http://www.diyaudio.com/forums/full-range/173553-fr88ex-based-micro-onken.html
I'm aware that I'm pushing my luck a bit with a narrow box and the alignment is not quite what I wanted, the ports are a tad long, but it's close.
Oh yes, Martello is a kind of small and simple castle and I remember somewhere there being downward ported speakers that are known as castles
Driver Review: Comments: This is without a doubt the highest performing 3" I've come across, at least on a few fronts. The motor is an underhung neodymium design and the cone is thin (and fragile) formed aluminum. The only negative is a slightly ragged top end that may take some filter work if used full range, but I'd generally recommend a cheap and small neo tweeter placed close and crossed over high. There's a lot on the positive side, like high sensitivity, a clean low end and smooth midrange response. The frame is cast with ventilation under the spider, but users will have to pay close attention to airflow behind the cone - It's even more important to chamfer the inside baffle opening and in this case likely use a thinner baffle material as well. Tested June 2009. [Zaph: http://zaphaudio.com/smalltest/]
Another Martello build here: http://www.diyaudio.com/forums/full-range/188569-fountek-fr88ex-3-build.html#post2564558
Attachments

Last edited:
Member
Joined 2009
Paid Member
Member
Joined 2009
Paid Member
Member
Joined 2009
Paid Member

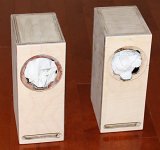
drivers breaking in - it's a bit rough, it's not sealed properly, no stuffing or lining, box needs sanding down etc.
Looking good. I'm interested in your listening impressions on this driver after you have the box tuned.
Member
Joined 2009
Paid Member
Well I've not had time to make much progress but they've had a few more hours to break in. The boxes are still not lined/stuffed.
However, I can say that the sound seems to have stopped changing, so the break-in is showing very good progress.
Even in this state I find the sound very good. They won't rattle any windows of course, the bass just doesn't go deep or with much conviction but then for the size they do well. No BSC has been employed.
Compared with my Moon Onken speakers based on the now obsolete fostex FE127e they sound more neutral. I put this down to the 7kHz peakiness of the Fostex whereas the Fountek has no obvious warts so far. They are not as sensitive as the Fostex drivers, my tube amp is on 'full speed' and it's still not really enough (but it's a flea powered amp so don't let this worry you yet).
Listening is mostly gentle music, no hard rock. Piano sounds good.
So far so good !
Last edited:
Well I've not had time to make much progress but they've had a few more hours to break in. The boxes are still not lined/stuffed.
However, I can say that the sound seems to have stopped changing, so the break-in is showing very good progress.
Even in this state I find the sound very good. They won't rattle any windows of course, the bass just doesn't go deep or with much conviction but then for the size they do well. No BSC has been employed.
Compared with my Moon Onken speakers based on the now obsolete fostex FE127e they sound more neutral. I put this down to the 7kHz peakiness of the Fostex whereas the Fountek has no obvious warts so far. They are not as sensitive as the Fostex drivers, my tube amp is on 'full speed' and it's still not really enough (but it's a flea powered amp so don't let this worry you yet).
Listening is mostly gentle music, no hard rock. Piano sounds good.
So far so good !
it's certainly been my experience that when well executed, this design architecture creates a small enclosure that is neutral enough to showcase the particular driver's nature - so you may well hear more differences than in other enclosures.
congrats - nice project
Member
Joined 2009
Paid Member
Hi Chris,
Well I am surprised by how good I find the sound of these little Fountek's. I thought they looked great on paper, but they actually sound good too, given their size. I have a line on some felt so I hope to get the enclosures sorted out in the next week and then I can give them a proper listen.
Well I am surprised by how good I find the sound of these little Fountek's. I thought they looked great on paper, but they actually sound good too, given their size. I have a line on some felt so I hope to get the enclosures sorted out in the next week and then I can give them a proper listen.
Member
Joined 2009
Paid Member
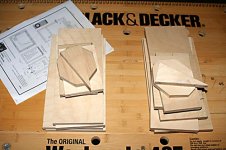
some progress again.
I've fitted the holey brace and glued a few triangular wooden pieces in place to strengthen the corners and stiffen the long dimensions.
Have started sticking pieces of black felt over the inside surfaces - a bit of a messy job but it'll work just fine.
I've fitted the holey brace and glued a few triangular wooden pieces in place to strengthen the corners and stiffen the long dimensions.
Have started sticking pieces of black felt over the inside surfaces - a bit of a messy job but it'll work just fine.
Attachments
Member
Joined 2009
Paid Member
I was a bit worried about that. The felt was free though. I did notice a subjective change in the sound of my voice when I 'talk' into the opening - it sounds 'dead' compared to what it was before. Perhaps I can stuff some felt pieces inside the cavity ?
Add some "Poly-fluff"...
Mine are now in kinda TML style box, but" i.m still learnin how to crawl...😉
Joe
Mine are now in kinda TML style box, but" i.m still learnin how to crawl...😉
Joe
Hello All,
I won these speakers in a raffle and they've been in the box for about 7 months. VERY, VERY interested in your opinions on this enclosure.
John
I won these speakers in a raffle and they've been in the box for about 7 months. VERY, VERY interested in your opinions on this enclosure.
John
Member
Joined 2009
Paid Member
Hello All,
I won these speakers in a raffle and they've been in the box for about 7 months. VERY, VERY interested in your opinions on this enclosure.
John
Hold on them speaker drivers John - if my first impressions hold true you'll be very pleased with these little marvels.
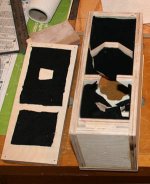
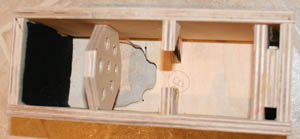
I've completed installing the felt lining on all surfaces. I've also finished the gluing up so I now have a complete box. I've hand-planed the edges flush and given the boxes an initial sanding also by hand - a fair bit of grunt work but it's quite satisfying.
p.s. you may have noticed in post9 the first image allows you to see that I've taken the wooden 'triangles' that were cut off the corners of the holey brace and glued them in the corners about half way between the brace and the bottom of the enclosure - the idea being to add a bit more stiffness (did I 'splain that OK?)
Attachments
Last edited:
Bigun,
Sounds good, I'll hold on to them since you posted a drawing for the enclosure. Before that, I didn't have any idea how to get started. Seems like a fairly easy build. Thanks.
John
P.S. - you have " 'splained " it well
Sounds good, I'll hold on to them since you posted a drawing for the enclosure. Before that, I didn't have any idea how to get started. Seems like a fairly easy build. Thanks.
John
P.S. - you have " 'splained " it well
Member
Joined 2009
Paid Member
Glad to have provided some encouragement minus23 (with a name like that I assume you live somewhere north?)
I quite like these little boxes, fun to make when they're so easy to handle. Of course, simple doesn't mean it ain't gonna take some work.
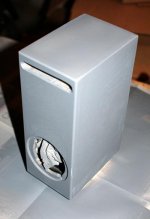
I've sanded them further, filled cracks and dings, sanded a bit more, filled again, sanded again. I thought they were looking good so I splashed out on a can of primer. Since my last speaker project was a veneer & varnish finish I decided this time to try my hand at a painted finish just for the learning.
I've applied 3 coats of primer. It's brutal though, shows up every imperfection. Still I reckon this will allow me to better see them and fix 'em up. I'm aiming for at least 10 coats of primer for a solid foundation and to ensure a good coverage. First coat just tints the grain but as the coats go on the coverage improves. I'll need to get a bit more into the slot port.
I haven't decided on a final colour, maybe you fella's would like to profer a suggestion. I'm thinking red; Black is so 'local box store' 😛
I quite like these little boxes, fun to make when they're so easy to handle. Of course, simple doesn't mean it ain't gonna take some work.
I've sanded them further, filled cracks and dings, sanded a bit more, filled again, sanded again. I thought they were looking good so I splashed out on a can of primer. Since my last speaker project was a veneer & varnish finish I decided this time to try my hand at a painted finish just for the learning.
I've applied 3 coats of primer. It's brutal though, shows up every imperfection. Still I reckon this will allow me to better see them and fix 'em up. I'm aiming for at least 10 coats of primer for a solid foundation and to ensure a good coverage. First coat just tints the grain but as the coats go on the coverage improves. I'll need to get a bit more into the slot port.
I haven't decided on a final colour, maybe you fella's would like to profer a suggestion. I'm thinking red; Black is so 'local box store' 😛
Attachments
Glad to have provided some encouragement minus23 (with a name like that I assume you live somewhere north?)
I quite like these little boxes, fun to make when they're so easy to handle. Of course, simple doesn't mean it ain't gonna take some work.
I've sanded them further, filled cracks and dings, sanded a bit more, filled again, sanded again. I thought they were looking good so I splashed out on a can of primer. Since my last speaker project was a veneer & varnish finish I decided this time to try my hand at a painted finish just for the learning.
I've applied 3 coats of primer. It's brutal though, shows up every imperfection. Still I reckon this will allow me to better see them and fix 'em up. I'm aiming for at least 10 coats of primer for a solid foundation and to ensure a good coverage. First coat just tints the grain but as the coats go on the coverage improves. I'll need to get a bit more into the slot port.
I haven't decided on a final colour, maybe you fella's would like to profer a suggestion. I'm thinking red; Black is so 'local box store' 😛
maybe by the time you're finished with the painting, you'll appreciate the economy of materials and labor in a veneer job with clear coat finish? 🙄
FWIW, I've found the Tremclad texture products to do a decent job of hiding fabrication faux pas (or on back sides) but with the required several coats of color and clear top coats, you can easily spend more on product alone than the square foot cost of the veneer (and the total labor is probably less as well).
Mid brownish/reds are nice on boxes this size.
Member
Joined 2009
Paid Member
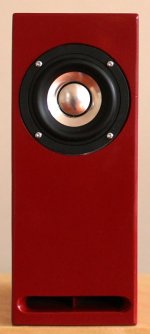
I found before, that using Veneer also required a fair bit of time and care to get good results but anyhow, for this project the goal was to try something new so veneer was not an option.
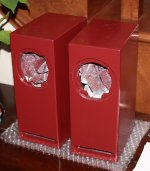
I went for some Colonial Red. The boxes have had one coat so I could see what this colour looked like on them; trouble is that reds are difficult for digital cameras to capture accurately. Even with some editing the colours in the photo aren't quite right and they look much better in the flesh.
The boxes now need some gentle sanding and then several more coats. It won't be perfect, but I am liking the painted finish for small speakers.
Attachments
Member
Joined 2009
Paid Member
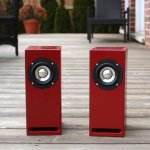
I've now got the speaker drivers installed in the enclosures and I'm listening to them through my Cellini tube amp.
The felt lining has addressed any issues with h.f. reflections inside the box and the fully glued up box now allows the tapered slot port to work properly - bass is excellent for such a small box and driver - I'm pleasantly surprised. Imaging and sound stage are good. So far I can't find fault - will continue listening.
I can quite easily get picky about my craftmanship - but the next pair I make will be perfect 😀
I have it on record from the missus that WAF is very high
Attachments
- Home
- Loudspeakers
- Full Range
- Martello enclosure for FR88EX