And you're still driving directly, or through your DHT?
I've got an 8W DHT SET that I'll be using for voltage. Will be trying the F4 on bottom of a bi-amp setup and driving everything with the SET running a resistor. Really looking forward to hearing it this week/end, I've been trying to solve a bass problem for a year. Any amp I try beats the SET in bass, but loses too many other places... And bi-amping with an active crossover killed coherency. Hoping the F4 solves all of that.
Yesterday I hooked the F4 up as follows: PS Audio Directstream -> PassLabs XP10 -> Bottlehead S.E.X. -> F4 -> Harbeth 7es3. It sounds exactly as Nelson and everyone else has claimed: tone, texture and warmth of the S.E.X. with drive and bass of a much more powerful amp. I am thrilled with the sound and the flexibility of this amp. I have used tube amps for the past 15 years...various Audio Research and Conrad Johnson amps. I've tried a few solid state amps on occasion, the last being a PassLabs Int-60 that replaced an Audio Research VSi-75. I could live with that amp, as well as the F6 I built, instead of any of the Audio Research amps, except maybe my old CA-50 (it has a bit of a mid-bass bump and warmth not found in current AR models that makes it a very engaging amp to listen to). But no solid state amp I have heard to date has ever gotten me to consider giving up my Conrad Johnson Classic 60. It is the one I have always come back to. While there are certainly solid state and tube amps that are quieter, more detailed, more accurate, more of all the things high-end reviewers generally rave about, none have the the BIG sound that the Classic 60 has. The F4 driven by the S.E.X. has it. It sounds warm, rich and BIG with all the resolution I want. I built the S.E.X. for occasional headphone use and it is obviously not a state of the art DHT amp by any measure. So now I am wondering how good the F4 would be with an even better DHT driving it. I could easily imagine ending the amp game altogether with a pair of F4 mono blocks and just exploring different preamps in the future.
now you know why I'm having Papa's Koan (F4) powered on behind my back in workshop, cruising all day long with whooping 1/2W to 1W
mostly FM program ,in my area - sole one left radio station worth listening
(so called cultural programme , all others are commercial )
mostly FM program ,in my area - sole one left radio station worth listening
(so called cultural programme , all others are commercial )
I have built a pair of F4 amps. And I agree it is fun to rotate the various preamps I have into the F4s. Of the amps I have built these are my favorites.
...maybe? It depends on how good a solderer you are.
What solder are you using? Is it lead-free? Might be part of the issue.,,
Good guess, when properly soldered I find enough flow both sides are good. Since I had a bad joint on Wayne's Line Stage, I check. If the leg through hole is a tight fit, I flip it over and hit it on that side too. Uh, after a third check for correct part and orientation!
Russellc
Yesterday I hooked the F4 up as follows: PS Audio Directstream -> PassLabs XP10 -> Bottlehead S.E.X. -> F4 -> Harbeth 7es3. It sounds exactly as Nelson and everyone else has claimed: tone, texture and warmth of the S.E.X. with drive and bass of a much more powerful amp. I am thrilled with the sound and the flexibility of this amp. I have used tube amps for the past 15 years...various Audio Research and Conrad Johnson amps. I've tried a few solid state amps on occasion, the last being a PassLabs Int-60 that replaced an Audio Research VSi-75. I could live with that amp, as well as the F6 I built, instead of any of the Audio Research amps, except maybe my old CA-50 (it has a bit of a mid-bass bump and warmth not found in current AR models that makes it a very engaging amp to listen to). But no solid state amp I have heard to date has ever gotten me to consider giving up my Conrad Johnson Classic 60. It is the one I have always come back to. While there are certainly solid state and tube amps that are quieter, more detailed, more accurate, more of all the things high-end reviewers generally rave about, none have the the BIG sound that the Classic 60 has. The F4 driven by the S.E.X. has it. It sounds warm, rich and BIG with all the resolution I want. I built the S.E.X. for occasional headphone use and it is obviously not a state of the art DHT amp by any measure. So now I am wondering how good the F4 would be with an even better DHT driving it. I could easily imagine ending the amp game altogether with a pair of F4 mono blocks and just exploring different preamps in the future.
That all sounds great. Can't wait to finally get mine up and running.
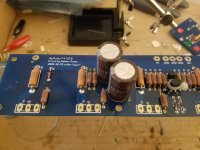
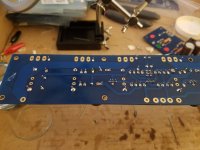
Missing a couple resistors, but stuffed and soldered a new board today. Much better. After soldering (the top again), I flipped the board and had fully soldered leads on almost all of the bottom. Just went ahead and hit those few from the other side too. Looks much better, thanks for all the tips...
Got the remainder of the parts yesterday (thanks for the mosfets Wade!) and finished up the boards.
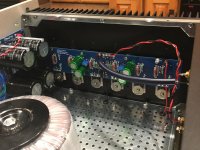
Started the biasing procedure, but unfortunately 10k at P9 is too high (can only get up to .10v bias at cold startup) and 4.75k is too low (can only get down to .15v at cold startup). Linked a couple 4.75s to try and get down a bit from the 10k, but didn't get a chance to bring it up before bed time. Hopefully I can finish today and order some 7.5k resistors to get the bias in the sweet spot.
Also, here's some pictoral evidence of the improved soldering technique... only needed to add solder to two leads on the bottom here, everything else flowed fully through.
Thanks again for all the help... and the super fast shipping Wade (wdavis009).
Attachments
Hello, did i understood correctly that for the output stage source resistors there is a metal film recommendation in the detriment of wire-wound resistors? Did I understood correctly? Is there a reason for that ?
For example i chose
594-AC05W0R470J which is ~50ppm ~5W
instead of
71-CPF2-G-0.47
or
667-ERX-3FJR47 (that is most widely used)
Mouser part numbers.
I have read somewhere a metal film recommendation and i did not understand the logic in that.
Thank you...
For example i chose
594-AC05W0R470J which is ~50ppm ~5W
instead of
71-CPF2-G-0.47
or
667-ERX-3FJR47 (that is most widely used)
Mouser part numbers.
I have read somewhere a metal film recommendation and i did not understand the logic in that.
Thank you...
Last edited:
I think it would be unwise to substitute different part numbers instead of using the parts listed in the diyAudio F4 Bill Of Materials, unless you understand exactly what you are doing, and why you are doing it, and what improvement you expect the substitution will make. If 100 people have built and enjoyed listening to the F4 amp using part X, you'd want and need an extremely good reason to throw out part X and use part Y instead.
For example i chose
594-AC05W0R470J which is ~50ppm ~5W
instead of
71-CPF2-G-0.47
or
667-ERX-3FJR47 (that is most widely used)
if you go with wirewound, i'd recommend something that is non-inductive and non-magnetic, like the Mills MR-5 series. I've used these to good results in other amps; that is, they didn't make the amp sound worse.
Honestly, couldn't really tell the difference between the fancy ones and the blue panasonics that Mr. Pass uses. I think it's mostly a matter of conscience; can you sleep at night using reasonably priced parts? Lots of people like to use boutique parts because they/we are afraid we're missing something. That's the fun of DIY .
If this is your first amp, i'd recommend sticking to the parts on the BOM. That way, you can get a feel for how it normally sounds and then upgrade parts and see what the effect is.
I went for the cheaper part ; and 470mOhm ; they have an inductance in the range of uH hence with no audio range impact.
I think it would be unwise to substitute different part numbers instead of using the parts listed in the diyAudio F4 Bill Of Materials, unless you understand exactly what you are doing, and why you are doing it, and what improvement you expect the substitution will make. If 100 people have built and enjoyed listening to the F4 amp using part X, you'd want and need an extremely good reason to throw out part X and use part Y instead.
i understood perfectly what i was doing.
i just needed educated oppinion(s) on the topic in case i might miss something.
maybe the question did not sat right with you or was not clear ; it's ok.
I think it would be unwise to substitute different part numbers instead of using the parts listed in the diyAudio F4 Bill Of Materials, unless you understand exactly what you are doing, and why you are doing it, and what improvement you expect the substitution will make. If 100 people have built and enjoyed listening to the F4 amp using part X, you'd want and need an extremely good reason to throw out part X and use part Y instead.
That seems a bit extreme, especially regarding passive components. I have read numerous times on the various build threads that parts are chosen primarily because they are cheap and readily available. In the last article I read by Nelson he stated basically the same but substituted "junk" for "cheap". I believe he also stated that the BA3 "deserved" good versus junk parts.
Any tips for how to remove stripped screws?
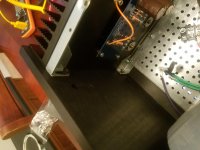
My front face plate screw holes didn't quite line up, resulting in lots of anger and two stripped screws I can't get out. Ended up only getting a single screw flush and couldn't even get the fourth in there at all. I jammed some felt pads in the gaps so the face plate doesn't rattle too much...
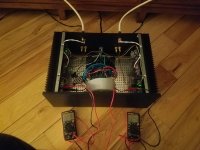
Otherwise, got everything biased up (to .280) and am ready to go. Just have to open up my SET amps and make sure I know which speaker terminal is grounded. Later tonight or tomorrow...
My front face plate screw holes didn't quite line up, resulting in lots of anger and two stripped screws I can't get out. Ended up only getting a single screw flush and couldn't even get the fourth in there at all. I jammed some felt pads in the gaps so the face plate doesn't rattle too much...
Otherwise, got everything biased up (to .280) and am ready to go. Just have to open up my SET amps and make sure I know which speaker terminal is grounded. Later tonight or tomorrow...
Attachments
Any tips for how to remove stripped screws?
My front face plate screw holes didn't quite line up, resulting in lots of anger and two stripped screws I can't get out. Ended up only getting a single screw flush and couldn't even get the fourth in there at all. I jammed some felt pads in the gaps so the face plate doesn't rattle too much...
Otherwise, got everything biased up (to .280) and am ready to go. Just have to open up my SET amps and make sure I know which speaker terminal is grounded. Later tonight or tomorrow...
Those are the wrong screws for the faceplate. You should use the silver panhead screws. You can see them in the pictures I posted previously. If the holes aren't lined up you should loosen the bolts attaching the bottom plate so that the heat sinks can be moved in or out until the holes line up. Once the screws for the faceplate are snug you can then tighten the bottom plate back up. For squaring everything up, I find it easiest to attached everything loosely, stand the amp up on its faceplate, aligned the heatsinks evenly on each side of the faceplate and then tighten everything up.
To get the screws out you can use a small pair of vice grips and lock them tight on the screw head. Threads on the faceplate will probably be stripped now but you can use a tap set (available at Home Depot, etc.) to clean them up. Just don't tighten the screws too much after doing that as the threads will be weaker.
Last edited:
You can see the correct screws in this picture.
Thanks Wade. I'll give it a shot later tonight...
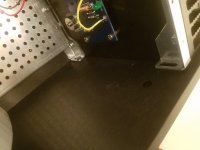
With probably less than 1/4th of a rotation per turn, the vice grips were a slow go, but effective. After loosening everything I was pretty much able to get the front on. Had to use one metal screw so it could work itself in at an angle.
Got everything hooked up and am just slowly bringing it up to temp to check the bias again. Tried each channel on a test speaker yesterday and am about to give it a go on the real system...
Got everything hooked up and am just slowly bringing it up to temp to check the bias again. Tried each channel on a test speaker yesterday and am about to give it a go on the real system...
Attachments

- Home
- Amplifiers
- Pass Labs
- A guide to building the Pass F4 amplifier