Love it! Yes. Are you planning on a group buy run? Waynes own BA18 Pre would enjoy the PSU.
If there is enough interest then I could organise something. I would need a contact in the US to receive all the boards for interested parties there. I also need to get some of the dual rail positive and negative boards made for testing before I distribute them to make sure there are no issues. 🙂 I've put a post in the BA18 thread to generate interest.
Instead of sanding everything, wouldn't it just be easier to run a wire from the pot body to the grounding bolt?
I did that way back when on an early project when I was confounded by ground loops. You certainly can drill a screw into each chassis panel and connect a wire between it all but as 6L6 said, you get the same effect by sanding AND is far less hassle and less prone to missing something.
And again, just be sure you test continuity. Thats something I learned a long time ago through trial and (lots of) errors early on - so don't assume! 🙂
If there is enough interest then I could organise something. I would need a contact in the US to receive all the boards for interested parties there. I also need to get some of the dual rail positive and negative boards made for testing before I distribute them to make sure there are no issues. 🙂 I've put a post in the BA18 thread to generate interest.
Definitely interested on few of them!!
Definitely interested on few of them!!
Same here. I'd be interested in some too. I was just looking at figuring out this same thing to use for a front panel LED/switch.
Can these be sold in the DIY store?
Same here. I'd be interested in some too. I was just looking at figuring out this same thing to use for a front panel LED/switch.
Can these be sold in the DIY store?
For switching it's easier to use an IEC inlet with switch built in. These usually have fuse holders built in too for added safety.
Would be awesome to have my boards in the diyAudio store but wouldn't even know where to start with that one or how it all even works!
I've followed everyone's suggestions regarding noise floor. All chassis parts are now sanded and they, along with the pot body all have continuity to the ground bolt on the back. I've also swapped out the hp jack for Neutrik plastic body one. My findings: some of the "shhhhh" is from the upstream DAC. However, WHAMMY's own noise floor still bugs me. I can't hear it during music but I'd love for WHAMMY to be pitch black regardless...
I'll be doing some op amp rolling and have a question:
I'd like to put a piece of tape on top of each amp so I can't see the model number. Instead I'll write A,B,C, etc. to do blind evaluation of them. Should I be concerned about a piece of tape causing the amps to run too hot?
Thanks.
I'll be doing some op amp rolling and have a question:
I'd like to put a piece of tape on top of each amp so I can't see the model number. Instead I'll write A,B,C, etc. to do blind evaluation of them. Should I be concerned about a piece of tape causing the amps to run too hot?
Thanks.
Should I be concerned about a piece of tape causing the amps to run too hot?
No, but be careful when you remove the tape as not to cause a static discharge. Best remove the op amp from the socket and place in conductive foam before removing the tape.
No, but be careful when you remove the tape as not to cause a static discharge. Best remove the op amp from the socket and place in conductive foam before removing the tape.
Thanks!
I need a replacement for one of the red led's for the regulator. Does anyone know a source/part number?
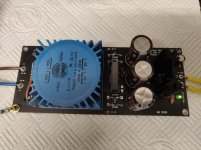
Hey guys. I have been getting handy with KiCad just lately and made a few power supply PCB designs based on the one on the Whammy and I also made a PCB of the circuit 6L6 posted which provides a rectifier to drive an LED for power on indicator.
I got some boards made of the single rail positive power supply and the LED rectifier and I am just awaiting the components from Mouser so I can build some for testing.
I made an alteration to the schematic 6L6 posted on the rectifier and made the addition of a 10K trim pot so you can adjust the brightness of the power LED on the fly.
These designs aren't just useful for the Whammy but can be useful for many other future projects.
I also did two types of the dual rail PCB. One with a positive and negative supply which is pictured and the other which is dual positive which is useful for building standalone linear power supply boxes.
Let me know what you guys think. 🙂
Very nice!

From 6L6's rough BOM "LED D5 D6 {RED} These are not lights, but voltage references use red 604-WP710A10LID".
If there is enough interest then I could organise something. I would need a contact in the US to receive all the boards for interested parties there. I also need to get some of the dual rail positive and negative boards made for testing before I distribute them to make sure there are no issues. 🙂 I've put a post in the BA18 thread to generate interest.
Also interested!
I got the single rail board built and up and running. It works sweet and would be a good PSU for anyone that just needs a positive supply that's dead quiet. I need 2 of these boards for testing so I got 8 boards left. 🙂
Attachments
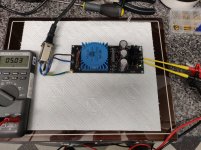
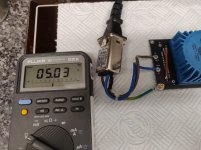
Very nice build indeed. And looks like a great DC source.
Would be plugging in the rail pcbs instead of or to the rail capacitors C19 and C28. For whammy build you can actullay add those the the power pcb itself and jist plug in the output to the main board
I was actually thinking about a dc source for the muses board this will do just fine. Would you consider selling one ?
And do you have the led pcbs avaialble as well ?
Thanks,
Oleg
Hello Gaz2613,
Your boards are looking very nice! 🙂
I am interested in both the single and dual rail version. So, if you have some boards left I would take one.
I also would like to use them for a muse controiller and for various preamps like the B1, H2 and B1 Korg.
Best regards
Stephan
Your boards are looking very nice! 🙂
I am interested in both the single and dual rail version. So, if you have some boards left I would take one.
I also would like to use them for a muse controiller and for various preamps like the B1, H2 and B1 Korg.
Best regards
Stephan
Very nice build indeed. And looks like a great DC source.
Would be plugging in the rail pcbs instead of or to the rail capacitors C19 and C28. For whammy build you can actullay add those the the power pcb itself and jist plug in the output to the main board
I was actually thinking about a dc source for the muses board this will do just fine. Would you consider selling one ?
And do you have the led pcbs avaialble as well ?
Thanks,
Oleg
I have the Single Rail Positive Output as pictured and the LED Rectifier boards available.
Hello Gaz2613,
Your boards are looking very nice! 🙂
I am interested in both the single and dual rail version. So, if you have some boards left I would take one.
I also would like to use them for a muse controiller and for various preamps like the B1, H2 and B1 Korg.
Best regards
Stephan
I only have single rail positive at the moment. I'll be getting dual rail boards manufactured soon. Are you looking for positive/negative dual rail or positive/positive?
You have PM.
Well it should be easy to make a Positvie/Negative output using dual positive out on the PCBs right 🙂
Well it should be easy to make a Positvie/Negative output using dual positive out on the PCBs right 🙂
You have PM.
Well it should be easy to make a Positvie/Negative output using dual positive out on the PCBs right 🙂
No because the pinout is different between the positive and negative regulators that's why I made 2 separate boards.
The dual positive one was made for people who want to make just a power supply in an enclosure to power multiple devices.
- Home
- Amplifiers
- Pass Labs
- "WHAMMY" Pass DIY headphone amp guide