Cubicincher,
Thanks for letting us know that the WLS is most neutral of the three.
Best,
Anand.
Thanks for letting us know that the WLS is most neutral of the three.
Best,
Anand.
Thank you myleftear & 6L6. I found the notes on the schematic I hadn’t printed out. Am I reading it correctly as myleftear suggested, the alternate parts are more for headphone use? I’m really not into headphones and am just looking to build a linestage to drive the F5T. Am I safe thinking to use the 1845 & 992’s and not make the capacitor and resistor changes?
Headphone vs No Headphone
Luvrockin,
Checkout post #1188 from 6l6. At the lower right hand side of the schmatic you will see the note about the parts to use for a straight build vs a Headphone build.

Luvrockin,
Checkout post #1188 from 6l6. At the lower right hand side of the schmatic you will see the note about the parts to use for a straight build vs a Headphone build.
Hello guys, I have a question about using the Muses VCM and display that I’ve purchased. The info on the website has modifications for using their VCM controller with Wayne’s BA18. They recommend changing some components on the BA18 so it can be powered with +/-14vdc. Does this sound ok and with lower rails, will I get enough output to drive my F5T or other future projects? I’ve included the link if anyone would care to glance. As a newbie, I’d like to be sure this is the correct thing to do. Thanks in advance.
https://edea75c2-1ee1-46a0-90b0-717...d/6fd7ca_be4a3abc142e448587231feaa445cf51.pdf
https://edea75c2-1ee1-46a0-90b0-717...d/6fd7ca_be4a3abc142e448587231feaa445cf51.pdf
to luvrockin #2748
Hello luvrockin,
your WLS-build looks really nice so far.
But wait, till you have listened to it.... 😉 And no hurry on the last few miles -
no silly mistakes please! 😀
Cheers
Dirk
Hello luvrockin,
your WLS-build looks really nice so far.
But wait, till you have listened to it.... 😉 And no hurry on the last few miles -
no silly mistakes please! 😀
Cheers
Dirk
Thanks for the info Anand. Dirk, will take it slow and steady. My biggest hang up is how to incorporate this into a chassis that will like decent. Joe
to luvrockin #2750
Luvrockin,
I am sure you will find a really good solution for the case! 😉
Those are the moments I am sitting in front of the pcbs and moving them around like in those old computer - game - days with 'Tetris'... 🙄
Cheers
Dirk
Luvrockin,
I am sure you will find a really good solution for the case! 😉
Those are the moments I am sitting in front of the pcbs and moving them around like in those old computer - game - days with 'Tetris'... 🙄
Cheers
Dirk
SRMcGee Wow Beautiful builds! I much appreciate you taking the time to share the pictures and your thoughts. I plan to do a simple version of the amp. Everything you said is right in line with what I would like!
cubicincher
The speakers that I have great soundstage and detail. I tend to like to lean towards the side of gaining more detail as I think that is one quality that I haven't exploited completely with them. The speakers are open-backed on the mids and highs so soundstage is pretty easily achieved Every step that I have taken in component changes has been towards having more highs and detail. The components that I started with were very warm sounding.
I have built the Korg Nutube. It is a very nice-sounding little preamp. I have enjoyed it quite a bit. It was the basic full kit from DIY audio. I will definitely use it in a 2nd system.
Thanks again! You guys are great!
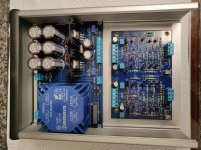
My BA2018
SRM,
Those builds are gorgeous!
May I ask:
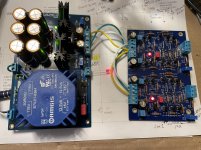
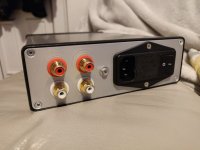
- what are these caps between umbilical and the line-stages, and what they‘re for?
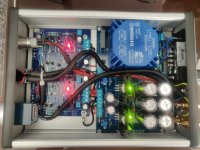
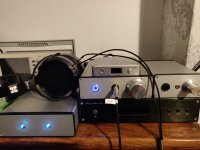
- how did you fix the blue led‘s around the volume-knob, are the glued into place or is there a nifty magic behind?
SRMcGee- Scott, beautiful work. Using the program you shared with me, did you actually then do the machined and printing yourself?
Thanks for the info Anand. Dirk, will take it slow and steady. My biggest hang up is how to incorporate this into a chassis that will like decent. Joe
Why not do what I did and use the Hammond 1455T2201 enclosure? It looks neat and my Helios PSU was design to slide into the rails of it.
Attachments
Last edited:
May I ask:
- what are these caps between umbilical and the line-stages, and what they‘re for?
- how did you fix the blue led‘s around the volume-knob, are the glued into place or is there a nifty magic behind?
myleftear:
The caps are 0.1 uF and are intended to filter away any noise that might have been picked up by the rails between the power supply chassis and the BA2018 chassis. There are three bipolar power supplies in the power supply chassis; hence, there are six incoming power lines (3 positive, 3 negative) to be cleansed.
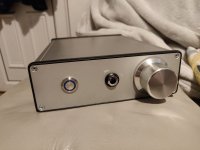
I use Front Panel Express on most of my projects and years ago worked out a nifty way to showcase knobs. In the case of my BA2018, the knob is made of steel and is 54mm in diameter. I put a 56mm diameter cavity on the front panel; that allows the bottom of the knob to sit just below the surface of the front panel and leaves a 1mm ring around the knob. There are eight 3.1mm diameter holes drilled from the rear side of the front panel into the cavity, and a 3mm LED has been inserted into each hole. The LEDs are held in place by clear silicone glue (clear silicone caulk could be used as well).
SRMcGee- Scott, beautiful work. Using the program you shared with me, did you actually then do the machined and printing yourself?
luvrockin:
No, the design was created using Front Panel Designer and then sent, along with the front and rear panels, to Front Panel Express for processing. They drilled the holes, etched the aluminum and added the color in accordance with my design. FPE isn't cheap, but they do a nice job implementing your vision.
All:
There is no rocket science to my designs and I'm happy to share. The .fpd file for the front panel on my BA2018 is attached. I'm always looking for ways to improve my designs, so feel free to suggest improvements.
Regards,
Scott
Attachments
Cinemag's strange behavior
Here I am again.
My WLS is wonderfully playing, I enjoy it very much.
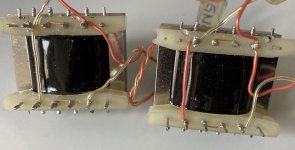
I then connected the cinemags to the output, and whoops, one channel is being upped like the expected +6dB (listened, not measured), but the other stays the same.
THIS IS PUZZLING. How can it be, I mean, if one channel was noisy or dead, ok, broken part, but no effect?
😕
Here I am again.
My WLS is wonderfully playing, I enjoy it very much.
I then connected the cinemags to the output, and whoops, one channel is being upped like the expected +6dB (listened, not measured), but the other stays the same.
THIS IS PUZZLING. How can it be, I mean, if one channel was noisy or dead, ok, broken part, but no effect?
😕
Attachments
Last edited:
- Home
- Amplifiers
- Pass Labs
- Wayne's BA 2018 linestage