Owon makes a $225 portable one that is like a DMM in size. I use it almost everyday. Great since it is isolated from earth mains ground.

I recently finished the BA 2018 linestage. I should say done but not finished yet, because of some details I want to improve.
I could not have done it without this forum en the build guide. I learned the most from the mistakes other people made, which helped me to avoid them. My knowledge of electronics is very limited. Advise on how to adjust the trimmers, how to solder smd's and the importance of the quality of the power source was very welcome. Thank very much to all of you.
I needed a second linestage board, because I fried the first one . Literally the board started to smoke. So I learned to be precise and patient and yes neatness counts.
Sound. Previously i build the Korg Nutube B1 Preamplifier which was a big improvement on my system. It did however have a hiss and I was not entirely happy with the high tones. That was probably due to my lack of solder skills.
Wayne's 2018 Linestage is a further improvement on my system. The definition of the high tones is refined. The bass is tight. The stereo image is wide. Musical instruments are easy to distinguish. When I turn up the volume, the music still sounds very nice. I didn't expect the difference to be so big. I am very happy with this build.
Thank you very much Wayne Colburn for sharing this design.
Attachments

Last edited:

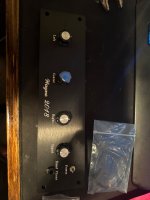

Finally finished and she sings. Sounds fantastic! Despite the not so perfect wiring she’s dead quiet.
I learned that I’ll never do input selection this way again and to plan the wiring layout before I design a front panel!
Thank you @birdbox and @6L6 for answering all the questions I have and just being all around good guys!
On to the next!
I learned that I’ll never do input selection this way again and to plan the wiring layout before I design a front panel!
Thank you @birdbox and @6L6 for answering all the questions I have and just being all around good guys!
On to the next!
Attachments

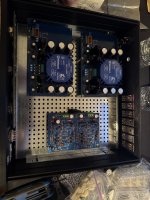
After many years of sitting in the neglected projects pile, my BA2018 boards finally got a chance to make a positive contribution to society  👍
👍
but somewhere along the way, life threw a curveball in the form of FJV1845/FJV992 which are the smd versions of the KSA992/KSC1845 and you know what happens to those who hang around here for too long ... one starts to get the urge to follow questionable pursuits 🤔😏😈
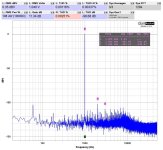
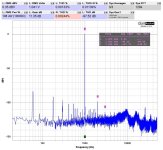
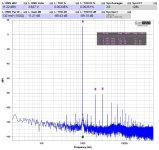
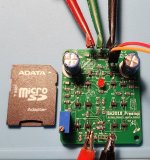
Anyway, Mouser heeded my call but I didn't have appropriate SOT23-3 to TO-92 adapters so I improvised. I was only mildly surprised that it worked, moderately surprised that the results were pretty much identical to the through hole version and greatly relieved to see that they were roughly 10C above room temp running on +/-15V rails. I ran the TH version on +/-18V rails for comparison and as expected, THD is slightly better.
Anyway, this part of the journey was mucho fun. Ignore the crabgrass growing in my charts as my messy desk has gotten much messier and my measurement setup is quite adhoc now. I think I need to invest in some cookie tins.
Cheers,
Stephen
... to be continued of course - the road to purgatory is a very long, winding one. ZM says it eventually leads to Rome 🤣👽
👍 but somewhere along the way, life threw a curveball in the form of FJV1845/FJV992 which are the smd versions of the KSA992/KSC1845 and you know what happens to those who hang around here for too long ... one starts to get the urge to follow questionable pursuits 🤔😏😈
Anyway, Mouser heeded my call but I didn't have appropriate SOT23-3 to TO-92 adapters so I improvised. I was only mildly surprised that it worked, moderately surprised that the results were pretty much identical to the through hole version and greatly relieved to see that they were roughly 10C above room temp running on +/-15V rails. I ran the TH version on +/-18V rails for comparison and as expected, THD is slightly better.
Anyway, this part of the journey was mucho fun. Ignore the crabgrass growing in my charts as my messy desk has gotten much messier and my measurement setup is quite adhoc now. I think I need to invest in some cookie tins.
Cheers,
Stephen
... to be continued of course - the road to purgatory is a very long, winding one. ZM says it eventually leads to Rome 🤣👽
Attachments

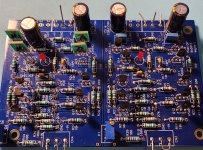

Next stop on the road to purgatory looks like this. All pads are supposed to be 'handsoldered' according to KiCad.
805 for resistors and alternative footprints for TO-126 outputs. I think this board is 50mm x 90mm (don't remember offhand)

805 for resistors and alternative footprints for TO-126 outputs. I think this board is 50mm x 90mm (don't remember offhand)
We did say the road was a long winding one right? I can already hear the cries "but that board is still got TH components! What was the point of suffering through all those SMD components just to poke ugly holes through the lovely FR-4?"
If you fall into that camp, you probably have this artwork hanging in your bedroom

and if that's the case, you might want to add this to your art collection as well

My penance was to suffer through trying to make it 1-layer without a dozen jumpers so that it could be printed on ALU ... built in heatsink. This one is not the 'handsoldered' footprints so stencil and hotplate/oven is highly recommended ... unless you have a really heavy penance bill to pay.
Time waits for no man but we all wait for the postman ...
To be continued
If you fall into that camp, you probably have this artwork hanging in your bedroom
and if that's the case, you might want to add this to your art collection as well
My penance was to suffer through trying to make it 1-layer without a dozen jumpers so that it could be printed on ALU ... built in heatsink. This one is not the 'handsoldered' footprints so stencil and hotplate/oven is highly recommended ... unless you have a really heavy penance bill to pay.
Time waits for no man but we all wait for the postman ...
To be continued

The long awaited (by almost nobody) update to my adventure in SMD land ...
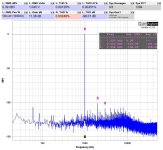
I managed to really screw this one up in so many ways, you'd think that it was deliberate but that's just the boundless nature of my stupidity at work here. I'll keep it short and just say that I had components facing the wrong way in the schematic and screwed up footprints more than a couple of times, so after 4 revisions of PCBs, I finally got a mildly-incorrect version to work. In this one, the JFET source and drain being interchangeable is put to the test but the measurements don't seem to care. I can finally say at last, that it does work using SMD devices.
I was surprised that the THD was lower than the TH version but happy to take it as a win. I tested at both 15V and 18V rails with some additional reduction in THD at +/-18V. I have corrected versions (correct JFET footprints) coming for testing and will post gerbers for those once they pass but if anyone wants gerbers for this one, send me a PM.
Cheers
Attachments
-
 BA2018_SMD_V3.01_jfet_switched_FR_local_supply_caps.jpg96.6 KB · Views: 95
 -
 BA2018_SMD_V3.01_jfet_switched_11dbV_10K_load_local_supply_caps.jpg138.4 KB · Views: 83
 -
 BA2018_SMD_V3.01_jfet_switched_0dbV_10K_load_local_supply_caps_18V_supply.jpg133.2 KB · Views: 74
 -
 BA2018_SMD_V3.01_jfet_switched_0dbV_10K_load_local_supply_caps.jpg132.7 KB · Views: 92
 -
 BA2018_SMD_2.jpg250.6 KB · Views: 102
 -
 BA2018_SMD_1.jpg239.1 KB · Views: 105

Fun fact:
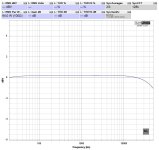
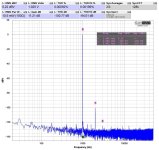
After so many failures and burned components, I stopped testing fully populated boards so when I finally had one working, it didn't have local power supply caps installed. I later installed 220uF caps that you see in the previous pics. Power is +/-15V rails supplied by a Siglent SPD3303X-E benchtop supply. I'll let the graphs do all the talking

After so many failures and burned components, I stopped testing fully populated boards so when I finally had one working, it didn't have local power supply caps installed. I later installed 220uF caps that you see in the previous pics. Power is +/-15V rails supplied by a Siglent SPD3303X-E benchtop supply. I'll let the graphs do all the talking
- Home
- Amplifiers
- Pass Labs
- Wayne's BA 2018 linestage