Okay. But this will be the first time that you will wind the bobbin using the drill? Or you have done before? It is practical?
That's a good idea!
That's a good idea!
hi tony,
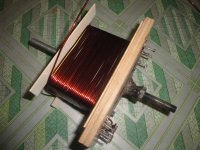
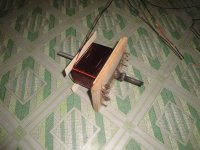
i made the bobbin with pcb board.
the problem is i cant wind the wire with straight.
the wire is very thick and i burn the wire with lighter, the enamel is not removing. i think this is good quality wire.
any method for winding this wires?
i will post images when my camera return from my friend.
what i do in cases where thick wires is used is i lay them out straight on the ground and remove the kinks if any before winding them onto the bobbin....
nice bobbins and mandrel you have there btw....
now after winding the coils you can use rubber or wooden mallets to compress the coils.....do not pund on the coils directly but use a small wooden planck about 1/2 inch thick.....do not remove the coils from the mandrel while you are doing this.....


another way is to use a table vise:
An externally hosted image should be here but it was not working when we last tested it.
removing enamels off the wire ends, i use the flat side of the box cutter's knife....

have someone beside you always to assist you.....when i built my biggest traffo, there were three of us, two brother in laws assisted me....😀
Sir Tony,
I already dismantle one of the trafo i have, the bobbin size is 51mm x 42mm. I sent you PM for my requirements. I found this site interesting Practical Transformer Winding, what do you think of it?
Junie, do not re-use the magnet wire, scrap them and get fresh wires....😎
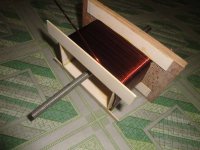
i tried with this jig.
the bobbin size is 1.75 inch centerleg, core stack 4.5 inch. i made with pcb board.
a couple of suggestion please.....the mandrel should sit in the full traverse width of the bobbins.....you can drill holes on the side of cover plate to thread in the wires...
Yes, the wire must be straight before it reaches the winding bobbin.
Tensioning through a wire straightener or as Tony suggests, long lays of straight wire on the floor going out the door and through the garden.
The wire must be straight, the wire must be tensioned.
Tensioning through a wire straightener or as Tony suggests, long lays of straight wire on the floor going out the door and through the garden.
The wire must be straight, the wire must be tensioned.
hi tony,
i cant wind with 13gage wire for my transformer, its very thick and cant wind straight.
pls tell me, for a 1200watts transformer(primary 235v ac, 60-30-0-30-60ac secondary), can easy to wind with 15awg or 16awg wire for secondary and primary gage,
lamination cl 1.75inch.
how many core stack need?
les heat.
hi tony,
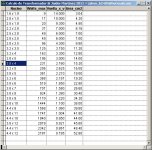
from this image if i select 4.4cm by 9cm for 1568watts transformer, what are the calculation? 60-30-0-30-60v ac for seconddary, if i choose 16awg for secondary and 18awg for primary. is this gages are ok, pls reply.
just about right for the core size...in India, you are using British standards for magnet wires so make sure you get correctly wires that you need...
1 3/4 inches center leg x 3 1/2 inches stack will require about 320 turns #18, so at 230 volt primary, that will be 1.39 turns per volt.....
secondary, you will need 4 coils of 42 turns per coils #15 magnet wire...
if you can not do a quadfillar, you can do 2 x bifillar instead.....
hi tony thanks for the reply,
if u can, pls tell me the size of the wires in millimeters, so i can measure it.
one question -in my house the main voltage is 220v and, in the shop 235v ,so i need for both windings. can u tell me the solution.
Last edited:
your traffo will work fine from 220 to 235 volts....
#18 is 1.02mm, #15 is 1.45mm....there will be variances due to insulation on wire....
#18 is 1.02mm, #15 is 1.45mm....there will be variances due to insulation on wire....
if you are seeing 235Vac in the workshop, when you just happen to measure it, then what is the maximum when you are not measuring the voltage?
How high can it go?
That should be you design voltage.
How high can it go?
That should be you design voltage.
design assumption i take with my traffo builds is 230volts primary.....no need to complicate matters....what happens at 220 volts is you lose some power output, but i doubt you will notice it in normal music listening.....with measuring sine wave power makes a slight loss of power....
hi tony,
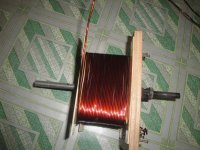
is this correct or not?
i make the bobbin with epoxy pcb board.
i start wind secondary first.
if first layer complete what insulation material should i use?
In one wire there is a little scratch on top of the wire,(.3mm by .4mm)(the enamel is removed), my screw driver scratched. is it ok or i have to replace the hole wire with new one?
can i add transformer varnish to the scratch area?
is this insulation paper is good for layer separating?
what material used to separate between primary and secondary?
Attachments

- Home
- Amplifiers
- Power Supplies
- Tony's latest traffo DIY build