You don't want HD to do most of the cutting. I have yet to find a HD store where the blade on the panel saw wasn't dull. The nice veneer will be a mess. One might be better off spending a bit more and getting the 2x4 purebond sheets shipped to them. More veneer types available as well.
I only have a jigsaw (so I can the hole) 🙂
I only have a jigsaw (so I can the hole) 🙂
🙂 - Same but I only have a RotoZip with hole jig.
🙂 - Same but I only have a RotoZip with hole jig.
Hey I got one of those too. I guess I'll go that route instead. Thanks for the tip
Would this work as stuffing? Bonded Logic - Manufacturer of Environmentally Friendly Insulation and Padding Products
I know folks use the Ultratouch denim for damping. I noticed they have acoustical panels which resemble thick felt sheets which may be more appropriate as it comes in different thicknesses.
Bonded Logic - Construction Products - Acoustical Panels
http://www.bondedlogic.com/construction-products/acoustical-panels
This stuff looks really nice.
Bonded Logic - Construction Products - Acoustical Panels
http://www.bondedlogic.com/construction-products/acoustical-panels
This stuff looks really nice.
Last edited:
Interesting, line level would be very nice considering I want to power these with a SET amplifier. You may have just saved me a hundred bucks!
Thanks!
If you are interested in doing line-level BSC, here is a link:
Baffle Step Compensation
Unless you have low impedance drive from your receiver or source, it requires a buffer or pre-amp to get low impedance to drive to the power amp.
Progress.... About that....
Progress will be slow. I'm balancing school, work, and sports at the moment but that will be dying down shortly. The season ends mid February and my second semester is much lighter. 😀
I'm going to build the cabinets first, but the drivers are out of stock for 6 to 8 weeks. So it will be probably 2 to 3 months before they are complete.
Patience is a virtue. 😉
Update:
I purchased the plywood (3/4" "Sandeply") which, if I remember, has a maple veneer on it. The largest void I could find visible along the edge was less than 1/8", so it at least seems decent. But the veneer looks especially nice. Very even.
My father is coming by tonight to lend some extra hands. nice to see the ball finally rolling.
Great Design Dumble! I love a simple design with lots of promise.
I've read the thread quickly and was wondering if I'm the only one that looks at a 45" span and thinks that it may need some internal bracing.
What say ye?
I've read the thread quickly and was wondering if I'm the only one that looks at a 45" span and thinks that it may need some internal bracing.
What say ye?
It's going to get some bracing. That's just going to be done with the scrap wood from cutting. I have about 1.5 by 8 feet left. I was thinking 2 + shaped braces horizontal and running vertical on each side a .75 by 1.5 inch brace to make the sides more rigid
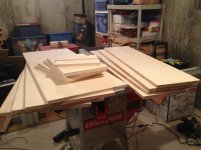
Wood Cutting Done!
Here are some pics of the work so far. The first pic is of some stacked wood... not so interesting. But that pile is all of the pieces for the two speakers. It took about 48 square feet of ply for the two cabinets.
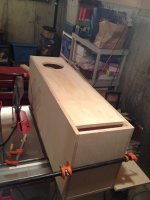
After the circles for the drivers were cut, I mocked up the cabinets using some clamps to hold everything in place. It's a big speaker but well proportioned I think. Tomorrow I will begin putting the cabinets together.
Here are some pics of the work so far. The first pic is of some stacked wood... not so interesting. But that pile is all of the pieces for the two speakers. It took about 48 square feet of ply for the two cabinets.
After the circles for the drivers were cut, I mocked up the cabinets using some clamps to hold everything in place. It's a big speaker but well proportioned I think. Tomorrow I will begin putting the cabinets together.
Attachments

Great job so far. Can't wait to see them done. I'm really interested in how the Betsy K performs. I know you have to wait on them but they really look worth the wait.
Good luck.
JH
Good luck.
JH
I actually got some used (!) and they should be here by Tuesday. I'm shooting for these being mostly done by next weekend.
Nice job so far. Looking forward to seeing the build finished and your listening impressions on the first WIBAQ. You and Bjorn may have a winner here and more folks to follow, I am sure.
Thanks. I'm pretty excited about this speaker. Bjorn really hit it out of the park with such a simple and promising design.
The World's First WiBAQ!!!
Not first pair, just first single speaker. I'm going to hopefully finish the second by this weekend. The one that is 'finished' is still missing cabinet spikes and binding posts. The wires don't exit the back of the speaker yet, as I am waiting for the binding posts before I drill the holes, so I haven't had the chance to listen to it yet.
I am also going to wait until some warmer weather to apply a finish to the cabinets. I was thinking a simple linseed oil rub. Right now its 30 degrees in New England and it would take a finish quite a while to dry in these conditions. No way am I applying linseed oil in the house.
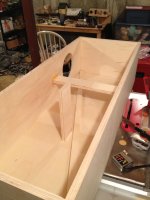
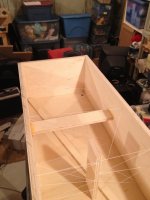
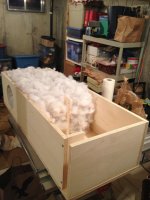
So what do you think? The first couple photos are the interior of the speaker, including the bracing I used, the strings I added to support the stuffing, and the stuffing itself. The braces were scrap from the cutting process. There is a strip going diagonally across the largest side just to stiffen it a bit, and one brace going side to side and another going front to back. These were place at the "Golden Ratio" points. Why? Cause I told myself it would help, and I had no other way to decide on the placement.
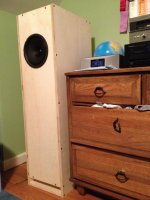
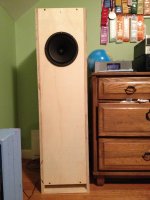
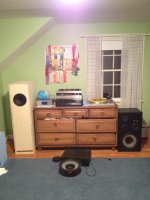
The finished speaker pictures are of it situated in its home in my room. The look large and in charge but not really overwhelming. Can't wait to begin to listen to it! 😀
Not first pair, just first single speaker. I'm going to hopefully finish the second by this weekend. The one that is 'finished' is still missing cabinet spikes and binding posts. The wires don't exit the back of the speaker yet, as I am waiting for the binding posts before I drill the holes, so I haven't had the chance to listen to it yet.
I am also going to wait until some warmer weather to apply a finish to the cabinets. I was thinking a simple linseed oil rub. Right now its 30 degrees in New England and it would take a finish quite a while to dry in these conditions. No way am I applying linseed oil in the house.
So what do you think? The first couple photos are the interior of the speaker, including the bracing I used, the strings I added to support the stuffing, and the stuffing itself. The braces were scrap from the cutting process. There is a strip going diagonally across the largest side just to stiffen it a bit, and one brace going side to side and another going front to back. These were place at the "Golden Ratio" points. Why? Cause I told myself it would help, and I had no other way to decide on the placement.
The finished speaker pictures are of it situated in its home in my room. The look large and in charge but not really overwhelming. Can't wait to begin to listen to it! 😀
Attachments
- Home
- Loudspeakers
- Full Range
- The WIBAQ: TABAQ Design with Betsy K