Sounds good, I’ll wait for that vessel +1 to arrive then and see if it does the trick. Thank you!The 'snap' is from thread stiction. I find all the fasteners on the PSU cover do that and I've never seen any indication of thread lock.
These are the gold standard. I restored my Realistic lab500 dd turntable which is a sleeper good unit as well.
@donhughes111@Bon,
I believe you may be using a Vesconite thrust bearing. Just curious of your thoughts on it as far as wear and quietness (is that a word?).
Don
I did not follow through on my plan to simultaneously run wear tests on 2 SP10mkII, one a Torlon bearing cap and the other a Vesconite bearing cap warrjon made for me.
I got sidetracked with other projects and the Christmas/New Year disruptions. I plan to start the comparative wear test soon. I seem to recall warrjon is using Vesconite in his mkII and likes the noise performance but the wear is still unknown. He also has some issues with the difficulty of machining Vesconite to the desired tolerance.
@donhughes111
I got sidetracked with other projects and the Christmas/New Year disruptions. I plan to start the comparative wear test soon. I seem to recall warrjon is using Vesconite in his mkII and likes the noise performance but the wear is still unknown. He also has some issues with the difficulty of machining Vesconite to the desired tolerance.
I too have been side tracked with jobs for people. I have also been working on my inverted bearing mk2 motor and have had ditched the maglev and re-designed the rotor/platter interface.
I don't expect the Vesconite thrust pad to be an improvement over Torlon in noise as the rotation point is very small. As Torlon thrust pads are now available again I would suggest anyone needing to replace it use the Torlon.
Sounds good, I’ll wait for that vessel +1 to arrive then and see if it does the trick. Thank you!
The rest of the screws in the unit are +2 size.
Those Vessel drivers are my go-to for everything now. Phillips are designed to cam out - these are not. Plus, they're JIS compatible.
Yeah this driver is great, got in here just fine. Before I do more disassembly than necessary, I think I’m in okay shape in here unless I’m missing a clear red flag (new to this line of work haha)The rest of the screws in the unit are +2 size.
Those Vessel drivers are my go-to for everything now. Phillips are designed to cam out - these are not. Plus, they're JIS compatible.
Yeah this driver is great, got in here just fine. Before I do more disassembly than necessary, I think I’m in okay shape in here unless I’m missing a clear red flag (new to this line of work haha)
View attachment 1132265View attachment 1132266View attachment 1132268View attachment 1132269
Those caps have been replaced and look good no signs of bulging. The large cap is OEM and I'd leave it. Just check and adjust the 32 and 5V. Do this prior to plugging the PS into the SP10 then again after with the TT running, the reason I do this is if the 5V is way high it could blow the chips. I also switch the DVM to AC and check ripple on the 32 and 5V.

HELP! I need suggestions. I am working on two plinths. One is the Resin/Bento plinth. The tonearm is an EPA 100 which requires a 38mm diameter hole to mount the tonearm. The plinth is 28mm thick at the mount point. I thought I would drill it with a step drill but that is not working. The drill basically stalls out part way through and will not penetrate the material.
Looking for suggestions on the best way to drill the 38mm hole in the R/B plinth. I do not have a CNC machine to do it.
Thanks,
Don
Looking for suggestions on the best way to drill the 38mm hole in the R/B plinth. I do not have a CNC machine to do it.
Thanks,
Don
@DonHELP! I need suggestions. I am working on two plinths. One is the Resin/Bento plinth. The tonearm is an EPA 100 which requires a 38mm diameter hole to mount the tonearm. The plinth is 28mm thick at the mount point. I thought I would drill it with a step drill but that is not working. The drill basically stalls out part way through and will not penetrate the material.
Looking for suggestions on the best way to drill the 38mm hole in the R/B plinth. I do not have a CNC machine to do it.
Thanks,
Don
Annular cutters are very efficient at cutting large holes in difficult materials because the cutting area is much smaller than a conventional drill bit. You will need an adapter for the drill chuck. The plinth needs to be held down securely. I suggest practice with a scrap piece and watch a few Youtube videos.
Attachments

Yeah this driver is great, got in here just fine. Before I do more disassembly than necessary, I think I’m in okay shape in here unless I’m missing a clear red flag (new to this line of work haha)
if you believe in the sound of the power cables or if you want to improve the original one without making invasive changes to the rear panel, you can easily do it.
Here you see some VDH Mainsserver power cable.
https://www.roechling.com/us/indust...ied-wood-laminated-compressed-wood/lignostoneThe only caps in the electronic unit that have a hard time are the C2,4 and 6. The rest are mostly power supply smoothing caps.
I use Mag Wheel polish to shine the edge of the platter. Makes it easy if you have a lathe but can be done by hand, just a little more work.
IME, having had resin/bentonite and Permalli (Panzerholtz) plinths the Permalli was far superior. I took measurements of both plinths. Stylus on a stationary LP and tapped the plinth monitoring the output of the cartridge. The Permalli plinth had far better impulse response. Meaning that any plinth disturbance like acoustic feedback will better attenuated.
This material looks interesting, and seemingly more available to those of us in the US.
Any densified wood will be better than using plywood or even resin/bento, from my measurements. What I found was than the Permalli significantly reduced noise transmitted from the plinth to the platter. Basically acoustic feedback from the plinth and its decay were improved. There was a 7dB improvement below 100Hz and 20dB above.https://www.roechling.com/us/indust...ied-wood-laminated-compressed-wood/lignostone
This material looks interesting, and seemingly more available to those of us in the US.
I am working on the connection between my new plinth and the old chassis. Does anybody know the wire gauge of the motor wiring - from the motor to the 12 pin connector. I have no idea what the power requirements of the motor are.
Thanks,
Don
Thanks,
Don
Here is a preview of my inverted bearing SP10mk2 motor. The platter not yet properly balanced, this will be done with the magnet and FG mounted in the rotor.
The platter is currently spinning on a 2mm SI3N4 ball inside the platter. There is currently NO sleeve so the platter is spinning balanced on the pivot point only. Once I have the platter balanced a very thin ring will be added in the rotor as a sleeve to prevent the platter tilting.

The platter is currently spinning on a 2mm SI3N4 ball inside the platter. There is currently NO sleeve so the platter is spinning balanced on the pivot point only. Once I have the platter balanced a very thin ring will be added in the rotor as a sleeve to prevent the platter tilting.
Good news, bad news.
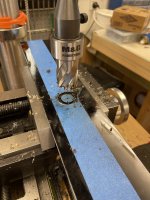
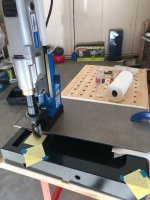
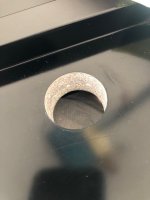
I drilled the 38mm tone arm hole. Used an annular drill bit and mag drill. Worked perfectly. Dead nuts on location and a perfect hole mic'd at 38.11mm using a 38.1mm drill (1 1/2"). Whole different world using the right equipment. Thanks for the tip Bon. Pics attached.
Now the bad news. I totally screwed up the Tonearm elevation. I have to rework that part of the plinth. Top and bottom surfaces since I need to maintain appropriate material thickness for the tonearm mount. Then repaint it.
Don
Attachments
- Home
- Source & Line
- Analogue Source
- The Incredible Technics SP-10 Thread