I’m really glad all this information is coming together here and look forward to seeing more of Andy’s work.
For my part, I’m just hoping to be able to figure things out with the active Tannoy crossover I found and hope it doesn’t get in the way sonically. It needs to be converted for 115/60 Hz use first.
If so, I’ll finally be able to really start enjoying all the work I put into my pair of BJ2 amps.
Unfortunately, I don’t think I’ll be up to continuing to produce two stereo versions of every amp I want to try.
I’ll need to figure out a passive solution eventually if I want to play Sissy, LuDef and others with Tannoys.
Attachments


even if it's Tannoy written on it, I'm not expecting wonders, seeing how much parts in it
anyhow, Tulips are less cumbersome for xover design, asking "just" for mild amount of Newman compensation, while Pepperpots are more demanding
informative page about active xover for Pepperpots: https://www.hilberink.nl/codehans/tannoy86.htm
anyhow, Tulips are less cumbersome for xover design, asking "just" for mild amount of Newman compensation, while Pepperpots are more demanding
informative page about active xover for Pepperpots: https://www.hilberink.nl/codehans/tannoy86.htm
Yes I saw that information and a bit more on Hans’ site when I was researching in it.
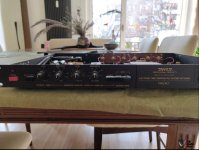
It’s a gamble in more ways than one. Vintage piece to start.
Tannoy label…meh…at least it tells me someone had more of a clue than me.
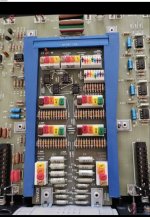
The card installed is the most flexible they offered…rather than design for one driver.
All I can do is cross my fingers and hope I get lucky. 🤞
I paid probably half of what most the “mid-range” aftermarket Tannoy crossover options were asking.
It’s a gamble in more ways than one. Vintage piece to start.
Tannoy label…meh…at least it tells me someone had more of a clue than me.
The card installed is the most flexible they offered…rather than design for one driver.
All I can do is cross my fingers and hope I get lucky. 🤞
I paid probably half of what most the “mid-range” aftermarket Tannoy crossover options were asking.
Haha, more like MZM’s work, by proxyI’m really glad all this information is coming together here and look forward to seeing more of Andy’s work.

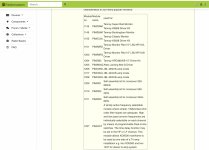
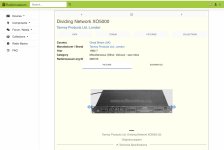
No original manual.have some manual/data?
I got basic info off Radiomuseum (screenshots).
Hans has a link on his website that says he’ll send .pdf or hardcopy of original manual for a contribution. Haven’t done that yet.
There’s a second link on his website with snapshots of unit and a bunch of pages from original manual (file).
Kind of a pain to view, but gives an idea.
Edit: Added close up of card with adjustment switches.
Attachments
-
 E208ABC5-5E0B-4D05-949F-BAB1409587EA.jpeg224.2 KB · Views: 93
 -
 A8A05B6C-3C4C-41C3-B8A8-D14F87747620.jpeg213.5 KB · Views: 76
 -
 170E9F38-198C-42B7-A0D2-0DD1B7FB1629.jpeg232.7 KB · Views: 81
 -
 1C084608-C43B-48C5-975E-AC2EE7F15FA6.jpeg143.4 KB · Views: 94
 -
xo5000man.zip1.6 MB · Views: 51
-
 3C786EDE-2330-4B4C-A986-20FF99535F68.jpeg361.8 KB · Views: 106
Last edited:

I did not forget, but I was thinking more about just making a completely new one when I am at it. Though, why not keep what I can.you already got instruction for that, but beingyou forgot what I wrote
in final boxes (or before that) remove those nasty connectors ( good for quicky pro use, but even for that they're evidently tired)
redo all solder points, try to make wiring between components shortest possible, use 1.6mm solid core for that
observe pics of xovers I posted above, analyze and apply what you observed
if bass choke wire is 1.6mm Dia it is good enough; if you want better, find a way to get it with 2mm Dia wire
rest of part is decent; if you have some doubts in yellow Tann cap, replace it with your preferred poison brand
edit - any news in work on drivers?

Will get to Xo’s soon, then I will post some findings here and that might be a lot of fun too 🙂
Wrt driver work: Both are now finished, except for basket painting and plastic ring painting. Though those basket rings are damaged, and I originally wanted to swap those, but can’t find new ones. So I am going to remove paint and sand carefully, then paint and see what I get.
Also, need to measure Fs on driver B. Easy and quick, maybe today.
So, ad planned I did some paint removal on the plastic rings that protect the surrounds. Well, this had been perhaps the most tedious job og all during this service, several hours spent…. And a nescessary one: these parts are no longer made, two good UK sources and the Mighty one himself confirm this.
So, to the rescue. Using sand paper of different coarsenezzez, and whatever tools needed to remove all the drekky paint.
Thinner is not recommended, the plastic melts… ehem…
So, some plastic has been sanded away. But it still looks good, and is now ready for paint. The seeming unevennezzez are purely visual, and should be gone when painted. Plan is four coats of matt black spray.
Attachments

Yes, yes, we all love OCD. But I am planning on very very thin coats
Nah, start with two, then see.
Used 4 on the baskets, and difference between second and fourth coat was significant. Thin coats.
Nah, start with two, then see.
Used 4 on the baskets, and difference between second and fourth coat was significant. Thin coats.
+1 Andynor. Thin coat.
No primer? For plastic i usually sand to 400, clean degrease with isopropyl 99.99% alcohol and apply dedicated primer. Promote adherence and make a proper surface (by filling irregularity). Use nitril non powdered glove if you have to touch parts.
Seems like OCD but it's the way for clean work ime.
No primer? For plastic i usually sand to 400, clean degrease with isopropyl 99.99% alcohol and apply dedicated primer. Promote adherence and make a proper surface (by filling irregularity). Use nitril non powdered glove if you have to touch parts.
Seems like OCD but it's the way for clean work ime.
Andy is a cheapskate, no primer
me being taught by friend ( now retired) working all his professional life as car body repair/paint Guru
though, these simple works (Tann plastic and Tann basket) aren't so critical, due to wonders of modern paints
in short, primer is proper, but with first timer (at speaker repair) every additional step is increasing risk of ooking something
can you imagine our extended correspondence, me writing ZMEngrish, Andy on the other end thinking with 'Talian Viking brain...... (also spiced with me having confusing Flue for 2 weeks straight)
Yeah you are right there is nice products availlable nowadays and increased steps is another potential headache.
ZM, Andynor are the tweeters using ferrofluid on this drivers? If yes have you ever changed it?
I ask because i took a look at my drivers and last time it's been made i think the guy didn't put enough amount of it.
Is there a guide or video about it somewhere?
ZM, Andynor are the tweeters using ferrofluid on this drivers? If yes have you ever changed it?
I ask because i took a look at my drivers and last time it's been made i think the guy didn't put enough amount of it.
Is there a guide or video about it somewhere?
That question needs MZM. The only thing I can contribute with is that these drivers use ferrofluid on the tweeters. It seems it is just enough to almost cover the voice coils. So, when I serviced these tweeters (destroying/damaging one in the process - now subject of a future repair since I have a spare tweet), I had to remove some dirt from one of the gaps. On the other driver, I had to clean the diaphragm, and therefore some ferrofluid was lost. I have a new tweeter on the way, so there will be additional fluid included. Two options: remove all and replace with new fluid, or eyeball it. But I guess ZM as usual has the facit 🙂
remove all old FFluid (paper shim, stronger paper tissue as shim)
put new one, which you'll get with original dia from Lockwood
then you'll see ( eyeball) how much is Kosher, so you can compare what's left in old one ( and state/liquidity of it) with new one
if needed (for old one, but I doubt that) , beg Lockwood either for small ampule of Ferrofluid, or at least for info what sort/brand of fluid is in case
note: it could be usefull - take pic f ampule before putting fluid to gap; then fill it; then use small syringe (5-10mL?) and inject water in ampule to have same amount of water as it was with Ferrofluid
write here, so we can have reference what's proper amount of FFluid for all 12" and 15" Tulips
don't forget to take several pictures of gap filled, before assembling it, post them too
of course, if you see printed amount of FFluid in mL on ampule, don't bother
now, ageing of Fluid - my experience is that - if driver wasn't thermally abused, wasn't serviced and if it is not 158yrs old, no need to think about quantity left in gap ( evaporation of fluid itself)
but without having info (for particular driver) about exact mL for one fill and pictures of gap filled as reference, hard to say
I could disassemble my Tulip Tweets to produce reference pics, but doing that with new ampule is, well, better
Last edited:
- Home
- Amplifiers
- Pass Labs
- Tannoy 3134 DC ZM-induced purchase, service and repair