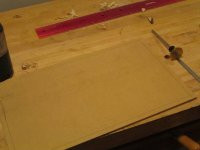
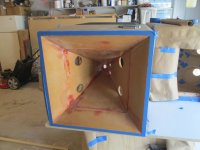
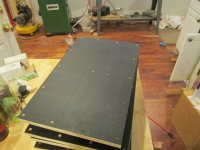
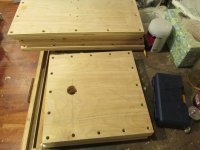
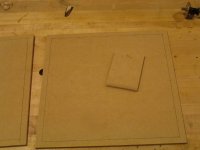
Sorry for the long pause..work and life got very busy. Here's a bunch more construction photos.....
Attachments
-
 Synergy Build Log 098.JPG102.1 KB · Views: 1,464
 -
 Synergy Build Log 118.JPG129 KB · Views: 713
 -
 Synergy Build Log 116.JPG164.2 KB · Views: 530
 -
 Synergy Build Log 113.JPG127 KB · Views: 491
 -
 Synergy Build Log 111.JPG141.6 KB · Views: 574
 -
 Synergy Build Log 107.JPG106.5 KB · Views: 590
 -
 Synergy Build Log 106.JPG118.9 KB · Views: 1,399
 -
 Synergy Build Log 101.JPG109.4 KB · Views: 1,406
 -
 Synergy Build Log 100.JPG91.4 KB · Views: 1,424
 -
 Synergy Build Log 099.JPG109.4 KB · Views: 1,419
And more...
One thing that might be asked is my finishing schedule. I'm a fan of the following:
1. Seal multiple spray coats of de-waxed shellac. I use a $15 Harbor Freight gun for most spraying jobs. I've owned fancier guns...and they do a better job. Not 20X better. I use automotive glazing compound to cover any scratches or rubs. (That's the pink stuff.)
2. Sand, down to ~300 grit...do not skip grits...do not rush...go slow. It will go faster in the long run.
3. Seal one more very light coat.
4. Build coats of finish with the recommended adhere coat...this will also expose any spots you missed in 1 and 2 for glazing and sanding.
5. Start with glazing and go to 2 again...repeat until you're happy.
I love Target Coatings products....they always work very well. The horns are as follows:
De-Waxed Shellac.
Glazing
De-Waxed Shellac (alcohol based).
Target Shellac as a bond coat (water based)
Target White Lacquer (roughly 3 coats...more glazing, sealer of Target water based shellac and 10 more coats of lacquer)
Yes...there are 14 (ish) coats of lacquer on the horns, and with the water based stuff it only took a long weekend.
And yes I used the $15 Harbor Freight HVLP gun, and I didn't build a booth.
Attachments
-
 Synergy Build Log 142.JPG155.2 KB · Views: 1,143
 -
 Synergy Build Log 138.JPG125.2 KB · Views: 931
 -
 Synergy Build Log 134.JPG49.7 KB · Views: 843
 -
 Synergy Build Log 132.JPG54.4 KB · Views: 798
 -
 Synergy Build Log 127.JPG131.4 KB · Views: 776
 -
 Synergy Build Log 120.JPG123.9 KB · Views: 788
 -
 Synergy Build Log 119.JPG136.1 KB · Views: 939
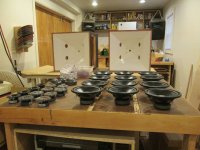
Looks great! That is an insane number of drivers there on the table! 😀
You have some painted white and some painted black, are there two sets?
You have some painted white and some painted black, are there two sets?
Looks great! That is an insane number of drivers there on the table! 😀
You have some painted white and some painted black, are there two sets?
I included a picture of some of my prototype horn lenses. The big black one had no chance with my wife...the other two either had midrange port issues or spacing issues.
Scott
Are there spacers on some of the mid drivers?
Could just be the angle of the picture.
Those are just plastic covers so the surrounds aren't damaged in shipping. The surround sticks up above the frame, which is why you have to rebate for it on the back side of the horn.
I tried to limit myself to midranges and woofers where I wouldn't have to do that, but they were too large or too expensive, or too junky.
Scott
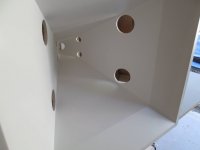
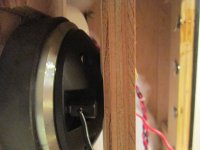
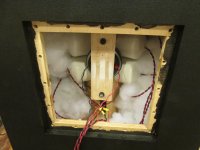
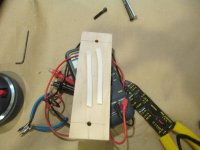
Next up is the midrange cup. I had to dremel out the inside lip of a 3" PVC endcap...but otherwise they work very well. They are hot glued to the horn. Be patient...it takes a while for the glue to cool enough to hold them on. Once completely cool...it's actually hard to get them off. They can be removed by slow careful cutting with a utility knife...for driver replacement.
Note that the wires come through the end of the end cap and all surfaces are sealed.
Also note that the compression driver is held in place by the compression action of a board with two strips of foam. Holds in in place easily...and well. Probably not suitable for something that's needed for touring...but for carrying up my stairs...just fine.
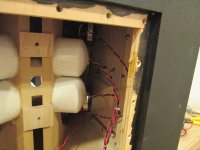
The outside finish is Duratex....love it.
Note that the wires come through the end of the end cap and all surfaces are sealed.
Also note that the compression driver is held in place by the compression action of a board with two strips of foam. Holds in in place easily...and well. Probably not suitable for something that's needed for touring...but for carrying up my stairs...just fine.
The outside finish is Duratex....love it.
Attachments
-
 Synergy Build Log 121.JPG130.3 KB · Views: 851
 -
 Ebay And Synergy Build 9-9-2013 020.JPG134.2 KB · Views: 896
 -
 Ebay And Synergy Build 9-9-2013 019.JPG136.9 KB · Views: 906
 -
 Ebay And Synergy Build 9-9-2013 018.JPG119.5 KB · Views: 852
 -
 Ebay And Synergy Build 9-9-2013 017.JPG135.7 KB · Views: 885
 -
 Ebay And Synergy Build 9-9-2013 016.JPG160 KB · Views: 946
 -
 Ebay And Synergy Build 9-9-2013 006.JPG128 KB · Views: 1,068
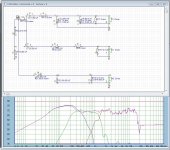
Last...for now is the crossover.
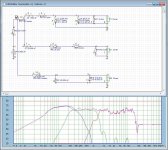
I have two version...A and B....A uses 9mH in series with the woofer and 40 Ohms in parallel with the mid. B uses 8 mH in series with the woofer and 13 Ohms in parallel with the mid. The difference is a bit more midbass and less midrange. I found the A version a bit too analytic ...but I left it as the center channel for the home theater. Made voices absolutely intelligible in HT usage...even if the rest of the track is busy and rubbish.
The comparison plot shows A vs. B....A has a bit more output in the midrange and less in the bass.
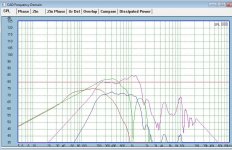
I think I've explained before that SoundEasy should be called Sound "Really kind of difficult, but with a enough work will get the job done, though you'll practice cursing a lot" I don't buy the measurements below about 200 Hz for the woofer...so I'm running a bit blind. I'll re-take and see what's actually happening and refine the crossovers as needed. These aren't the last crossovers....for sure. Plenty of optimization for measured time domain and frequency domain performance
I have two version...A and B....A uses 9mH in series with the woofer and 40 Ohms in parallel with the mid. B uses 8 mH in series with the woofer and 13 Ohms in parallel with the mid. The difference is a bit more midbass and less midrange. I found the A version a bit too analytic ...but I left it as the center channel for the home theater. Made voices absolutely intelligible in HT usage...even if the rest of the track is busy and rubbish.
The comparison plot shows A vs. B....A has a bit more output in the midrange and less in the bass.
I think I've explained before that SoundEasy should be called Sound "Really kind of difficult, but with a enough work will get the job done, though you'll practice cursing a lot" I don't buy the measurements below about 200 Hz for the woofer...so I'm running a bit blind. I'll re-take and see what's actually happening and refine the crossovers as needed. These aren't the last crossovers....for sure. Plenty of optimization for measured time domain and frequency domain performance
Attachments
Very nice work on the crossovers and measurements! The bass measurements look good, why do you say you don't trust them? Do they not match the predicted response? Are you using a sealed bass alignment or is it vented?
Hi Scott,
Did you find it necessary to pad down the CD for the 3" mids or the sealed bass drivers or both? Just wondering if a ported bass or different bass drivers would raise the sensitivity. I'm really curious how those 3" Daytons perform.
Mike
Did you find it necessary to pad down the CD for the 3" mids or the sealed bass drivers or both? Just wondering if a ported bass or different bass drivers would raise the sensitivity. I'm really curious how those 3" Daytons perform.
Mike
Last edited:
Scott,
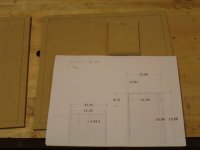
I see the dimensions for the holes for the ports going into the horn, but how much depth do you dremel away for each? Put another way, what is the depth of each hole fpr the ports at the specified diameter, and how much of the depth was dremeled to a wider diameter?
I see the dimensions for the holes for the ports going into the horn, but how much depth do you dremel away for each? Put another way, what is the depth of each hole fpr the ports at the specified diameter, and how much of the depth was dremeled to a wider diameter?
Hi Scott,
Did you find it necessary to pad down the CD for the 3" mids or the sealed bass drivers or both? Just wondering if a ported bass or different bass drivers would raise the sensitivity. I'm really curious how those 3" Daytons perform.
Mike
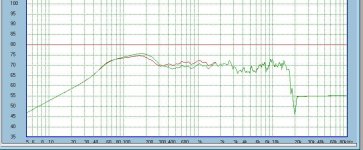
Every driver had some shaping. Including the woofer...as I've said before...the data from the band hall was much better. It clearly showed the rise for the horn loading and the natural rolloff...the data in the plots attached is probably only valid from ~250-300Hz up.
Attachments

Scott,
I see the dimensions for the holes for the ports going into the horn, but how much depth do you dremel away for each? Put another way, what is the depth of each hole fpr the ports at the specified diameter, and how much of the depth was dremeled to a wider diameter?
I don't have good dimensions...I dremeled them out as much as the dremel would allow without going to extreme lengths. I had about 1/8" material left in the port holes. The pictures are the best way.... I'll look through the pictures I have to see if there are any close ups.
Scott
I don't have good dimensions...I dremeled them out as much as the dremel would allow without going to extreme lengths. I had about 1/8" material left in the port holes. The pictures are the best way.... I'll look through the pictures I have to see if there are any close ups.
Scott
I'm not a speaker guy, but I thought the length of the port was a major contributor to the frequency pass. Don't you need to know both the diameter of the port, as well as it's length to accurately pass the desired frequencies? If so, you've told us the diameter very clearly, but the length of the port is not really obvious.
Again, I could be wrong, is it only diameter of the port, or both that matter?
If you look at it, structurally they are 4'th bandpass. To get better high frequency response you can make the port larger in diameter or shorter by cutting a frustrum into it. Look at the Danley patent....he goes through it. For my design if you cut them back so there is roughly 1/8" thickness at the port hole...you'll get very similar response to mine.
Scott
Scott,
Thanks for creating such an interesting thread! I wish I'd seen it a couple of years ago, then I would have bought the right drivers! 🙂
Keep up the great work, and thanks for the inspiration!
Thanks for creating such an interesting thread! I wish I'd seen it a couple of years ago, then I would have bought the right drivers! 🙂
Keep up the great work, and thanks for the inspiration!
Member
Joined 2009
Paid Member
This does look interesting.
Anybody else built these ?
Anything Scott would change now that they've bee in use for awhile ?
Anybody else built these ?
Anything Scott would change now that they've bee in use for awhile ?
- Home
- Loudspeakers
- Multi-Way
- Synergy Horns-Dayton and PRV.....