I am just getting into the Synergy horn design and think I may have found a suitable low budget option for a 2-way bass driver. I used the dimensions of bwaslo's 60x90 horn (coSyne) and stuck in the PE buyout 6.5in polycone woofer at the miidpoint of the main expansion with a 3.5in dia hole. If you get rid of the mid drivers, there will be just enough room to fit 3 drivers on top and bottom and 2 drivers on the sides for an 8 driver mid-bass that produces this response. The drivers are <$5 ea.
What do you guys think?
I would have two main concerns.
If you put three drivers top and bottom where are the ports? Wouldn't you have to put one in the middle? By keeping them in the corners you minimize discontinuities that the tweeter will see. I'm not saying it can't be done...but you might find you've got problematic ripples in the tweeter response.
Also, you may not have the ability to push the tweeter low enough to meet the mid/woofers at roughly 1/4 wavelength.
Scott
Whoa...just re-read this. You'll have 8 3.5" diameter holes, for 6.5" woofers? I would think that would definitely mess with the tweeter response. Keep those holes in the corner....make them as small as possible.
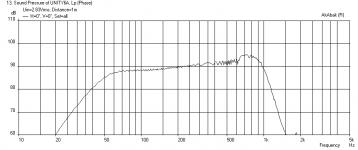
I see the point about huge holes in the sidewalls. Ok, if we back off on the desire to get 94 dB efficiency and drop to 4 drivers per horn and make the holes 2 in dia (or equivalent slot of 4.2 in x 0.75 in slot at the corners) the nominal efficiency drops to 88.5 dB which isn't bad for a 'home audio' speaker. Price gets cut in half to less than $20 for the 4 bass drivers. Not sure why you say the tweeter won't work as the main horn seems to be able to hit a 1 kHz XO point from bwaslo's measurements:

Here is the response with 4 drivers and a 1kHz LPF applied to suppress a peak that comes from making the hole smaller.

An externally hosted image should be here but it was not working when we last tested it.
Here is the response with 4 drivers and a 1kHz LPF applied to suppress a peak that comes from making the hole smaller.
Attachments
Whoa...just re-read this. You'll have 8 3.5" diameter holes, for 6.5" woofers? I would think that would definitely mess with the tweeter response. Keep those holes in the corner....make them as small as possible.
Not necessarily. You have to look at what the cross sectional area of the horn is where the 3.5" holes will be located. If they are located where the circumference is longer than 1 wave length of the compression driver's lowest frequency, then the holes will be nearly acoustically invisible. You just need to look at the acoustical image size and calculate if it can interfere with the other driver’s response.
Not necessarily. You have to look at what the cross sectional area of the horn is where the 3.5" holes will be located. If they are located where the circumference is longer than 1 wave length of the compression driver's lowest frequency, then the holes will be nearly acoustically invisible. You just need to look at the acoustical image size and calculate if it can interfere with the other driver’s response.
Oh I know...but he was talking about getting rid of the mids, and putting the 6.5" woofers, including possibly holes in the center of a horn mouth (based on 3 on one side) what sounded to be as far back towards the tweeter as possible. That sounded a bit dubious to me, it may be below the frequency where it needs to be, but it may not. Sounded like a bit of a departure from what's typically done.
Scott
Yeah, if the holes are going to be that close to the throat, then it would be big trouble.
Yeah, if the holes are going to be that close to the throat, then it would be big trouble.
No, as I said, the holes are at the middle of the main expansion or about halfway out. Although I have tried putting them closer to the diffraction edge (angle change) and that still works. I think for the bass, it is not critical where you put the holes/slots.
No, as I said, the holes are at the middle of the main expansion or about halfway out. Although I have tried putting them closer to the diffraction edge (angle change) and that still works. I think for the bass, it is not critical where you put the holes/slots.
The placement of the bass ports are only critical for the lowest frequency that the mids will play. You just need to check the wave length against the circumference at the port location. Similar to the comment I made to SpeakerScott above.
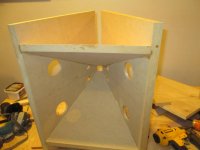
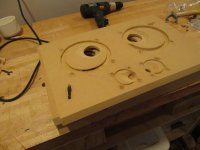
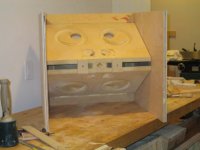
So next up is threaded insert installation. Buy. The. Tool.
Yes, there is a tool.
Buy it. It's very helpful. Also, install them on a very sturdy surface so you can press down hard as you are screwing them in. It helps prevent the MDF from pulling up...it still does, but not as bad. Then sand it flush. I put a dot of sanding sealer in the holes before screwing them in, in hopes that it would prevent the MDF from pulling up. I'm not sure it worked.
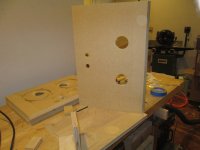
You can also see the jig I built to help hold the full height pieces.
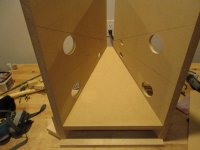
The secondary flare and the primary flare were put together using gorilla glue which expands, aiding in assembly even if there is a small gap.
That said, work to minimize the gap. Gorilla glue isn't all that strong, so if you have large gaps you might consider secondary blocks, to increase glue surface area...I did on mine even though my gaps were pretty small.
I held the secondary flares in place using tape, and worked very slowly to ensure that each piece was glued on as square as possible. It was probably a week between start to finish since I was only gluing 1 secondary flare piece a day, one morning one at night. Patience is rewarded here....dry fit as much as possible.
Yes, there is a tool.
Buy it. It's very helpful. Also, install them on a very sturdy surface so you can press down hard as you are screwing them in. It helps prevent the MDF from pulling up...it still does, but not as bad. Then sand it flush. I put a dot of sanding sealer in the holes before screwing them in, in hopes that it would prevent the MDF from pulling up. I'm not sure it worked.
You can also see the jig I built to help hold the full height pieces.
The secondary flare and the primary flare were put together using gorilla glue which expands, aiding in assembly even if there is a small gap.
That said, work to minimize the gap. Gorilla glue isn't all that strong, so if you have large gaps you might consider secondary blocks, to increase glue surface area...I did on mine even though my gaps were pretty small.
I held the secondary flares in place using tape, and worked very slowly to ensure that each piece was glued on as square as possible. It was probably a week between start to finish since I was only gluing 1 secondary flare piece a day, one morning one at night. Patience is rewarded here....dry fit as much as possible.
Attachments
Last edited:
Nice work there - looks great. Sometimes I use hot melt glue to tack and clamp while PVA glue sets. The hot melt can also be use to seal cracks like caulking.
Nice work there - looks great. Sometimes I use hot melt glue to tack and clamp while PVA glue sets. The hot melt can also be use to seal cracks like caulking.
I didn't think to use hot-melt as a temporary hold. I've used 60 second epoxy before...but that's for something that you know you can get into position in about 5 seconds flat. (They have a different version of 60 seconds than I do.)
I'll have to keep the hot melt trick up my sleeve for the next build where I could use about 8 other hands.
hey, Speakerscott,
I just browsed through your photos of your Synergy builds. Dang! Those look nice. Any thoughts of publishing your wood and crossover plans?
I've been trying to get a detailed set of plans for the diy world but the only design of mine I'm happy with so far uses 'buyout' drivers, which are no longer available. I've been (slowly) working up another 90x60 waveform coherent design using FaitalPro 3"mids and Visaton 5" woofers, but health problems have largely blocked progress since last spring. I'm really glad to see all your photos. How do they sound?
Bill
Bwaslo,
Try the 6.5 in polycone woofer buyout drivers from PE - only $4.77 ea. The high Qts lets them reach down to 50 Hz in sealed box. I want to build your 60x90 design but in a two way with these woofers.
Try the 6.5 in polycone woofer buyout drivers from PE - only $4.77 ea. The high Qts lets them reach down to 50 Hz in sealed box. I want to build your 60x90 design but in a two way with these woofers.
Very nice build! You're about a year ahead of me 😀. I just started my first proto build using the BMS4550 and Visaton M10's. Veeeery ugly, with lots of filler. I doubt if I will ever be able to make it a clean build as you did with these.
hey, Speakerscott,
I just browsed through your photos of your Synergy builds. Dang! Those look nice. Any thoughts of publishing your wood and crossover plans?
I've been trying to get a detailed set of plans for the diy world but the only design of mine I'm happy with so far uses 'buyout' drivers, which are no longer available. I've been (slowly) working up another 90x60 waveform coherent design using FaitalPro 3"mids and Visaton 5" woofers, but health problems have largely blocked progress since last spring. I'm really glad to see all your photos. How do they sound?
Bill
I'm going to take these posts and put them into a PDF document...I don't have any more detail on the drawings than those I've already published. After taking a few furniture making classes I gave up on detailed plans and began working from full-size drawings/mockups. So much easier. I'll put a link to the document on the diysoundgroup forum, I would be posting these images there..but I would have to do far more re-sizing.
They sound fantastic, and I don't even have them quite waveform coherent yet. I'm well within the 1/4 wavelength spacing requirements...but I keep ending up with greater than 1'st order roll-offs. I'm not as good with SoundEasy tuning for phase and rolloff...as I said earlier I might have to fire up my old XP box and do a crossover in LSPCad that I fine-tune in SoundEasy under emulation.
Scott
Very nice build! You're about a year ahead of me 😀. I just started my first proto build using the BMS4550 and Visaton M10's. Veeeery ugly, with lots of filler. I doubt if I will ever be able to make it a clean build as you did with these.
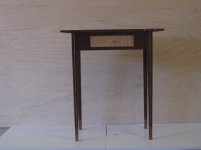
I just perused your thread....yeah...I had some prototypes that looked like that. Then my OCD kicked in and I started using some furniture making techniques to get the results I wanted. This was my last table, Mahogany, Maple, Zebrawood.
Great progress though! I wish I could have done the BMS...my wife barely put up with the speaker budget and size as it was....
Attachments

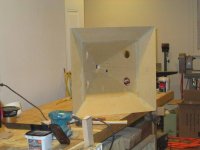
So next up is the process I used to smooth out the tweeter entry points. As far as I can see in the pictures on the Danley site...they don't do that. But I did...I kept reading about higher order modes...etc....so figured out a way to do it.
First I got two part epoxy putty to use as the filler. Next I drilled a piece of 1/8" MDF with a 1" hole. I covered it with masking tape, figuring that the epoxy would stick to the tape and the tape would come off the guide.
I then taped the guide to my entry throat and used it to build up and sand down the epoxy putty.
I thought I had gotten great photos of it.
I didn't, or if I did they are buried somewhere on my hard drive.
Scott
Attachments

Speakerscott,
Very nice progress and great craftsmanship on this horn ( nice looking table too ). Let us know how the tweeter entry anything operation goes and if you can measure the difference. I can see why Bwaslo recommended making the throat entry only 0.71 in x 0.71 in - then when you use a 1 in drill it naturally makes a nice circle to square transition at the entry. I have a cheap CD that has a built in 4x4 in horn and I am thinking of making the begining of the wooden horn that size to match perfectly and this use the factory 90 deg horn as the throat. This may move the mid holes down further though.
Very nice progress and great craftsmanship on this horn ( nice looking table too ). Let us know how the tweeter entry anything operation goes and if you can measure the difference. I can see why Bwaslo recommended making the throat entry only 0.71 in x 0.71 in - then when you use a 1 in drill it naturally makes a nice circle to square transition at the entry. I have a cheap CD that has a built in 4x4 in horn and I am thinking of making the begining of the wooden horn that size to match perfectly and this use the factory 90 deg horn as the throat. This may move the mid holes down further though.
Wow! They look very, very well made. Compliments! I will never be able to pull that of. And that's not just because I don't have a tablesaw 😱.I just perused your thread....yeah...I had some prototypes that looked like that. Then my OCD kicked in and I started using some furniture making techniques to get the results I wanted. This was my last table, Mahogany, Maple, Zebrawood.
Tried to post some more build photos tonight about how I started wrapping enclosures around the horns. I keep getting an upload error. I'll try again tomorrow....
- Home
- Loudspeakers
- Multi-Way
- Synergy Horns-Dayton and PRV.....