I will wait with anticipation for the follow up information and the build log. I've wanted to "do" a unity/synergy horn for my own use and have been following several builds on the WWW.
Thanks for posting it!
John
Thanks for posting it!
John
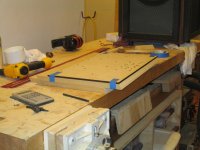
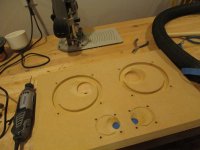
So next up in the build is how to repeatably drill all the stinking mounting holes. I wanted to use threaded inserts to ease driver replacement if ever necessary. I ordered a couple extra mids and woofers for myself in case one ever went bad. (One did...but in a crazy way, totally my fault...story to be told later.)
There will be hundreds of holes...between the access panels, driver mounting panels...etc. Have a drill press, it will speed things up greatly. It could be done by hand...very slowly and carefully...but it could be done. Also, please use a brad point bit or a forstner bit for drilling...preventing bits from wandering. Much more precise.
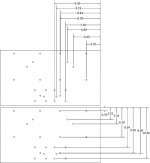
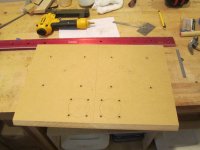
I made myself a marking template. I used 1/4" thick MDF that I laser cut using an exported DXF. (I have access to a laser cutter at work.) However, with a lot of careful measuring you could hand measure and mark it...and drill the guide.
I cut 1/4" holes and used something called a transfer punch to transfer them to the piece that would be used in the horn. It only took a couple of minutes to transfer all the drill locations to the work pieces where it would probably take you 20 or more each piece to measure every one. So totally worth the time.
You can also see I marked the location of the tweeter entry and the center line of the board.
There will be hundreds of holes...between the access panels, driver mounting panels...etc. Have a drill press, it will speed things up greatly. It could be done by hand...very slowly and carefully...but it could be done. Also, please use a brad point bit or a forstner bit for drilling...preventing bits from wandering. Much more precise.
I made myself a marking template. I used 1/4" thick MDF that I laser cut using an exported DXF. (I have access to a laser cutter at work.) However, with a lot of careful measuring you could hand measure and mark it...and drill the guide.
I cut 1/4" holes and used something called a transfer punch to transfer them to the piece that would be used in the horn. It only took a couple of minutes to transfer all the drill locations to the work pieces where it would probably take you 20 or more each piece to measure every one. So totally worth the time.
You can also see I marked the location of the tweeter entry and the center line of the board.
Attachments

Great design!!!
I've been following the other synergy builds as well and this cabinet design seems really well laid out. Looking forward to the additional details.
I've been following the other synergy builds as well and this cabinet design seems really well laid out. Looking forward to the additional details.
Scott,
Looking forward for the detailed build, im amazed of what Tom Danley invented, and kudos to Tom for giving his blessing for us DIYer 😀
cheers
henry
Looking forward for the detailed build, im amazed of what Tom Danley invented, and kudos to Tom for giving his blessing for us DIYer 😀
cheers
henry
I had stumbled upon the photos of your progress on your personal site earlier, and was hoping we'd see a bit more detail. Fantastic effort on both the build and the documentation.
We're moving this week into a place with a large rec room space in the basement. Ironic that I finally have the space to set up a good dedicated system shortly after realizing that my tinitus really means I can't listen enough to do it justice. Still, once the dust settles from the move it'll be very very tempting to build 3 of these for L/C/R duty.
We're moving this week into a place with a large rec room space in the basement. Ironic that I finally have the space to set up a good dedicated system shortly after realizing that my tinitus really means I can't listen enough to do it justice. Still, once the dust settles from the move it'll be very very tempting to build 3 of these for L/C/R duty.
Scott have you measured them to see what 1W/1m sensitivity rating you achieve out of them?
No I have to fire up an older Windows XP machine and hope I have the right microphone calibration file to do it with Praxis. I expect it to be in the ~90dB range.
Scott
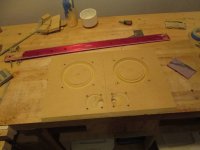
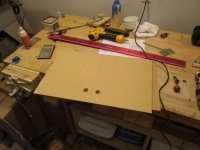
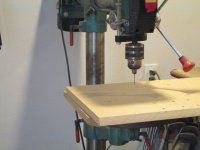
Next up is hole marking and drilling...for the driver mounting points I wanted to use threaded inserts. It happens the brass ones I used need a 1/4" hole. They are 6-32 which has plenty of holding power for an 8" woofer of the excursion of the Dayton.
I drilled each hole on my drill press.
Next I made marking drills for the woofer and midrange taps. I picked the smallest drill I had (not sure what size) and drilled all the way through since the back is what got marked. This gave me a precise location to drill on the front.
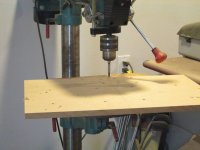
When I flipped the piece over I discovered that the hole was somewhat difficult to find...the MDF had "self healed" so I used a tiny plane to shave off the material covering the hole.
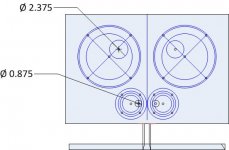
I drilled the tap ports for the woofers and mids from the front side of the horn using forstner bits. I didn't care too much about tearout on the back side since I knew I'd be grinding away at those areas anyway.
I then used a combination of dremel tools and routers to make clearence for the surrounds and cut aggressive frustums into both the mid and woofer holes.
I drilled each hole on my drill press.
Next I made marking drills for the woofer and midrange taps. I picked the smallest drill I had (not sure what size) and drilled all the way through since the back is what got marked. This gave me a precise location to drill on the front.
When I flipped the piece over I discovered that the hole was somewhat difficult to find...the MDF had "self healed" so I used a tiny plane to shave off the material covering the hole.
I drilled the tap ports for the woofers and mids from the front side of the horn using forstner bits. I didn't care too much about tearout on the back side since I knew I'd be grinding away at those areas anyway.
I then used a combination of dremel tools and routers to make clearence for the surrounds and cut aggressive frustums into both the mid and woofer holes.
Attachments
-
 Synergy Build Log 057.JPG128.1 KB · Views: 1,005
 -
 Synergy Build Log 018.JPG117.4 KB · Views: 717
 -
 Synergy Build Log 015.JPG129.3 KB · Views: 603
 -
 Synergy Build Log 012.JPG123.4 KB · Views: 638
 -
 Synergy Build Log 010.JPG121.9 KB · Views: 671
 -
 Synergy Build Log 009.JPG116.9 KB · Views: 625
 -
 Synergy Build Log 008.JPG119.2 KB · Views: 815
I will wait with anticipation for the follow up information and the build log. I've wanted to "do" a unity/synergy horn for my own use and have been following several builds on the WWW.
Thanks for posting it!
John
John,
I've said it before...I cannot overemphasize how special this is. Hopefully you'll get one working for yourself.
Scott
Scott,
Looking forward for the detailed build, im amazed of what Tom Danley invented, and kudos to Tom for giving his blessing for us DIYer 😀
cheers
henry
I've "known" Tom for almost 20 years online. He's one of the truly special people in the DIY audio community. He has an amazing consistency of helping the DIY'er and newbie alike as much as his time constraints will allow. Always the gentlemen. I will not be surprised if his name is in there with some of the legends when all is said and done. If he ever shows up in Austin...dinner's on me, and we'll have a fun discussion over a bottle of wine out of my cellar. His pick. (If he's a beer guy I may have to take it all back.)
I ran a speaker mailing list back in the day (~1995) based out of The University of Texas at Austin called "basslist" off of the Unix servers there. Tom showed up with the Servodrive subwoofer and later the Unity Horn. At the time I had no clue how those things worked. It took me almost 20 years to catch on.
My a-ha moment was with the Paraline. It was at that point I realized Tom thought of acoustics as pressure injection (among other ways of looking at it) instead of wavefront propagation.
It was then that I realized how special the Synergy was...solving many of the "problems" of modern speaker design.
I've probably spent well over $2K to $3K developing these speakers. I'll put them up against anything out there, regardless of price...they may lose...but not by much.
Scott
P.S. Most times....they'll crush the competition.
Last edited:
Simply design the speakers so that they can be flipped. 🙂Scott,
This is a point that too many overlook, especially younger people who have not owned speakers long enough to realize that horizontal cones can sag several millimeters in just a few years.
Art
Simply design the speakers so that they can be flipped. 🙂
Heck...I don't change my HVAC filter often enough...I'm not adding any other monthly/yearly maintenance to my life. 😉
Heck...I don't change my HVAC filter often enough...I'm not adding any other monthly/yearly maintenance to my life. 😉
LoL, rotate speakers like tires.
I'm also following this with much interest, I really, really want to try a Synergy.
Sagging is usually a concern for down firing woofers. Is it likely to be an issue for closed back mids like the Visaton M10 or the Misco RDC3TA that move < 1 mm even at high volumes?
Sagging is usually a concern for down firing woofers. Is it likely to be an issue for closed back mids like the Visaton M10 or the Misco RDC3TA that move < 1 mm even at high volumes?
I wasn't as worried about the mids as I was about the woofers. However, all cones have mass, all suspensions have compliance...they will sag some. I may have mentioned this earlier in the thread...the worst example I've ever seen was an older RF car sub. Heavy cone...floppy suspension, foam surround. It sagged to the point where it would only allow about 2mm of rearward excursion before banging the voice coil into the back plate. Ooops.
Scott
Always wanted to do this too, but I realize there are all kinds of folks who'd say that. Been a fan of and sometimes email correspondent with Tom for many years. Great guy.
By the way, when you fill up your PE cart, you end up with $454.18. 🙂
By the way, when you fill up your PE cart, you end up with $454.18. 🙂
Always wanted to do this too, but I realize there are all kinds of folks who'd say that. Been a fan of and sometimes email correspondent with Tom for many years. Great guy.
By the way, when you fill up your PE cart, you end up with $454.18. 🙂
I also have a full set of PA130-8's and the Dayton compression drivers. Crossovers are about $250 and there may be 3 sheets of plywood and 3 sheets of MDF in these things....
;-)
Scott
I also have a full set of PA130-8's and the Dayton compression drivers. Crossovers are about $250 and there may be 3 sheets of plywood and 3 sheets of MDF in these things....
;-)
Scott
Scott -
Oops! My cart price was for only a stereo pair, without spares. All in, however, the materials and parts prices are still very low for what I presume you have ended up with. That said, I'd have to find a willing builder or start from scratch learning woodworking, something unlikely at my somewhat advanced age. I'll follow this thread with interest, though, and congrats! - Pat
2-way 6.5 in bass driver option?
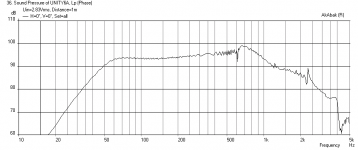
I am just getting into the Synergy horn design and think I may have found a suitable low budget option for a 2-way bass driver. I used the dimensions of bwaslo's 60x90 horn (coSyne) and stuck in the PE buyout 6.5in polycone woofer at the miidpoint of the main expansion with a 3.5in dia hole. If you get rid of the mid drivers, there will be just enough room to fit 3 drivers on top and bottom and 2 drivers on the sides for an 8 driver mid-bass that produces this response. The drivers are <$5 ea.
Here is bwaslo's design: DIY Synergy/Unity spreadsheet

Here is the calculated response for a sealed back box (no bass vents):
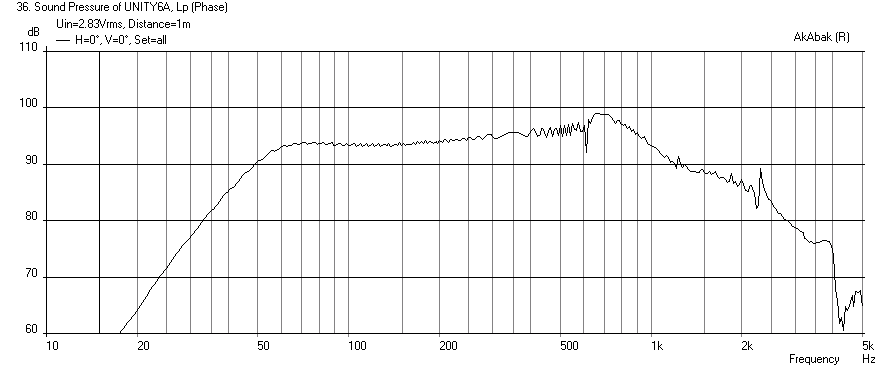
What do you guys think?
I am just getting into the Synergy horn design and think I may have found a suitable low budget option for a 2-way bass driver. I used the dimensions of bwaslo's 60x90 horn (coSyne) and stuck in the PE buyout 6.5in polycone woofer at the miidpoint of the main expansion with a 3.5in dia hole. If you get rid of the mid drivers, there will be just enough room to fit 3 drivers on top and bottom and 2 drivers on the sides for an 8 driver mid-bass that produces this response. The drivers are <$5 ea.
Here is bwaslo's design: DIY Synergy/Unity spreadsheet
Here is the calculated response for a sealed back box (no bass vents):
What do you guys think?
Attachments
Last edited:
- Home
- Loudspeakers
- Multi-Way
- Synergy Horns-Dayton and PRV.....