This design alow you to use 3U heatsink. With 3P Output slim case as 2U (80mm high heatsink) i don't know if there is enough headroom for cooling.
I will try to reduce LS-IP in same shape as the OPS above
Marc
Yes, you're right, Marc. Didn't regard this. But I think even on a 3U heat sink it might be better to distribute the power devices longitudinal instead of concentrating them in a rectangular shape.
Best regards!
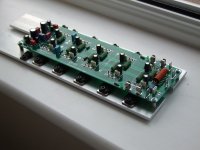
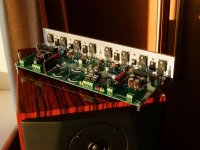
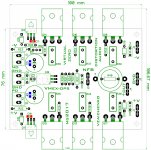
Layout tryout on Valery VHex_OPS. The board mesure 100x76mm with 3P. So it has some 1P/2P/3P universal layout as there is no gain to go for 2P or 1P layout. Price will be the same. board house will coast you under 30$ (shipping included) for 10u
Marc
Dear Marc,
Are the drilling holes for the outputs match with the standard layout for Diystore Heatsinks ?
--gannaji.
Dear Marc,
Are the drilling holes for the outputs match with the standard layout for Diystore Heatsinks ?
--gannaji.
I not include this feature when i do the layout job as i every time do my own hole and tapping.
Marc
One of the most difficult activities for lone DIYers is drilling and tapping heat sinks, again and again for each design ! Is it very difficult to have a more uniform hole pattern from PCB to PCB design?
Last edited:
It's a case of competing requirements - board houses offer good prices on 100x100mm or smaller sized boards, but Idefixes obviously wanted to put 3 pairs on the single board. The DIYstore UMS is only adequately equipped for 2 pair on such a board.
By the way I would say that it's much easier to employ transistor clamps if you want a heat sink that you can move from design to design on.
By the way I would say that it's much easier to employ transistor clamps if you want a heat sink that you can move from design to design on.
Dear mt490,
Even if one does not want to use the same heat sink from design to design, the drilling and tapping of heat sinks by hand is a difficult chore.
One of the suppliers of Heat sinks in India offered to drill and tap his heat sinks if the order is for 25 numbers or more. (All similar).
We have a talented group of PCB designers. each should adopt a standard hole distance for his designs, may be one or two sets of standards, for one pair and multiple pair outputs.
--gannaji
I agree - standardized hole placement would be useful.
With this one, the priority was to keep the boards rather small.
But adapting them to the standard would be a plus for sure.
I will check if I can relatively easily adapt my boards accordingly.
With this one, the priority was to keep the boards rather small.
But adapting them to the standard would be a plus for sure.
I will check if I can relatively easily adapt my boards accordingly.
Dear mt490,
Even if one does not want to use the same heat sink from design to design, the drilling and tapping of heat sinks by hand is a difficult chore.
One of the suppliers of Heat sinks in India offered to drill and tap his heat sinks if the order is for 25 numbers or more. (All similar).
We have a talented group of PCB designers. each should adopt a standard hole distance for his designs, may be one or two sets of standards, for one pair and multiple pair outputs.
--gannaji
Whilst you are free to make comment, be sure to realise that as DIY'ers there are no obligations to do anything beyond the individual's wills.
We have these standards here in the DIYAudio Store section, the yet mentioned Universal Mounting Specs. There are two possibilities to arrange a three pair OPS, an in-line one and a rectangular one. I'd prefer the first option for reasons that I mentioned above.
But each to his own, I think.
Best regards!
But each to his own, I think.
Best regards!
From what I could see for the UMS system they don't offer anything for a 2U heatsink. The UMS won't accept MT200 devices so it's not good for our larger amp designs either. If there's enough interest I can make boards available for this amp in 3 pairs to fit the UMS system.
As for difficulty tapping, if you select good quality heat sink extrusions and disregard the conventional tapping wisdom it's a lot easier. Use spiral flute taps in a drill.
As for difficulty tapping, if you select good quality heat sink extrusions and disregard the conventional tapping wisdom it's a lot easier. Use spiral flute taps in a drill.
Last edited:
I can add my 3 cents to the heatsink drill and tapp drama 😀
From a good few past months I am using standarised mounting setup with flat rod 5mm x 40mm and it is working very good.
Tapping and drilling 5mm aluminium piece is very easy and goes really quick (with cordless drill). Highly recommended.
For makeing encosure it would be easier too.
Just get 4 heatsinks 190mm wide and you will have 380mm depth enclosure/heatsink. Cheaper, more efficient and less time consuming work.
Regards
Peter
Attachments
Yes, Peter, fully agreed!
I also think that a heat spreader like your's can make mounting quite more comfortable. In a 400 mm depth Dissipante enclosure *imho* it is essential for balanced heat distribution over both heat sinks.
We have to regard one more heat interface, i.e. one more thermal resistance, in this case, though.
Best regards!
Thank you all for your +ve attitude. I can only request that a suitable standard for one pair, two pairs, three pairs etc be adopted.
Borys, I see you've got a triode or pentode tube stage, is it a preaamp or are you including it in the amplifier NFB loop?
LATFet amp looks nice
LATFet amp looks nice
Last edited:
as someone who finds "less than maximum joy" (is that diplomatic enough? 🙂 ) tapping heatsinks and will have to do it soon, could you be a little more specific regarding "disregard conventional wisdom"? the points in bold red were very clear.
or anybody else who has beneficial tips?
thanks,
mlloyd1
or anybody else who has beneficial tips?
thanks,
mlloyd1
As for difficulty tapping, if you select good quality heat sink extrusions and disregard the conventional tapping wisdom it's a lot easier. Use spiral flute taps in a drill.
Last edited:
I can add my 3 cents to the heatsink drill and tapp drama 😀
From a good few past months I am using standarised mounting setup with flat rod 5mm x 40mm and it is working very good.
Tapping and drilling 5mm aluminium piece is very easy and goes really quick (with cordless drill). Highly recommended.
For makeing encosure it would be easier too.
Just get 4 heatsinks 190mm wide and you will have 380mm depth enclosure/heatsink. Cheaper, more efficient and less time consuming work.
Regards
Peter
Peter, by the way - what SMD transistors do you use at the VAS output of Cliff Jumper (big ones)?
From a good few past months I am using standarised mounting setup with flat rod 5mm x 40mm and it is working very good.
Regards
Peter
Thank you for agreeing that standardization helps ! Can you be more specific about your standard ?
as someone who finds "less than maximum joy" (is that diplomatic enough? 🙂 ) tapping heatsinks and will have to do it soon, could you be a little more specific regarding "disregard conventional wisdom"? the points in bold red were very clear.
or anybody else who has beneficial tips?
thanks,
mlloyd1
-Start with a good sharp drill bit. Turn it slow and don't make heat. Use a water based coolant if possible. Aluminum instantly softens when it gets hot. Soft aluminum will glue itself to anything that rubs against it. It loves to stick to taps and dull end mills. Clean alloys like 6063 are a little more resistant to this. Chinese heatsinks contain a lot of crap in the alloy which makes them more susceptible to this.
-Small diameter taps will break easily with any side force, so anything that helps you keep it square will lower the chance of breakage. Those T-handle tap drivers are terrible for judging square. A cordless drill is three times as long so it's much easier to judge square. Don't crank the chuck tight so the tap can slip when you hit the bottom of the hole. The same can be done with a drill press but they don't usually have a reverse to back the tap out.
- Turning a half turn, then backing up to break the chip causes two problems. First when you back up, the tap can bind on the chip and cause breakage. Secondly the chips will build up in the flutes of the tap and will eventually fill the flute. Once that happens the chips will bind in the flute, lock the tap up in the hole and break it. If you use a reverse helix spiral flute tap in a blind hole, the chip will peel off in a continuous string and push upwards out of the hole the same way drill chips do. If you continue non-stop the chip will continue in a single piece and self clean the taps flutes, so no filling and breakage.
There are taps designed specifically for aluminum. They are a little sharper than a steel tap and have slightly larger flutes for chip removal. The cost the same as a steel tap and are available from most machine shop supply stores. I buy mine from Sowa Tool SOWA - Homepage. They are worth buying if you can find them. They cut noticeably better. If you are dealing with thinner sheet metal they are also available in thread rolling format which doesn't create any chip at all. They make a smooth tougher thread which will hang on better in sheet metal.
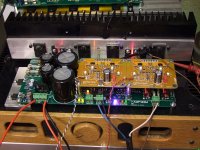
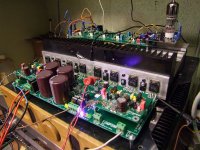
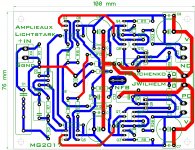
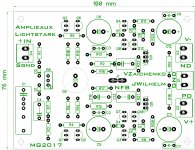
Hi all. I rework Lichtstark-TH-IPS to fit to VHex_OPS size (76x100mm) and rework VHex_OPS layout to have board connection face to face. So LS-OPS and VHex-OPS are connection compatible with slewmaster OPS and IPS line.
Marc
Marc
Attachments


Excellent job Marc!
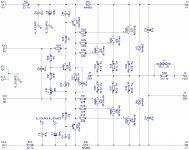
Note for the builders:
- IPS - R4, R5, R12, R13, R18, R19 are shown for +/-50...55V rails;
- OPS - R27 = 680R for 2 output pairs; R27 = 560R for 3 output pairs.
Cheers,
Valery
Note for the builders:
- IPS - R4, R5, R12, R13, R18, R19 are shown for +/-50...55V rails;
- OPS - R27 = 680R for 2 output pairs; R27 = 560R for 3 output pairs.
Cheers,
Valery
- Home
- Amplifiers
- Solid State
- Revisiting some "old" ideas from 1970's - IPS, OPS