@SomekPoland
This is wonderful!!! Thank you so much, your video will absolutely help people new to SMD see that it’s not that difficult, and assist them in building their Pearl!
I’ll add it to the top post in this thread.
👏 👏 👏
This is wonderful!!! Thank you so much, your video will absolutely help people new to SMD see that it’s not that difficult, and assist them in building their Pearl!
I’ll add it to the top post in this thread.
👏 👏 👏

With 60R AND the compensation capacitors disabled, you should get a flat line from the 1/f knee to 20kHz
Here are some simulation results for integrated noise -- reminding all that these are just a simulation with the compensation network caps disabled:
Here are some simulation results for integrated noise -- reminding all that these are just a simulation with the compensation network caps disabled:
| Opamp | Integrated Noise (uV) 20Hz - 20kHz |
| OPA891 | 223 |
| AD825 | 535 |
| ADA4625 | 519 |
| LME49720 | 824 |
| LT1113 | 525 |
| NE5534 | 563 |
| OPA161x | 855 |
| OPA165x | 523 |
| OPA604 | 546 |
| TL071 | 564 |
| LT1028A | 1182 |
| Notes | |
| LT1028, OPA891,AD825 | Single |
| LME49720 | Model is LME49860/NS |
I see some P3s are using slip on connectors for some terminals, can someone provide details, ie, gauge wire etc?
Thx Jim, was referring to insulated, female spades.This will have everything, and enough for a LOT more projects.
I also used the tape method. I am too shaky to use a tweezers at the final step. Pick up with the tweezers and stick it to the tape. Hold the tape and carefully line it up to match the pads, then press carefully. My practice is on these before doing any on the Pearl boards.Nice method and thank you for the video. Nevertheless I prefer Jim's (6L6), beautifully explained on online guide. 🍻
Interesting, I have taken the liberty of expanding your table with voltage and current noise @1000Hz and sorting by the integrated-noise value.Here are some simulation results for integrated noise -- reminding all that these are just a simulation with the compensation network caps disabled:
I do suspect that the model for OPA891 is not weighting current noise properly.
Further, your simulation seem to favor low current noise, maybe not a huge surprise considering the output impedance from the cascoding transistor in series with R10=22K.
From a noise perspective it seems that most any j-FET input is a good choice and total noise seem to be dominated by voltage noise. Given that your numbers are without the bass-boost of the RIAA correction, a low 1/f frequency could be a discrimination factor for op-amp choice.
OPA1642 and OPA2134 is definitely be on my shortlist
Last edited:
Thanks for the kind reception. I'll be posting a whole kit review after I assemble and test the Pearl 3. I'll post it here if you guys allow that.
I too have only two (unsteady) hands and was going to try "third hand" tweezers using an elastic band to provide local steady "grip". I thought I might use chop sticks for extra reach if necessary.
(Full disclosure; not an original idea. I think someone -- probably 6L6 -- made this suggestion for the Wayne preamp)
(Full disclosure; not an original idea. I think someone -- probably 6L6 -- made this suggestion for the Wayne preamp)
More shaky hands - I am going to try wooden clothespins like @sffrhd showed in post # 1950. Amazon has some jumbo (4" long) pegs that I hope will reach the FETs. Are there any reasons to avoid this?
https://www.diyaudio.com/community/threads/pearl-3-burning-amp-2023.404054/page-98
https://www.diyaudio.com/community/threads/pearl-3-burning-amp-2023.404054/page-98
I also made these (projects beget projects) for more reach. They reduce pressure. Next iteration will have the extensions glued to the outboard side of the clothespins to square up the attack. I used american cherry, use what you have lying around!

Beautiful ! Neither Norm Abrams not Tom Silva could have done better.
I'm sure both of them would have appreciated your choice of American Cherry for the wood.
I'm sure both of them would have appreciated your choice of American Cherry for the wood.
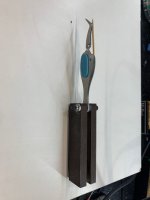
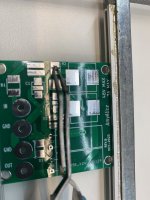
This is the "third hand" type tool I made for smd soldering. The tweezers ( https://www.amazon.com/dp/B095PHSKLV?psc=1&ref=ppx_yo2ov_dt_b_product_details ) are mounted on a steel block so that they pivot. Pick up the part with the tweezers, position over the pcb then solder. I used an AmyAlice filter pcb and a random 1205 resistor for illustration.


Attachments
- Home
- Amplifiers
- Pass Labs
- Pearl 3 Burning Amp 2023