Hmm, yes, and no in that the goal is to either raise the cab's resonance above or below the cab's BW, so for sub/woofer/mid bass apps it ideally needs to be stiffer to raise it since the amount of mass to lower it is just way too much unless in removable form. Once you move up in BW enough though, even braced corrugated cardboard works fine IME.
You’re replying to who?Hmm, yes, and no in that the goal is to either raise the cab's resonance above or below the cab's BW, so for sub/woofer/mid bass apps it ideally needs to be stiffer to raise it since the amount of mass to lower it is just way too much unless in removable form. Once you move up in BW enough though, even braced corrugated cardboard works fine IME.
The goal is to raise the cab resonance because of the low bw application? In order to do that we must make the box stiffer.
What is it about cardboard tho?
Good to know they all valid choice!View attachment 1122214
This is particle board.
Even as it is cheap, it is a very good material for speaker cabinets. Maybe the best. It is the cheapest panel, made from wood left over and glue. So in HIFI peoples "more expensive is always better" mindset this can not be a perfect material...
You can make an instrument out of ply wood, in fact guitars are made from it, "sounding" = resonating well. Particle board is the opposite. you won't get any nice sound out of it. For a very simple explanation, sound energy has to jump randomly from different size particle to particle, from dense to not so dense, turning sound into heat. Contains a lot of air, too.
Con: You can easily damage it at corners and edges. Carpenters hate it, as you have to hide it from sight. Painting it is a PITA.
MDF is harder, producing a more metallic sound. Quite heavy, too. It is much better for producing good looking objects. So any wood worker will tell you to use it for speaker cabinets, even as it may sound worse. Carpenters convenience product. Sales people are not objective.
If you want something robust, that may get wet and bumped around, birch ply wood construction is best, so you make a good PA speaker from it. A little resonance does not bother anyone.
OSB is a very special stuff. I don't like it in cabinet construction, it even isn't that cheap any more. Maybe for a workshop speaker.
See, I'm in Germany. wood prices have gone crazy in the last few years. You 150$ 3/8 -4' by 8' panel would cost me Euro 250, in questionable quality, not usable for living room use without additional veneer. I would be happy to get it so "cheap".
I don’t understand why you don’t have acces to Nice Baltic birch plywood, it isn’t come from russia? You’re kinda not too far from there. Haha.
I’ll see what I end up using for brace.
What I’ve seen from Home Depot website, 3/4 mdf is cheaper than particle board. I guess because the particle board is finished on both sides.
In a forum? Everybody in general and you in particular since you're the OP. 😉You’re replying to who?
The goal is to raise the cab resonance because of the low bw application? In order to do that we must make the box stiffer.
What is it about cardboard tho?
Correct.
As the speaker's gain BW rises, so goes the need for the box resonance to go down and to the first approximation the acoustical mean power point is sqrt(Lf*Hf gain BW), so assuming 20 - 20 kHz speaker system = ~632 Hz, then below this point we ideally want an increasingly rigid/'stiff' box and increasingly lossy box above it, hence there's a 'gray area' where it could be made out of either 'stiff' or 'lossy' cardboard box construction and why for low enough power and/or limited BW apps one can make an excellent performing speaker with it.
This is the basic particle board historically used for inexpensive speakers and I don't recall there being a 'finished' version, just MDF the next grade up, which appears of higher quality than I remember with HDF my preference, though cutting it was a real 'pain in the drain' unless one could afford the premium tools, accessories required.

Do I need to worry and remove a bit of bracing to keep internal volume at max I can ? Or since I Fill the hole thing with rockwool and add 10-30% of « perceived volume » I’ll be okay ?!
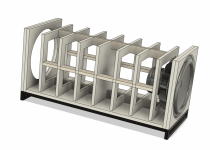
Well, assuming the 'cage' is what you're planning now, then unless you plan to 'skin' it with Balsa wood or similar it's way over braced, so your call one way or the other or a combination of the two, though personally have always tried to solve acoustical problems with acoustical solutions, so most net Vb for me and being rather acoustically small for the driver's specs would divide in two for dual subs and use the aforementioned diagonal bracing with a tie bar to do double duty providing mass loading to the backside of the woofer.
Partical board is scary to suggest to anyone who is actually gonna put power to something and cause some real pressure /velocity transients within. It’s so easy to pull it apart with just a few successions of tension and compression. And MDF ultimately fails as it can’t retain much more contact and ultimately connection than whatever glue can actually get soaked into it while plywood has an entire layered and alternating matrix of several surfaces all out of plane with the next intentionally as it goes together and laminated over and over again.
diagnols ultimately win. just like a triangle does in all structural environments or somethings going to tip over or violently shake side-by-side in an earthquake or seismic activity or a roll cage on a vehicle, etc. all have diagonals in manufacture Code
diagnols ultimately win. just like a triangle does in all structural environments or somethings going to tip over or violently shake side-by-side in an earthquake or seismic activity or a roll cage on a vehicle, etc. all have diagonals in manufacture Code
Last edited:
It’s all the math of the hexagon or 30/60/90 triangles . So is the 3:1 of odd harmonic intervals and the generic sine wave shapes within each other or overlapping as length to choose for driver entry or resonators in parallel to a common exit
Basically, if you half the volume of a (closed) sub woofer, you double the pressure inside of it for the same power input. So bracing is a very good idea if you want the cabinet not to expand (and contract) like a balloon, messing up the signal in the room. This will be audible, giving bass a muddy undertone.
The bracing you pictured is a little over the edge for my taste, simply using 5-7" high stripes of 3/4 material should do as well. If you do not care for the unnecessary volume, weight and cost, the complicated to manufacture braces are nicer, of course.
The divider in the middle makes it two separate boxes, as even a panel thinner than 3/4" will have incredible strength, pushed or pulled from the outside, if glued in perfectly. It is not confronted with pressure.
I have been trying bracing techniques (great word for a simple thing) for many years and you have to set them in the right perspective. The often promoted cross braces do not work too well and often interfere with bass drivers. The T-bar style I practice today is easy to implement, cheap and effective. Why make it more complicated?
I once build a new cabinet for one of two existing, commercial CANTON 10" subs. The new cabinet was a little taller and about 2" less wide to custom fit a space between two sideboards. The same net volume. I inside I put a T-bar matrix of regular squares. Which made it sound very “dead”. The surprise came when we tried them side by side, old and new. They sounded absolutely different, the new cabinet delivering tight bass, while the old one seemed to produce two tones at once. Not just a little different, but like day and night. It may, by coincidence, have been an extreme example, but anyone should just try it for his own once. Might be an eye opener. It may explain why the same driver, tried by different people, often gives good or bad results.
Since this experience, I have gone away from thick material like 1” to thinner and braced, saving weight and cost at the expense of some time. If you implement braces at the right time of the build, it does not take extra effort. I prepare long stripes, often made from left over's or even old furniture (Germans have this “green” gene) and then cut each individually with a miter saw. Foaming PU glue is a great help here. As they are inside, optics don't matter.
For the religious war about the right material for loudspeaker cabinets:
If I do cabinets, I usually use a combination of ply, MDF and particle board for them, any material used where it is suited best for function and/or looks. This saves money without any negative effect on sound quality.
I use water tight glue and biscuit joints. This prevents wood materials from coming apart even after decades. If you do not like the biscuits or miss the tools, wood dowels are an alternative, simpler to use and cheaper with comparable results.
For large cabinets, screw clamps get expensive. Better get some tension belts with a ratchet. One can replace 4 clamps... Use some small pieces of board to distribute pressure at the edges, so the belt does not cut into the wood. You can also get protection edges made from plastic.
So like that for a T bar style ?
Could, like you said, use 1/2 MDF or 5/8. strips are 2'' x (thickness of material, 4/3, 5/8 or 1/2)
hope I underdstood the Tbar concept.
Should I reduce the number ? from 3 to 2 per side ? Is rounding the corner worth it inside a sealed box ?did i went overbaord with bracing, again ?
The complexity of the other style I made earlier isnt too much a of a deal, since I would laser cut a pattern, then use this pattern to router the brace.
I have straps that I 3d printed corner to make a corner clamp. I have like 8 laying around. Just nee to print more corner.
Attachments
You could run lateral splines in the corners as well at a 45° angle to tie in the baffles. Just a thought...
What’s a lateral spline?You could run lateral splines in the corners as well at a 45° angle to tie in the baffles. Just a thought...
If it’s what I think, it adds a lot of complexity for the build.
Started to wanted to be able to assemble this in a day. Don’t see myself trying to pull off spline.
I have a biscuit jointer, but I borrowed it from my father and it doesn’t work smoothly, as I think it needs a little TLC.
Also important to note. All my tools are stored at the end of the day. I don’t have a dedicated and permanent workshop.
Was planning on using wood glue and pin/brad nail.
If you get your design laser cut, go for it. If it gets too expensive, take the stripes route. Rounding them off is useless, as the speed of air is low inside. A port In a vented cabinet is something else.
I suppose you use 3/4" board, so something like 2"-3" high ¾" strong stripes should be OK. This is no exact science, just empirical found numbers. Place them about 4" apart. You will hear when it is OK. Don't go for less than you have in your picture.
I highly recommend to use PU glue inside a cabinet. You do not need to clamp it as much as conventional glue and it fills gaps. Read the manual, I have a spray bottle with water and put some fine mist on the wood short before gluing, it will accelerate hardening and help it foam.
On the outside panels water resistant wood glue is easy to remove with a wet cloth.
If you do not work with this PU stuff every day, you may mess up the visual ply with it.
A general rule: If no glue squeezes out of a joint, it is not enough.
Carpenter is a profession and they know all kinds of tricks...
4in appart for 3 in « high »x 3/4in thick strips, on a 15 x 15 x 20 inside diameter feels like it going to take a lots of internal volume.If you get your design laser cut, go for it. If it gets too expensive, take the stripes route. Rounding them off is useless, as the speed of air is low inside. A port In a vented cabinet is something else.
I suppose you use 3/4" board, so something like 2"-3" high ¾" strong stripes should be OK. This is no exact science, just empirical found numbers. Place them about 4" apart. You will hear when it is OK. Don't go for less than you have in your picture.
I highly recommend to use PU glue inside a cabinet. You do not need to clamp it as much as conventional glue and it fills gaps. Read the manual, I have a spray bottle with water and put some fine mist on the wood short before gluing, it will accelerate hardening and help it foam.
On the outside panels water resistant wood glue is easy to remove with a wet cloth.
If you do not work with this PU stuff every day, you may mess up the visual ply with it.
A general rule: If no glue squeezes out of a joint, it is not enough.
Carpenter is a profession and they know all kinds of tricks...
Are the horizontal (the one that goes the « whole lenght) one needed?
What you mean by: « you will hear when it’s okay? »
If I remeber correctly, you said to assemble the box, then when 1 pannel is left to install, you go ahead and install the strips.
You then knock on the cab and see if it sound « dead »?
Edit: went ahead and tried to model it in fusion. @4in appart, 2in high strips x 3/4 thick, it removes 0.5 cubic feet of internal volume.
Last edited:
You connected all of your braces with longitudinal bars end to end, but not to the baffles. You can connect the baffles by placing another longitudinal bar inside the 4 longitudinal corners of the box to do this.
Not sure to understand or visualize what you mean, sorry.You connected all of your braces with longitudinal bars end to end, but not to the baffles. You can connect the baffles by placing another longitudinal bar inside the 4 longitudinal corners of the box to do this.
See, there are many out there who place a single cross in each volume and call it a day. The sub will sure work. As long as you do not have a direct A to B comparison, it will be all right. Just not showing the whole potential of the chassis.
Building speakers is always a game of compromise as you have to watch certain limits. There is a point in a build like yours, where you may realize two 15" woofer would be nice, but a double 12" is the limit.
In the end you have to decide.
The 4” apart has shown to give “best” results with ¾” material. Also, there is no other way of compare able bracing using less volume. The usual, primitive approach of using stronger panel, for example 1” instead of 3/4” shows astonishingly little improvement with even more weight.
You may try such bracing on some spare panel. Just to get an idea what a 4” distance feels like, compared to 8” for example. There is a distance where placing braces narrower does not improve anything. This is the 100% point. Basically any brace is better than none, even if you may sacrifice 20% efficiency. This is DIYS = you make the rules.
See, there are many out there who place a single cross in each volume and call it a day. The sub will sure work. As long as you do not have a direct A to B comparison, it will be all right. Just not showing the whole potential of the chassis.
Building speakers is always a game of compromise as you have to watch certain limits. There is a point in a build like yours, where you may realize two 15" woofer would be nice, but a double 12" is the limit.
In the end you have to decide.
The 4” apart has shown to give “best” results with ¾” material. Also, there is no other way of compare able bracing using less volume. The usual, primitive approach of using stronger panel, for example 1” instead of 3/4” shows astonishingly little improvement with even more weight.
You may try such bracing on some spare panel. Just to get an idea what a 4” distance feels like, compared to 8” for example. There is a distance where placing braces narrower does not improve anything. This is the 100% point. Basically any brace is better than none, even if you may sacrifice 20% efficiency. This is DIYS = you make the rules.
Maybe I should have been better with 2: 12“ in that volume, But that’s kinda bit late, driver are home and paid.
That’s why I asked you guys.
I don’t mind getting them @4” appart if it’s going to sound better, less rattle-ly. Just want to make sure I don’t over do it and I don’t “loose” internal volume for “nothing”.
I’m here to learn. I don’t mind having 2:15” playing less than optimal for my first build. That’s a bit unfortunate, but that happen and I understand.
I can always reuse those driver in another build if ever. Or I can listen to the sub, and improve upon this build for the other subwoofer I’ll make for the other living room where WAF won’t be as much of a factor than the main living room.
Cant see in Winisd for now at what QTC I’ll be at around 2cubic feet internal volume. And I can always count on 10-30% of increased “perceived” volume with the rock wool.
As you were told, the volume is secondary if you have
a. high power driver with large voice coil
b. unlimited power from the amp (2x rms of the drivers rms is fine)
c. a DSP
d. a measuring microphone
If you would use no DSP things would get complicated. You will understand how complicated, if you have anything set up and switch form DSP'd response to linear, which can be done with a mouse click...
These Dayton driver are made to be used in too small volumes like no other. The DSP fixes it in the end.
Go away from a wrong or right view, match it to your situation and stick to some basic rules, that way you will have a hell of a sub shaking your house. Promised.
PS Qtc will be around 1.0 with a bump up before falling down.
Last edited:
- Home
- Loudspeakers
- Subwoofers
- Need help designing a home theater subwoofer