Hey guys.
Sorry for no update since a while. Life got in the way. And I’m the kind of guy that second guess everything (almost) so it makes every project like twice as long.
So got a chance to work on the sub during the weekend. Got 2 afternoon free and I invested time in the build. Kinda tired of seeing the pannel cut laying around in the shop.
So I tried to reference the manufacturer drawing for hole drilling to screws tu subs in. But I made a mistake somewhere, must be my panel not 100% same size as cad drawing, but my holes didn’t align with the driver.
So I used a self centring drill and used a 9/64 drill to start the hole. Then I got the two baffle on the drill press to make sure holes were straight.
Then I went to town gluing and screwing pannel together. They will have many holes to fill with wood filler or 2 part wood filler, but I didn’t have clamp big enough to clamp it. Also, Made the glue up much simplier and less stress inducing.
I went with a straight divider too. The pannel I previously cut was a bit too short and the angle wasn’t very good. (Didn’t fit well)


Tomorrow I’ll try to route (with a router) the indentation for the speakon female connection. I have two of those 1+1-, 2+2- connector.
I’ll need to figure out how to wire it and from the behringer inuke.
Sorry for no update since a while. Life got in the way. And I’m the kind of guy that second guess everything (almost) so it makes every project like twice as long.
So got a chance to work on the sub during the weekend. Got 2 afternoon free and I invested time in the build. Kinda tired of seeing the pannel cut laying around in the shop.
So I tried to reference the manufacturer drawing for hole drilling to screws tu subs in. But I made a mistake somewhere, must be my panel not 100% same size as cad drawing, but my holes didn’t align with the driver.
So I used a self centring drill and used a 9/64 drill to start the hole. Then I got the two baffle on the drill press to make sure holes were straight.
Then I went to town gluing and screwing pannel together. They will have many holes to fill with wood filler or 2 part wood filler, but I didn’t have clamp big enough to clamp it. Also, Made the glue up much simplier and less stress inducing.
I went with a straight divider too. The pannel I previously cut was a bit too short and the angle wasn’t very good. (Didn’t fit well)
Tomorrow I’ll try to route (with a router) the indentation for the speakon female connection. I have two of those 1+1-, 2+2- connector.
I’ll need to figure out how to wire it and from the behringer inuke.
Attachments

I did?! Regardless, the ~10% on average is for driver, vent, bracing......GM mentioned in my build that the usual amount / maximum amount of bracing is 10% of the internal volume
That is serious bracing. Very good you the way you did it. Otherwise such a long cabinet would resonate like crazy. There are to few DIYS builder doing it right.
Of course nice to to cut braces from complete panels, but using 4 stripes for each segment would have led to less waste.
Anyway, well done!
Of course nice to to cut braces from complete panels, but using 4 stripes for each segment would have led to less waste.
Anyway, well done!
Thank you so much.
Yeah, less waste, but would have been a bit more work to install and glue and screws. I went with “easier” and quicker. Rather than less expansive and less waste.
Has is, the cab already sound very dead.
Can’t wait to fill with rockwool. And put the last pannel on.
What would you suggest to put between driver and rockwool? I’ve read that it would be better to put some sort of fabrics to keep rockwool dust away from the driver.
Rockwool is quite stable and loose particles slowly make their way to the bottom of the cabinet. There is no hurricane inside a closed box. If you are concerned, get two sheets of acrylic wool sold for damping speakers and place a layer behind each driver to separate from the Rockwool. That stuff is not as affective as mineral wool and times more expensive, but it does not release any particles.
You could also use some fabric around the back of the speaker, it has still to be open for air, not too close knit.
You could also use some fabric around the back of the speaker, it has still to be open for air, not too close knit.
I got this in an order a received. Thought of using this.
When I blow through, I feel the heat coming slowly out of it, but I don’t feel “wind” coming through.
Would that work?


When I blow through, I feel the heat coming slowly out of it, but I don’t feel “wind” coming through.
Would that work?
This is exactly the acrylic wool I mentioned. You may cut the Rockwool to squares and fit these between the braces, then close the Box. Before fitting the woofer, put this stuff inside the cabinet so it protects the rear of the woofer. That is the best you can do.
You can rip the Rockwool to pieces and fill the cavity, too.
You can rip the Rockwool to pieces and fill the cavity, too.
Maybe, to make this damping easyer to understand, inside the box the air does not really move, but there are pressure waves. Waves are energy moving, while the air basically staying where it is, just as a coarse explaination. So it does not blow through the wool, but rattles it. Air moves fabric, then fabric moves air and so on... This process reduces air speed and transforms kinetic energy into a temperature rise in the material. Which leads to the subjective enlargement of the cabinet.
Historically, cheese cloth was used.What would you suggest to put between driver and rockwool?
I have cheese cloth too.
But I think I’ll use the acrylic wool. It’s there and probably wouldn’t find another use for it before a while.
Makes all sense.
Cant wait to have it done and test it!
But I think I’ll use the acrylic wool. It’s there and probably wouldn’t find another use for it before a while.
Makes all sense.
Cant wait to have it done and test it!
How you want to load your amp? 8 or 4 ohmsHey guys.
Sorry for no update since a while. Life got in the way. And I’m the kind of guy that second guess everything (almost) so it makes every project like twice as long.
So got a chance to work on the sub during the weekend. Got 2 afternoon free and I invested time in the build. Kinda tired of seeing the pannel cut laying around in the shop.
So I tried to reference the manufacturer drawing for hole drilling to screws tu subs in. But I made a mistake somewhere, must be my panel not 100% same size as cad drawing, but my holes didn’t align with the driver.
So I used a self centring drill and used a 9/64 drill to start the hole. Then I got the two baffle on the drill press to make sure holes were straight.
Then I went to town gluing and screwing pannel together. They will have many holes to fill with wood filler or 2 part wood filler, but I didn’t have clamp big enough to clamp it. Also, Made the glue up much simplier and less stress inducing.
I went with a straight divider too. The pannel I previously cut was a bit too short and the angle wasn’t very good. (Didn’t fit well)
View attachment 1231495
View attachment 1231496View attachment 1231497View attachment 1231498View attachment 1231499
Tomorrow I’ll try to route (with a router) the indentation for the speakon female connection. I have two of those 1+1-, 2+2- connector.
I’ll need to figure out how to wire it and from the behringer inuke.
Will you bridge it?
Your drivers are 8 ohms?
That part is almost like Chinese for me.
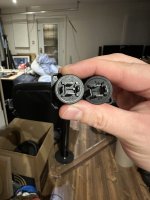
I believe they are 2 ohm / voice coil with 2 voice coil.
So I guess that makes them 4ohm driver.
https://www.daytonaudio.com/images/resources/295-514--dayton-audio-um15-22-spec-sheet.pdf
Amp are behringer inuke 6000. From the website:
“2 x 3,100 Watts @ 4 Ohms”
I have two amp available. But if I understand right, I might not need both of them?!
But maybe it’ll be easier to rap them if I run one amp per driver?
You would only need one amp. The NU6000DSP does not support bridged mono operation.
Bridged mono operation uses only the "+" connections of two amp sides- the NU6000 is already internally bridged, also why it does not support 2 ohm operation.
One side of the NU6000 amp would be used for each 4 ohm (two 2 ohm voice coils in series) driver.
You have a choice of wiring both drivers using the "A" Speakon output connector with 1+/1- for one driver, 2+/2- for the other, or two connectors each using 1+/1- , one plugged into the "A" output connector, the other "B".

Probably too late now, but your center cabinet divider panel would have been a good idea, as differences in gain between the two channels or a failure of one side can result in driver offset.
Bridged mono operation uses only the "+" connections of two amp sides- the NU6000 is already internally bridged, also why it does not support 2 ohm operation.
One side of the NU6000 amp would be used for each 4 ohm (two 2 ohm voice coils in series) driver.
You have a choice of wiring both drivers using the "A" Speakon output connector with 1+/1- for one driver, 2+/2- for the other, or two connectors each using 1+/1- , one plugged into the "A" output connector, the other "B".
Probably too late now, but your center cabinet divider panel would have been a good idea, as differences in gain between the two channels or a failure of one side can result in driver offset.
There’s a divider in the middle of the cabinet. Think pictures aren’t too clear on this. But the divider is shown by the arrow:


Thanks for the amp right off on the how to!
Is there any advantage / draw back on any of those configurations?!
Thanks for the amp right off on the how to!
Is there any advantage / draw back on any of those configurations?!
Last edited:
Can’t seem to edit my previous post on this thread, but following this found in the instruction manual.

Would have my subwoofer power by amp in stereo benefit from the 2 subwoofer channel on my receiver? (I.e: not playing the same bass track on each sub)
Or the 2 channel on the pre out on the receiver is the same audio channel but x2 for 2 subwoofer?
If I’m using one amp, I guess that I need to set the amp to mono.
A bit lost here! 😂😅
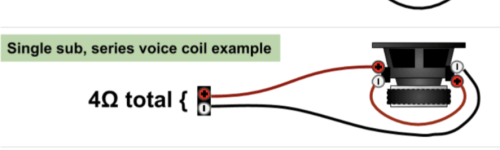
The i-Nuke amps have quite low rms power, compared to the Behringer numbers. Anyway, the 6000 is 100% enough to drive your two woofers. You connect the voice coils in series for 4 Ohms load: Amp + to coil 1 +, then a bridge wire from coil 1 - to coil 2 + and coil 2 - to amp -.
If you have two amps, using one amp for each driver would make them more stable, as any commercial amp is limited by it's power supply = to weak to drive all channels to max output at the same time. An extreme are AVR receiver, you find some to have like 200 watts only one channel driven, but not even 60 Watt wenn all 9 channels are fully loaded.
The numbers for the i-Nuke are better, but if you need the last bit of power, use both amps with one channel at idle. Not necessary for you at all, but just to explain.
Even if the 6000 may only have real 2x 1200W rms /4 Ohms, this will blow your windows out. May be another thing in a PA situation.
So, use one amp in Stereo mode, as the two outputs may measure separate, depending on the room correction used.
Also, when setting up the DSP with a microphone, both sides may need a different fine tune. Anyway, there is no disadvantge in using stereo. You can always connect the two channels internaly to mono with just a mouse click.
For the connectors, for simplicity use two of them. One for each chassis. The Speakon connectors are no fun to connect to 2x2 wires. You will find 2 wires tight enough.
I will definitely make a drawing on how I should wire it from you guys messages.
Now I feel like the connector aren’t very integrated in the design and they were just put there.


But having it on any other surface doesn’t make much sense since it will be “in the way”.
Now I feel like the connector aren’t very integrated in the design and they were just put there.
But having it on any other surface doesn’t make much sense since it will be “in the way”.
Easiest I think for you will be wire each driver in a 4 ohm configuration like the attached pic, you will connect the long wires to the speakon A connector, wire the other driver the same and connect the long wires to the speakon B connector in your cabinet.
Then 2 speakon speaker cables , one for A channel and one for B channel in your iNuke, and Voila!!
You are done !
Then 2 speakon speaker cables , one for A channel and one for B channel in your iNuke, and Voila!!
You are done !
Attachments
- Home
- Loudspeakers
- Subwoofers
- Need help designing a home theater subwoofer